
Popular categories
Looking for a yarn?


|
||||||||||||||||||||||||||||||||||
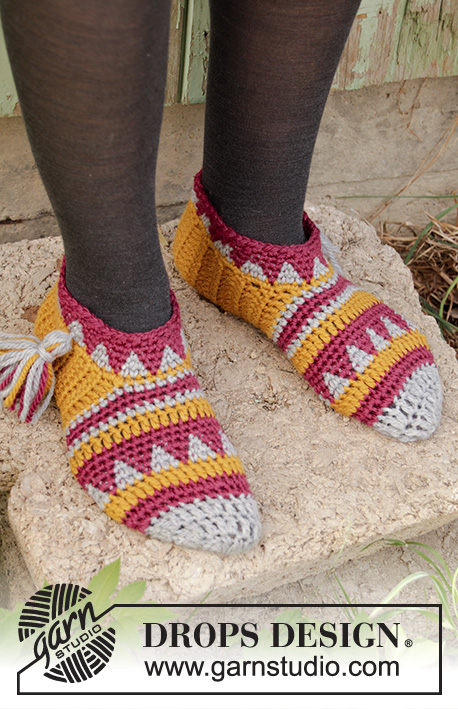
Cool Kicks |
||||||||||||||||||||||||||||||||||
 |
 |
|||||||||||||||||||||||||||||||||
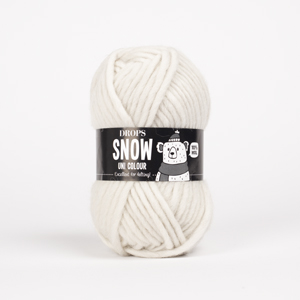
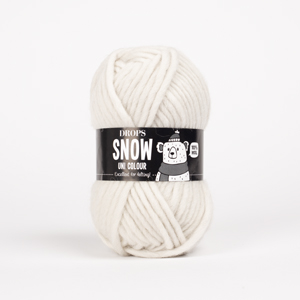
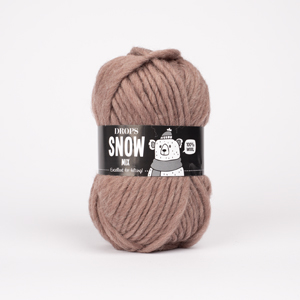
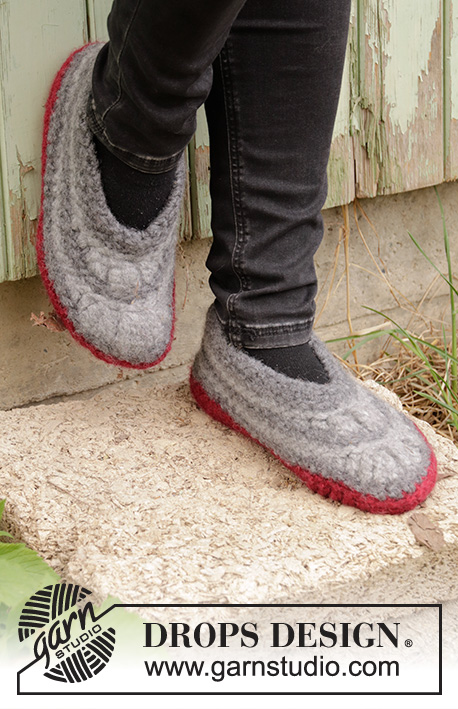
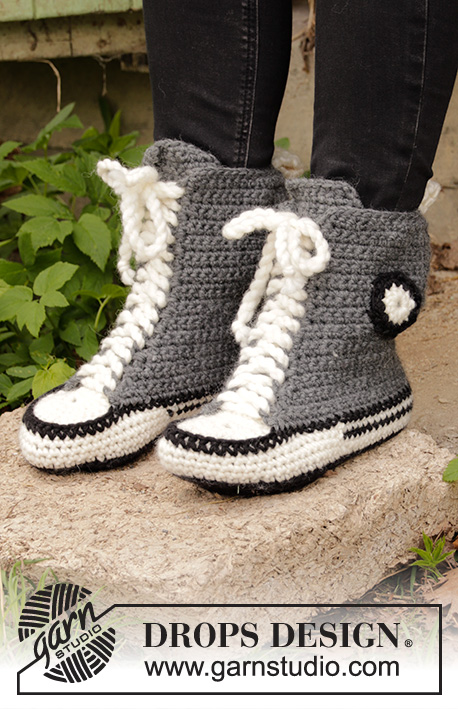
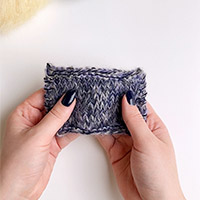
Crocheted slippers in DROPS Snow. Sizes 35 – 43 = US 5 – 10 1/2.
DROPS 193-6 |
||||||||||||||||||||||||||||||||||
|
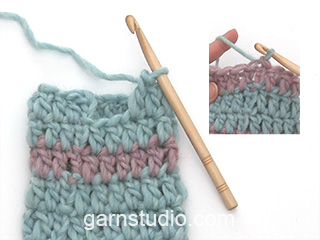
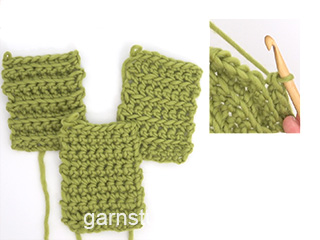
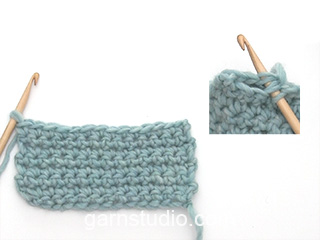
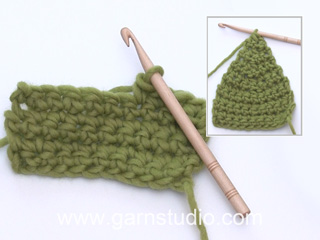
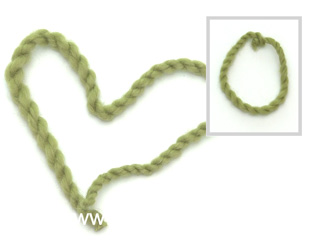
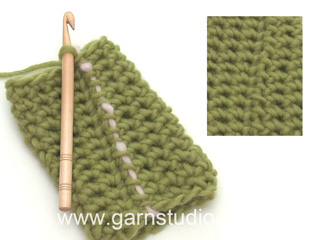
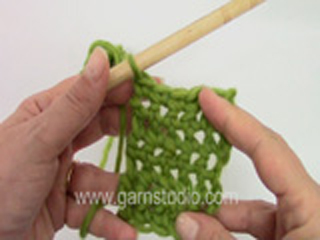
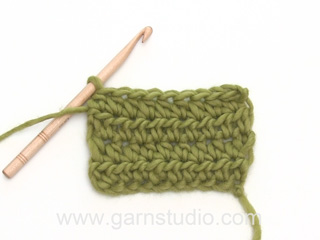
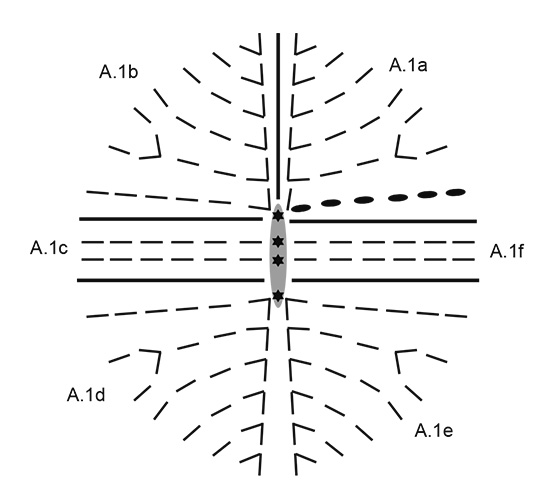
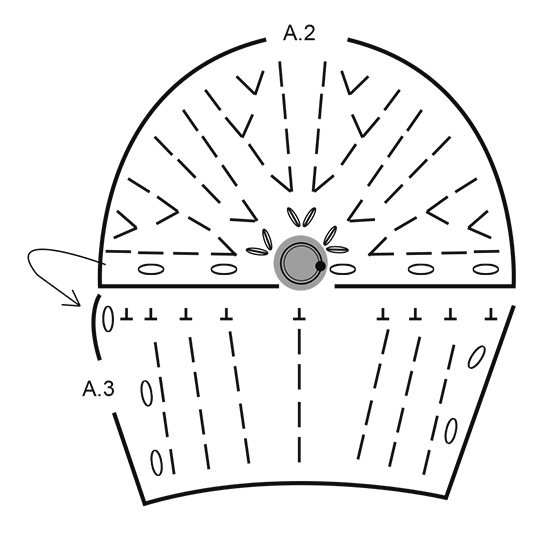
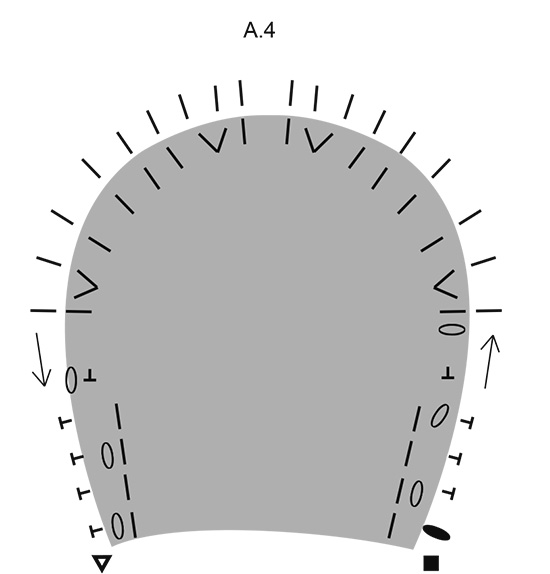
------------------------------------------------------- EXPLANATIONS FOR THE PATTERN: ------------------------------------------------------- PATTERN: See diagrams A.1 to A.4. The area marked with grey has already been worked; it just shows how the next round is worked in the stitches/rows. CROCHET INFORMATION-1 (in the round): At the beginning of each round of single crochets, replace the first single crochet with 1 chain stitch, i.e. skip the first stitch from the previous round. The round ends with 1 slip stitch in the first chain stitch from the beginning of the round. COLOR CHANGE-1: To get a neat transition when changing color, work the last single crochet before the color change as follows: Insert the hook in the last stitch, pick up the strand, make a yarn over with the new color and pull it through all loops on the hook. Continue with the new color. COLOR CHANGE-2 (decoration): Crochet the slip stitch at the end of the first round with the new color. CROCHET INFORMATION-2 (for when working back and forth): Each row starts with 1 chain stitch; the chain stitch does not replace the first single crochet. 2 SINGLE CROCHETS TOGETHER: * Insert the hook in the next stitch, pick up the strand *, repeat from *-* one more time, make a yarn over and pull it through all 3 loops on the hook (= 1 single crochet decreased). ------------------------------------------------------- START THE PIECE HERE: ------------------------------------------------------- SLIPPER - SHORT OVERVIEW OF THE PIECE: The piece is worked in the round from the sole and up the edge. Then a half circle is worked on top of toe; this is worked together with the edge of the sole. Then you work a band, sides/back piece back and forth and a front edge for the laces. To finish, you work a flap, decoration and twisted cord (for laces). Be careful when changing color as you work, and read PATTERN above. SOLE: The sole is worked in the round, starting mid under the sole. Work a row of 22-24-28 chain stitches (= the area marked with grey in diagram A.1) with hook size 5 mm = US 8 and black. Then work in the round (i.e. on either side of this row of chain stitches) as follows: Work A.1a over the first chain stitch, insert 1 marker here (= mid front of toe), work A.1b over the same chain stitch, work A.1c over the next 20-22-26 chain stitches (= 10-11-13 repeats of 2 stitches), work A.1d and A.1e over the last chain stitch, continue in the round on the opposite side of the row of chain stitches, i.e. work A.1f over these 20-22-26 chain stitches (= 10-11-13 repeats of 2 stitches). Continue this pattern. REMEMBER THE CROCHET GAUGE! When A.1 has been completed there are 72-76-84 single crochets on the last round. Cut and fasten strand. NOTE: If the marker has been displaced slightly, replace it so that it is mid front of toe. EDGE OF SOLE: The edge is worked in the round. Start the next round in the middle of the one side of the sole, i.e. start in the 18th-19th-21st single crochet before the marker. Work towards the toe with off white as follows: ROUND 1: Read CROCHET INFORMATION-1. Work 1 single crochet in the back loop of each single crochet. ROUND 2: Now work normal single crochets through both loops - work 1 single crochet in each single crochet. ROUND 3: Now work half a stripe at the end of the round on the heel as follows: Work 1 single crochet in each of the first 36-38-42 single crochets, change to black – read COLOR CHANGE-1, and work 1 single crochet in each of the last 36-38-42 single crochets. ROUND 4: Change to off white and work 1 single crochet in each single crochet = 72-76-84 single crochets. Cut and fasten the strand. Lay the piece to one side. TOP OF TOE - HALF CIRCLE: Work 4 chain stitches with hook size 5 mm = US 8 and off white and form them into a ring with 1 slip stitch in the first chain stitch. Then work back and forth according to diagram A.2. When A.2 has been completed there are 20 single crochets on the last row – do not cut the strand! Insert 1 marker mid front (= 10 single crochets on each side of marker) Follow the arrow in the diagram; you are now working sideways, i.e. around the rows on A.2. Work A.3 back and forth over these stitches. When A.3 has been completed there are 7 single crochets on the last row. Change to black – the next round of assembly starts here – from the right side! ASSEMBLY (edge of sole and half circle): Lay the half circle onto the edge of the sole; the marker on the half circle should meet the marker mid front of edge; In other words, start in the 13th stitch before the marker on the sole, work 1 round with black through both layers as shown in diagram A.4 (= 25 single crochets and 1 chain stitch which is equivalent to 1 single crochet), continue with 1 single crochet in each of the remaining 46-50-58 single crochets on the sole = 72-76-84 single crochets. Cut and fasten the strand. Lay the piece to one side. BAND: Work a small band which later will be crocheted together with the last row on the side piece. Work back and forth with off white as follows: ROW 1: Work 5 chain stitches, turn and work 1 single crochet in the 2nd chain stitch from the hook, work 1 single crochet in each of the next 3 chain stitches = 4 single crochets. ROWS 2-9: Read CROCHET INFORMATION-2! Work 1 single crochet in each single crochet. Cut and fasten the strand. Lay the band to one side. SIDES/BACK PIECE: Work a side piece back and forth from the last round on the edge. Do not work over the 18 single crochets mid front (9 single crochets on each side of the marker in front). Work over the remaining 54-58-66 single crochets – starting from the right side as follows: ROW 1: Remember CROCHET INFORMATION-2. Work with dark grey. Work 2 SINGLE CROCHETS TOGETHER - read description above, 1 single crochet in each single crochet until there are 2 single crochets left on the row, work 2 single crochets together (= 2 single crochets decreased). ROW 2: Repeat row 1 = 50-54-62 single crochets. ROW 3: Work 2 single crochets together, 1 single crochet in each of the next 19-21-25 single crochets, 2 single crochets together, 1 single crochet in each of the next 4 single crochets, 2 single crochets together, 1 single crochet in each of the next 19-21-25 single crochets, finish with 2 single crochets together (= 4 single crochets decreased) = 46-50-58 single crochets. ROW 4: Repeat row 1 = 44-48-56 single crochets. ROW 5: Work 2 single crochets together, 1 single crochet in each of the next 16-18-22 single crochets, 2 single crochets together, 1 single crochet in each of the next 4 single crochets, 2 single crochets together, 1 single crochet in each of the next 16-18-22 single crochets, finish with 2 single crochets together (= 4 single crochets decreased) = 40-44-52 single crochets. ROW 6: Repeat row 1 = 38-42-50 single crochets. ROW 7: Repeat row 1 = 36-40-48 single crochets. ROWS 8-11: Work 1 single crochet in each single crochet = 36-40-48 single crochets. Insert 1 marker on this row – THE PIECE IS NOW MEASURED FROM HERE! ROW 12: Work 2 single crochets together, 1 single crochet in each of the next 2-1-4 single crochets, * 2 single crochets together, 1 single crochet in each of the next 3 single crochets *, work from *-* a total of 6-7-8 times, finish with 2 single crochets together (= 8-9-10 single crochets decreased) = 28-31-38 single crochets. ROW 13: Work 1 single crochet in each of the first 7-7-10 single crochets, work 2 single crochets in each of the next 14-16-18 single crochets and 1 single crochet in each of the last 7-8-10 single crochets = 42-47-56 single crochets. Then work back and forth with 1 single crochet in each single crochet until the piece measures approx. 9-10-11 cm = 3½"-4"-4⅜" from the marker. The next row is worked as follows: Work 1 single crochet in each of the first 7-7-10 single crochets, work 2 single crochets together a total of 14-16-18 times, work 1 single crochet in each of the last 7-8-10 single crochets = 28-31-38 single crochets. The next row is worked together with the band (the band is placed on the right side of the slipper) from the right side as follows: Work 1 single crochet in each of the first 12-13-17 single crochets, fold the band in 2 and work 1 single crochet in each of the next 4 single crochets through all 3 layers, then work 1 single crochet in each of the last 12-14-17 single crochets. Do not cut the strand! FRONT EDGE FOR LACES: Work 1 edge down the rows where you increased/decreased as follows: Work * 2 chain stitches, skip 1 row, work 1 single crochet around the next row *, repeat from *-* along the whole diagonal edge, finish with 1 slip stitch in the last row. Cut and fasten the strand. Work 1 edge on the other diagonal side in the same way, but reversed; i.e. start at the bottom with 1 slip stitch in the first row, finish with 1 slip stitch at the top of the diagonal edge. Cut and fasten the strand. FLAP: Continue by working a flap back and forth in the 7 single crochets which were worked across the top of the half circle. Work with dark grey. ROW 1: Remember CROCHET INFORMATION-2! Work 2 single crochets in the first single crochet, 1 single crochet in each of the next 5 stitches, work 2 single crochets in the last single crochet = 9 single crochets. ROW 2: Work 2 single crochets in the first single crochet, 1 single crochet in each of the next 7 stitches, work 2 single crochets in the last single crochet = 11 single crochets. Repeat row-2, 0-1-1 time = 11-13-13 single crochets. Then work 1 single crochet in each single crochet until the flap measures approx. 14-15-16 cm = 5½"-6"-6¼". Then work as follows: * 1 single crochet in each single crochet, turn and work 2 single crochets together, 1 single crochet in each single crochet until there are 2 single crochets left, work 2 single crochets together (= 2 single crochets decreased) *, work from *-* a total of 2 times = 7-9-9 single crochets. Cut and fasten the strand. DECORATION: Work 3 chain stitches with off white and form them into a ring with 1 slip stitch in the first chain stitch. ROUND 1: Work 2 chain stitches (= 1 half double crochet), work 11 half double crochets around the ring, finish with 1 slip stitch in the 2nd chain stitch, change to black – read COLOR CHANGE-2 (decoration) = 12 half double crochets. ROUND 2: Work 1 chain stitch (= 1 single crochet), 1 single crochet in the first half double crochet, work 2 single crochets in each of the remaining 11 half double crochets = 24 single crochets. Sew the decoration to the middle of one of the side pieces with small neat stitches. CORD: Work a twisted cord as follows: Cut 2 strands off-white, each 4 meters = 157" in length. Twist them together until they begin to resist, fold the strands double and they will continue to twist. Tie a knot in each end. Thread the cord through the chain-spaces in the same way as you would thread a running shoe and tie a bow. Work 1 more slipper in the same way, but sew the decoration to the opposite side of the slipper. |
||||||||||||||||||||||||||||||||||
Diagram explanations |
||||||||||||||||||||||||||||||||||
|
||||||||||||||||||||||||||||||||||
|
||||||||||||||||||||||||||||||||||
|
||||||||||||||||||||||||||||||||||
|
||||||||||||||||||||||||||||||||||
|
Have you made this or any other of our designs? Tag your pictures in social media with #dropsdesign so we can see them! Do you need help with this pattern?You'll find tutorial videos, a Comments/Questions area and more by visiting the pattern on garnstudio.com. © 1982-2024 DROPS Design A/S. We reserve all rights. This document, including all its sub-sections, has copyrights. Read more about what you can do with our patterns at the bottom of each pattern on our site. |
||||||||||||||||||||||||||||||||||


With over 40 years in knitting and crochet design, DROPS Design offers one of the most extensive collections of free patterns on the internet - translated to 17 languages. As of today we count 304 catalogs and 11422 patterns - 11417 of which are translated into English (US/in).
We work hard to bring you the best knitting and crochet have to offer, inspiration and advice as well as great quality yarns at incredible prices! Would you like to use our patterns for other than personal use? You can read what you are allowed to do in the Copyright text at the bottom of all our patterns. Happy crafting!
Comments / Questions (14)
Hallo, ich kann nicht gut Häckeln, gibt es diesen schicken Schuh auch als Strickanleitung?\r\nVielen Dank für ihre Mühe, mir zu antworten.\r\nBabette
09.01.2024 - 19:40DROPS Design answered:
Liebe Babette, dieses Modell haben wir nur zum häkeln; hier finden Sie aber alle unsere Modelle für gestrickte Hausschuhen. Viel Spaß beim stricken!
10.01.2024 - 09:23Hallo Hebben jullie ook de geschreven uitleg voor het telpatroon? Ik heb de blauwe sloffen al gehaakt - dewelke eigenlijk dezelfde zijn maar lager, maar er zit wel een verschil op mbt de steken met deze. Alvast bedankt voor de reactie. Groetjes Nathalie
21.05.2023 - 17:38Ik begrijp het vastzetten van de halve cirkel niet. Begin je op de zoolrand met een vast en een losse wat als 1 steek telt? Wanneer ik hier door beide lagen moet haken dan worden mijn sloffen slechts 7 cm breed. De rest is super helder uitgelegd maar hier meer ik echt nog een stuk toelichting.
26.12.2020 - 10:07DROPS Design answered:
Dag Elise,
Je begint bij het zwarte vierkantje en haakt dan eerst 1 losse, daarna haak je steeds 1 vaste door beide lagen in elke steek van de zool.
17.01.2021 - 14:01Ja, we begrijpen elkaar duidelijk niet. Die eerste toer is geen probleem.. ALLE symbolen begrijp ik. Alleen ik begrijp niet hoe ik verder ga met toer, 2 en 3 bijvoorbeeld. Tel ik naar boven in de tekening? Dus als ik in de 4e toer begin, als 2e steek, 2 vasten in 1 steek doe? Hoe kom ik dan weer bij het midden met 2 vasten in 1 steek? Dus toer 4 = 1 losse, 2 v in 1 steek dan 1 vaste in volgende 3 steken elk, dan 2 vasten in 1 steek, want midden?
27.11.2020 - 11:04DROPS Design answered:
Dag Franciska,
Ne toer 4 is 1 losse, 1 vaste in de steek, 1 vaste in de steek, 2 vasten in de volgende steek (nu ben je in de zwarte lijn tussen A.1a en A.1 b), 2 vasten in de volgende steek, 1 vaste in de volgende steek, 1 vaste in de volgende steek, 1 vaste in de volgende steek (nu ben je bij de zwarte lijn tussen A.1b en A.1 c), A.1c en zo verder met A.1d en A.1 e.
p.s.: Zou het mogelijk zijn om langs te gaan bij een garenwinkel in de buurt, zodat iemand mee kan kijken? Dat werkt wellicht verhelderend.
30.11.2020 - 20:19Uhyggelig vanskelig. Så her blir det ikke tøfler. Finner noe annet
18.11.2020 - 20:58Dank voor reactie. Die 1e toer had ik. Maar als die af is, hoe kom ik dan bij de 2e. Ik kom uit bij zo'n zwarte stip.. (losse, halve vaste?) daarna 1 vaste in diezelfde steek? En dan dubbele vaste in dezelfde steek? Ga ik een rij verder op de tekening? Dus als ik in de 4e toer begin, als 2e steek, 2 vasten in 1 steek doe? Hoe kom ik dan weer bij het midden met 2 vasten in 1 steek? Dus toer 4 = 1 losse, 2 v in 1 steek dan 1 vaste in volgende 3 steken elk, dan 2 vasten in 1 steek, want midden?
18.11.2020 - 16:34DROPS Design answered:
Dag Franciska,
Je eindigt de toer met 1 halve vaste in de eerste losse op het begin van de toer en dan begin je met de volgende zwarte ovaal, dus met 1 losse.
19.11.2020 - 10:26Ik begin bij de zool, maar geen idee hoe. Ik heb 24 lossen.. moet dan A.1a doen. Maar hoe? Begin ik dan met 'een losse, een vaste en dan 6 lossen'? En hoe kan het dat het minder is in de volgende toer van A.1a? Ik begrijp er totaal niets van.. help
12.11.2020 - 12:54DROPS Design answered:
Dag Franciska,
Je begint bij A.1 a, dus bij de zwarte ovaal in het midden en haakt in de rondte richting links, in de vorm van een cirkel haak je van binnenuit naar de rand toe. Het volgende symbool is dus 1 vaste in de steek en het symbool daarna is 2 vasten in dezelfde steek. Vervolgens ben je bij A.1 c. Deze moet je een aantal keren herhalen (Als je dat gebied in de teltekening uitrekt, zie ook duidelijker de vorm van een schoenzool). Zo ga je verder in de rondte hakend.
18.11.2020 - 13:05Mi piacerebbe questo modello per bebè! Grazie per tutti i vostri bellissimi modelli!
27.01.2020 - 16:15Hej Hur många varv ska det vara på sulan? Jag får det till 6 varv när jag kollar diagramet. Virkar jag efter beskrivningen för storlek 38/40 får jag mer än 76 fm. Ska jag öka i varje varv och på näst sista varvet? Hur många maskor ska det vara efter varje varv på sulan? Tack på förhand
07.12.2019 - 03:14DROPS Design answered:
Hei Angelika! Ja, sålen består av 6 omganger. På siste omgang skal det være 76 fastmasker, 6. omgang skal se slik ut: A.1a = 1 luftmaske + 7 fastmasker, A.1b = 8 fastmasker, A.1c = 22 fastmasker, A.1d 8 fastmasker, A.1e = 8 fastmasker, A.1f 22 fastmasker. Dette utgjør 76 masker (inkludert 1 luftmaske). Lykke til!
09.12.2019 - 09:14Had graag dergelijk patroon gehad om te breien.
30.03.2019 - 22:36