DROPS Safran
DROPS Safran
100% Cotton
from 8.00 RON /50g
Get the yarn to make this pattern from 56.00RON.

The yarn cost is calculated from the pattern’s smallest size and the yarn’s cheapest product type. Looking for an even better price? You might find it on the DROPS Deals!

DROPS Super Sale

White Romance

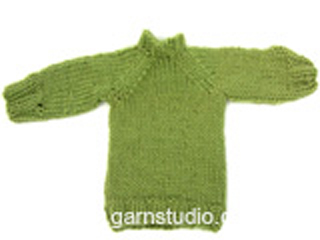
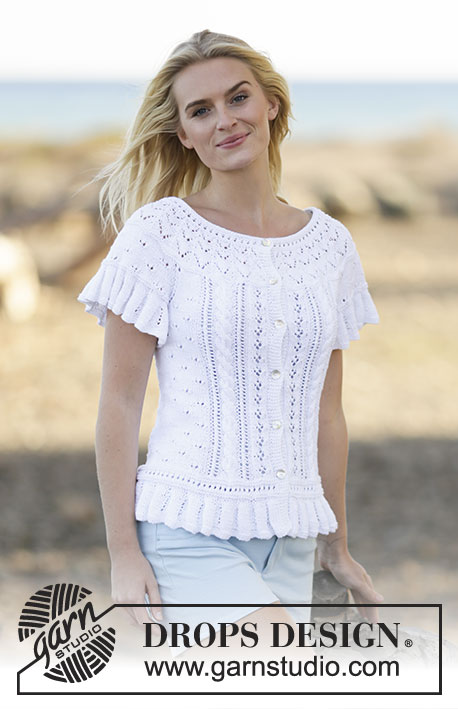
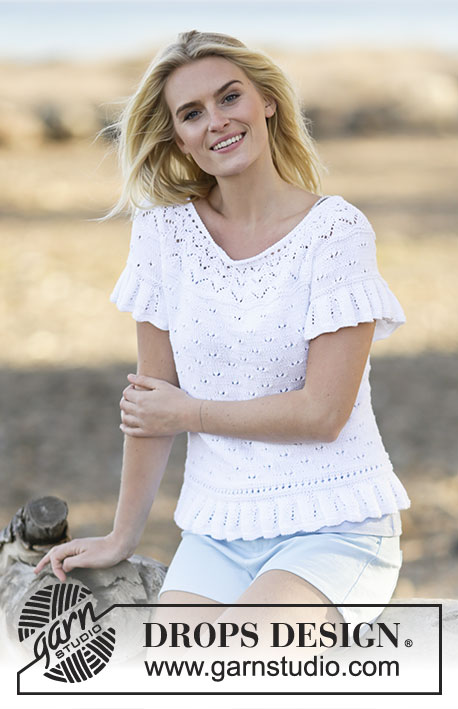
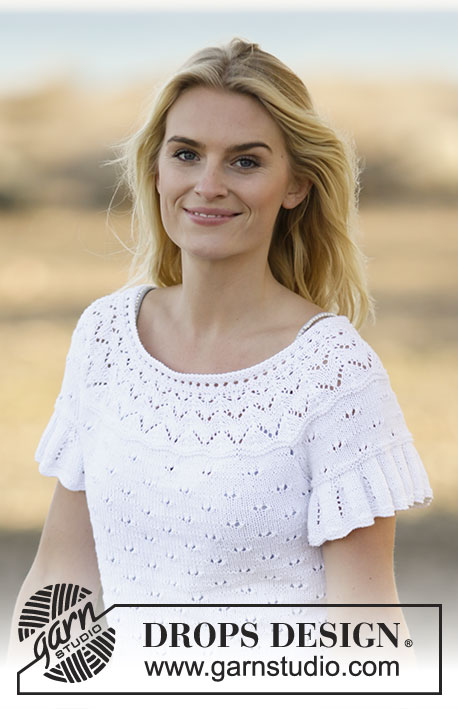
Knitted DROPS top with lace pattern, short sleeves and round yoke in ”Safran”. Size: S - XXXL.

DROPS 159-12
DROPS design: Pattern no e-226
Yarn group A
----------------------------------------------------------
Size: S - M - L - XL - XXL - XXXL
Materials:
DROPS SAFRAN from Garnstudio
350-350-400-450-500-550 g colour no 17, white

DROPS CIRCULAR NEEDLE (40 and 80 cm) SIZE 3 mm - or size needed to get 24 sts x 32 rows in stocking st = 10 x 10 cm.
DROPS CIRCULAR NEEDLE (40 and 80 cm) SIZE 2.5 mm - for edges.

-------------------------------------------------------

Alternative Yarn – See how to change yarns here
Yarn Groups A to F – Use the same pattern and change the yarn here
Yarn usage using an alternative yarn – Use our yarn converter here

-------------------------------------------------------

DROPS Safran
DROPS Safran
100% Cotton
from 8.00 RON /50g
Get the yarn to make this pattern from 56.00RON.

The yarn cost is calculated from the pattern’s smallest size and the yarn’s cheapest product type. Looking for an even better price? You might find it on the DROPS Deals!

Pattern instructions

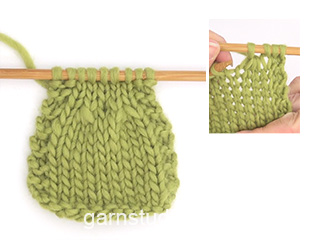
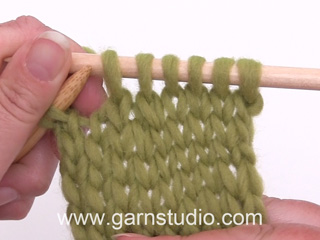
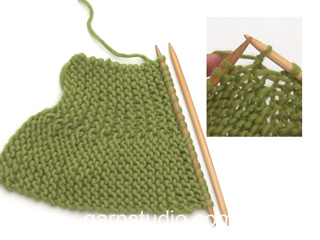
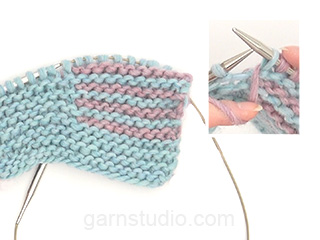
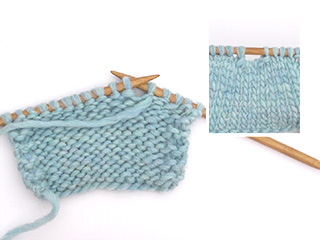
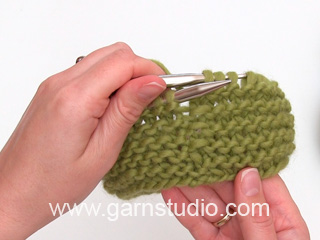
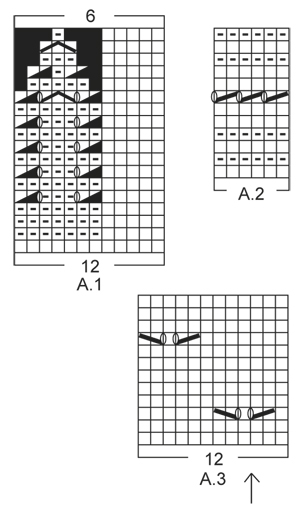
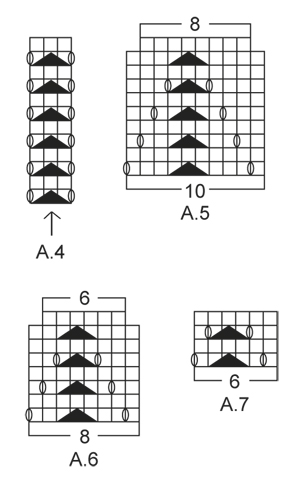
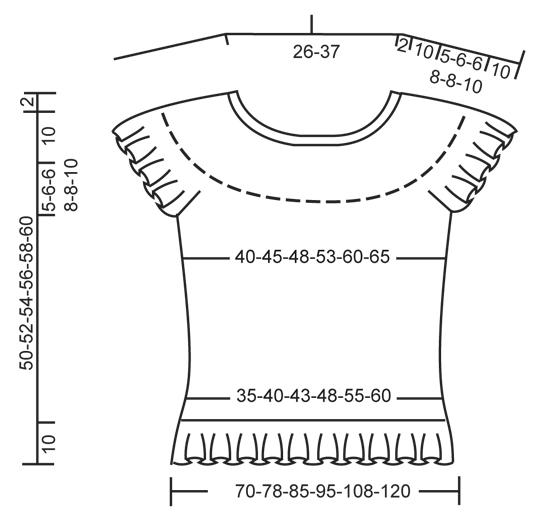
GARTER ST (in the round on circular needle):
* K 1 round and P 1 round *, repeat from *-*. 1 ridge = 2 rounds.

PATTERN:
See diagrams A.1 to A.7. The diagrams show all rows in pattern seen from RS.

INCREASE TIP:
Inc 1 st by making 1 YO. On next round work YO twisted to avoid holes - work inc sts in stocking st.

RAGLAN:
Dec for raglan on each side of A.4 in every transition between sleeves and body.
Dec as follows after A.4: Slip 1 st as if to K, K 1, psso.
Dec as follows 2 sts before A.4: K 2 tog.
----------------------------------------------------------

BODY:
Worked in the round on circular needle.
Cast on 336-372-408-456-516-576 sts on circular needle size 2.5 mm with Safran. Work 2 ridges in GARTER ST - see explanation above. Switch to circular needle size 3 mm and work pattern according to diagram A.1. When A.1 has been worked 1 time vertically, there are 168-186-204-228-258-288 sts on needle. Then continue pattern according to diagram A.2. After A.2 K 2 rounds while AT THE SAME TIME inc 0-6-0-0-6-0 sts evenly on last round = 168-192-204-228-264-288 sts. Insert 1 marker at beg of round and 1 marker after 84-96-102-114-132-144 sts (= the sides). Then continue pattern according to diagram A.3. REMEMBER THE KNITTING TENSION
AT THE SAME TIME when piece measures 12 cm, inc 1 st on each side of both markers - READ INCREASE TIP (= 4 sts inc). Repeat inc every 4-4-4-5-5-5 cm a total of 6 times in each side = 192-216-228-252-288-312 sts - NOTE: Work inc sts in stocking st. Continue to work until piece measures 35-36-38-38-40-40 cm. Work next round as follows: Cast off 5-5-5-6-6-6 sts for armhole, work 86-98-104-114-132-144 sts (= front piece), cast off 10-10-10-12-12-12 sts for armhole (i.e. 5-5-5-6-6-6 sts on each side of marker), work 86-98-104-114-132-144 sts (= back piece) and cast off the remaining 5-5-5-6-6-6 sts. Put piece aside and knit the sleeves.

SLEEVE:
Worked in the round on circular needle.
Cast on 144-156-156-168-168-180 sts on circular needle size 2.5 mm with Safran. Work 2 ridges in GARTER ST - see explanation above. Switch to circular needle size 3 mm and work pattern according to diagram A.1. When A.1 has been worked, there are 72-78-78-84-84-90 sts on needle. Work 2 ridges. AT THE SAME TIME on last round cast off the middle 10-10-10-12-12-12 sts mid under sleeve = 62-68-68-72-72-78 sts remain on needle. Put piece aside and knit another sleeve.

YOKE:
Slip sleeves on to same circular needle as body where armholes were cast off (without working them first) = 296-332-344-372-408-444 sts. AT THE SAME TIME insert 1 marker in first and last st on both sleeves (= 4 markers). Beg mid back and continue pattern as before on body AT THE SAME TIME work A.3 on sleeves (arrow in diagram should match middle of sleeve, beg on same row in diagram as on body). Work in addition A.4 in every transition between body and sleeves (arrow in diagram should match against st with marker). When 2 rounds have been worked in the round over all sts, beg dec for RAGLAN - see explanation above (= 8 sts dec). Repeat dec on every 4th round 4-5-5-7-7-8 times in total = 264-292-304-316-352-380 sts. Work 2 ridges over all the sts while AT THE SAME TIME dec 4-12-4-6-12-10 sts evenly on 1st round = 260-280-300-310-340-370 sts. K 2 rounds. Now beg dec for round yoke and work pattern in the round according to diagram A.5 (= 26-28-30-31-34-37 repetitions on round – NOTE: Switch to a shorter circular needle when needed). When A.5 has been worked 1 time vertically, work A.6 instead of A.5. When A.6 has been worked 1 time vertically, there are 156-168-180-186-204-222 sts on needle. Now work A.7 instead of A.6. When A.7 has been worked 1 time vertically, work an elevation in the back of neck. Insert 1 marker mid front. Beg mid back and K until 14-14-16-16-18-20 sts remain before marker. Turn, K back until 14-14-16-16-18-20 sts remain before marker in the other side. Turn, K until 30-30-34-34-38-42 sts remain before marker. Turn, K back until 30-30-34-34-38-42 sts remain before marker in the other side. Turn, K until 46-46-52-52-58-64 sts remain before marker. Turn, K back until 46-46-52-52-58-64 sts remain before marker in the other side. Turn, K until 62-62-70-70-76-86 sts remain before marker. Turn, K back until 62-62-70-70-76-86 sts remain before marker in the other side. Turn and K back to beg of round.

NECK EDGE:
Switch to circular needle size 2.5 mm and work pattern in the round over all sts according to diagram A.2. AT THE SAME TIME on 1st round dec 22-24-24-26-30-32 sts evenly = 134-144-156-160-174-190 sts. After A.2, loosely cast off with K from RS. Top measures approx. 52-54-56-58-60-62 cm from shoulder and down.

ASSEMBLY:
Sew the openings under the sleeves.

Diagram

symbols = K
symbols = P
symbols = no stitch, skip this square
symbols = 1 YO between 2 sts
symbols = K 2 tog
symbols = slip 1 st as if to K, K 1, psso
symbols = P 2 tog
symbols = slip 1 st as if to K, K 2 tog, psso
symbols = P 3 tog
diagram
diagram
diagram

Each of our patterns has specific tutorial videos to help you.

Do you have a question? See a list of frequently asked questions (FAQ)

Knitting tension is what determines the final measurements of your work, and is usually measured per 10 x 10 cm. It is provided like so: number of stitches in width x number of rows in height - eg: 19 stitches x 26 rows = 10 x 10 cm.

The knitting tension is very individual; some people knit/crochet loosely while others work tightly. You adjust the knitting tension with the needle size, which is why the suggested needle size is only meant as a guide! You need to adjust this (up or down) to ensure that YOUR knitting tension matches the knitting tension provided in the pattern. If you work with a different knitting tension than provided you will have a different yarn consumption, and your work will have different measurements than what the pattern suggests.

The knitting tension also determines which yarns can replace each other. As long as you achieve the same knitting tension you can replace one yarn with another.

See DROPS lesson: How to measure your tension/gauge

See DROPS video: How to make a gauge tension swatch

The required amount of yarn is provided in grams, eg: 450 g. To calculate how many balls you’ll need you first need to know how many grams are in 1 ball (25g, 50g or 100g). This information is available if you click on the individual yarn quality on our pages. Divide the amount required with the amount of each ball. For example, if each ball is 50g (the most common amount), the calculation will be as follows: 450 / 50 = 9 balls.

The important thing when changing from one yarn to another is that the knitting/crochet tension remains the same. This is so that the measurements of the finished piece will be the same as on the sketch provided. It is easier to achieve the same knitting tension using yarns from the same yarn group. It is also possible to work with multiple strands of a thinner yarn to achieve the knitting tension of a thicker one. Please try our yarn converter. We recommend you to always work a test swatch.

Please NOTE: when changing yarn the garment might have a different look and feel to the garment in the photo, due to individual properties and qualities of each yarn.

See DROPS lesson: Can I use a different yarn than the one mentioned in the pattern?

All our yarns are categorised into yarn groups (from A to F) according to thickness and knitting tension – group A contains the thinnest yarns and group F the thickest. This makes it easier for you to find alternative yarns to our patterns, should you wish to switch yarn. All yarns within the same group have a similar knitting tension and can easily replace each other. However, different yarn qualities have different structures and properties which will give the finished work a unique look and feel.

Click here for an overview of the yarns in each yarn group

At the top of all our patterns you’ll find a link to our yarn calculator, which is a helpful tool should you wish to use a different yarn than suggested. By filling in the yarn quality you wish to replace, the amount (in your size) and number of strands, the calculator will present good alternative yarns with the same knitting tension. Additionally it will tell you how much you’ll require in the new qualities and whether you’ll need to work with multiple strands. Most skeins are 50g (some are 25g or 100g).

If the pattern is worked with multiple colours, every colour will have to be calculated separately. Similarly, if the pattern is worked with several strands of different yarns (for example 1 strand Alpaca and 1 strand Kid-Silk) you will have to find alternatives for each, individually.

Click here to see our yarn calculator

Since different yarns have different qualities and textures we have chosen to keep the original yarn in our patterns. However, you can easily find options among our available qualities by using our yarn calculator, or simply pick a yarn from the same yarn group.

It is possible that some retailers still have discontinued yarns in stock, or that someone has a few skeins at home that they would like to find patterns for.

The yarn calculator will provide both alternative yarn as well as required amount in the new quality.

If you think it's hard to decide what size to make, it can be a good idea to measure a garment you own already and like the size of. Then you can pick the size by comparing those measures with the ones available in the pattern's size chart.

You'll find the size chart at the bottom of the pattern.

See DROPS lesson: How to read size chart

The needle size provided in the pattern serves only as a guide, the important thing is to follow the knitting tension. And since knitting tension is very individual, you will have to adjust the needle size to ensure that YOUR tension is the same as in the pattern – maybe you’ll have to adjust 1, or even 2 needle sizes, up or down to achieve the correct tension. For this, we recommend that you work test swatches.

Should you work with a different knitting tension than the one provided, the measurements of the finished garment might deviate from the measurement sketch.

See DROPS lesson: How to measure your tension/gauge

See DROPS video: How to make a tension/gauge swatch

Working a garment top-down provides more flexibility and room for personal adjustment. For example it is easier to try the garment on while working, as well as making adjustments to length of yoke and shoulder caps.

The instructions are carefully explaining every step, in the correct order. Diagrams are adjusted to the knitting direction and are worked as usual.

The diagram depicts all rows/rounds, and every stitch seen from the right side. It is read from bottom to top, from right to left. 1 square = 1 stitch.

When working back and forth, every other row is worked from the right side and every other row is worked from the wrong side. When working from the wrong side, the diagram will have to be worked reversed: from left to right, knit stitches are purled, purl stitches are knit etc.

When working in the round every round is worked from the right side and the diagram are worked from right to left on all rounds.

See DROPS lesson: How to read knitting diagrams

The diagram depicts all rows/rounds, and every stitch seen from the right side. It is worked from bottom to top, from right to left.

When working back and forth every other row is worked from the right side: from right to left and every other row is worked from the wrong side: from left to right.

When working in the round, every row in the diagram are worked from the right side, from right to left.

When working a circular diagram you start in the middle and work your way outwards, counter clockwise, row by row.

The rows usually start with a given number of chain stitches (equivalent to the height of the following stitch), this will either be depicted in the diagram or explained in the pattern.

See DROPS lesson: How to read crochet diagrams

Instructions for working several diagrams after each other on the same row/round, will often be written like so: “work A.1, A.2, A.3 a total of 0-0-2-3-4 times". This means you work A.1 once, then A.2 is worked once, and A.3 is repeated (in width) the number of times provided for your size – in this case like so: S = 0 times, M = 0 times, L=2 times, XL= 3 times and XXL = 4 times.

The diagrams are worked as usual: begin with the first row in A.1, then work the first row in A.2 etc.

See DROPS lesson: How to read knitting diagrams

See DROPS lesson: How to read crochet diagrams

The total width of the garment (from wrist-to-wrist) will be larger in the larger sizes, despite the actual sleeves being shorter. The larger sizes have longer sleeve caps and wider shoulders, so there will be a good fit in all sizes.

The measurement sketch/schematic drawing provides information regarding the full length of the garment. If it’s a jumper or a jacket the length is measured from the highest point on the shoulder closest to the neckline, and straight down to the bottom of the garment. It is NOT measured from the tip of shoulder. Similarly, the length of yoke is measured from the highest point on the shoulder and down to where yoke is split into body and sleeves.

On a jacket measures are never taken along bands, unless specifically stated. Always measure inside band stitches when measuring the length.

See DROPS lesson: How to read a schematic drawing

Diagrams are often repeated on the round or in height. 1 repeat is the diagram the way it appears in the pattern. If it says to work 5 repeats of A.1 in the round, then you work A.1 a total of 5 times after/next to each other in the round. If it says to work 2 repeats of A.1 vertically/in height you work the entire diagram once, then begin again at the start and work the entire diagram one more time.

Chain stitches are slightly narrower than other stitches and to avoid working the cast-on edge too tight, we simply chain more stitches to begin with. The stitch count will be adjusted on the following row to fit the pattern and measurement sketch.

The rib edge is more elastic and will contract slightly compared to, for example, stocking stitch. By increasing before the rib edge, you avoid a visible difference in width between the rib edge and the rest of the body.

It’s very easy to cast off too tightly, and by making yarn overs while casting off (and simultaneously casting these off) you avoid a too tight cast off edge.

See DROPS video: How to bind off with yarn overs (yo)

To achieve an even increase (or decrease) you can increase on, for example: every 3rd and 4th row alternately, like so: work 2 rows and increase on the 3rd row, work 3 rows and increase on the 4th. Repeat this until the increase is complete.

See DROPS lesson: Increase or decrease 1 st on every 3rd and 4th row alternately

Should you prefer to work in the round instead of back and forth, you may of course adjust the pattern. You’ll need to add steeks mid-front (usually 5 stitches), and follow the instructions. When you would normally turn and work from the wrong side, simply work across the steek and continue in the round. At the end you’ll cut the piece open, pick up stitches to work bands, and cover the cut edges.

See DROPS video: How to knit steeks and cut open

Should you prefer to work back and forth instead of in the round, you may of course adjust the pattern so you work the pieces separately and then assemble them at the end. Divide the stitches for the body in 2, add 1 edge stitch in each side (for sewing) and work the front and back pieces separately.

See DROPS lesson: Can I adapt a pattern for circular needles into straight needles?

Pattern repeats can vary slightly in the different sizes, in order to get the correct proportions. If you’re not working the exact same size as the garment in the photo, yours might deviate slightly. This has been carefully developed and adjusted so that the complete impression of the garment is the same in all sizes.

Make sure to follow instructions and diagrams for your size!

If you have found a pattern you like which is available in women’s size it’s not very difficult to convert it to men’s size. The biggest difference will be the length of sleeves and body. Start working on the women size that you think would fit across the chest. The additional length will be worked right before you cast off for the armhole/sleeve cap. If the pattern is worked top-down you can add the length right after the armhole or before the first decrease on sleeve.

Regarding additional yarn amount, this will depend on how much length you add, but it is better with a skein too many than too few.

All yarns will have excess fibres (from production) that might come off as lint or shedding. Brushed yarns (ie hairier yarns) have more of these loose, excess fibres, causing more shedding.

Shedding also depends on what is worn under or over the garment, and whether this pulls at the yarn fibres. It’s therefore not possible to guarantee that there will be no shedding

Below are some tips on how to get the best result when working with hairier yarns:

1. When the garment is finished (before you wash it) shake it vigorously so the looser hairs come off. NOTE: do NOT use a lint roller, brush or any method that pulls at the yarn.

2. Place the garment in a plastic bag and put it in your freezer - the temperature will cause the fibres to become less attached to each other, and excess fibres will come off easier.

3. Leave in the freezer for a few hours before taking it out and shaking it again.

4. Wash the garment according to the instructions on the yarn label.

Pilling is a natural process that happens to even the most exclusive of fibers. It's a natural sign of wear and tear that is hard to avoid, and that is most visible in high friction areas of your garment like a sweater's arms and cuffs.

You can make your garment look as new by removing the pilling, using a fabric comb or a pill/lint remover.

Still can't find the answer you need? Then scroll down and leave your question so one of our experts can try to help you. This will be done normally within 5 to 10 working days.
In the meantime, you can read the questions and answers that others have left to this pattern or join the DROPS Workshop on Facebook to get help from fellow knitters/crocheters!

You might also like...

Post a comment to pattern DROPS 159-12

We would love to hear what you have to say about this pattern!

If you want to leave a question, please make sure you select the correct category in the form below, to speed up the answering process. Required fields are marked *.

Comments / Questions (43)

country flag Marie Garpefjäll wrote:

A1 ingen maska, hoppa över denna maska, den svarta rutan, ska man bara sätta över den maskan på nästa sticka?

25.02.2018 - 20:58

DROPS Design answered:

Hej Marie, nej du hoppar bara över den svarta rutan i diagrammet og sticker nästa ruta i diagrammet. Lycka till!

26.02.2018 - 13:35

country flag Dolfin wrote:

Bonjour, motif A1 ligne 13, le diagramme du motif se fait sur 5 mailles endroit, et 7 mailles pour le motif, or si je lis bien il me faut 8 mailles pour faire le motif à la ligne 13 ? Si je fais ainsi je décale tout mon motif... De plus ligne 14, on tricote 5 mailles endroits et 5 mailles envers, mais d'après le motif de la ligne précédente, il me reste 6 mailles puisqu'il y a 2 jetés ? Merci de m'aider parce que je ne comprends pas du tout...

17.07.2017 - 19:01

DROPS Design answered:

Bonjour Mme Dolfin, au rang 13, tricotez les 7 m ainsi: 2 m ens à l'env, 1 jeté, glissez 1 m à l'end, 2 m ens à l'end, passez la m glissée par-dessus la m tricotée, 1 jeté, 2 m ens à l'env = on diminue 4 m et on fait 2 jetés = on diminue 2 m au total, il reste 5 m au rang suivant (+ les 6 m end). Puis on diminue avec 2 m ens à l'env, 1 m env, 2 m ens à l'env (= on diminue 2 m, il reste 3 m au rang suivant). Bon tricot!

18.07.2017 - 08:35

country flag Claudia Charland wrote:

Hi, when slipping sleeves onto the yoke, you work A3 over all stitches (sleeves and yoke). When do you begin A4? It reads "in addition", does that mean AFTER A3 or AT THE SAME TIME as A3? Also, is A4 worked over all stitches for body (front and back) excluding the sleeves? Thank you!

11.05.2017 - 12:45

DROPS Design answered:

Hi Claudia, You continue the pattern as before on the body, A.3 on the sleeves and A.4 in every transition between body and sleeves. I hope this helps, Kind regards, Deirdre

11.05.2017 - 13:15

country flag Danie wrote:

Bonjour je ne comprends pas au niveau de l'empiecement au sujet des diminutions il est noté de "commencer maintenant a diminuer pour l'empiécement arrondi et tricoter en rod en suivant le diagramme µA5 (=30 fois le tout le tour) je ne comprends pas si il faut diminuer ts les 2 r ou plus merci de m'aider car je suis bloquée

12.04.2017 - 21:12

DROPS Design answered:

Bonjour Danie, Quand on tricote A.5 on va diminuer 2 m dans chaque motif au dernier tour de A.5, puis on tricote A.6 et on diminue 2 m dans chaque motif au dernier tour de A.6, puis on tricote A.7 (= pas de diminutions). On fait ensuite les rangs raccourcis et on va faire le col en répartissant 22-32 diminutions au 1er tour puis on va tricoter A.2. Bon tricot!

18.04.2017 - 08:27

country flag Mazoyer wrote:

Comment fait on poursuivere le diagramme a3 avec les augmentations? Merci

09.05.2015 - 23:37

DROPS Design answered:

Bonjour Mme Mazoyer, continuez à tricoter les motifs en les alignant comme avant entre les marqueurs, il y aura plus de mailles avant/après les motifs au niveau des marqueurs, mais entre les marqueurs, ils doivent être alignés. Bon tricot!

11.05.2015 - 10:30

country flag Mette Dam Torbensen wrote:

Hvordan finder jeg ud af hvilken str. jeg skal strikke? Kan ikke finde noget med brystmål osv.?

07.05.2015 - 05:16

DROPS Design answered:

Hej Mette. Alle maal staar i maalskitsen nederst paa mönstret. Det er i cm per störrelse.

07.05.2015 - 12:38

country flag Dagmar wrote:

Ich habe diesen Sommerpulli soeben fertig gestrickt....und ich muss sagen ich bin begeistert . Der Pulli hat sich super nach der Anleitung stricken lassen. Ich freue mich jetzt schon den Pulli an sonnigen Tagen zu tragen . Alles in allem Daumen nach oben :-)

11.04.2015 - 20:51

country flag Valerie Clementz wrote:

Bonjour , j'adoe ce modèle mais je ne sais pas tricoter avec des aiguilles circulaires.Tous vos modèles sont ils toujours en circulaire??? merci de votre réponse.

19.03.2015 - 10:05

DROPS Design answered:

Bonjour Mme Clementz, vous trouverez sous l'onglet "vidéos" à droite de la photo, toutes les vidéos relatives à ce modèle, notamment comment tricoter en rond sur aiguille circulaire. Pour adapter ce modèle en plusieurs pièces, répartissez les mailles par pièce (dos, devant, manches) et ajoutez les m lis - pensez à bien placer le point fantaisie, ou (plus simple), aidez-vous des vidéos pour apprendre à maîtriser les aig. circulaires, beaucoup les ont finalement adoptées après avoir essayer. Bon tricot!

19.03.2015 - 11:11

Luis Daniel wrote:

Me gustan todos los modelos de Drop´s pero algunos le faltan su desarrollo como a este modelos.

13.03.2015 - 04:28

country flag Marimar wrote:

Très féminin

30.01.2015 - 22:51