DROPS Big Fabel
DROPS Big Fabel
75% Wool, 25% Polyamide
Discontinued
find alternatives
DROPS Super Sale

Salt and Pepper

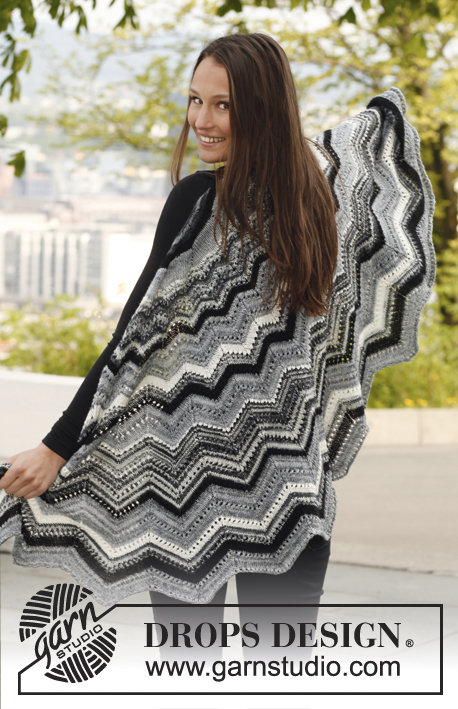
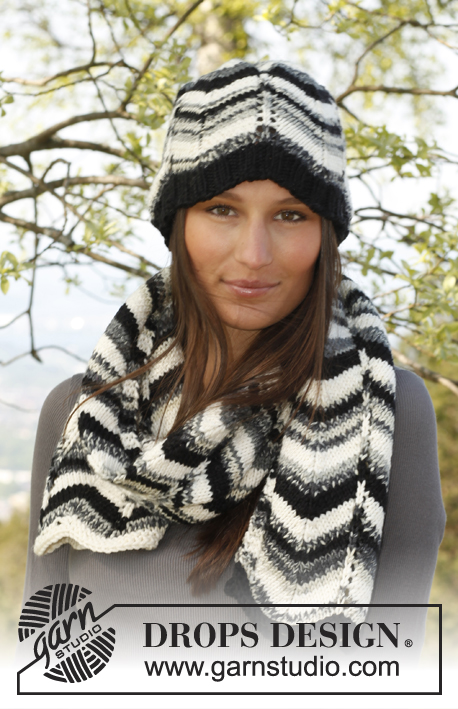
Knitted DROPS jacket with short sleeves, stripes and zigzag pattern in 1 thread ”Big Fabel” og 2 threads "Fabel". Size: XS - XXXL.

DROPS 140-27
DROPS design: Pattern no bf-004
Yarn group C
-----------------------------------------------------------
Size: XS/S - M/L - XL/XXL - XXXL
Materials:
DROPS BIG FABEL from Garnstudio
200-300-300-300 g colour no 400, black
200-300-300-300 g colour no 905, black/off white
100-200-200-200 g colour no 100, off white
100-200-200-200 g colour no 200, grey

Or use:
DROPS FABEL from Garnstudio
150-250-250-250 g colour no 400, black
150-250-250-250 g colour no 905, salt and pepper
100-150-150-150 g colour no 100, off white
100-150-150-150 g colour no 200, grey

DROPS CIRCULAR NEEDLE (80 cm) SIZE 5.5 mm – or size needed to get 19 sts with zigzag pattern (= diagram A-1) = width 10 cm in 1 tread Big Fabel or 2 threads Fabel.
DROPS CIRCULAR NEEDLE (80 cm) SIZE 4 mm – for rib.
----------------------------------------------------------

-------------------------------------------------------

Alternative Yarn – See how to change yarns here
Yarn Groups A to F – Use the same pattern and change the yarn here
Yarn usage using an alternative yarn – Use our yarn converter here

-------------------------------------------------------

DROPS Big Fabel
DROPS Big Fabel
75% Wool, 25% Polyamide
Discontinued
find alternatives

Pattern instructions

NOTE: This pattern is written in British English. All measurements in charts are in cm. For conversion from cm to inches - click here. There are different terms for crocheting in British and American English. If this pattern includes crochet, click for "crochet terms" here. For this pattern in American English, please click here.
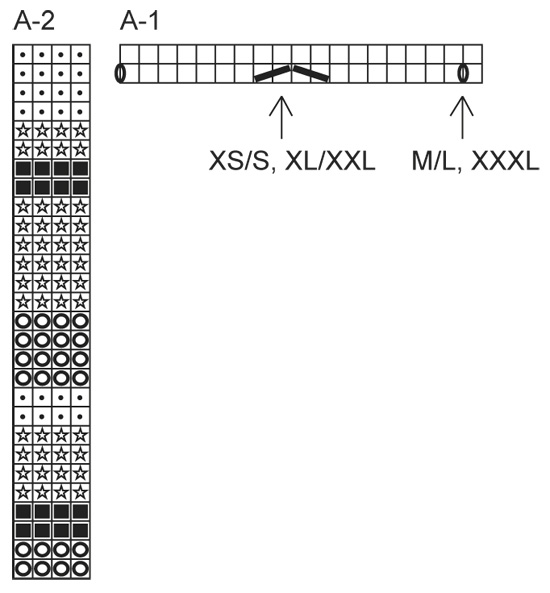
GARTER ST (back and forth on circular needle):
K all rows. 1 ridge = 2 rows K.

PATTERN:
See diagram A-1 for zigzag pattern and diagram A-2 for stripes. Diagram A-1 shows all rows in pattern from RS, 1 repetition = 19 sts in width. Arrows in diagram A-1 applies to left front piece, see explanation in pattern.
----------------------------------------------------------

JACKET:
First work right front piece and cast on for sleeve, then work left front piece the same way. Then place the 2 parts tog and work down the back piece. Worked back and forth on a circular needle to make room for all the sts.

RIGHT FRONT PIECE:
LOOSELY cast on 32-41-51-60 sts on circular needle size 5.5 mm with 1 thread Big Fabel or 2 threads Fabel black. Work as follows (1st row = RS): * K 1 towards mid front, 1st row in diagram A-1 over 29-38-48-57 sts (i.e. 1½-2-2½-3 repetitions) and finish with K 2 towards the side. K 1 row from WS over all sts *, repeat from *-* 1 more time. Continue with zigzag pattern according to diagram A-1 (work the next to last st towards the side as first st in A-1), 1 st in garter st in each side and stripes according to diagram A-2. REMEMBER THE KNITTING TENSION!
When piece measures 42 cm in all sizes, cast on 37 new sts at the end of next row from RS = 69-78-88-97 sts. Work the new sts in diagram A-1 but work the outermost 8 sts on sleeve in garter st while at the same time working them in A-1 (i.e. there are now 3½-4-4½-5 repetitions of A-1 + 1 st in each side). When piece measures 64-66-68-70 cm in total, insert 1 marker in piece (= mid on top of shoulder), make a mark in stripe pattern (A-2) on where you are.
Then work back piece from the top and down - now the stripes must be worked reversed, i.e. from where you are in diagram and down so that they fit towards each other in side seam.
Continue to work for 2 cm, finish after 1 row from WS, put piece aside and work left front piece.

LEFT FRONT PIECE:
Cast on and work as right front piece but reversed – i.e. work as follows (1st row = RS): 1 st in garter st, 1 st in stocking st, then diagram A-1 over 28-37-47-56 sts – beg at arrow for your size in diagram (size XS/S and XL/XXL beg with K 2 tog, size M/L and XXXL beg with 1 YO and then K 1), finish with 1 st in stocking st and 1 st in garter st towards mid front. When casting on sts for sleeve, this must be done at the end of row from WS. Make sure to finish piece on the same place in diagram as on right front piece.

BACK PIECE:
Work sts from left front piece as before according to A-1 and A-2, then cast on 16 new sts at the back of neck, and work sts from right front piece on to needle as before according to A-1 and A-2 = 154-172-192-210 sts. Continue the pattern with the outermost 8 sts in each side in garter st - there are now 8-9-10-11 repetitions of A-1 (in sizes XS/S and XL/XXL there will be 1 st extra at the edge in each side, in sizes M/L and XXXL there will be 1 st extra only in one side).
When piece measures approx. 22-24-26-28 cm (adjust so that same no of stripes have been worked from marker on shoulder as on front piece from where sts were cast on for sleeve), cast off 37 sts at beg of the next 2 rows = 80-98-118-136 sts remain on needle. Continue pattern with 1 edge st in garter st in each side and 1 st in stocking st inside this st in each side. When piece measures approx. 62-64-66-68 cm from marker on shoulder (adjust after 1 row from WS and in same stripe in A-2 as front piece beg with), switch to black. * Work 1st row of A-1 one time, then K from WS over all sts *, repeat from *-* 1 more time, then cast off with K from RS.

ASSEMBLY:
Fold the piece double at the marker on shoulder and sew side and underarm seams tog inside 1 edge st.

BANDS + NECK EDGE:
Knit up with black on circular needle size 4 mm inside 1 edge st: 290-298-306-314 sts up along right front, in the back of neck and down along left front (there should now be approx. 21 sts on 10 cm). Work rib as follows from WS: 2 sts in garter st, * P 2, K 2 *, repeat from *-*, finish with P 2 and 2 sts in garter st. When rib measures 5 cm, inc 1 st in each of the middle 24 P-sections in the neck (seen from RS) so that there are P 3 and K 2 = 314-322-330-338 sts. Then work K over K and P over P with 2 sts in garter st in each side until edge measures 10-10-11-12 cm, cast off with K over K and P over P.

Diagram

symbols = K from RS, P from WS
symbols = 1 YO between 2 sts, on next row P YO twisted to avoid holes
symbols = slip 1 st as if to K, K 1, psso
symbols = K 2 tog
symbols = grey
symbols = black
symbols = black/off white
symbols = off white
diagram
diagram
Do you have a question? See a list of frequently asked questions (FAQ)

Knitting tension is what determines the final measurements of your work, and is usually measured per 10 x 10 cm. It is provided like so: number of stitches in width x number of rows in height - eg: 19 stitches x 26 rows = 10 x 10 cm.

The knitting tension is very individual; some people knit/crochet loosely while others work tightly. You adjust the knitting tension with the needle size, which is why the suggested needle size is only meant as a guide! You need to adjust this (up or down) to ensure that YOUR knitting tension matches the knitting tension provided in the pattern. If you work with a different knitting tension than provided you will have a different yarn consumption, and your work will have different measurements than what the pattern suggests.

The knitting tension also determines which yarns can replace each other. As long as you achieve the same knitting tension you can replace one yarn with another.

See DROPS lesson: How to measure your tension/gauge

See DROPS video: How to make a gauge tension swatch

The required amount of yarn is provided in grams, eg: 450 g. To calculate how many balls you’ll need you first need to know how many grams are in 1 ball (25g, 50g or 100g). This information is available if you click on the individual yarn quality on our pages. Divide the amount required with the amount of each ball. For example, if each ball is 50g (the most common amount), the calculation will be as follows: 450 / 50 = 9 balls.

The important thing when changing from one yarn to another is that the knitting/crochet tension remains the same. This is so that the measurements of the finished piece will be the same as on the sketch provided. It is easier to achieve the same knitting tension using yarns from the same yarn group. It is also possible to work with multiple strands of a thinner yarn to achieve the knitting tension of a thicker one. Please try our yarn converter. We recommend you to always work a test swatch.

Please NOTE: when changing yarn the garment might have a different look and feel to the garment in the photo, due to individual properties and qualities of each yarn.

See DROPS lesson: Can I use a different yarn than the one mentioned in the pattern?

All our yarns are categorised into yarn groups (from A to F) according to thickness and knitting tension – group A contains the thinnest yarns and group F the thickest. This makes it easier for you to find alternative yarns to our patterns, should you wish to switch yarn. All yarns within the same group have a similar knitting tension and can easily replace each other. However, different yarn qualities have different structures and properties which will give the finished work a unique look and feel.

Click here for an overview of the yarns in each yarn group

At the top of all our patterns you’ll find a link to our yarn calculator, which is a helpful tool should you wish to use a different yarn than suggested. By filling in the yarn quality you wish to replace, the amount (in your size) and number of strands, the calculator will present good alternative yarns with the same knitting tension. Additionally it will tell you how much you’ll require in the new qualities and whether you’ll need to work with multiple strands. Most skeins are 50g (some are 25g or 100g).

If the pattern is worked with multiple colours, every colour will have to be calculated separately. Similarly, if the pattern is worked with several strands of different yarns (for example 1 strand Alpaca and 1 strand Kid-Silk) you will have to find alternatives for each, individually.

Click here to see our yarn calculator

Since different yarns have different qualities and textures we have chosen to keep the original yarn in our patterns. However, you can easily find options among our available qualities by using our yarn calculator, or simply pick a yarn from the same yarn group.

It is possible that some retailers still have discontinued yarns in stock, or that someone has a few skeins at home that they would like to find patterns for.

The yarn calculator will provide both alternative yarn as well as required amount in the new quality.

If you think it's hard to decide what size to make, it can be a good idea to measure a garment you own already and like the size of. Then you can pick the size by comparing those measures with the ones available in the pattern's size chart.

You'll find the size chart at the bottom of the pattern.

See DROPS lesson: How to read size chart

The needle size provided in the pattern serves only as a guide, the important thing is to follow the knitting tension. And since knitting tension is very individual, you will have to adjust the needle size to ensure that YOUR tension is the same as in the pattern – maybe you’ll have to adjust 1, or even 2 needle sizes, up or down to achieve the correct tension. For this, we recommend that you work test swatches.

Should you work with a different knitting tension than the one provided, the measurements of the finished garment might deviate from the measurement sketch.

See DROPS lesson: How to measure your tension/gauge

See DROPS video: How to make a tension/gauge swatch

Working a garment top-down provides more flexibility and room for personal adjustment. For example it is easier to try the garment on while working, as well as making adjustments to length of yoke and shoulder caps.

The instructions are carefully explaining every step, in the correct order. Diagrams are adjusted to the knitting direction and are worked as usual.

The diagram depicts all rows/rounds, and every stitch seen from the right side. It is read from bottom to top, from right to left. 1 square = 1 stitch.

When working back and forth, every other row is worked from the right side and every other row is worked from the wrong side. When working from the wrong side, the diagram will have to be worked reversed: from left to right, knit stitches are purled, purl stitches are knit etc.

When working in the round every round is worked from the right side and the diagram are worked from right to left on all rounds.

See DROPS lesson: How to read knitting diagrams

The diagram depicts all rows/rounds, and every stitch seen from the right side. It is worked from bottom to top, from right to left.

When working back and forth every other row is worked from the right side: from right to left and every other row is worked from the wrong side: from left to right.

When working in the round, every row in the diagram are worked from the right side, from right to left.

When working a circular diagram you start in the middle and work your way outwards, counter clockwise, row by row.

The rows usually start with a given number of chain stitches (equivalent to the height of the following stitch), this will either be depicted in the diagram or explained in the pattern.

See DROPS lesson: How to read crochet diagrams

Instructions for working several diagrams after each other on the same row/round, will often be written like so: “work A.1, A.2, A.3 a total of 0-0-2-3-4 times". This means you work A.1 once, then A.2 is worked once, and A.3 is repeated (in width) the number of times provided for your size – in this case like so: S = 0 times, M = 0 times, L=2 times, XL= 3 times and XXL = 4 times.

The diagrams are worked as usual: begin with the first row in A.1, then work the first row in A.2 etc.

See DROPS lesson: How to read knitting diagrams

See DROPS lesson: How to read crochet diagrams

The total width of the garment (from wrist-to-wrist) will be larger in the larger sizes, despite the actual sleeves being shorter. The larger sizes have longer sleeve caps and wider shoulders, so there will be a good fit in all sizes.

The measurement sketch/schematic drawing provides information regarding the full length of the garment. If it’s a jumper or a jacket the length is measured from the highest point on the shoulder closest to the neckline, and straight down to the bottom of the garment. It is NOT measured from the tip of shoulder. Similarly, the length of yoke is measured from the highest point on the shoulder and down to where yoke is split into body and sleeves.

On a jacket measures are never taken along bands, unless specifically stated. Always measure inside band stitches when measuring the length.

See DROPS lesson: How to read a schematic drawing

Diagrams are often repeated on the round or in height. 1 repeat is the diagram the way it appears in the pattern. If it says to work 5 repeats of A.1 in the round, then you work A.1 a total of 5 times after/next to each other in the round. If it says to work 2 repeats of A.1 vertically/in height you work the entire diagram once, then begin again at the start and work the entire diagram one more time.

Chain stitches are slightly narrower than other stitches and to avoid working the cast-on edge too tight, we simply chain more stitches to begin with. The stitch count will be adjusted on the following row to fit the pattern and measurement sketch.

The rib edge is more elastic and will contract slightly compared to, for example, stocking stitch. By increasing before the rib edge, you avoid a visible difference in width between the rib edge and the rest of the body.

It’s very easy to cast off too tightly, and by making yarn overs while casting off (and simultaneously casting these off) you avoid a too tight cast off edge.

See DROPS video: How to bind off with yarn overs (yo)

To achieve an even increase (or decrease) you can increase on, for example: every 3rd and 4th row alternately, like so: work 2 rows and increase on the 3rd row, work 3 rows and increase on the 4th. Repeat this until the increase is complete.

See DROPS lesson: Increase or decrease 1 st on every 3rd and 4th row alternately

Should you prefer to work in the round instead of back and forth, you may of course adjust the pattern. You’ll need to add steeks mid-front (usually 5 stitches), and follow the instructions. When you would normally turn and work from the wrong side, simply work across the steek and continue in the round. At the end you’ll cut the piece open, pick up stitches to work bands, and cover the cut edges.

See DROPS video: How to knit steeks and cut open

Should you prefer to work back and forth instead of in the round, you may of course adjust the pattern so you work the pieces separately and then assemble them at the end. Divide the stitches for the body in 2, add 1 edge stitch in each side (for sewing) and work the front and back pieces separately.

See DROPS lesson: Can I adapt a pattern for circular needles into straight needles?

Pattern repeats can vary slightly in the different sizes, in order to get the correct proportions. If you’re not working the exact same size as the garment in the photo, yours might deviate slightly. This has been carefully developed and adjusted so that the complete impression of the garment is the same in all sizes.

Make sure to follow instructions and diagrams for your size!

If you have found a pattern you like which is available in women’s size it’s not very difficult to convert it to men’s size. The biggest difference will be the length of sleeves and body. Start working on the women size that you think would fit across the chest. The additional length will be worked right before you cast off for the armhole/sleeve cap. If the pattern is worked top-down you can add the length right after the armhole or before the first decrease on sleeve.

Regarding additional yarn amount, this will depend on how much length you add, but it is better with a skein too many than too few.

All yarns will have excess fibres (from production) that might come off as lint or shedding. Brushed yarns (ie hairier yarns) have more of these loose, excess fibres, causing more shedding.

Shedding also depends on what is worn under or over the garment, and whether this pulls at the yarn fibres. It’s therefore not possible to guarantee that there will be no shedding

Below are some tips on how to get the best result when working with hairier yarns:

1. When the garment is finished (before you wash it) shake it vigorously so the looser hairs come off. NOTE: do NOT use a lint roller, brush or any method that pulls at the yarn.

2. Place the garment in a plastic bag and put it in your freezer - the temperature will cause the fibres to become less attached to each other, and excess fibres will come off easier.

3. Leave in the freezer for a few hours before taking it out and shaking it again.

4. Wash the garment according to the instructions on the yarn label.

Pilling is a natural process that happens to even the most exclusive of fibers. It's a natural sign of wear and tear that is hard to avoid, and that is most visible in high friction areas of your garment like a sweater's arms and cuffs.

You can make your garment look as new by removing the pilling, using a fabric comb or a pill/lint remover.

Still can't find the answer you need? Then scroll down and leave your question so one of our experts can try to help you. This will be done normally within 5 to 10 working days.
In the meantime, you can read the questions and answers that others have left to this pattern or join the DROPS Workshop on Facebook to get help from fellow knitters/crocheters!

You might also like...

Post a comment to pattern DROPS 140-27

We would love to hear what you have to say about this pattern!

If you want to leave a question, please make sure you select the correct category in the form below, to speed up the answering process. Required fields are marked *.

Comments / Questions (21)

country flag Catharina Almén wrote:

Jag förstår inte riktigt. I höger framställer står det att de yttersta 8 m stickas räta och att det blir 4 rapporter i stl M. Jag får det inte att gå ihop. Om jag stickar 8 rm ytterst, får jag det till 3,5 rapport. Var är felet?

29.03.2024 - 13:50

DROPS Design answered:

Hei Catharina. De nya m stickas in i diag A-1, men de 8 yttersta m på ärmen, stickas i rätst samtidigt som de stickas i A-1. Altså, selv om de 8 ytterste maskene strikkes rätst, så "tilhørere" de A.1. mvh DROPS Design

08.04.2024 - 08:39

country flag Petra wrote:

Please, I'm stuck on sewing the sides. When I fold the piece the chevron stripes in the sides do not align. Instead of this \ /shape I get this shape / /. How should I sew it together?

11.01.2015 - 13:14

DROPS Design answered:

Dear Petra, the chevron should match on the sides - check that you start left front piece as stated. Happy knitting!

12.01.2015 - 10:09

country flag Olivia Keinänen wrote:

XS/S koon etukappaleen silmukkamäärä ei täsmää mitenkään vaikka kuinka lasken. Muissa kokonumeroissa se on minusta oikein. Jos kuvion tekee 1 1/2 kertaa nuolen osoittamasta kohdasta niin se on yhteensä 28 silmukkaa, ei 29 silmukkaa niin kuin ohje väittää. Mistä tämä yksi ylimääräinen silmukka tulee?

20.12.2013 - 10:10

DROPS Design answered:

Hei! S-määrä täsmää, kun teet vielä puolikkaan mallikerran lopussa langankierron piirroksen mukaisesti (tämä langankierto korvaa viimeistä kavennettua silmukkaa).

20.12.2013 - 16:28

country flag Berit wrote:

Texten Höger framstycke: rad 9 förklarar allt!

26.09.2012 - 20:26

country flag Ingrid Ullberg wrote:

Mönstret140-27. Zigzag mönstret stämmer inte ihop storlek M/L i sidorna när man fogar ihop styckerna. Emotser förklaring av er.

25.09.2012 - 14:48

DROPS Design answered:

Sedan stickas bakst uppifrån och ner - nu måste ränderna stickas åt motsatt håll, dvs från dit du har kommit i diag och neråt, så att de kommer att stämma mot varandra i sidsömmen.

04.12.2012 - 12:15

country flag Ingrid Ullberg wrote:

Mönster 140-27. Ovanstående tröja stickad ,precis färdig, i storlek M/L.när sidorna skall sys ihop visar det sig att zigzag mönstret inte passar ihop.Blir förmodligen fel,eftersom ryggpartiet stickas från nacken och neråt. Således blir också framstycken för långa i förhållande till ryggpartiet.

25.09.2012 - 14:26

country flag Anna Marie Madsen wrote:

Er modellen strikket i glatstrikning? Jeg synes ikke det er tydeligt på mønsterillustrationerne, at se om der er tale om det og når der så samtidig i opkriften øverst skrives retstrikning, men er det ikke kun i startkanten?

23.08.2012 - 12:17

DROPS Design answered:

Ja, det er glatstrikning. Siksak er lavet af mønster A-1 og det er glatstrik. Det er kun startkanten som er retstrik og kantmasken efterfølgende. Efter de første to pinde er A-1 (de hvide firkanter) r fra retsiden og vr fra vrangen.

25.12.2012 - 16:31

country flag Inger wrote:

Morsom modell.

27.06.2012 - 10:08

country flag Elisabeth wrote:

Flot

26.06.2012 - 07:00

country flag Nina wrote:

Elegant og stilig.

22.06.2012 - 09:18