DROPS Safran
DROPS Safran
100% Cotton
from 2.05 $ /50g
Get the yarn to make this pattern from 8.20$.

The yarn cost is calculated from the pattern’s smallest size and the yarn’s cheapest product type. Looking for an even better price? You might find it on the DROPS Deals!

DROPS Super Sale

Rosewater Rain

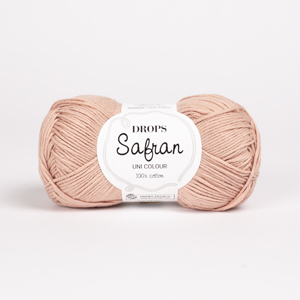
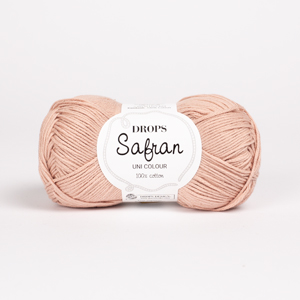
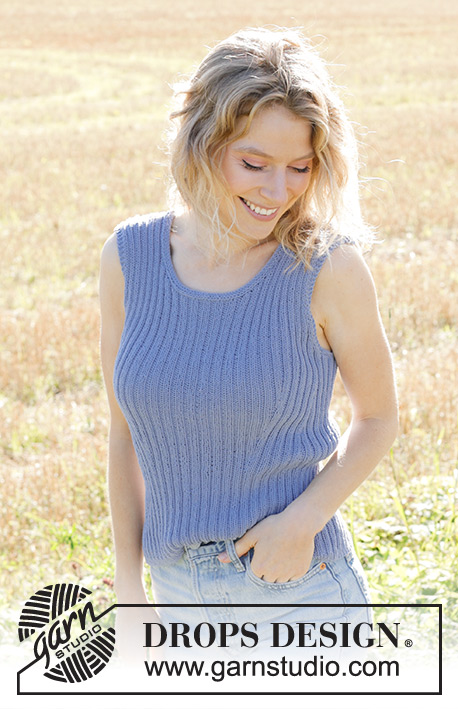
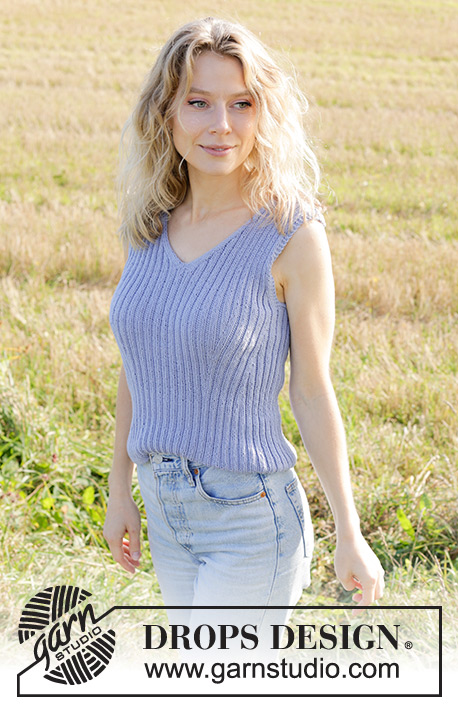
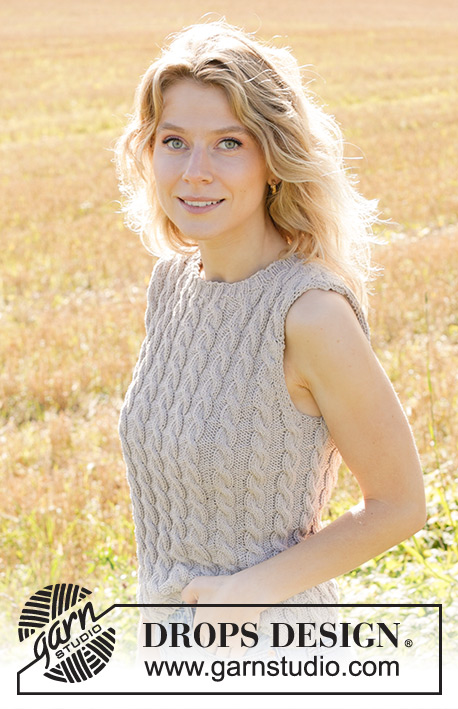
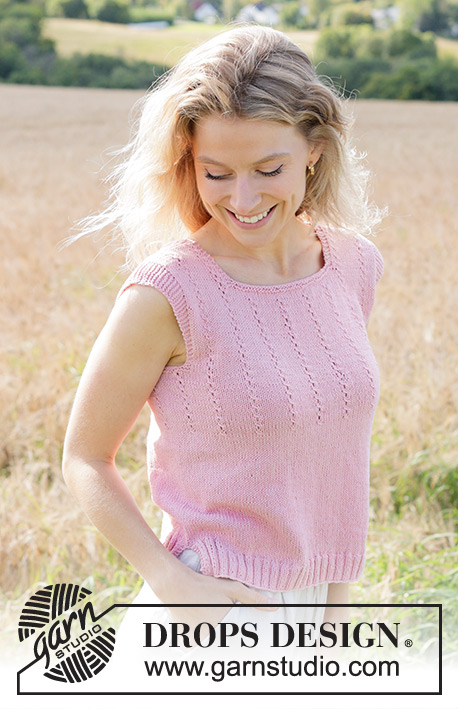
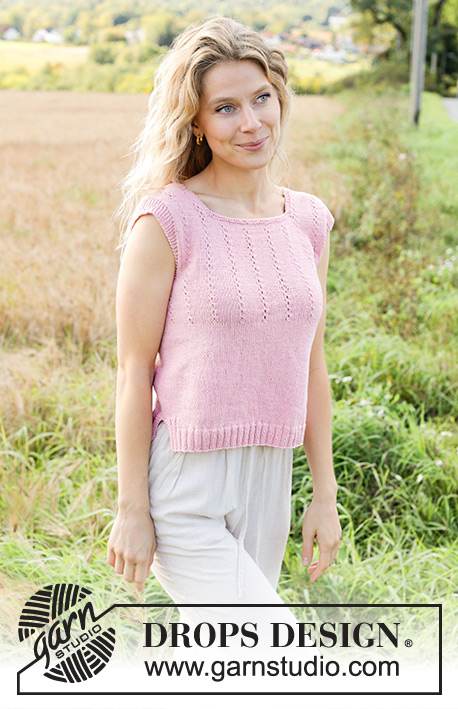
Knitted top in DROPS Safran. Piece is knitted bottom up with lace cables. Size XS – XXXL.

DROPS 250-15
DROPS design: Pattern e-359
Yarn group A
----------------------------------------------------------

SIZE:
XS - S - M - L - XL - XXL

Finished measurements:
Chest measurements: 82-92-100-110-120-128 cm = 32¼"-36¼"-39⅜"-43⅜"-47¼"-50⅜"
Full length: 48-50-52-54-56-58 cm = 19"-19¾"-20½"-21¼"-22"-22¾"
All measurements in charts are in cm.

YARN:
DROPS SAFRAN from Garnstudio (belongs to yarn group A)
200-200-200-200-250-250 g color 01, desert rose

NEEDLES:
DROPS CIRCULAR NEEDLE SIZE 3.5 MM = US 4: Length: 80 cm = 32"
DROPS CIRCULAR NEEDLE SIZE 2.5 MM = US 1.5: Length: 80 cm = 32"

KNITTING GAUGE:
24 stitches in width and 32 rows vertically in stockinette stitch = 10 x 10 cm = 4" x 4".
NOTE! Remember that needle size is only a suggestion. If you have too many stitches on 10 cm = 4" switch to larger needles. If you have too few stitches on 10 cm = 4" switch to smaller needles.

-------------------------------------------------------

Alternative Yarn – See how to change yarns here
Yarn Groups A to F – Use the same pattern and change the yarn here
Yarn usage using an alternative yarn – Use our yarn converter here

-------------------------------------------------------

DROPS Safran
DROPS Safran
100% Cotton
from 2.05 $ /50g
Get the yarn to make this pattern from 8.20$.

The yarn cost is calculated from the pattern’s smallest size and the yarn’s cheapest product type. Looking for an even better price? You might find it on the DROPS Deals!

Pattern instructions

NOTE: This pattern is written in American English. All measurements in charts are in cm. For conversion from inches to cm - click here. There are different terms for crocheting in American and British English. If this pattern includes crochet, click for "crochet terms" here. For this pattern in British English, please click here.
----------------------------------------------------------

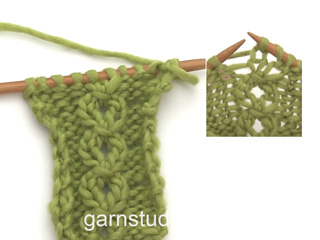
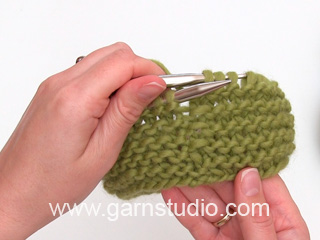
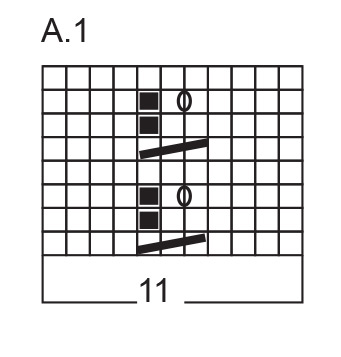
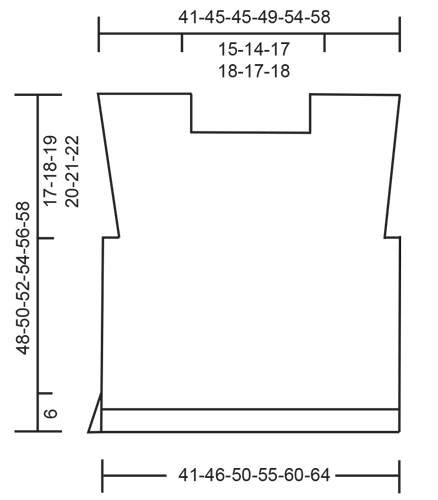
EXPLANATION FOR THE PATTERN:

----------------------------------------------------------

GARTER STITCH (back and forth):
Knit all rows.
1 ridge vertically = knit 2 rows.

GARTER STITCH (worked in the round):
1 ridge vertically = 2 rounds, i.e. knit 1 round and purl 1 round.

PATTERN:
See diagram A.1. Diagrams show all rows seen from the right side.

INCREASE TIP:
Increase 1 stitch by making 1 yarn over inside stitches in garter stitch. On next row knit yarn over twisted to avoid hole. Work the increased stitches in garter stitch.

----------------------------------------------------------

START THE PIECE HERE:

----------------------------------------------------------

TOP - SHORT OVERVIEW OF THE PIECE:
Work front piece and back piece first back and forth, bottom up separately to make a vent at the bottom. Then put the parts together, and finish in the round, before dividing the piece for armholes. Finish each part separately. Sew the shoulder seams.

BACK PIECE:
Cast on 114-126-138-154-166-178 stitches on circular needle size 2.5 MM = US 1.5 with DROPS Safran. Purl 1 row from wrong side, then work rib, begin from right side as follows: 2 stitches in GARTER STITCH - read explanation above - * knit 2, purl 2 *, work from *-* until 4 stitches remain, knit 2 and finish with 2 stitches in garter stitch. Continue rib like this for 4 cm = 1½", work next row as follows from right side: 2 stitches in garter stitch, knit 2, purl 2, knit 2, purl 2, knit the next 94-106-118-134-146-158 stitches, and decrease 15-16-17-22-23-24 stitches evenly over these stitches, purl 2, knit 2, purl 2, knit 2 and 2 stitches in garter stitch = 99-110-121-132-143-154 stitches.
Switch to circular needle size 3.5 MM = US 4 and work in stockinette stitch with 8 stitches rib + 2 stitches in garter stitch in each side until piece measures 6 cm = 2⅜", finish with a row from wrong side. Put back piece aside, and work the front piece.

FRONT PIECE:
Cast on the same number of stitches and work the same way as back piece. Then place the parts together as explained below.

TOP:
Now slip parts together as follows: Knit over the 99-110-121-132-143-154 stitches from front piece, and knit over the 99-110-121-132-143-154 stitches from back piece = 198-220-242-264-286-308 stitches. Work in stockinette stitch in the round over all stitches.
When piece measures 21-22-23-24-25-26 cm = 8¼"-8¾"-9"-9½"-9¾"-10¼", work A.1 over all stitches (= 18-20-22-24-26-28 repetitions). Insert 2 marker threads in piece, after 9-10-11-12-13-14 repetitions of A.1 and after last stitch on round. Continue with A.1 vertically. When piece measures 30-31-32-33-34-35 cm = 11¾"-12¼"-12½"-13"-13⅜"-13¾", work 2 ridges in GARTER STITCH - read explanation above - over the 20-20-30-30-30-30 stitches in each side (= 10-10-15-15-15-15 stitches in garter stitch on each side of marker thread in each side) while AT THE SAME TIME on first round decreasing 2-2-4-4-4-4 stitches evenly over these stitches in garter stitch in each side (= 18-18-26-26-26-26 stitches in garter stitch and 194-216-234-256-278-300 stitches in total), work the remaining stitches in pattern as before. When 2 ridges in garter stitch have been worked vertically over the 18-18-26-26-26-26 stitches in each side, bind off the middle 12-12-20-20-20-20 stitches in each side for armholes and finish each piece separately.

BACK PIECE:
= 85-96-97-108-119-130 stitches. Work piece back and forth on needle from here. Continue with pattern and 3 stitches in garter stitch in each side. When piece measures 2 cm =¾" from where body was divided for armholes, increase 1 stitch in each side for shoulder - read INCREASE TIP! Repeat increase in each side on every 6th-8th-8th-12th-12th-12th row 7-6-6-5-5-5 times in total = 99-108-109-118-129-140 stitches. AT THE SAME TIME when piece measures 40-42-44-46-48-50 cm = 15¾"-16½"-17¼"-18"-19"-19¾", work 2 ridges in garter stitch over the middle 53-52-63-64-63-64 stitches while AT THE SAME TIME on 1st row decreasing 12-12-16-16-16-16 stitches evenly over these stitches in garter stitch (= 41-40-47-48-47-48 stitches in garter stitch), work the remaining stitches in pattern as before. When 2 ridges in garter stitch have been worked vertically over the 41-40-47-48-47-48 stitches in garter stitch, bind off the middle 35-34-41-42-41-42 stitches for neck and finish each piece separately = 26-31-26-30-36-41 stitches remain on each shoulder. Continue with pattern, 10-9-9-8-8-8 stitches in garter stitch towards the armholes and 3 stitches in garter stitch towards the neck. Bind off when piece measures 48-50-52-54-56-58 cm = 19"-19¾"-20½"-21¼"-22"-22¾". Work the other shoulder the same way.

FRONT PIECE:
= 85-96-97-108-119-130 stitches. Work as on back piece.

ASSEMBLY:
Sew the shoulder seams.

Diagram

All measurements in charts are in cm.

symbols = knit from the right side, purl from the wrong side
symbols = this square is not a stitch because stitch was decreased earlier, go directly to next symbol in diagram
symbols = between 2 stitches make 1 yarn over
diagram
diagram
Do you have a question? See a list of frequently asked questions (FAQ)

Knitting tension is what determines the final measurements of your work, and is usually measured per 10 x 10 cm. It is provided like so: number of stitches in width x number of rows in height - eg: 19 stitches x 26 rows = 10 x 10 cm.

The knitting tension is very individual; some people knit/crochet loosely while others work tightly. You adjust the knitting tension with the needle size, which is why the suggested needle size only serve as a guide! You need to adjust this (up or down) to ensure that YOUR knitting tension matches the knitting tension provided in the pattern. If you work with a different knitting tension than provided you will have a different yarn consumption, and your work will have different measurements than what the pattern suggests.

The knitting tension also determines which yarns can replace each other. As long as you achieve the same knitting tension you can replace one yarn with another.

See DROPS lesson: How to measure your tension/gauge

See DROPS video: How to make a gauge tension swatch

The required amount of yarn is provided in grams, eg: 450 g. To calculate how many balls you’ll need you first need to know how many grams are in 1 ball (25g, 50g or 100g). This information is available if you click on the individual yarn quality on our pages. Divide the amount required with the amount of each ball. For example, if each ball is 50g (the most common amount), the calculation will be as follows: 450 / 50 = 9 balls.

The important thing when changing from one yarn to another is that the knitting/crochet tension remains the same. This is so that the measurements of the finished piece will be the same as on the sketch provided. It is easier to achieve the same knitting tension using yarns from the same yarn group. It is also possible to work with multiple strands of a thinner yarn to achieve the knitting tension of a thicker one. Please try our yarn converter. We recommend you to always work a test swatch.

Please NOTE: when changing yarn the garment might have a different look and feel to the garment in the photo, due to individual properties and qualities of each yarn.

See DROPS lesson: Can I use a different yarn than the one mentioned in the pattern?

All our yarns are categorised into yarn groups (from A to F) according to thickness and knitting tension – group A contains the thinnest yarns and group F the thickest. This makes it easier for you to find alternative yarns to our patterns, should you wish to switch yarn. All yarns within the same group have a similar knitting tension and can easily replace each other. However, different yarn qualities have different structures and properties which will give the finished work a unique look and feel.

Click here for an overview of the yarns in each yarn group

At the top of all our patterns you’ll find a link to our yarn converter, which is a helpful tool should you wish to use a different yarn than suggested. By filling in the yarn quality you wish to replace, the amount (in your size) and number of strands, the converter will present good alternative yarns with the same knitting tension. Additionally it will tell you how much you’ll require in the new qualities and whether you’ll need to work with multiple strands. Most skeins are 50g (some are 25g or 100g).

If the pattern is worked with multiple colours, every colour will have to be converted separately. Similarly, if the pattern is worked with several strands of different yarns (for example 1 strand Alpaca and 1 strand Kid-Silk) you will have to find alternatives for each, individually.

Click here to see our yarn converter

Since different yarns have different qualities and textures we have chosen to keep the original yarn in our patterns. However, you can easily find options among our available qualities by using our yarn converter, or simply pick a yarn from the same yarn group.

It is possible that some retailers still have discontinued yarns in stock, or that someone has a few skeins at home that they would like to find patterns for.

The yarn converter will provide both alternative yarn as well as required amount in the new quality.

If you think it's hard to decide what size to make, it can be a good idea to measure a garment you own already and like the size of. Then you can pick the size by comparing those measures with the ones available in the pattern's size chart.

You'll find the size chart at the bottom of the pattern.

See DROPS lesson: How to read size chart

The needle size provided in the pattern serves only as a guide, the important thing is to follow the knitting tension. And since knitting tension is very individual, you will have to adjust the needle size to ensure that YOUR tension is the same as in the pattern – maybe you’ll have to adjust 1, or even 2 needle sizes, up or down to achieve the correct tension. For this, we recommend that you work test swatches.

Should you work with a different knitting tension than the one provided, the measurements of the finished garment might deviate from the measurement sketch.

See DROPS lesson: How to measure your tension/gauge

See DROPS video: How to make a gauge tension swatch

Working a garment top-down provides more flexibility and room for personal adjustment. For example it is easier to try the garment on while working, as well as making adjustments to length of yoke and shoulder caps.

The instructions are carefully explaining every step, in the correct order. Diagrams are adjusted to the knitting direction and are worked as usual.

The diagram depicts all rows/rounds, and every stitch seen from the right side. It is read from bottom to top, from right to left. 1 square = 1 stitch.

When working back and forth, every other row is worked from the right side and every other row is worked from the wrong side. When working from the wrong side, the diagram will have to be worked reversed: from left to right, knit stitches are purled, purl stitches are knit etc.

When working in the round every round is worked from the right side and the diagram are worked from right to left on all rounds.

See DROPS lesson: How to read knitting diagrams

The diagram depicts all rows/rounds, and every stitch seen from the right side. It is worked from bottom to top, from right to left.

When working back and forth every other row is worked from the right side: from right to left and every other row is worked from the wrong side: from left to right.

When working in the round, every row in the diagram are worked from the right side, from right to left.

When working a circular diagram you start in the middle and work your way outwards, counter clockwise, row by row.

The rows usually start with a given number of chain stitches (equivalent to the height of the following stitch), this will either be depicted in the diagram or explained in the pattern.

See DROPS lesson: How to read crochet diagrams

Instructions for working several diagrams after each other on the same row/round, will often be written like so: “work A.1, A.2, A.3 a total of 0-0-2-3-4 times". This means you work A.1 once, then A.2 is worked once, and A.3 is repeated (in width) the number of times provided for your size – in this case like so: S = 0 times, M = 0 times, L=2 times, XL= 3 times and XXL = 4 times.

The diagrams are worked as usual: begin with the first row in A.1, then work the first row in A.2 etc.

See DROPS lesson: How to read knitting diagrams

See DROPS lesson: How to read crochet diagrams

The total width of the garment (from wrist-to-wrist) will be larger in the larger sizes, despite the actual sleeves being shorter. The larger sizes have longer sleeve caps and wider shoulders, so there will be a good fit in all sizes.

The measurement sketch/schematic drawing provides information regarding the full length of the garment. If it’s a jumper or a jacket the length is measured from the highest point on the shoulder (usually closest to the neckline), and straight down to the bottom of the garment. It is NOT measured from the tip of shoulder. Similarly, the length of yoke is measured from the highest point on the shoulder and down to where yoke is split into body and sleeves.

See DROPS lesson: How to read a schematic drawing

Diagrams are often repeated on the round or in height. 1 repeat is the diagram the way it appears in the pattern. If it says to work 5 repeats of A.1 in the round, then you work A.1 a total of 5 times after/next to each other in the round. If it says to work 2 repeats of A.1 vertically/in height you work the entire diagram once, then begin again at the start and work the entire diagram one more time.

Chain stitches are slightly narrower than other stitches and to avoid working the cast-on edge too tight, we simply chain more stitches to begin with. The stitch count will be adjusted on the following row to fit the pattern and measurement sketch.

The rib edge is more elastic and will contract slightly compared to, for example, stocking stitch. By increasing before the rib edge, you avoid a visible difference in width between the rib edge and the rest of the body.

It’s very easy to cast off too tightly, and by making yarn overs while casting off (and simultaneously casting these off) you avoid a too tight cast off edge.

See DROPS video: How to bind off with yarn overs (yo)

To achieve an even increase (or decrease) you can increase on, for example: every 3rd and 4th row alternately, like so: work 2 rows and increase on the 3rd row, work 3 rows and increase on the 4th. Repeat this until the increase is complete.

See DROPS lesson: Increase or decrease 1 st on every 3rd and 4th row alternately

Should you prefer to work in the round instead of back and forth, you may of course adjust the pattern. You’ll need to add steeks mid-front (usually 5 stitches), and follow the instructions. When you would normally turn and work from the wrong side, simply work across the steek and continue in the round. At the end you’ll cut the piece open, pick up stitches to work bands, and cover the cut edges.

See DROPS video: How to knit steeks and cut open

Should you prefer to work back and forth instead of in the round, you may of course adjust the pattern so you work the pieces separately and then assemble them at the end. Divide the stitches for the body in 2, add 1 edge stitch in each side (for sewing) and work the front and back pieces separately.

See DROPS lesson: Can I adapt a pattern for circular needles into straight needles?

Pattern repeats can vary slightly in the different sizes, in order to get the correct proportions. If you’re not working the exact same size as the garment in the photo, yours might deviate slightly. This has been carefully developed and adjusted so that the complete impression of the garment is the same in all sizes.

Make sure to follow instructions and diagrams for your size!

If you have found a pattern you like which is available in women’s size it’s not very difficult to convert it to men’s size. The biggest difference will be the length of sleeves and body. Start working on the women size that you think would fit across the chest. The additional length will be worked right before you cast off for the armhole/sleeve cap. If the pattern is worked top-down you can add the length right after the armhole or before the first decrease on sleeve.

Regarding additional yarn amount, this will depend on how much length you add, but it is better with a skein too many than too few.

All yarns will have excess fibres (from production) that might come off as lint or shedding. Brushed yarns (ie hairier yarns) have more of these loose, excess fibres, causing more shedding.

Shedding also depends on what is worn under or over the garment, and whether this pulls at the yarn fibres. It’s therefore not possible to guarantee that there will be no shedding

Below are some tips on how to get the best result when working with hairier yarns:

1. When the garment is finished (before you wash it) shake it vigorously so the looser hairs come off. NOTE: do NOT use a lint roller, brush or any method that pulls at the yarn.

2. Place the garment in a plastic bag and put it in your freezer - the temperature will cause the fibres to become less attached to each other, and excess fibres will come off easier.

3. Leave in the freezer for a few hours before taking it out and shaking it again.

4. Wash the garment according to the instructions on the yarn label.

Pilling is a natural process that happens to even the most exclusive of fibers. It's a natural sign of wear and tear that is hard to avoid, and that is most visible in high friction areas of your garment like a sweater's arms and cuffs.

You can make your garment look as new by removing the pilling, using a fabric comb or a pill/lint remover.

Still can't find the answer you need? Then scroll down and leave your question so one of our experts can try to help you. This will be done normally within 5 to 10 working days.
In the meantime, you can read the questions and answers that others have left to this pattern or join the DROPS Workshop on Facebook to get help from fellow knitters/crocheters!

You might also like...

Post a comment to pattern DROPS 250-15

We would love to hear what you have to say about this pattern!

If you want to leave a question, please make sure you select the correct category in the form below, to speed up the answering process. Required fields are marked *.

Comments / Questions (9)

country flag Barbara wrote:

Hallo :-) ... geniale Idee die Größen zu markieren, große Arbeitserleichterung. LG Barbara

29.04.2024 - 13:21

country flag Corina Avram wrote:

Hello! I can’t seem to fit the back piece in the difference between the part I cast off for armhole and the part the top is 42cm (size S). I calculated and there are less then 10 cm available to fit 48 rows needed to reach the increase for the shoulders. By the time I am done with the increases my back piece is 48cm. Where I am doing it wrong? Thanks.

21.04.2024 - 15:57

DROPS Design answered:

Dear Corina, the increases are worked at the same time as the decreases for the neck, so you can still be working the increases for 5 more cm when you start decreasing for the neck at the 42cm mark. There is nothing wrong, you just have to be working both simultaneously. Happy knitting!.

22.04.2024 - 01:00

country flag Corina wrote:

Hello. The increase for shoulder in size S is done every 8th row. Does that mean that I count the purl row too, or only the knit ones? In other words are the increases added only on the right side? Thanks

20.04.2024 - 15:40

DROPS Design answered:

Dear Corina, yes, you count all the rows, unless pattern specifies otherwise (for example "Every row from the RS", but not with this pattern). Here you count all the rows. Happy Knitting!

20.04.2024 - 22:57

country flag Corina wrote:

Thank for the explanation. Now if the pattern is worked back and forth, is the diagram followed only from the right side? To my inexperienced eye, it looks like there’s an extra knit row in between the rows in the diagram. Please advise, thank you!

20.04.2024 - 06:48

DROPS Design answered:

Hi Corine, the diagram shows all rows of your fabric (see from right side). Odd rows (1,3,5..) of the pattern are worked from right side. Even rows (2,4, 6…) are worked from wrong side. You are right: rows 4 and 8 are purled from the wrong side. How to read the knitting diagram you will find HERE. Happy knitting!

20.04.2024 - 08:27

country flag Corina wrote:

Hello! I am about half way through the work with this top, but I don’t see (or I missed it completely) the explanations for the armhole sides. There is a rib around thr armhole in the picture. How is that one knitted? Thanks

19.04.2024 - 20:54

DROPS Design answered:

Dear Corina, The pattern tells you (on the body) "When piece measures 30-31-32-33-34-35 cm, work 2 ridges in GARTER STITCH - read explanation above - over the 20-20-30-30-30-30 stitches in each side (= 10-10-15-15-15-15 stitches in garter stitch on each side of marker thread in each side)" and then later (on the back): "Continue with pattern and 3 stitches in garter stitch in each side. ". Those stitches that knitted with garter stitch for the edge around the armhole. I hope this helps. Happy Knitting!

19.04.2024 - 23:23

country flag Corina Avram wrote:

Hi! I slipped both sides on the same 3.5 mm needle, hut how do I join the work? Right now they are just 2 separe parts on the same needle. Thanks for the help.

17.04.2024 - 11:30

DROPS Design answered:

Dear Mrs Avram, work the front piece from RS, then do not turn as before, just work the stitches of back piece from WS, then after the last stitch on back piece, join piece in the round and continue working. Happy knitting!

17.04.2024 - 12:42

country flag Kate Joyce wrote:

Explanation needed on A1 diagram. The black square within the square has the same explanation as line going through 3 squares. What does line through 3 squares really mean. Thanks

14.04.2024 - 23:12

DROPS Design answered:

Dear Kate, there is a typo in the chart abbreviations, thank you for the comment; we shall change the online version as soon as possible. It should be: slip 1 as if to knit, knit 2, pass the slipped stitch over the 2 knitted stitches. Happy knitting!

14.04.2024 - 23:59

country flag MArieka wrote:

Ice cream

19.01.2024 - 15:28

country flag AndreaW wrote:

"Forever Young"

19.01.2024 - 09:19