
Popular categories
Looking for a yarn?


|
|||||||||||||||||||
Sand Diamond |
|||||||||||||||||||
 |
 |
||||||||||||||||||
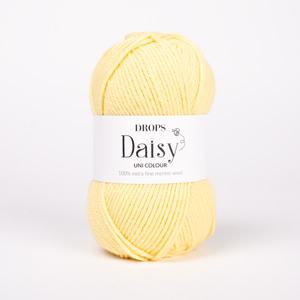
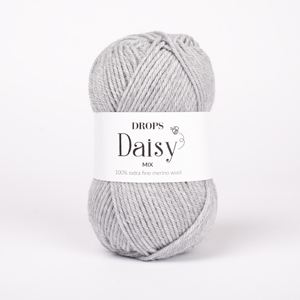
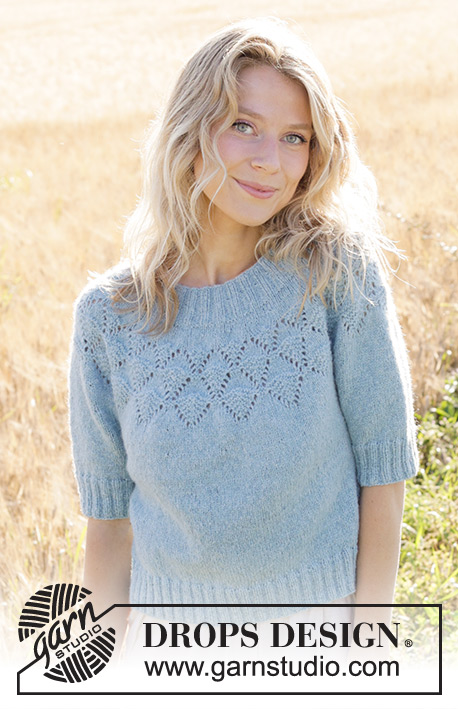
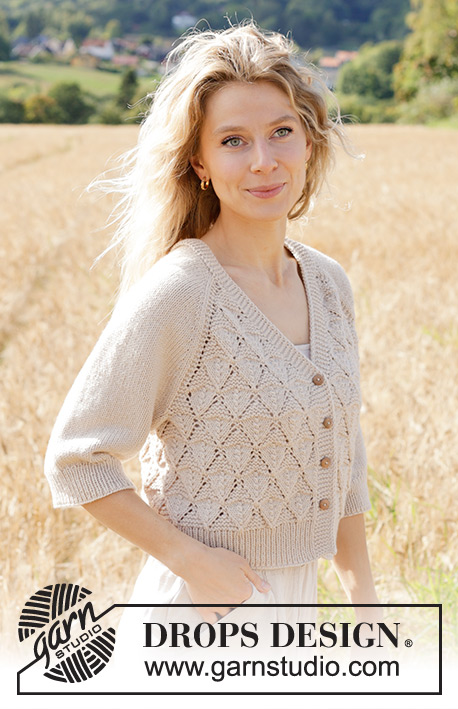
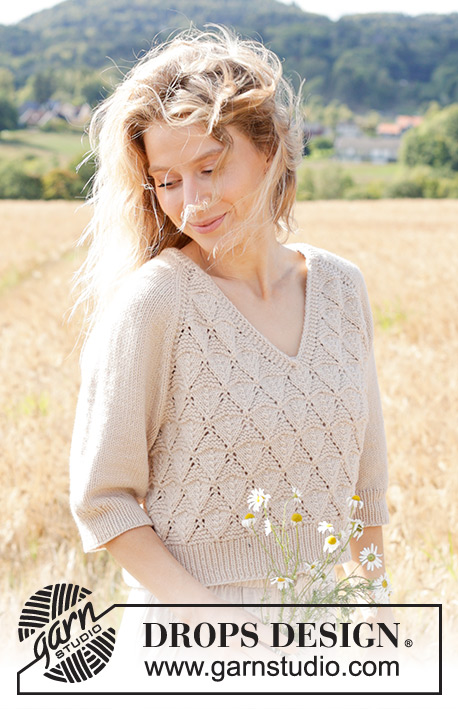
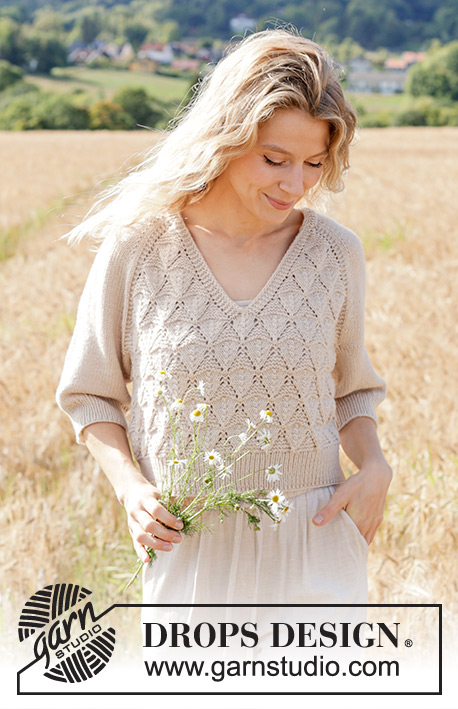
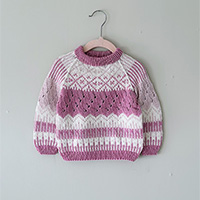
Knitted jumper in DROPS Daisy or DROPS Merino Extra Fine. The piece is worked top down with raglan, V-neck, lace pattern and ¾-length sleeves. Sizes S - XXXL.
DROPS 248-6 |
|||||||||||||||||||
|
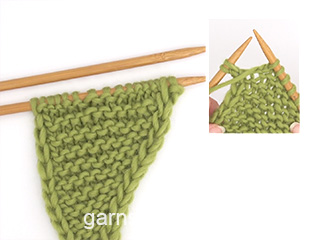
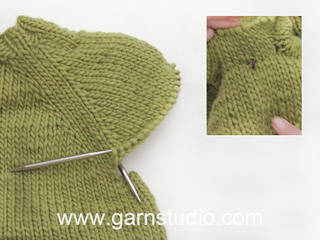
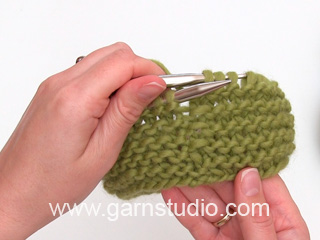
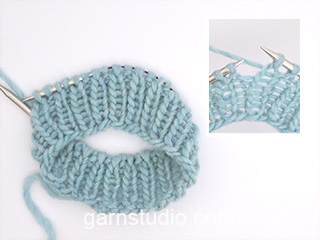
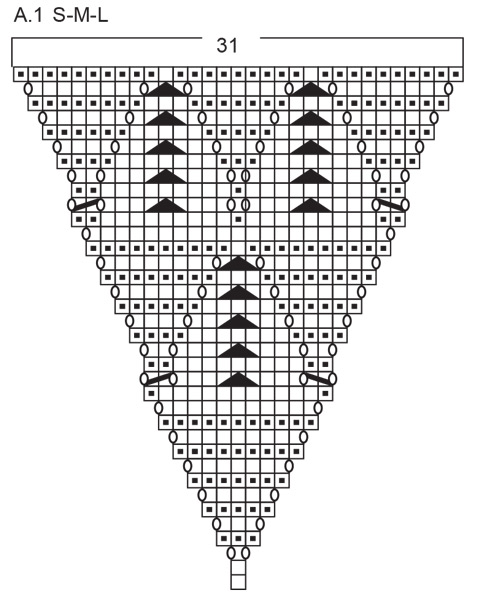
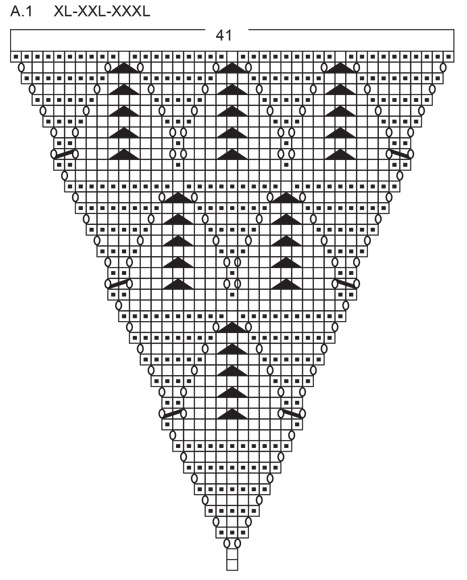
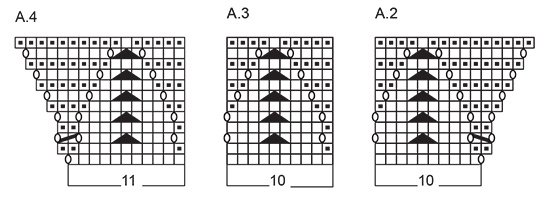
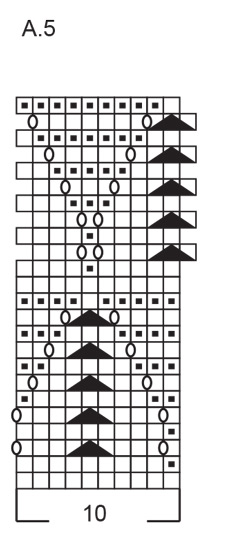
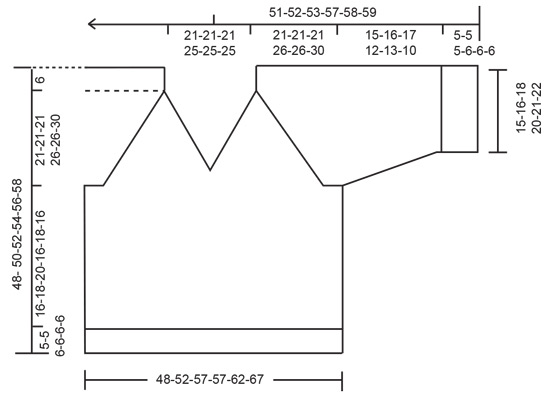
------------------------------------------------------- EXPLANATIONS FOR THE PATTERN: ------------------------------------------------------- GARTER STITCH (worked back and forth): Knit all rows, from both the right and wrong side. 1 ridge in height = knit 2 rows. GARTER STITCH (worked in the round): 1 ridge vertically = 2 rounds, i.e. knit 1 round and purl 1 round. PATTERN: See diagrams A.1 to A.5. The diagrams show all rows in the pattern seen from the right side. See diagram for your size in A.1. RIGHT BAND WITH I-CORD: RIGHT SIDE: Work 9 garter stitches, slip 1 stitch purl-wise with strand in front, knit 1. WRONG SIDE: Slip 1 stitch purl-wise with strand in front, knit 1, 9 garter stitches. LEFT BAND WITH I-CORD: RIGHT SIDE: Slip 1 stitch purl-wise with strand in front, knit 1, 9 garter stitches. WRONG SIDE: Work 9 garter stitches, slip 1 stitch purl-wise with strand in front, knit 1. RAGLAN: Increase 1 stitch by making 1 yarn over, which is worked twisted on the next round/row. The new stitches are then worked in stocking stitch. DECREASE TIP (for sleeves): Decrease 1 stitch on each side of the marker-stitch as follows: Work until there are 2 stitches left before the marker-stitch, knit 2 together, knit 1 (= marker-stitch), slip 1 stitch knit-wise, knit 1 and pass the slipped stitch over the knitted stitch. ------------------------------------------------------- START THE PIECE HERE: ------------------------------------------------------- JUMPER - SHORT OVERVIEW OF THE PIECE: The pattern uses both long and short needles; start with the length which fits the number of stitches and change when necessary. The piece is started back and forth, top down. When the V-neck is finished, continue working in the round with circular needle. Start by working 2 loose bands, then cast on stitches for the neckline between the bands and work the yoke back and forth. When the yoke is finished, divide for the body and sleeves. Continue the body in the round, while the sleeves wait. The sleeves are then worked in the round. The bands are sewn together mid-back, then sewn to the neckline. RIGHT BAND (when the garment is worn): Cast on 11 stitches with circular needle size 4 mm. Work RIGHT BAND WITH I-CORD – read description above, back and forth for 4 cm. Now knit together the first 2 stitches from the right side. Decrease like this every 3 cm a total of 5 times = 6 band stitches. Continue working until the band measures 21-21-21-23-23-23 cm, finishing after a row from the wrong side. Cut the strand and lay the piece to one side. LEFT BAND (when the garment is worn): Cast on 11 stitches with circular needle size 4 mm. Work LEFT BAND WITH I-CORD – read description above, back and forth for 4 cm. Now knit together the last 2 stitches from the right side. Decrease like this every 3 cm a total of 5 times = 6 band stitches. Continue working until the band measures 21-21-21-23-23-23 cm, finish after a row from the right side. Do not cut the strand. Cast on 99-99-99-113-113-113 stitches at the end of the row, then work the 6 stitches from the right band = 111-111-111-125-125-125 stitches. Work 1 row from the wrong side, purling the 99-99-99-113-113-113 cast on stitches and working the 6 band-stitches on each side as before. INFORMATION BEFORE CONTINUING: Lace pattern is now worked on the front piece, first according to diagram A.1, then A.2, A.3 and A.4. Lace pattern is worked on the back piece according to diagrams A.2, A.3 and A.4. The increases for the V-neck and raglan are drawn into the diagrams. When A.2, A.3 and A.4 have been worked 1 time in height, work 1 more repeat of A.3 between A.2 and A.4. The sleeves are worked in stocking stitch and increased as described under RAGLAN – read description above. The increases are inside 2 stocking stitches on each side of the sleeves and are worked every 2nd row 4-3-2-11-7-6 times, then every 4th row/round 10-13-13-12-14-17 times = 14-16-15-23-21-23 increases on each side of each sleeve. YOKE: REMEMBER THE KNITTING TENSION! Work the first row as follows from the right side: 6 band stitches as before, A.1, work 2 GARTER STITCHES – read description above (= left front piece), knit 2, increase 1 stitch for RAGLAN - read description above, 20-20-20-22-22-22 stocking stitches, increase 1 stitch for raglan, knit 2 (= left sleeve), 2 garter stitches, A,2, A.3 over the next 20-20-20-30-30-30 stitches, A.4, 2 garter stitches (= back piece), knit 2, increase 1 stitch for raglan, 20-20-20-22-22-22 stocking stitches, increase 1 stitch for raglan, knit 2 (= right sleeve), 2 garter stitches, A.1, 6 band stitches as before (= right front piece). There are 9 stitches on each front piece, 26-26-26-28-28-28 stitches on each sleeve (including the yarn overs and 2 stocking stitches on each side) and 45-45-45-55-55-55 stitches on the back piece. Continue this pattern and increase for raglan as described above. When A.1 has been worked 1 time in height, there are 39-39-39-49-49-49 stitches on each front piece and 75-75-75-85-85-85 stitches on the back piece. Cut the strand. Continue in the round over all stitches. Move the necessary stitches onto the right needle, without working them, until the beginning of the round is in the transition between the back piece and the right sleeve (between 2 garter stitches and 2 knitted stitches). Continue as follows: Knit and increase as before over the stitches on the right sleeve, work 2 garter stitches, 1 yarn over, work the first 33-33-33-43-43-43 stitches from the right front piece, place the next 4 stitches on an extra needle in front of the piece (= all stitches from the right front piece are now either worked or on the extra needle), knit the next 4 stitches together 2 and 2 (= first 4 stitches on the left front piece), knit together the first 2 stitches from the extra needle and knit the other 2 stitches (3 decreased stitches mid-front), work the next 33-33-33-43-43-43 stitches from the left front piece, make 1 yarn over, 2 garter stitches, work and increase as before over the left sleeve, 2 garter stitches, work A.2, A.3 over the next 50-50-50-60-60-60 stitches, A.4, work 2 garter stitches. The first round in A.2, A.3 and A.4 has been worked on the front and back pieces. Start on round 2 in diagrams A.2, A.3 and A.4 and work in the round over all stitches as follows: Knit and increase as before over the stitches on the right sleeve, work 2 GARTER STITCHES – read explanation above, A.2, A.3 over the next 50-50-50-60-60-60 stitches, A.4, 2 garter stitches, knit and increase as before over the stitches on the left sleeve, work 2 garter stitches, A.2, A.3 over the next 50-50-50-60-60-60 stitches, A.4, 2 garter stitches. Continue this pattern and increases until you have worked 1-2-2-1-1-2 repeats of A.2, A.3 and A.4 over A.1. There are now 85-95-95-105-105-115 stitches on the front/back pieces and 52-56-54-72-68-72 stitches on each sleeve, a total of 274-302-298-354-346-374 stitches. The yoke measures approx. 23-27-27-32-32-36 cm from the shoulder. Sizes M-L-XL-XXL and XXXL are finished; go to DIVIDE FOR BODY AND SLEEVES. SIZE S: Work 1 repeat in height without increasing as follows: Knit the right sleeve, work 2 garter stitches, A.3 over the next 70 stitches, work the first stitch in A.3, 2 garter stitches, knit over the left sleeve, 2 garter stitches, A.3 over the next 70 stitches, work the first stitch in A.3, 2 garter stitches. The yoke measures approx. 27 cm from the shoulder. DIVIDE FOR BODY AND SLEEVES – ALL SIZES: Place the first 52-56-54-72-68-72 stitches on a thread for the sleeve, cast on 15-15-25-15-25-25 stitches under the sleeve, knit 85-95-95-105-105-115 (front piece), place the next 52-56-54-72-68-72 stitches on a thread for the sleeve, cast on 15-15-25-15-25-25 stitches under the sleeve, knit the last 85-95-95-105-105-115 stitches (back piece). BODY: 200-220-240-240-260-280 stitches. Start with round 14-2-2-2-2-2 in A.5, and continue the pattern in the round until the body measures 16-18-20-16-18-16 cm, finishing after a whole or half repeat of A.5 in height. Change to circular needle size 3 mm. Work rib (knit 1, purl 1), AT THE SAME TIME increase 42-42-48-48-48-58 stitches evenly on round 1 = 242-262-288-288-308-338 stitches. When the rib measures 5-5-5-6-6-6 cm, cast off. The jumper measures approx. 48-50-52-54-56-58 cm from the shoulder. SLEEVES: Place the 52-56-54-72-68-72 stitches from the thread on one side of the piece on circular needle size 4 mm and knit up 1 stitch in each of the 15-15-25-15-25-25 stitches cast on under the sleeve = 67-71-79-87-93-97 stitches. Insert 1 marker in the middle stitch of the 15-15-25-15-25-25 stitches under the sleeve – start the round just before this marker-stitch. Work stocking stitch in the round. When the sleeve measures 3 cm from the division, decrease under the sleeve – read DECREASE TIP, repeat this decrease when the sleeve measures 8-8-9-6-6-6 cm = 63-67-75-83-89-93 stitches. Work until the sleeve measures 15-16-17-12-13-10 cm from the division. Change to double pointed needles size 3 mm. Work rib (knit 1, purl 1), AT THE SAME TIME increase 13-13-15-17-19-19 stitches evenly on round 1 = 76-80-90-100-108-112 stitches. Cast off when the rib measures 5-5-5-6-6-6 cm. ASSEMBLY: Sew the bands together mid-back, then sew the bands to the neckline. |
|||||||||||||||||||
Diagram explanations |
|||||||||||||||||||
|
|||||||||||||||||||
|
|||||||||||||||||||
|
|||||||||||||||||||
|
|||||||||||||||||||
|
|||||||||||||||||||
|
|||||||||||||||||||
|
Have you made this or any other of our designs? Tag your pictures in social media with #dropsdesign so we can see them! Do you need help with this pattern?You'll find tutorial videos, a Comments/Questions area and more by visiting the pattern on garnstudio.com. © 1982-2024 DROPS Design A/S. We reserve all rights. This document, including all its sub-sections, has copyrights. Read more about what you can do with our patterns at the bottom of each pattern on our site. |
|||||||||||||||||||

With over 40 years in knitting and crochet design, DROPS Design offers one of the most extensive collections of free patterns on the internet - translated to 17 languages. As of today we count 304 catalogues and 11422 patterns - 11422 of which are translated into English (UK/cm).
We work hard to bring you the best knitting and crochet have to offer, inspiration and advice as well as great quality yarns at incredible prices! Would you like to use our patterns for other than personal use? You can read what you are allowed to do in the Copyright text at the bottom of all our patterns. Happy crafting!
Comments / Questions (31)
Hej jeg strikker denne i str L! Jeg har nu strikket A 2, A 3 og A 4 een gang i højden. Hvordan strikker jeg en rapport mere af A3 mellem A2 og A4? For at nå hertil og for at få maskeantal passe, har jeg strikket følgende rapport: A2, A3, A3, A4 Hvordan får jeg plads til yderlige rapport med A3 mellem A2 og A4? Mvh Kirsten
27.04.2024 - 20:30Jeg har svært med at få startet. Skal diagram A3 strikkes 2 gange efter hinanden ( A2, A3,A3, A4)? Jeg kan ikke få maskeantallet til at passe på bagstykket. Mvh Kirsten
26.04.2024 - 13:43DROPS Design answered:
Hej Kirsten, Vi beskriver første pind nede ved BÆRESTYKKET. Vi kan hjælpe dig med første pind hvis du skriver hvilken størrelse du strikker :)
26.04.2024 - 14:07Jak odczytać schemat A.2 do A.5 w pracy na okrągło? Jesteśmy cały czas na prawej stronie robótki i mam robić cały czas prawe oczka? Tak wychodzi ze schematu? Proszę o pomoc
22.04.2024 - 13:59DROPS Design answered:
Witaj Magdo, podczas pracy na okrągło jesteśmy cały czas na prawej stronie robótki. Oczka z czarnym kwadracikiem w środku są przerabiane na lewo, a oczka bez wypełnienia na prawo. Pozdrawiamy!
22.04.2024 - 14:53Aansluitend op het antwoord van mijn voorgaande vraag, dan zit er een fout in het patroon. Want bij XL moet je A3 over de volgende 30 steken steken breien bij de start , dus begin je al met 51 steken. Dan kan je na 1 herhaling van A2, A3 en A4, met 15 meerderingen nooit op 55 steken uitkomen, maar op 66 steken
08.04.2024 - 09:11DROPS Design answered:
Dag Suleika,
Na 1 herhaling van A.2, A.3 en A.4 heb je in totaal 10 steken gemeerderd over die telpatronen en niet 15.
10.04.2024 - 09:42J’ai fait les deux bordures et monte les 99 m.; et les bords extérieurs sont avec le I cord ; c’est correct?
06.04.2024 - 20:59DROPS Design answered:
Bonjour Mme Bérard, tout à fait, ces bordures i-cord vont continuer le long de l'encolure V. Bon tricot!
08.04.2024 - 07:58Hallo, ik heb geen antwoord gekregen, op mijn vraag waarom ik 95 steken heb aan het rugpand ipv 85 bij XL. Als je het diagram aanhoudt meerder je toch tot 95 steken voorraad het achterpand? Ik heb die vraag bij nog iemand zien staan, maar dat was in het Duits waarvan ik het antwoord niet begreep..
06.04.2024 - 15:52DROPS Design answered:
Dag Suleika,
Nadat je de telpatronen 1 keer verticaal hebt gebreid, zijn er 55 steken op het achterpand. Brei deze steken + de telpatronen vervolgens nog 3 keer in de hoogte = 3 keer x 5 meerderingen aan elke kant = 30 steken in totaal gemeerderd meerderingen. Hiermee kom je op 85 steken in totaal.
07.04.2024 - 18:41Kunnen jullie het gedeelte van de pas verduidelijken van de 4 steken die op een extra naald aan de voorkant gezet moeten worden? Nadat je 43 ( XL) steken hebt gebreid van het rechtervoorpand. Ik heb op die plek 6 steken van de voorbies over en geen 4 en ik snap niet wat jullie bedoelen met een extra naald aan de voorkant? Ben geen beginnende breien, maar hier kom ik niet uit..
01.04.2024 - 20:14DROPS Design answered:
Dag Suleika,
Je zet 4 steken op een hulpnaald (je zou hiervoor ook een kabelnaad kunnen gebruiken. Dan brei je de volgende 4 steken 2 aan 2 samen. Dan pak je weer de steken van de hulpnaald of kabelnaad. Hiervan brei je je 2 steken samen en de andere 2 steken brei je recht.
03.04.2024 - 20:46Hoe kan het dat ik voor maat XL, na diagram A1 1 x te hebben gebreid, 95 steken voor het achterpand heb ipv 85. Je blijft A4, A3 en A2 toch herhalen gedurende het hele A1 diagram? Dus dan moet je A3 toch uitbreiden?
01.04.2024 - 18:05Hi , I am trying this jumper (Size M) and encountered a problem while knitting first round of yoke. Initially we have 6 on both sides + 99 = 111. there are 4 increases, with that we have 115. However in A2(10) and A4(11) including a yarn over at the end. If i do that I am left with 2 extra stiches. because for A2 (9 + 1 from YO) A4(10+YO) but initially we had 111. so 2 stiches are left extra. could you please help me how to handle A2 and A4 first row YO?
28.03.2024 - 19:21DROPS Design answered:
Dear Sri, there are 111 sts and you work diagrams increasing as shown in diagrams + increase on sleeves a total of 16 times (3 times on every 2nd row +13 times on every 4th row/round). On very first row you only increase on sleeve + in A.2 and in A.4, not in A.1 where increases for diagrams start with 3rd row (= you increase a total of 6 sts: 2 sts on each sleeve + 1 stitch on each A.2/A.4), then just continue increasing as shown in diagrams. Hope this can help and that I didn't misunderstand your question. Happy knitting!
02.04.2024 - 13:56Hello! I’m having a hard time picturing the structure of the sweater. I finished the right and left bands and did the 99 cast on stitches. But where does this neckline part of the sweater get joined? Which part eventually becomes the “v” part of the v neck - the center of those cast on stitches or the foundation stitches of the right and left bands? I watched the tutorial videos but it’s still confusing. Thank you!
26.03.2024 - 23:04DROPS Design answered:
Dear Ksenya, after you join the bands (wich will be later sewn together and sewn on to the neckine on the back), you continue to knit the bands' stitches with garter stitch and increase stitches to shape the V neck (and the raglans at the same time). After you inrease enough stitches to the V neckine, you join the two fronts. I hope this helps. Happy Knitting.
27.03.2024 - 10:05