
Popular categories
Looking for a yarn?


|
|||||||||||||||||||
Sand Diamond |
|||||||||||||||||||
 |
 |
||||||||||||||||||
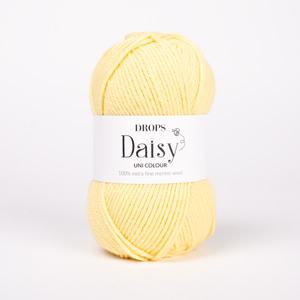
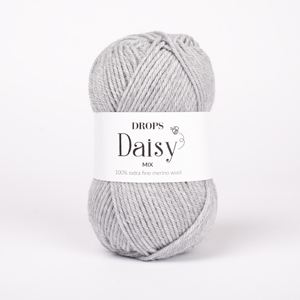
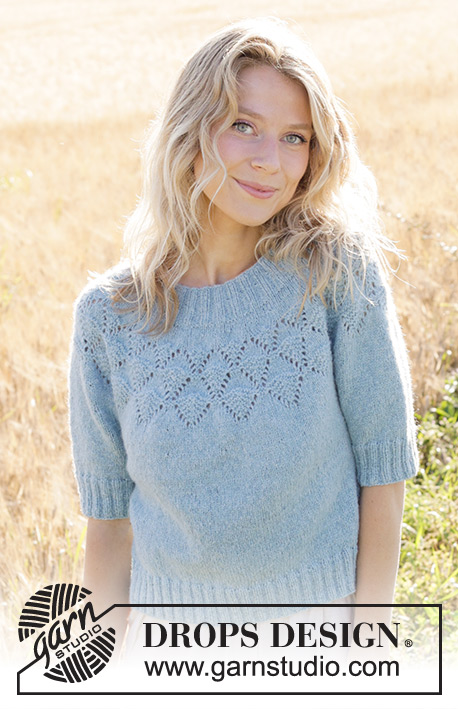
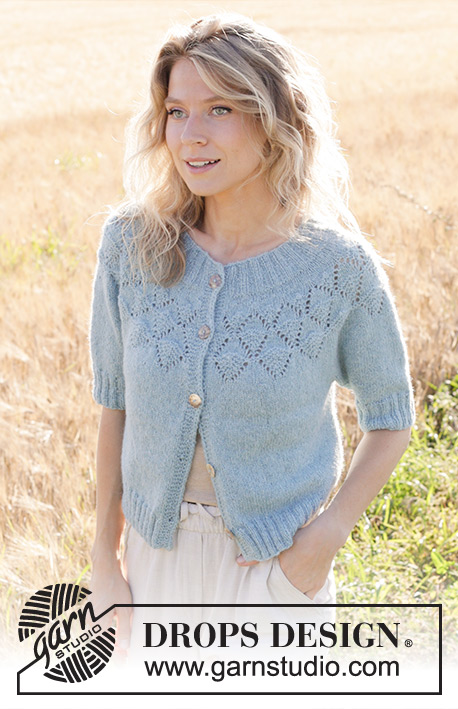
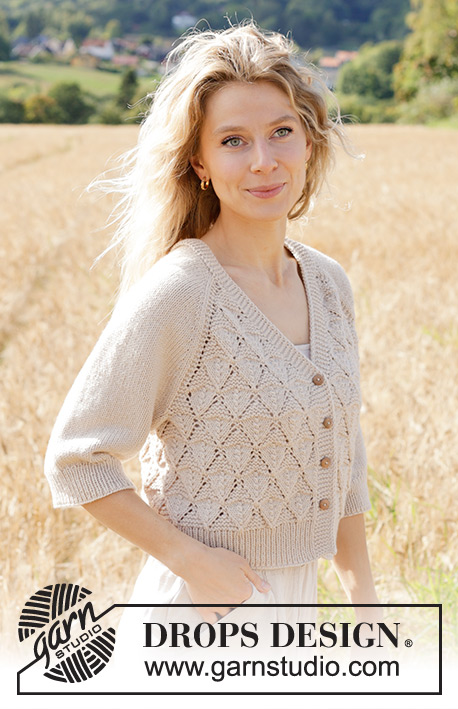
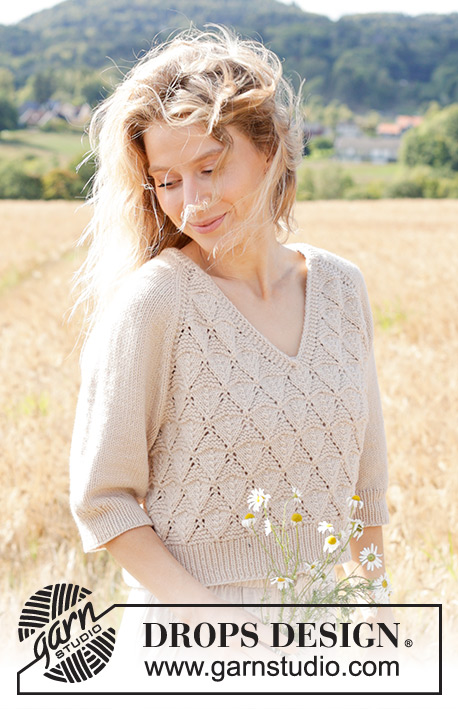
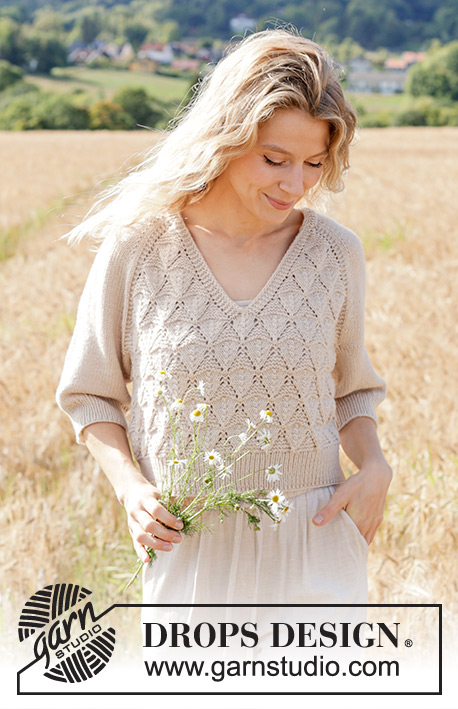
Knitted jumper in DROPS Daisy or DROPS Merino Extra Fine. The piece is worked top down with raglan, V-neck, lace pattern and ¾-length sleeves. Sizes S - XXXL.
DROPS 248-6 |
|||||||||||||||||||
|
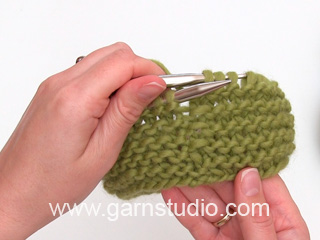
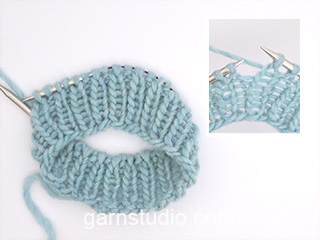
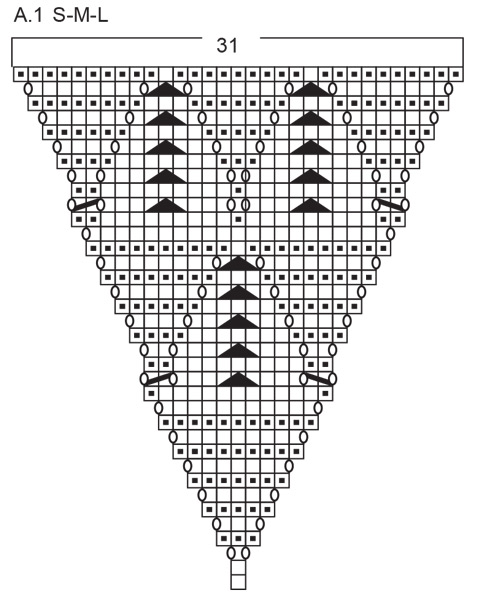
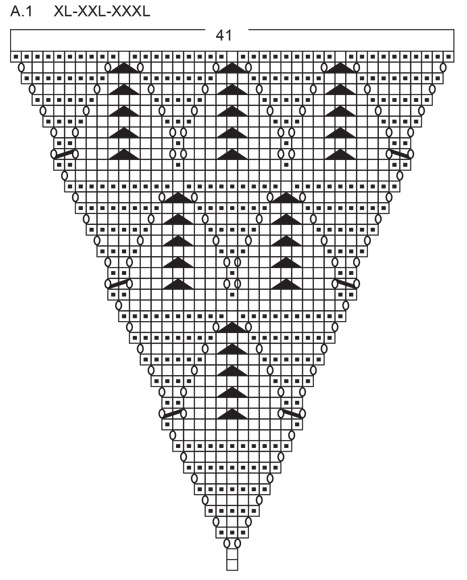
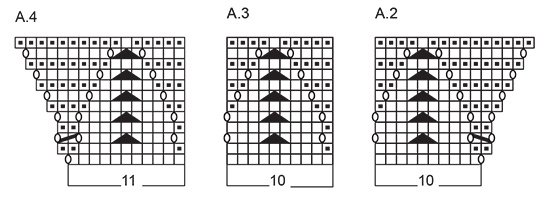
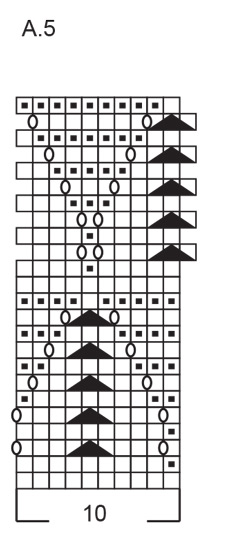
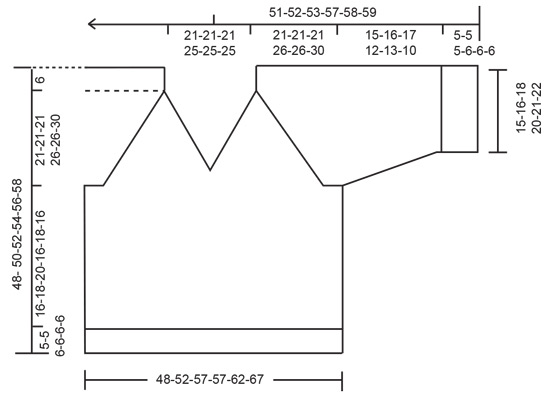
------------------------------------------------------- EXPLANATIONS FOR THE PATTERN: ------------------------------------------------------- GARTER STITCH (worked back and forth): Knit all rows, from both the right and wrong side. 1 ridge in height = knit 2 rows. GARTER STITCH (worked in the round): 1 ridge vertically = 2 rounds, i.e. knit 1 round and purl 1 round. PATTERN: See diagrams A.1 to A.5. The diagrams show all rows in the pattern seen from the right side. See diagram for your size in A.1. RIGHT BAND WITH I-CORD: RIGHT SIDE: Work 9 garter stitches, slip 1 stitch purl-wise with strand in front, knit 1. WRONG SIDE: Slip 1 stitch purl-wise with strand in front, knit 1, 9 garter stitches. LEFT BAND WITH I-CORD: RIGHT SIDE: Slip 1 stitch purl-wise with strand in front, knit 1, 9 garter stitches. WRONG SIDE: Work 9 garter stitches, slip 1 stitch purl-wise with strand in front, knit 1. RAGLAN: Increase 1 stitch by making 1 yarn over, which is worked twisted on the next round/row. The new stitches are then worked in stocking stitch. DECREASE TIP (for sleeves): Decrease 1 stitch on each side of the marker-stitch as follows: Work until there are 2 stitches left before the marker-stitch, knit 2 together, knit 1 (= marker-stitch), slip 1 stitch knit-wise, knit 1 and pass the slipped stitch over the knitted stitch. ------------------------------------------------------- START THE PIECE HERE: ------------------------------------------------------- JUMPER - SHORT OVERVIEW OF THE PIECE: The pattern uses both long and short needles; start with the length which fits the number of stitches and change when necessary. The piece is started back and forth, top down. When the V-neck is finished, continue working in the round with circular needle. Start by working 2 loose bands, then cast on stitches for the neckline between the bands and work the yoke back and forth. When the yoke is finished, divide for the body and sleeves. Continue the body in the round, while the sleeves wait. The sleeves are then worked in the round. The bands are sewn together mid-back, then sewn to the neckline. RIGHT BAND (when the garment is worn): Cast on 11 stitches with circular needle size 4 mm. Work RIGHT BAND WITH I-CORD – read description above, back and forth for 4 cm. Now knit together the first 2 stitches from the right side. Decrease like this every 3 cm a total of 5 times = 6 band stitches. Continue working until the band measures 21-21-21-23-23-23 cm, finishing after a row from the wrong side. Cut the strand and lay the piece to one side. LEFT BAND (when the garment is worn): Cast on 11 stitches with circular needle size 4 mm. Work LEFT BAND WITH I-CORD – read description above, back and forth for 4 cm. Now knit together the last 2 stitches from the right side. Decrease like this every 3 cm a total of 5 times = 6 band stitches. Continue working until the band measures 21-21-21-23-23-23 cm, finish after a row from the right side. Do not cut the strand. Cast on 99-99-99-113-113-113 stitches at the end of the row, then work the 6 stitches from the right band = 111-111-111-125-125-125 stitches. Work 1 row from the wrong side, purling the 99-99-99-113-113-113 cast on stitches and working the 6 band-stitches on each side as before. INFORMATION BEFORE CONTINUING: Lace pattern is now worked on the front piece, first according to diagram A.1, then A.2, A.3 and A.4. Lace pattern is worked on the back piece according to diagrams A.2, A.3 and A.4. The increases for the V-neck and raglan are drawn into the diagrams. When A.2, A.3 and A.4 have been worked 1 time in height, work 1 more repeat of A.3 between A.2 and A.4. The sleeves are worked in stocking stitch and increased as described under RAGLAN – read description above. The increases are inside 2 stocking stitches on each side of the sleeves and are worked every 2nd row 4-3-2-11-7-6 times, then every 4th row/round 10-13-13-12-14-17 times = 14-16-15-23-21-23 increases on each side of each sleeve. YOKE: REMEMBER THE KNITTING TENSION! Work the first row as follows from the right side: 6 band stitches as before, A.1, work 2 GARTER STITCHES – read description above (= left front piece), knit 2, increase 1 stitch for RAGLAN - read description above, 20-20-20-22-22-22 stocking stitches, increase 1 stitch for raglan, knit 2 (= left sleeve), 2 garter stitches, A,2, A.3 over the next 20-20-20-30-30-30 stitches, A.4, 2 garter stitches (= back piece), knit 2, increase 1 stitch for raglan, 20-20-20-22-22-22 stocking stitches, increase 1 stitch for raglan, knit 2 (= right sleeve), 2 garter stitches, A.1, 6 band stitches as before (= right front piece). There are 9 stitches on each front piece, 26-26-26-28-28-28 stitches on each sleeve (including the yarn overs and 2 stocking stitches on each side) and 45-45-45-55-55-55 stitches on the back piece. Continue this pattern and increase for raglan as described above. When A.1 has been worked 1 time in height, there are 39-39-39-49-49-49 stitches on each front piece and 75-75-75-85-85-85 stitches on the back piece. Cut the strand. Continue in the round over all stitches. Move the necessary stitches onto the right needle, without working them, until the beginning of the round is in the transition between the back piece and the right sleeve (between 2 garter stitches and 2 knitted stitches). Continue as follows: Knit and increase as before over the stitches on the right sleeve, work 2 garter stitches, 1 yarn over, work the first 33-33-33-43-43-43 stitches from the right front piece, place the next 4 stitches on an extra needle in front of the piece (= all stitches from the right front piece are now either worked or on the extra needle), knit the next 4 stitches together 2 and 2 (= first 4 stitches on the left front piece), knit together the first 2 stitches from the extra needle and knit the other 2 stitches (3 decreased stitches mid-front), work the next 33-33-33-43-43-43 stitches from the left front piece, make 1 yarn over, 2 garter stitches, work and increase as before over the left sleeve, 2 garter stitches, work A.2, A.3 over the next 50-50-50-60-60-60 stitches, A.4, work 2 garter stitches. The first round in A.2, A.3 and A.4 has been worked on the front and back pieces. Start on round 2 in diagrams A.2, A.3 and A.4 and work in the round over all stitches as follows: Knit and increase as before over the stitches on the right sleeve, work 2 GARTER STITCHES – read explanation above, A.2, A.3 over the next 50-50-50-60-60-60 stitches, A.4, 2 garter stitches, knit and increase as before over the stitches on the left sleeve, work 2 garter stitches, A.2, A.3 over the next 50-50-50-60-60-60 stitches, A.4, 2 garter stitches. Continue this pattern and increases until you have worked 1-2-2-1-1-2 repeats of A.2, A.3 and A.4 over A.1. There are now 85-95-95-105-105-115 stitches on the front/back pieces and 52-56-54-72-68-72 stitches on each sleeve, a total of 274-302-298-354-346-374 stitches. The yoke measures approx. 23-27-27-32-32-36 cm from the shoulder. Sizes M-L-XL-XXL and XXXL are finished; go to DIVIDE FOR BODY AND SLEEVES. SIZE S: Work 1 repeat in height without increasing as follows: Knit the right sleeve, work 2 garter stitches, A.3 over the next 70 stitches, work the first stitch in A.3, 2 garter stitches, knit over the left sleeve, 2 garter stitches, A.3 over the next 70 stitches, work the first stitch in A.3, 2 garter stitches. The yoke measures approx. 27 cm from the shoulder. DIVIDE FOR BODY AND SLEEVES – ALL SIZES: Place the first 52-56-54-72-68-72 stitches on a thread for the sleeve, cast on 15-15-25-15-25-25 stitches under the sleeve, knit 85-95-95-105-105-115 (front piece), place the next 52-56-54-72-68-72 stitches on a thread for the sleeve, cast on 15-15-25-15-25-25 stitches under the sleeve, knit the last 85-95-95-105-105-115 stitches (back piece). BODY: 200-220-240-240-260-280 stitches. Start with round 14-2-2-2-2-2 in A.5, and continue the pattern in the round until the body measures 16-18-20-16-18-16 cm, finishing after a whole or half repeat of A.5 in height. Change to circular needle size 3 mm. Work rib (knit 1, purl 1), AT THE SAME TIME increase 42-42-48-48-48-58 stitches evenly on round 1 = 242-262-288-288-308-338 stitches. When the rib measures 5-5-5-6-6-6 cm, cast off. The jumper measures approx. 48-50-52-54-56-58 cm from the shoulder. SLEEVES: Place the 52-56-54-72-68-72 stitches from the thread on one side of the piece on circular needle size 4 mm and knit up 1 stitch in each of the 15-15-25-15-25-25 stitches cast on under the sleeve = 67-71-79-87-93-97 stitches. Insert 1 marker in the middle stitch of the 15-15-25-15-25-25 stitches under the sleeve – start the round just before this marker-stitch. Work stocking stitch in the round. When the sleeve measures 3 cm from the division, decrease under the sleeve – read DECREASE TIP, repeat this decrease when the sleeve measures 8-8-9-6-6-6 cm = 63-67-75-83-89-93 stitches. Work until the sleeve measures 15-16-17-12-13-10 cm from the division. Change to double pointed needles size 3 mm. Work rib (knit 1, purl 1), AT THE SAME TIME increase 13-13-15-17-19-19 stitches evenly on round 1 = 76-80-90-100-108-112 stitches. Cast off when the rib measures 5-5-5-6-6-6 cm. ASSEMBLY: Sew the bands together mid-back, then sew the bands to the neckline. |
|||||||||||||||||||
Diagram explanations |
|||||||||||||||||||
|
|||||||||||||||||||
|
|||||||||||||||||||
|
|||||||||||||||||||
|
|||||||||||||||||||
|
|||||||||||||||||||
|
|||||||||||||||||||
|
Have you made this or any other of our designs? Tag your pictures in social media with #dropsdesign so we can see them! Do you need help with this pattern?You'll find tutorial videos, a Comments/Questions area and more by visiting the pattern on garnstudio.com. © 1982-2024 DROPS Design A/S. We reserve all rights. This document, including all its sub-sections, has copyrights. Read more about what you can do with our patterns at the bottom of each pattern on our site. |
|||||||||||||||||||


With over 40 years in knitting and crochet design, DROPS Design offers one of the most extensive collections of free patterns on the internet - translated to 17 languages. As of today we count 304 catalogues and 11422 patterns - 11422 of which are translated into English (UK/cm).
We work hard to bring you the best knitting and crochet have to offer, inspiration and advice as well as great quality yarns at incredible prices! Would you like to use our patterns for other than personal use? You can read what you are allowed to do in the Copyright text at the bottom of all our patterns. Happy crafting!
Comments / Questions (33)
Hi , I am trying this jumper (Size M) and encountered a problem while knitting first round of yoke. Initially we have 6 on both sides + 99 = 111. there are 4 increases, with that we have 115. However in A2(10) and A4(11) including a yarn over at the end. If i do that I am left with 2 extra stiches. because for A2 (9 + 1 from YO) A4(10+YO) but initially we had 111. so 2 stiches are left extra. could you please help me how to handle A2 and A4 first row YO?
28.03.2024 - 19:21DROPS Design answered:
Dear Sri, there are 111 sts and you work diagrams increasing as shown in diagrams + increase on sleeves a total of 16 times (3 times on every 2nd row +13 times on every 4th row/round). On very first row you only increase on sleeve + in A.2 and in A.4, not in A.1 where increases for diagrams start with 3rd row (= you increase a total of 6 sts: 2 sts on each sleeve + 1 stitch on each A.2/A.4), then just continue increasing as shown in diagrams. Hope this can help and that I didn't misunderstand your question. Happy knitting!
02.04.2024 - 13:56Hello! I’m having a hard time picturing the structure of the sweater. I finished the right and left bands and did the 99 cast on stitches. But where does this neckline part of the sweater get joined? Which part eventually becomes the “v” part of the v neck - the center of those cast on stitches or the foundation stitches of the right and left bands? I watched the tutorial videos but it’s still confusing. Thank you!
26.03.2024 - 23:04DROPS Design answered:
Dear Ksenya, after you join the bands (wich will be later sewn together and sewn on to the neckine on the back), you continue to knit the bands' stitches with garter stitch and increase stitches to shape the V neck (and the raglans at the same time). After you inrease enough stitches to the V neckine, you join the two fronts. I hope this helps. Happy Knitting.
27.03.2024 - 10:05Jag får inte bakstyckets maskantal att stämma. A2, A3 över de nästa 20 maskorna, A4 (11 maskor) Detta blir 31 maskor med ökningarna 2+2 är det 35 maskor o det borde vara 45?
22.03.2024 - 09:15DROPS Design answered:
Hej Camilla. Du stickar såhär: 2m rätstickning, A.2 (=10 m), 20 m A.3 (=A.3 x2), A.4 (=11 m), 2 m rätstickning. 2+10+20+11+2 = 45 m. Mvh DROPS Design
22.03.2024 - 09:56Guten Tag! Ich stricke Größe XL und komme bei der Passe beim Rückenteil bei den Zunahmen auf 10 Maschen mehr als in der Beschreibung angegeben. Es steht: Wenn A.2, A.3 und A.4 1 x in der Höhe gestrickt wurden, 1 Rapport mehr von A.3 zwischen A.2 und A.4 stricken. Wenn A.1 1 x in der Höhe gestrickt wurde, sind 39-39-39-49-49-49 Maschen pro Vorderteil und 75-75-75-85-85-85 Maschen für das Rückenteil vorhanden..Ich komme auf 95 Maschen! Grüße Romana Meißner
16.03.2024 - 13:36DROPS Design answered:
Liebe Frau Meißner, nach den Diagrammen 1 Mal in der Höhe gestrickt wurden, gab es 55 Maschen, dann stricken Sie diese +Diagramme noch 3 Mal in der Höhe = 3 Mal x 5 Zunahmen = 15 Zunahmen (und insgesamt 4 Mal 12 Reihen = 48 Reihen wie in A.1); und so hat man: 2 M. Krausrechts + 15 M A.2 + 50 M A.3 + 16 M A.3 + 2 M Krausrechts = 85 M. Viel Spaß beim Stricken!
18.03.2024 - 08:45Bon jour en lisant l'explication de ce model, que veut dire : AVEC I-CORD ? serait il possible de mettre en video la mise en place des bordure avec le dos et les devant ? merci
08.03.2024 - 11:42DROPS Design answered:
Bonjour Mme Tan, les 2 mailles I-cord des bordures des devants se tricotent comme on le montre dans cette vidéo en début/en fin de rang, pour la bordure d'encolure des devants. Bon tricot!
08.03.2024 - 13:39I beskrivelsen af bærestykket passer maskeantallet ikke. I str. M har man 111 masker, men ifølge beskrivelsen bruger man kun 101 masker og har således 10 masker tilovers?
06.03.2024 - 09:12DROPS Design answered:
Hei Jette Når du skal starte på bærestykket har du 111 masker (str. M) og på første pinne strikker du slik: 6 stolpemasker, A.1 (=1 maske), 2 masker retstrik, 2 rett, Øk 1 maske til raglan, 20 masker glattstrikk, øk 1 maske til raglan, 2 rett, 2 masker retstrik, A,2 (=10 masker), A.3 over de neste 20 maskene, A.4 (=11 masker), 2 masker retstrik, 2 rett, øk 1 maske til raglan, 20 masker glattstrikk, øk 1 maske til raglan, 2 rett, 2 masker retstrik, A.1 (=1 maske), 6 stolpemasker som før. Bare med tall (og uten raglanøkning) = 6+1+2+2+20+2+2+10+20+11+2+2+20+2+2+1+6=111 masker, slik det står beskrevet i oppskriften. mvh DROPS Design
11.03.2024 - 09:36Podrían explicar cómo continúa el patrón A .2- A.3- A.4 en la espalda después de la repetición A.3. o añadir una fotografía del suéter por la espalda. Talla XXXL Tal vez en la espalda no sigue la misma frecuencia que A.1?. Gracias
05.03.2024 - 12:29DROPS Design answered:
Hola María Dolores, todas las fotos que disponemos de este patrón están colgadas en esta página web. De todas formas, la espalda y el delantero se trabajan igual y todo junto en una pieza, en redondo. Trabajas A.2-A.3-A.4 sobre todo el canesú, de forma igual en el delantero y espalda hasta dividir para el cuerpo y las mangas y después trabajas A.5 sobre todos los puntos del cuerpo.
10.03.2024 - 20:18Jag får inte bakstycket att stämma i antal maskor, under delen "OK". Jag får det till att et ska vara 36 maskor totalt på bakstycket om jag stickar 2 m, A2,A3 =20m, A4=12m, 2m, Det står att det ska vara 45 m på nedersta raden. Vad gör jag för fel. Vänligen Tiina Johansson
04.03.2024 - 22:26DROPS Design answered:
Hej Tiina. Du stickar såhär: 2 m + 10 m (=A.2) + 20 m (A.3x2) + 11 m (A.4) + 2 m =45 m. Mvh DROPS Design
05.03.2024 - 07:50Kan dit patroon ook op gewone breinaalden gebreid worden? Ik ben 69 jaar en altijd op gewone breinaalden gebreid Ik kan nl. niet breien met rondbreinaalden.
04.03.2024 - 14:01DROPS Design answered:
Dag Ineke,
Om een patroon aan te passen om op rechte naalden te breien hebben we een instructie gemaakt. Deze vind je hier. Het is helaas niet geschikt voor alle patronen.
05.03.2024 - 22:48Por favor, al corregir el patrón de calados deben corregir también el recuento de puntos para que al dividir cuerpo y mangas no haya errores. Gracias
04.03.2024 - 13:19