DROPS Alpaca
DROPS Alpaca
100% Alpaca
from 3.40 £ /50g
DROPS Kid-Silk
DROPS Kid-Silk
75% Mohair, 25% Silk
from 4.60 £ /25g
Get the yarn to make this pattern from 32.00£.

The yarn cost is calculated from the pattern’s smallest size and the yarn’s cheapest product type. Looking for an even better price? You might find it on the DROPS Deals!

DROPS Super Sale

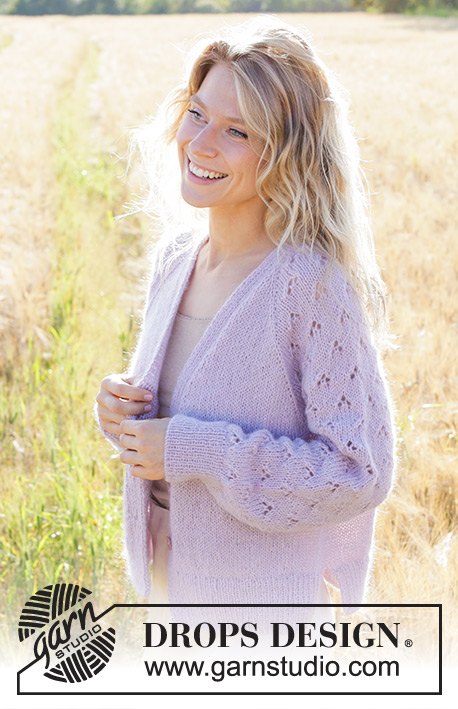
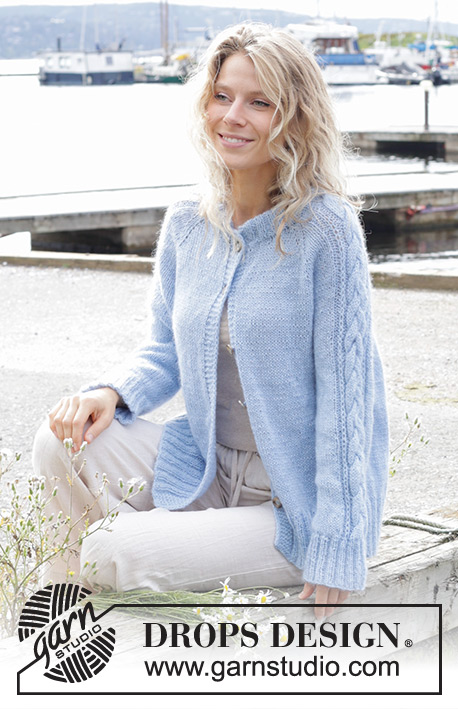
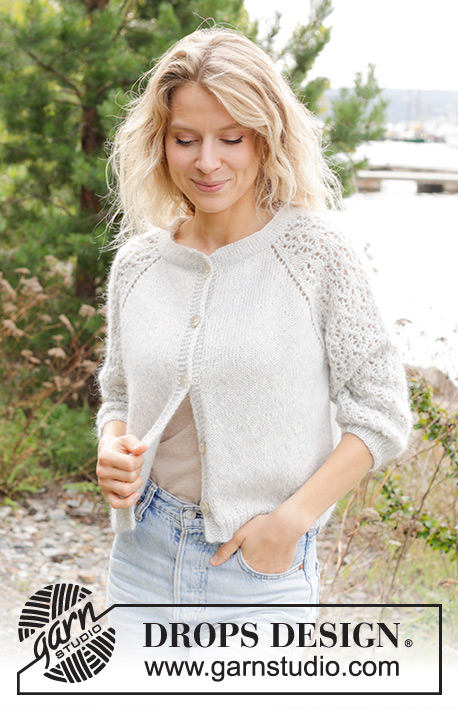
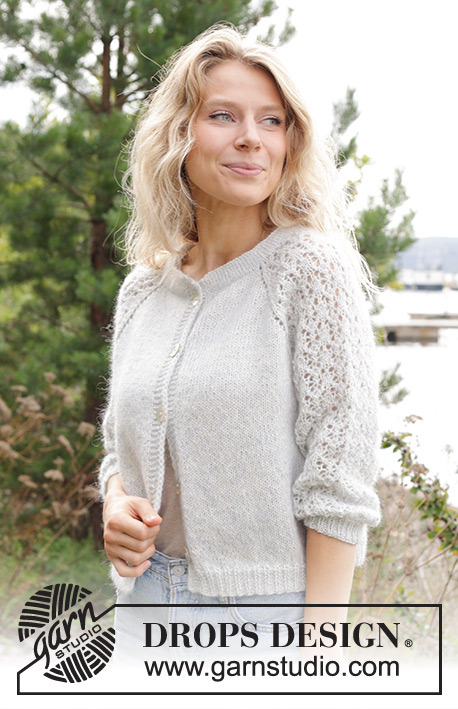
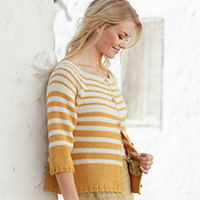
Remembering Spring Cardigan

Knitted jacket in DROPS Alpaca and DROPS Kid-Silk. The piece is worked top down with double neck, raglan, lace pattern and ¾-length sleeves. Sizes S - XXXL.

DROPS 250-2
DROPS Design: Pattern z-1016
Yarn group A + A or C
-------------------------------------------------------

SIZES:
S - M - L - XL - XXL - XXXL

YARN:
DROPS ALPACA from Garnstudio (belongs to yarn group A)
200-250-250-300-300-350 g colour 100, off white
And use:
DROPS KID-SILK from Garnstudio (belongs to yarn group A)
100-100-100-125-125-150 g colour 07, light sky blue

BUTTONS:
DROPS BUTTONS NO 522: 5-5-5-6-6-6 items.

NEEDLES:
DROPS CIRCULAR NEEDLE SIZE 4.5 MM: Length 40 cm and 80 cm.
DROPS CIRCULAR NEEDLE SIZE 3.5 MM: Length 80 cm.
DROPS DOUBLE POINTED NEEDLES SIZE 4.5 MM.
DROPS DOUBLE POINTED NEEDLES SIZE 3.5 MM.
The technique MAGIC LOOP can be used – you then only need 80 cm circular needle in each size.

KNITTING TENSION:
18 stitches in width and 24 rows in height with stocking stitch and 1 strand of each quality = 10 x 10 cm.
NOTE: Needle size is only a guide. If you get too many stitches on 10 cm, change to a larger needle size. If you get too few stitches on 10 cm, change to a smaller needle size.

-------------------------------------------------------

Alternative Yarn – See how to change yarns here
Yarn Groups A to F – Use the same pattern and change the yarn here
Yarn usage using an alternative yarn – Use our yarn converter here

-------------------------------------------------------

DROPS Alpaca
DROPS Alpaca
100% Alpaca
from 3.40 £ /50g
DROPS Kid-Silk
DROPS Kid-Silk
75% Mohair, 25% Silk
from 4.60 £ /25g
Get the yarn to make this pattern from 32.00£.

The yarn cost is calculated from the pattern’s smallest size and the yarn’s cheapest product type. Looking for an even better price? You might find it on the DROPS Deals!

Pattern instructions

NOTE: This pattern is written in British English. All measurements in charts are in cm. For conversion from cm to inches - click here. There are different terms for crocheting in British and American English. If this pattern includes crochet, click for "crochet terms" here. For this pattern in American English, please click here.
-------------------------------------------------------

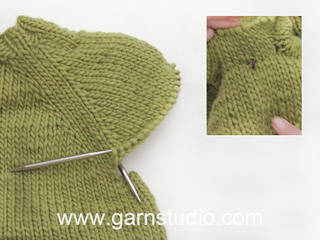
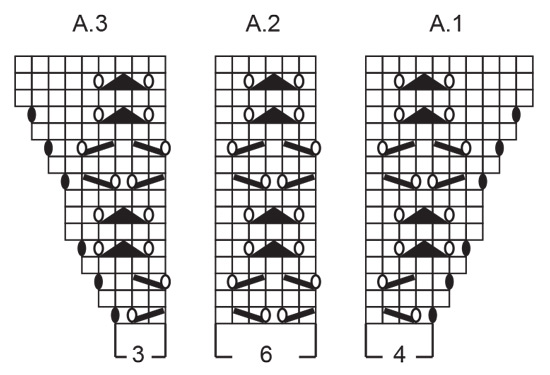
EXPLANATIONS FOR THE PATTERN:

-------------------------------------------------------

GARTER STITCH (worked back and forth):
Knit all rows, from both the right and wrong side.
1 ridge in height = knit 2 rows.

BANDS WITH I-CORD:
START OF ROW:
Work the band as follows: Slip 1 stitch purl-wise, with yarn in front, knit 1, work 4 garter stitches.
END OF ROW:
Work the band as follows: Work until there are 6 stitches left on the row, work 4 garter stitches, slip 1 stitch purl-wise with yarn in front, knit 1.
Work like this from both the right and wrong side.

PATTERN:
See diagrams A.1 to A.3. The diagrams show all the rows in the pattern seen from the right side.

RAGLAN:
Increase 1 stitch by making 1 yarn over before/after each marker-stitch. On the next row, on the front and back pieces, purl the yarn overs from the wrong side/knit them from the right side – leaving holes. The yarn overs on the sleeves are purled twisted from the wrong side – no holes. Work the new stitches in stocking stitch on the front and back pieces and into the pattern on the sleeves.

DECREASE TIP (for sleeves):
Decrease 1 stitch on each side of the marker-thread as follows: Work until there are 3 stitches left before the marker-thread, knit 2 together, knit 2 (marker-thread sits between these 2 stitches), slip 1 stitch knit-wise, knit 1 and pass the slipped stitch over the knitted stitch (2 stitches decreased).

BUTTONHOLES:
Work the buttonholes from the right side and on the right band.
ROW 1: Work until there are 4 stitches left on the row, make 1 yarn over, knit 2 together, work the last 2 band stitches as before.
ROW 2: Knit the yarn over to leave a hole.
The first buttonhole is worked on the first row after the neck, the other buttonholes when the piece measures:
S: 9-18-27-36 cm
M: 9½-19-28½-38 cm
L: 10-20-30-40 cm
XL: 8½-17-25½-34-42½ cm
XXL: 9-18-27-36-45 cm
XXXL: 9½-19-28½-38-47½ cm.

-------------------------------------------------------

START THE PIECE HERE:

-------------------------------------------------------

JACKET – SHORT OVERVIEW OF THE PIECE.
The pattern uses both long and short needles; start with the length which fits the number of stitches and change when necessary.
The double neck and yoke are worked back and forth with circular needle, from mid front and top down. When the yoke is finished, it is divided for body and sleeves and the body continued back and forth with circular needle, while the sleeves wait. The sleeves are worked in the round. The neck is folded to the inside and sewn down. If there is a «0» in your chosen size, skip the information and go straight to the next instruction.

DOUBLE NECK:
Cast on 104-108-114-118-122-126 stitches with circular needle size 4.5 mm, 1 strand DROPS Alpaca and 1 strand DROPS Kid-Silk (= 2 strands). Change to circular needle size 3.5 mm (casting on with a larger needle size gives and elastic cast-on edge).
Work stocking stitch back and forth for 2½ cm – with the last row from the wrong side and casting on 6 stitches at the end of this row = 110-114-120-124-128-132 stitches. Then work as follows:
ROW 1 (= right side): Work BAND WITH I-CORD – read description above, knit to end of row and cast on 6 stitches = 116-120-126-130-134-138 stitches.
ROW 2 (= wrong side): Work BAND WITH I-CORD, purl until there are 6 stitches left, work BAND WITH I-CORD. The neck is later folded along this row.
Continue with stocking stitch and bands with I-cord on each side until the neck measures 6 cm. It will be approx. 3 cm when folded double. Insert 1 marker after the band at the beginning of the round, the yoke is measured from here.

YOKE:
Continue with needle size 4.5 mm.
ROW 1 (= right side): Work the band as before, knit 104-108-114-118-122-126, AT THE SAME TIME decrease 10-10-12-12-12-12 stitches evenly spaced, work the band as before. Remember the first BUTTONHOLE – read description above = 106-110-114-118-122-126 stitches.
ROW 2 (= wrong side): Work the band as before, knit from the wrong side until there are 6 stitches left, work the band as before.
Insert 4 markers without working the stitches (these are used when increasing for raglan) as follows.
Count 19-20-21-22-23-24 stitches (= left front piece), insert 1 marker in the next stitch, count 19 stitches (= sleeve), insert 1 marker in the next stitch, count 26-28-30-32-34-36 stitches (= back piece), insert 1 marker in the next stitch, count 19 stitches (= sleeve), insert 1 marker in the next stitch, there are 19-20-21-22-23-24 stitches left after the last marker (= right front piece).

On the next row work PATTERN and increase for RAGLAN – read description above, as follows:
ROW 1 (= right side):
Work the band as before, knit 13-14-15-16-17-18 (= left front piece), increase 1 stitch for raglan, 1 stocking stitch (first marker sits in this stitch), work A.1, A.2 over the next 12 stitches, work A.3, 1 stocking stitch (second marker sits in this stitch = sleeve), increase 1 stitch for raglan, work 26-28-30-32-34-36 stocking stitches, increase 1 stitch for raglan (= back piece), 1 stocking stitch (third marker sits in this stitch), work A.1, A.2 over the next 12 stitches, work A.3, 1 stocking stitch (fourth marker sits in this stitch = sleeve), increase 1 stitch for raglan, work 13-14-15-16-17-18 stocking stitches and band as before (= right front piece). REMEMBER THE KNITTING TENSION!

Continue this pattern back and forth but note that the increases are different on the front/back pieces and the sleeves - read INCREASES FOR SLEEVES and INCREASES FOR FRONT/BACK PIECES before continuing!

INCREASES FOR SLEEVES:
On the sleeves you increase 17-20-21-23-24-25 times on each side (including the first increase described above).
The sleeve increases are drawn into diagrams A.1 and A.3. Each time A.1, A.2 and A.3 are finished in height, there is room for 2 more repeats of A.2 between A.1 and A.3. The stitches which do not fit into the pattern on each side of the sleeve are worked in stocking stitch.

INCREASES FOR FRONT/BACK PIECES:
On the front and back pieces, you increase 22-24-26-29-33-36 times (including the first increase described above), as follows:
Increase on each row 0-0-0-0-4-6 times, then every 2nd row 22-24-26-29-29-30 times.

AFTER THE LAST INCREASE:
When all the increases are finished there are 262-286-302-326-350-370 stitches (41-44-47-51-56-60 stitches on each front piece, 55-61-63-67-69-71 stitches on each sleeve (including the marker-stitches on each side of the sleeves) and 70-76-82-90-100-108 stitches on the back piece.
Continue with pattern, stocking stitch and the bands but without further increases. The stitches which do not fit into the pattern on each side of the sleeve are worked in stocking stitch. Work until the yoke measures 19-23-24-26-27-28 cm from the marker.

DIVIDE FOR BODY AND SLEEVES:
Now divide for the body and sleeves as follows: Work 41-44-47-51-56-60 stitches as before (= front piece), place the next 55-61-63-67-69-71 stitches on a thread for the sleeve, cast on 10-10-12-12-14-16 stitches (in side under sleeve), work 70-76-82-90-100-108 stitches (= back piece), place the next 55-61-63-67-69-71 stitches on a thread for the sleeve, cast on 10-10-12-12-14-16 stitches (in side under sleeve), work the last 41-44-47-51-56-60 stitches as before (= front piece). The body and sleeves are finished separately. The piece is now measured from here!

BODY:
= 172-184-200-216-240-260 stitches. Continue with stocking stitch and the bands as before, back and forth until the body measures 20-18-19-18-19-20 cm from the division. On the next row from the right side, begin working rib. AT THE SAME TIME increase 1-5-5-9-9-13 stitches evenly on the first row = 173-189-205-225-249-273 stitches, as follows:
Change to circular needle size 3.5 mm. Work the band as before, rib (knit 1, purl 1 – remember the increases) until there are 7 stitches left, knit 1 and work the band as before.
When the rib measures 3-3-3-4-4-4 cm, cast off a little loosely with rib. The jacket measures approx. 47-49-51-53-55-57 cm from the shoulder.

SLEEVES:
Place the 55-61-63-67-69-71 stitches from the thread on the one side of the piece on circular needle size 4.5 mm and knit up 1 stitch in each of the 10-10-12-12-14-16 stitches cast on under the sleeve = 65-71-75-79-83-87 stitches. Insert a marker-thread in the middle of the 10-10-12-12-14-16 stitches under the sleeve.
Start at the marker-thread and continue the pattern in the round. The stitches which do not fit into the pattern under the sleeve are worked in stocking stitch. AT THE SAME TIME when the sleeve measures 3-3-3-4-4-4 cm from the division, decrease 2 stitches under the sleeve – read DECREASE TIP. Decrease like this every 4-2½-2-1½-1½-1 cm a total of 6-8-9-10-11-12 times = 53-55-57-59-61-63 stitches. Continue working until the sleeve measures 30-27-26-23-23-22 cm from the division.
Change to double pointed needles size 3.5 mm and work rib (knit 1, purl 1). AT THE SAME TIME on the first round increase 1-1-3-3-5-7 stitches evenly spaced = 54-56-60-62-66-70 stitches.
When the rib measures 3-3-3-4-4-4 cm, cast off a little loosely with rib. The sleeve measures approx. 33-30-29-27-27-26 cm from the division.

ASSEMBLY:
Fold the neck double to the inside and sew down. To avoid the neck being tight and rolling outwards, it is important that the seam is elastic.
Sew the buttons onto the left band.

This pattern has been corrected.

Updated online: 06.03.2024
The pattern is updated. Correction on 1st row with raglan and pattern on the yoke in all sizes.

Diagram

symbols = knit from right side, purl from wrong side
symbols = between 2 stitches make 1 yarn over, which is purled twisted on the next row – no hole
symbols = between 2 stitches make 1 yarn over, which is purled on the next row – leaves a hole
symbols = knit 2 together
symbols = slip 1 stitch knit-wise, knit 1, pass the slipped stitch over the knitted stitch
symbols = slip 1 stitch knit-wise, knit 2 together, pass the slipped stitch over the knitted-together stitches
diagram
diagram

Each of our patterns has specific tutorial videos to help you.

Do you have a question? See a list of frequently asked questions (FAQ)

Knitting tension is what determines the final measurements of your work, and is usually measured per 10 x 10 cm. It is provided like so: number of stitches in width x number of rows in height - eg: 19 stitches x 26 rows = 10 x 10 cm.

The knitting tension is very individual; some people knit/crochet loosely while others work tightly. You adjust the knitting tension with the needle size, which is why the suggested needle size is only meant as a guide! You need to adjust this (up or down) to ensure that YOUR knitting tension matches the knitting tension provided in the pattern. If you work with a different knitting tension than provided you will have a different yarn consumption, and your work will have different measurements than what the pattern suggests.

The knitting tension also determines which yarns can replace each other. As long as you achieve the same knitting tension you can replace one yarn with another.

See DROPS lesson: How to measure your tension/gauge

See DROPS video: How to make a gauge tension swatch

The required amount of yarn is provided in grams, eg: 450 g. To calculate how many balls you’ll need you first need to know how many grams are in 1 ball (25g, 50g or 100g). This information is available if you click on the individual yarn quality on our pages. Divide the amount required with the amount of each ball. For example, if each ball is 50g (the most common amount), the calculation will be as follows: 450 / 50 = 9 balls.

The important thing when changing from one yarn to another is that the knitting/crochet tension remains the same. This is so that the measurements of the finished piece will be the same as on the sketch provided. It is easier to achieve the same knitting tension using yarns from the same yarn group. It is also possible to work with multiple strands of a thinner yarn to achieve the knitting tension of a thicker one. Please try our yarn converter. We recommend you to always work a test swatch.

Please NOTE: when changing yarn the garment might have a different look and feel to the garment in the photo, due to individual properties and qualities of each yarn.

See DROPS lesson: Can I use a different yarn than the one mentioned in the pattern?

All our yarns are categorised into yarn groups (from A to F) according to thickness and knitting tension – group A contains the thinnest yarns and group F the thickest. This makes it easier for you to find alternative yarns to our patterns, should you wish to switch yarn. All yarns within the same group have a similar knitting tension and can easily replace each other. However, different yarn qualities have different structures and properties which will give the finished work a unique look and feel.

Click here for an overview of the yarns in each yarn group

At the top of all our patterns you’ll find a link to our yarn calculator, which is a helpful tool should you wish to use a different yarn than suggested. By filling in the yarn quality you wish to replace, the amount (in your size) and number of strands, the calculator will present good alternative yarns with the same knitting tension. Additionally it will tell you how much you’ll require in the new qualities and whether you’ll need to work with multiple strands. Most skeins are 50g (some are 25g or 100g).

If the pattern is worked with multiple colours, every colour will have to be calculated separately. Similarly, if the pattern is worked with several strands of different yarns (for example 1 strand Alpaca and 1 strand Kid-Silk) you will have to find alternatives for each, individually.

Click here to see our yarn calculator

Since different yarns have different qualities and textures we have chosen to keep the original yarn in our patterns. However, you can easily find options among our available qualities by using our yarn calculator, or simply pick a yarn from the same yarn group.

It is possible that some retailers still have discontinued yarns in stock, or that someone has a few skeins at home that they would like to find patterns for.

The yarn calculator will provide both alternative yarn as well as required amount in the new quality.

If you think it's hard to decide what size to make, it can be a good idea to measure a garment you own already and like the size of. Then you can pick the size by comparing those measures with the ones available in the pattern's size chart.

You'll find the size chart at the bottom of the pattern.

See DROPS lesson: How to read size chart

The needle size provided in the pattern serves only as a guide, the important thing is to follow the knitting tension. And since knitting tension is very individual, you will have to adjust the needle size to ensure that YOUR tension is the same as in the pattern – maybe you’ll have to adjust 1, or even 2 needle sizes, up or down to achieve the correct tension. For this, we recommend that you work test swatches.

Should you work with a different knitting tension than the one provided, the measurements of the finished garment might deviate from the measurement sketch.

See DROPS lesson: How to measure your tension/gauge

See DROPS video: How to make a tension/gauge swatch

Working a garment top-down provides more flexibility and room for personal adjustment. For example it is easier to try the garment on while working, as well as making adjustments to length of yoke and shoulder caps.

The instructions are carefully explaining every step, in the correct order. Diagrams are adjusted to the knitting direction and are worked as usual.

The diagram depicts all rows/rounds, and every stitch seen from the right side. It is read from bottom to top, from right to left. 1 square = 1 stitch.

When working back and forth, every other row is worked from the right side and every other row is worked from the wrong side. When working from the wrong side, the diagram will have to be worked reversed: from left to right, knit stitches are purled, purl stitches are knit etc.

When working in the round every round is worked from the right side and the diagram are worked from right to left on all rounds.

See DROPS lesson: How to read knitting diagrams

The diagram depicts all rows/rounds, and every stitch seen from the right side. It is worked from bottom to top, from right to left.

When working back and forth every other row is worked from the right side: from right to left and every other row is worked from the wrong side: from left to right.

When working in the round, every row in the diagram are worked from the right side, from right to left.

When working a circular diagram you start in the middle and work your way outwards, counter clockwise, row by row.

The rows usually start with a given number of chain stitches (equivalent to the height of the following stitch), this will either be depicted in the diagram or explained in the pattern.

See DROPS lesson: How to read crochet diagrams

Instructions for working several diagrams after each other on the same row/round, will often be written like so: “work A.1, A.2, A.3 a total of 0-0-2-3-4 times". This means you work A.1 once, then A.2 is worked once, and A.3 is repeated (in width) the number of times provided for your size – in this case like so: S = 0 times, M = 0 times, L=2 times, XL= 3 times and XXL = 4 times.

The diagrams are worked as usual: begin with the first row in A.1, then work the first row in A.2 etc.

See DROPS lesson: How to read knitting diagrams

See DROPS lesson: How to read crochet diagrams

The total width of the garment (from wrist-to-wrist) will be larger in the larger sizes, despite the actual sleeves being shorter. The larger sizes have longer sleeve caps and wider shoulders, so there will be a good fit in all sizes.

The measurement sketch/schematic drawing provides information regarding the full length of the garment. If it’s a jumper or a jacket the length is measured from the highest point on the shoulder closest to the neckline, and straight down to the bottom of the garment. It is NOT measured from the tip of shoulder. Similarly, the length of yoke is measured from the highest point on the shoulder and down to where yoke is split into body and sleeves.

On a jacket measures are never taken along bands, unless specifically stated. Always measure inside band stitches when measuring the length.

See DROPS lesson: How to read a schematic drawing

Diagrams are often repeated on the round or in height. 1 repeat is the diagram the way it appears in the pattern. If it says to work 5 repeats of A.1 in the round, then you work A.1 a total of 5 times after/next to each other in the round. If it says to work 2 repeats of A.1 vertically/in height you work the entire diagram once, then begin again at the start and work the entire diagram one more time.

Chain stitches are slightly narrower than other stitches and to avoid working the cast-on edge too tight, we simply chain more stitches to begin with. The stitch count will be adjusted on the following row to fit the pattern and measurement sketch.

The rib edge is more elastic and will contract slightly compared to, for example, stocking stitch. By increasing before the rib edge, you avoid a visible difference in width between the rib edge and the rest of the body.

It’s very easy to cast off too tightly, and by making yarn overs while casting off (and simultaneously casting these off) you avoid a too tight cast off edge.

See DROPS video: How to bind off with yarn overs (yo)

To achieve an even increase (or decrease) you can increase on, for example: every 3rd and 4th row alternately, like so: work 2 rows and increase on the 3rd row, work 3 rows and increase on the 4th. Repeat this until the increase is complete.

See DROPS lesson: Increase or decrease 1 st on every 3rd and 4th row alternately

Should you prefer to work in the round instead of back and forth, you may of course adjust the pattern. You’ll need to add steeks mid-front (usually 5 stitches), and follow the instructions. When you would normally turn and work from the wrong side, simply work across the steek and continue in the round. At the end you’ll cut the piece open, pick up stitches to work bands, and cover the cut edges.

See DROPS video: How to knit steeks and cut open

Should you prefer to work back and forth instead of in the round, you may of course adjust the pattern so you work the pieces separately and then assemble them at the end. Divide the stitches for the body in 2, add 1 edge stitch in each side (for sewing) and work the front and back pieces separately.

See DROPS lesson: Can I adapt a pattern for circular needles into straight needles?

Pattern repeats can vary slightly in the different sizes, in order to get the correct proportions. If you’re not working the exact same size as the garment in the photo, yours might deviate slightly. This has been carefully developed and adjusted so that the complete impression of the garment is the same in all sizes.

Make sure to follow instructions and diagrams for your size!

If you have found a pattern you like which is available in women’s size it’s not very difficult to convert it to men’s size. The biggest difference will be the length of sleeves and body. Start working on the women size that you think would fit across the chest. The additional length will be worked right before you cast off for the armhole/sleeve cap. If the pattern is worked top-down you can add the length right after the armhole or before the first decrease on sleeve.

Regarding additional yarn amount, this will depend on how much length you add, but it is better with a skein too many than too few.

All yarns will have excess fibres (from production) that might come off as lint or shedding. Brushed yarns (ie hairier yarns) have more of these loose, excess fibres, causing more shedding.

Shedding also depends on what is worn under or over the garment, and whether this pulls at the yarn fibres. It’s therefore not possible to guarantee that there will be no shedding

Below are some tips on how to get the best result when working with hairier yarns:

1. When the garment is finished (before you wash it) shake it vigorously so the looser hairs come off. NOTE: do NOT use a lint roller, brush or any method that pulls at the yarn.

2. Place the garment in a plastic bag and put it in your freezer - the temperature will cause the fibres to become less attached to each other, and excess fibres will come off easier.

3. Leave in the freezer for a few hours before taking it out and shaking it again.

4. Wash the garment according to the instructions on the yarn label.

Pilling is a natural process that happens to even the most exclusive of fibers. It's a natural sign of wear and tear that is hard to avoid, and that is most visible in high friction areas of your garment like a sweater's arms and cuffs.

You can make your garment look as new by removing the pilling, using a fabric comb or a pill/lint remover.

Still can't find the answer you need? Then scroll down and leave your question so one of our experts can try to help you. This will be done normally within 5 to 10 working days.
In the meantime, you can read the questions and answers that others have left to this pattern or join the DROPS Workshop on Facebook to get help from fellow knitters/crocheters!

You might also like...

Post a comment to pattern DROPS 250-2

We would love to hear what you have to say about this pattern!

If you want to leave a question, please make sure you select the correct category in the form below, to speed up the answering process. Required fields are marked *.

Comments / Questions (9)

country flag Karin wrote:

Die unterschiedlichen Zunahmen an Ärmeln und Vorder-/Rückenteil sind für mich unklar beschrieben: Wie viel Male werden die Diagramme für die Passe in die Höhe gestrickt oder hört man mitten im Diagramm auf, wenn die Anzahl Zunahmen erreicht wurde? Werden die Raglanzunahmen nicht in jeder zweiten Reihe gestrickt, also immer auf der Vorderseite? Es ist mir nicht klar, wie das unterschiedlich sein kann, da die Ärmelzunahmen im Muster vorgegeben sind. Danke!

01.04.2024 - 19:30

DROPS Design answered:

Liebe Karin, die Raglanzunahmen werden bei den Ärmeln und beim Rumfpteil an einem unterschiedlichen Rythmus gestrickt; für die Ärmel nehmen Sie wie in den Diagrammen zu; bei den Vorderteilen + Rückenteil nehmen Sie zuerst in jeder Reihe (nur in die 2 grösseren Grösse) dann in jeder 2. Reihe (in jeder Hin-Reihe). Bein den Diagramme wird es nicht in jeder 2. Reihe zugenommen, nur wie in A.1 + in A.3 gezeigt wird (siehe 2. Symbol). Viel Spaß beim Stricken!

02.04.2024 - 15:38

country flag Isabela wrote:

Dear Drops Team, in the pattern description it says: S - M - L - XL - XXL – XXXL Finished measurements: Chest measurements: 80-88-96-106-118-130 cm = 31 1/2"-34 5/8"-37 3/4"-41 3/4"-46 1/2"-51 1/4" Full length: 47-49-51-53-55-57 cm = 18 1/2"-19 1/4"-20"-21"-21 5/8"-22 1/2 BUT the numbers on the chart provide different information, so I am confused which one is true.

26.02.2024 - 13:42

DROPS Design answered:

Dear Isabella, the numbers in the US-English pattern gives the circumference of bust while the chart shows just the finished measurements when piece lays flat - full length is the same as stated in the written pattern. Read more about measurement charts here. Happy knitting!

26.02.2024 - 14:56

country flag Isabela wrote:

Dear Team, I am confused with the measurements in this pattern, the size description in the text is different from the sizes shown in the diagram. Which one of the two is correct?

23.02.2024 - 18:13

DROPS Design answered:

Dear lsabella, which measurements do you mean could be wrong? Can you tell us more so that we can check and explain/edit? Thanks for your help.

26.02.2024 - 07:16

country flag Sylvie wrote:

J'aime beaucoup ce modèle que j'aimerais réaliser avec un col qui ne soit pas double et des manches de longueur normale. Comment dois je procéder ?. En vous remerciant

13.02.2024 - 17:08

DROPS Design answered:

Bonjour Sylvie, aidez-vous d'un modèle similaire de même tension pour tricoter le col (car ici, c'est un ourlet, pas des côtes et il vous faudra alors adapter le nombre de mailles en fonction des côtes souhaités et de la taille) et trouver également les ajustements nécessaires pour la longueur des manches souhaitée. Bon tricot!

14.02.2024 - 07:53

country flag Fernanda Kazic wrote:

Saltsjöbad!

20.01.2024 - 22:12

country flag Caroline wrote:

Romance

19.01.2024 - 08:54

country flag Susie wrote:

Sailing Away

19.01.2024 - 06:51

country flag Marlies Van Dijk wrote:

Romantisch, uit andere tijden

18.01.2024 - 22:20

country flag Pia Charlotte Nicolaisen wrote:

Perlehyasint

18.01.2024 - 15:36