
Popular categories
Looking for a yarn?


|
||||||||||
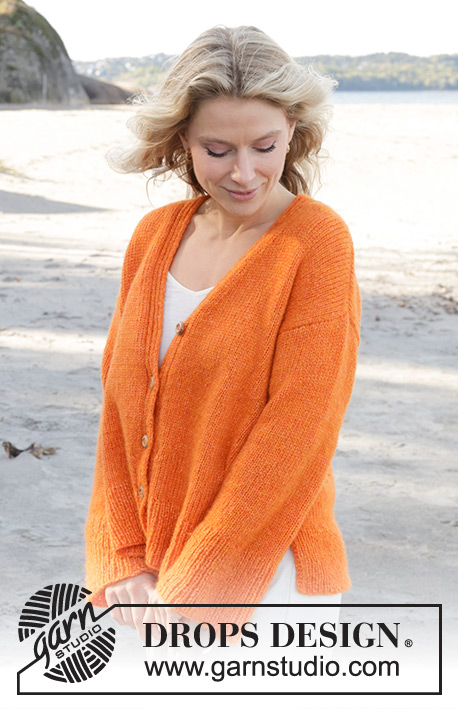
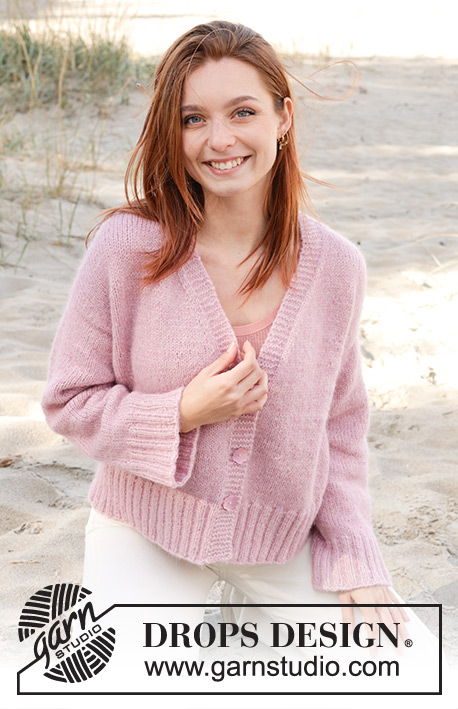
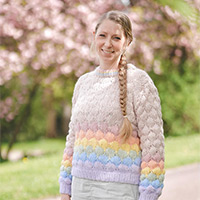
Elodie Cardigan |
||||||||||
 |
 |
|||||||||
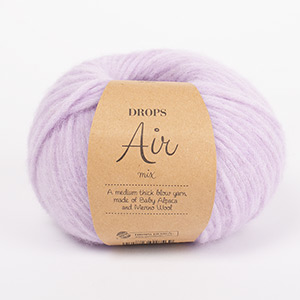
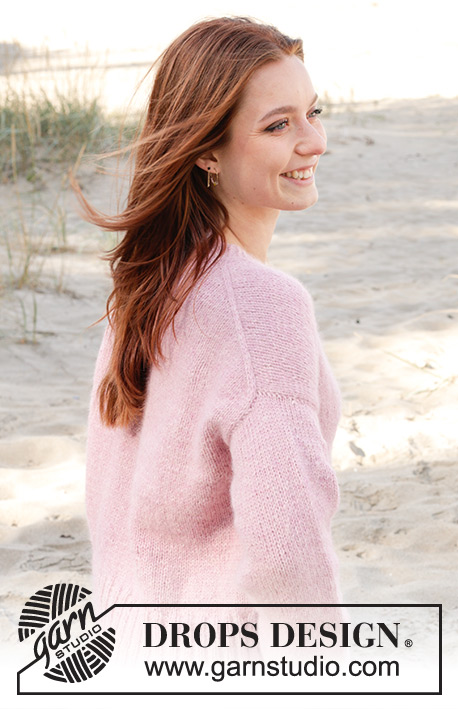
Knitted jacket in DROPS Air. The piece is worked top down with European/diagonal shoulders and V-neck. Sizes S - XXXL.
DROPS 240-29 |
||||||||||
|
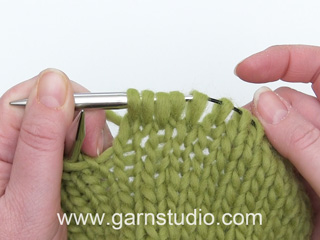
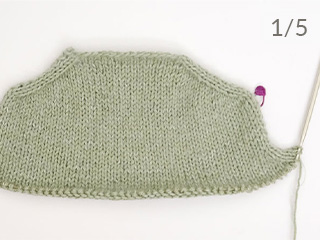
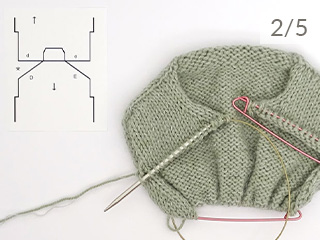
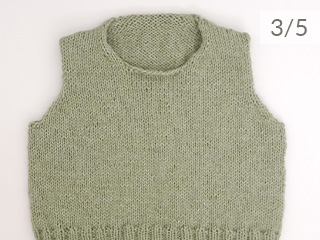
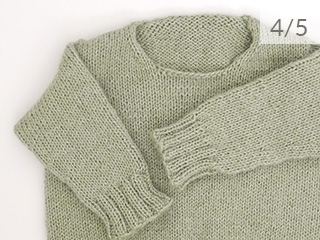
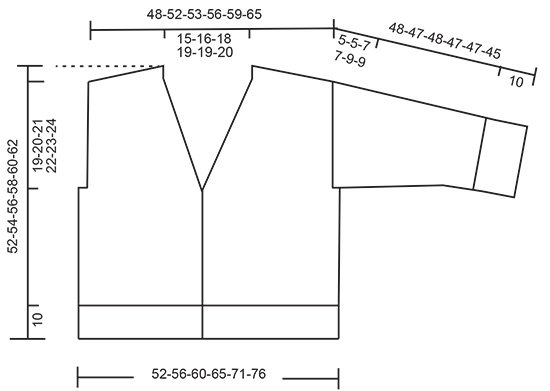
------------------------------------------------------- EXPLANATIONS FOR THE PATTERN: ------------------------------------------------------- RIDGE/GARTER STITCH (worked back and forth): Knit all rows. 1 ridge = knit 2 rows. INCREASE TIP FROM RIGHT SIDE Increase towards the left AFTER MARKER: Use left needle to pick up thread between 2 stitches from row below, pick up thread from front and knit stitch in back loop. Increase towards the right BEFORE MARKER: Use left needle to pick up thread between 2 stitches from row below, pick up thread from behind and knit stitch in front loop. INCREASE TIP FROM WRONG SIDE: Increase towards the left AFTER MARKER: Use left needle to pick up thread between 2 stitches from row below, pick up thread from behind and purl stitch in front loop. Increase towards the right BEFORE MARKER: Use left needle to pick up thread between 2 stitches from row below, pick up thread from front and purl stitch in back loop. BUTTONHOLES: Work buttonholes on the right band (when the garment is worn). Work from the right side when there are 4 stitches left on the row as follows: Make 1 yarn over, knit 2 together and knit 2. On the next row (wrong side), knit the yarn over to leave a hole. Work buttonholes when the piece measures: S: 27, 34 and 41 cm = 10⅝", 13⅜" and 16⅛" M: 27, 35 and 43 cm = 10⅝", 13¾" and 17" L: 29, 37 and 45 cm = 11⅜", 14½" and 17¾" XL: 30, 38 and 47 cm = 11¾", 15" and 18½" XXL: 32, 40 and 49 cm = 12½", 15¾" and 19¼" XXXL: 33, 42 and 51 cm = 13", 16½" and 20" DECREASE TIP (for sleeves): Decrease 1 stitch on either side of the marker-thread as follows: Work until there are 3 stitches left before the marker-thread, knit 2 together, knit 2 (marker-thread sits between these 2 stitches), slip 1 stitch as if to knit, knit 1 and pass the slipped stitch over the knitted stitch. ------------------------------------------------------- START THE PIECE HERE: ------------------------------------------------------- JACKET – SHORT OVERVIEW OF THE PIECE. The back piece is worked back and forth with circular needle, top down as far as the armholes. Stitches are knitted up along each shoulder and increased for the neck and the front pieces are worked back and forth with circular needle as far as the armholes. The back and front pieces are joined and the body continued back and forth with circular needle. Stitches are knitted up around each armhole and the sleeves are worked in the round with double pointed needles/short circular needle. The neck is worked to finish. BACK PIECE: Cast on 30-32-34-36-36-38 stitches with circular needle size 5 MM = US 8 and DROPS Air. Purl 1 row from the wrong side. Insert 1 marker inside the 3 outermost stitches on each side. Keep the markers inside these 3 stitches onwards. Work stockinette stitch back and forth. AT THE SAME TIME, increase AFTER the marker at the beginning of the row (seen from the right side) and BEFORE the marker at the end of the row – read INCREASE FROM RIGHT SIDE. On the next row (wrong side) increase in the same way – read INCREASE FROM WRONG SIDE. Increase from both the right and wrong side a total of 26-28-28-30-32-36 times. After the last increase there are 82-88-90-96-100-110 stitches. THE PIECE IS NOW MEASURED FROM HERE! Continue working until the piece measures 14-15-16-17-17-18 cm = 5½"-6"-6¼"-6¾"-6¾"-7". Cut the yarn, put stitches on a thread or on an extra needle and work the front pieces as explained below. LEFT FRONT PIECE: Start on the left shoulder (when the garment is worn). Cast on 7 stitches (band), knit up 26-28-28-30-32-36 stitches inside 1 stitch along the left shoulder on the back piece (knit up 1 stitch in each row) = 33-35-35-37-39-43 stitches. Work stockinette stitch with 7 stitches in GARTER STITCH-see description above, mid-front. When the piece measures 4 cm = 1½", increase at the beginning of each row from the right side for the neck, after the 7 garter stitches + 2 stockinette stitches – remember INCREASE FROM RIGHT SIDE. Increase 1 stitch every 2nd row 10-11-12-13-13-14 times, every 4th row 3 times and every 6th row 2 times = 48-51-52-55-57-62 stitches. When the piece measures 24-25-26-27-29-30 cm = 9½"-9¾"-10¼"-10⅝"-11⅜"-11¾", stitches on a thread or on an extra needle, after working the last row from the right side. Cut the yarn. Work the right front piece as explained below. RIGHT FRONT PIECE: Knit up 26-28-28-30-32-36 stitches inside 1 stitch along the right shoulder on the back piece then cast on 7 stitches at the end of the row (band) = 33-35-35-37-39-43 stitches. Work stockinette stitch with 7 stitches in garter stitch mid-front. When the piece measures 4 cm = 1½" increase at the end of each row from the right side for the neck, before 2 stockinette stitches + 7 garter stitches – remember INCREASE FROM RIGHT SIDE. Increase 1 stitch every 2nd row 10-11-12-13-13-14 times, every 4th row 3 times and every 6th row 2 times = 48-51-52-55-57-62 stitches. When the piece measures 24-25-26-27-29-30 cm = 9½"-9¾"-10¼"-10⅝"-11⅜"-11¾", work as follows from the wrong side: Work the 48-51-52-55-57-62 stitches on the right front piece, cast on 6-8-12-14-20-20 stitches work the 82-88-90-96-100-110 stitches on the back piece, cast on 6-8-12-14-20-20 stitches, work the 48-51-52-55-57-62 stitches on the left front piece. BODY: = 190-206-218-234-254-274 stitches. Continue back and forth with stockinette stitch and garter stitch - REMEMBER THE BUTTONHOLES – see description above, for a further 42-44-46-48-50-52 cm = 16½"-17¼"-18"-19"-19¾"-20½". Knit 1 row from the right side and increase 62-62-70-74-82-90 stitches evenly spaced (do not increase over the bands) = 252-268-288-308-336-364 stitches. Change to circular needle size 4 MM = US 6. Work rib as follows from the wrong side: 7 garter stitches, * purl 2, knit 2 *, work from *-* until there are 9 stitches left, purl 2 and 7 garter stitches. Continue this rib for 10 cm = 4". Bind off. LEFT SLEEVE: Using circular needle size 5 MM = US 8, knit up from the right side 40-42-45-45-49-51 stitches from the bottom of the armhole and up the front piece to the shoulder, then 24-26-27-29-29-31 stitches from the shoulder to the bottom of the armhole down the back piece = 64-68-72-74-78-82 stitches. Insert 1 marker in the middle of the stitches picked up. Work now back and forth in stockinette stitch with short rows for the sleeve cap, to gives a better shape to the sleeve. 1st row (from wrong side): work to 16 stitches after marker, turn. 2nd row (from right side): work to 16 stitches after marker, turn. 3rd row (from wrong side): work to 20 stitches after marker, turn. 4th row (from right side): work to 20 stitches after marker, turn. 5th row (from wrong side): work to 24 stitches after marker, turn. 6th row (from right side): work to 24 stitches after marker, turn. 7th row (from wrong side): work to the beginning of the row. Work stockinette stitch back and forth for 5-5-7-7-9-9 cm = 2"-2"-2¾"-2¾"-3½"-3½", measure from where the stitches were picked up (all length are measured mid on top of sleeve). Join the sleeve, using short circular needle/double pointed needles size 5 MM = US 8 and continue in the round. Insert 1 marker thread at the beginning of the round (mid-under sleeve). Allow the thread to follow your work onwards. Start at the marker-thread and continue with stockinette stitch until the sleeve measures 7-7-9-9-11-11 cm = 2¾"-2¾"-3½"-3½"-4⅜"-4⅜" from the knitted-up stitches. Decrease 2 stitches under the sleeve – read DECREASE TIP. Decrease like this every5½-4½ -3½-3½ -2½-2 cm = 2⅛"-1⅝"-1¼"-1¼"-1"-¾" a total of 6-7-8-8-9-10 times = 52-54-56-58-60-62 stitches. Continue working until the sleeve measures 38-37-38-37-37-35 cm = 15"-14½"-15"-14½"-14½"-13¾". There is approx. 10 cm = 4" left; try the jacket on and work to desired length before the rib. Knit 1 round and increase 16-18-16-18-20-18 stitches evenly spaced = 68-72-72-76-80-80 stitches. Change to double pointed needles size 4 MM = US 6 and work rib (knit 2, purl 2) for 10 cm = 4". Bind off a little loosely. The sleeve measures approx. 48-47-48-47-47-45 cm = 19"-18½"-19"-18½"-18½"-17¾". RIGHT SLEEVE: Work the same way as the left sleeve, but first knit up 24-26-27-29-29-31 stitches from the bottom of the armhole up the back piece to the shoulder, then 40-42-45-45-49-51 stitches from the shoulder down the front piece. Sew the bottom of the armholes. NECK Knit up 1 stitch in each of the 7 garter stitches at the top of the right front piece, work garter stitch back and forth for 8-9-9-10-10-10 cm = 3⅛"-3½"-3½"-4"-4"-4"; check that the band reaches approx. midway at the back of the neck when stretched slightly. Bind off. Work in the same way from the band on the left front piece. Sew the bands together mid-back and sew the neck to the neckline. ASSEMBLY: Sew the buttons onto the left band. |
||||||||||
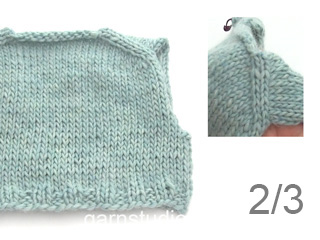
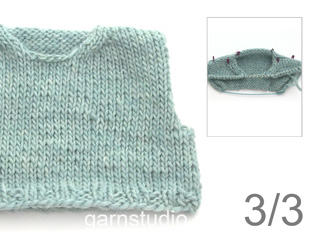
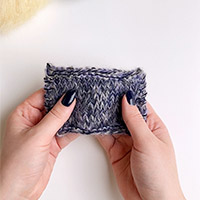
Diagram explanations |
||||||||||
|
||||||||||
|
||||||||||
|
||||||||||
|
||||||||||
|
Have you made this or any other of our designs? Tag your pictures in social media with #dropsdesign so we can see them! Do you need help with this pattern?You'll find tutorial videos, a Comments/Questions area and more by visiting the pattern on garnstudio.com. © 1982-2024 DROPS Design A/S. We reserve all rights. This document, including all its sub-sections, has copyrights. Read more about what you can do with our patterns at the bottom of each pattern on our site. |
||||||||||


With over 40 years in knitting and crochet design, DROPS Design offers one of the most extensive collections of free patterns on the internet - translated to 17 languages. As of today we count 304 catalogs and 11422 patterns - 11417 of which are translated into English (US/in).
We work hard to bring you the best knitting and crochet have to offer, inspiration and advice as well as great quality yarns at incredible prices! Would you like to use our patterns for other than personal use? You can read what you are allowed to do in the Copyright text at the bottom of all our patterns. Happy crafting!
Comments / Questions (28)
Bonjour La finition du col proposée ne donne pas un excellent rendu. J’ai donc modifié et fait une seule bande d’encolure que j’ai cousu à point arrière. Le rendu est bien plus joli. N’y aurait il pas une autre solution possible? Le gilet est vraiment superbe. Isa
13.03.2024 - 07:38DROPS Design answered:
Bonjour Mme Robert, vous pouvez peut-être vous inspirer de cette vidéo où on montre comment coudre un bord point mousse (emmanchure dans la vidéo, col dans ce modèle) le long du jersey (manche dans la vidéo, encolure dos dans ce gilet). Bon assemblage!
13.03.2024 - 08:29Hi again, increasing every 2nd row, is that: increase on the right side, no increase wrong side and then increase on the right side again? Or am I knitting a whole right and wrong side as well as a non increase? Thanks.
11.03.2024 - 06:57DROPS Design answered:
Dear Nicole, increasing every second row is increasing every row from the right side (and no increase on th ewrong side). I hope this helps. Happy Knitting!
11.03.2024 - 09:24Hello, on the front left shoulder, increasing 1 stitch every 2nd row, am I increasing 3 stitches every 4th roe? What does it mean “every 4th row 3 times”? Thank you 🌷
10.03.2024 - 15:06DROPS Design answered:
Dear Nicole, Increase 1 stitch every 2nd row 10-11-12-13-13-14 times, every 4th row 3 times and every 6th row 2 times. This means that you increase 1 stitch every other row (one row with increases, one row without increases)10-11-12-13-13-14 times. Then, increase 1 stitch every 4th row (1 row with increases, 3 without increase) 3 times. Then, increase 1 stitch every 6th row (1 row with increases, 5 without increases) 2 times. Happy knitting!
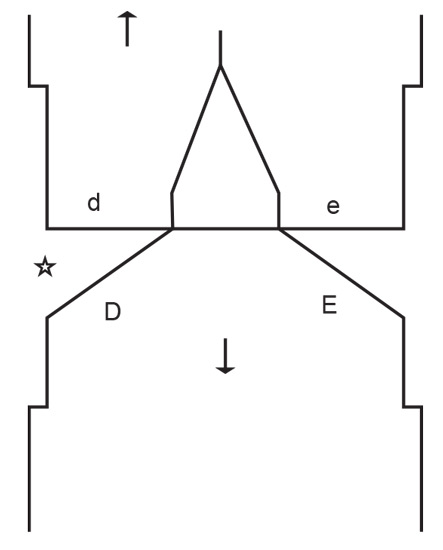
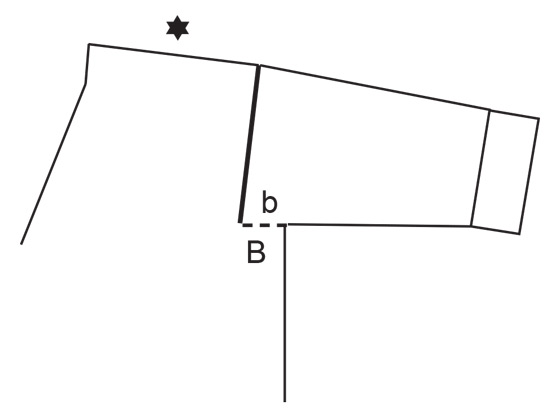
11.03.2024 - 00:18Dzień dobry, nie do końca wiem jak na rękawie przerobić główkę rękawa za pomocą rzędów skróconych. Od 7 rzędu przerabiałam 48 oczek tam i z powrotem aż do uzyskania 7cm na górze ramienia, natomiast 20 oczek znajdujące się od strony pachy nie przerabiałam. Następnie miałam połączyć oczka z rzędów skróconych z oczkami nieprzerabianymi i kontynuować na okrągło, ale powstała brzydka dziura pomiędzy tymi grupami oczek. Czy zrobiłam coś źle? Pozdrawiam
20.02.2024 - 22:51DROPS Design answered:
Witaj Dominiko, wszystko jest ok. Teraz będziesz wszywać tą górną część rękawa do dołu podkroju rękawa (do tyłu/przodu), czyli zszywasz b z B, jak na schemacie z czarną gwiazdką na dole wzoru. Pozdrawiamy!
21.02.2024 - 09:40Hello. Please can you confirm from what point is the measurement taken in order to make the buttonholes. Is it from the marker on the shoulder where the pattern says "THE PIECE IS MEASURED FROM HERE!" ? or from the front piece? Many thanks
12.02.2024 - 18:50DROPS Design answered:
Hi Norma, The positioning of the buttonholes is measured from the top of the front piece (from the knitted-up stitches). Happy crafting!
13.02.2024 - 06:46Hallo, ich habe eine Frage zu den Vorderteilen. In der Anleitung steht dass in JEDER Reihe 2 Maschen zugenommen werden. Und anschließend steht dass in dieser Weise in jeder 2./3./6. Reihe jeweils eine Masche zugenommen wird. Was heißt das? Werden also zum Beispiel 2 Maschen zugenommen und in der 2. Reihe 3 Maschen zugenommen ? Oder werden auf der hinreihe 2 Maschen zugenommen und auf der Rückreihe 1 Masche?
19.01.2024 - 21:18DROPS Design answered:
Liebe Sabrina, die Zunahmen für den Halsausschnitt werden am Ende einer Hin-Reihe, dh zuerst in jeder 2. Reihe. = bei jeder Hin-Reihe dann in jeder 4. Reihe = in jeder 2. Hin-Reihe dann in jeder 6. Reihe = in jeder 3. Hin-Reihe. Viel Spaß beim stricken!
22.01.2024 - 08:02Ciao! Nella porzione del corpo, c’e scritto di aumentare 62 maglie uniformemente (sto lavorando una M). Non capisco se si intende di lavorarla per l’intera lunghezza del corpo o nel primo ferro del corpo. Grazie in anticipo!
16.01.2024 - 20:22DROPS Design answered:
Buonasera Luna, deve aumentare tutte le maglie nel ferro a diritto indicato. Buon lavoro!
17.01.2024 - 16:53Hallo! Ich wüsste gern, welche Nadelstärke und -länge ich verwenden muss wenn ich die Ärmel mit einer Rundnadel anstatt mit einem Nadelspiel stricken möchte.
05.01.2024 - 14:06DROPS Design answered:
Liebe Ka, wenn Sie mit einer Rundnadel stricken möchten, stricken Sie dan nmit einer 40 cm am Anfang dann wenn es weniger Maschen sind mit dem Nadelspiel oder mit Magic Loop und 8O cm Rundnadel, siehe hier. Viel Spaß beim stricken!
05.01.2024 - 15:44Witam, jak mierzyć długość robótki, dziękuję, pozdrawiam serdecznie i życzę szczęścia w Nowym Roku
02.01.2024 - 12:35DROPS Design answered:
Witaj Małgosiu, również najlepsze życzenia na Nowy Rok. Napisz dokładnie o jaki wymiar Ci chodzi?
02.01.2024 - 13:09Hallo, ich bin jetzt bei den Ärmeln des Elodie Cardigan. Ich verstehe nicht, warum die waagrechten Maschen des Armauschnitts nicht mit aufgefasst werden. Sie werden zu keinem Zeitpunkt danach in der Anleitung erwähnt ? Und es wird auch nicht in Runde gestrickt. Ich habe gerade gesehen, dass es eine "neue Anleitung" für den Ärmel existiert, ersetzt diese komplett den Text in ihrer Anleitung ? und werden die Maschenanzahl dann zu denen in der Anleitung gezählt ?
15.12.2023 - 22:50DROPS Design answered:
Liebe Frau Müller, die ersten cm von dem Ärmel werden in Hin- und Rückreihen gestrickt, dann diese Reihen werden zu den angeschlagenen Maschen für das Armloch zusammengenäht - wie beim Figur - siehe schwarzes Sternchen. Dann wird der Ärmel in Runden gestrickt. Viel Spaß beim stricken!
18.12.2023 - 08:15