
Popular categories
Looking for a yarn?


|
||||||||||||||||||||||
Cotswolds |
||||||||||||||||||||||
 |
 |
|||||||||||||||||||||
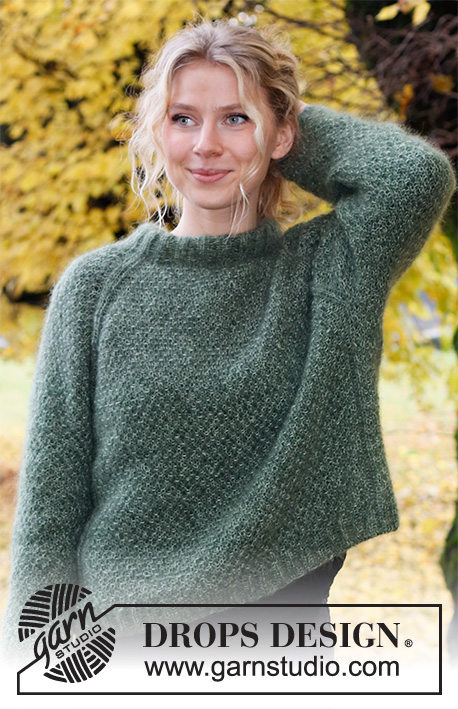
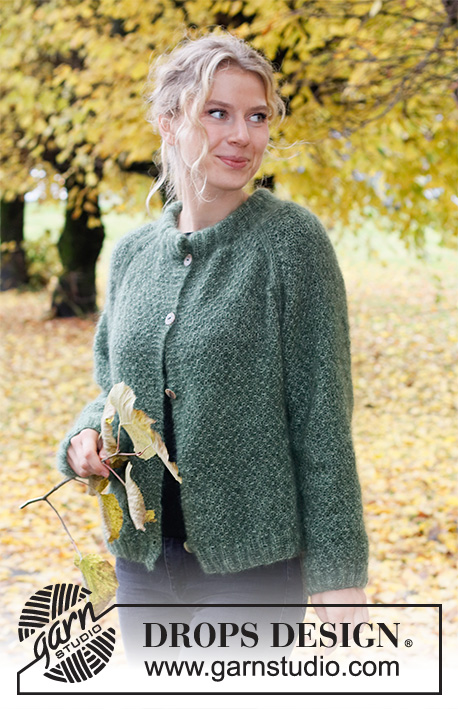
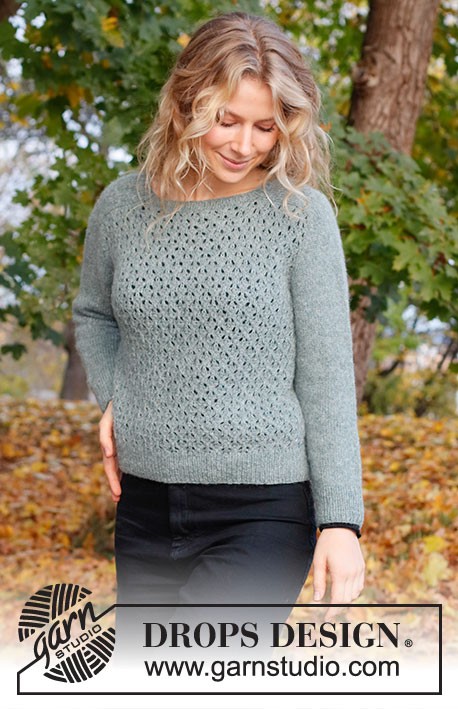
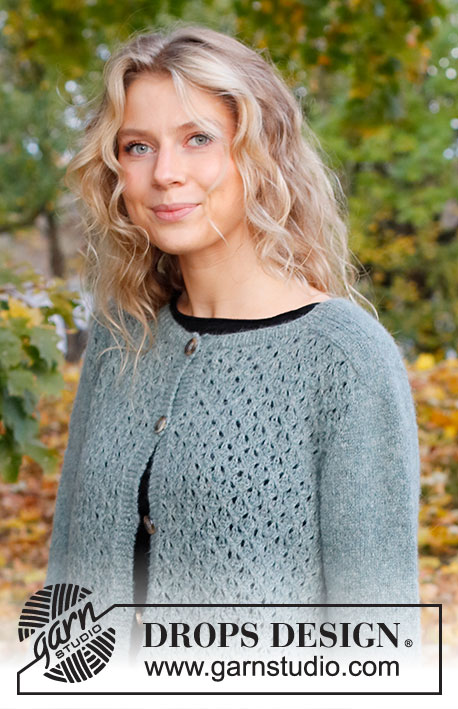
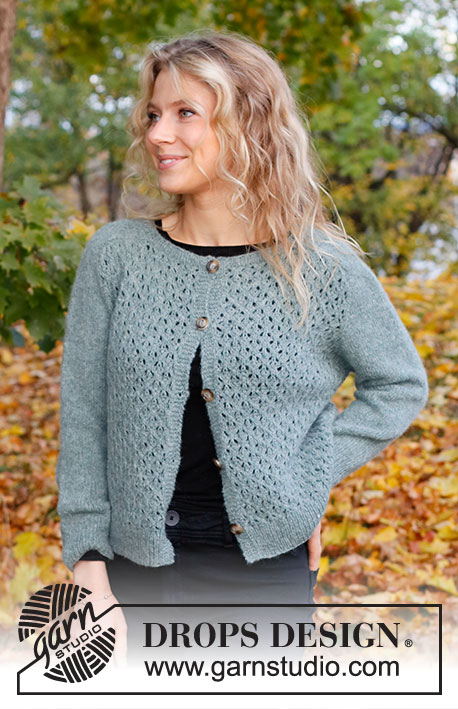
Knitted jacket in DROPS Sky. Piece is knitted top down with lace pattern and saddle shoulder. Size: S - XXXL
DROPS 226-11 |
||||||||||||||||||||||
|
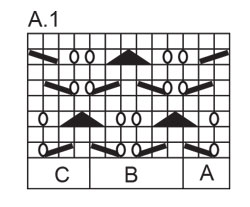
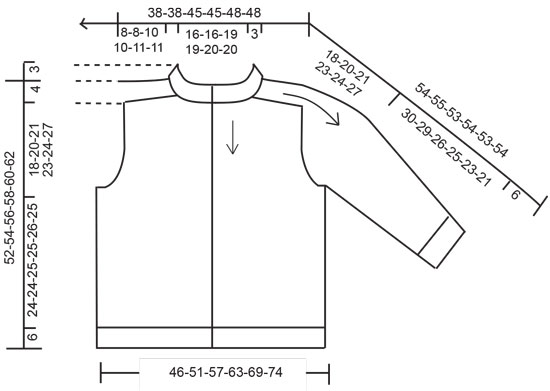
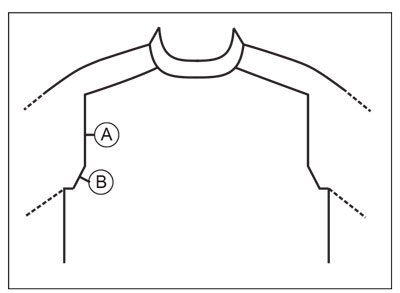
---------------------------------------------------------- EXPLANATION FOR THE PATTERN: ---------------------------------------------------------- GARTER STITCH (back and forth): Knit all rows. 1 ridge vertically = knit 2 rows. PATTERN: See diagram A.1. Diagrams show all rows in pattern seen from the right side. BUTTONHOLES: Decrease for buttonholes on right band (when garment is worn). 1 buttonhole = work from right side as before until 3 stitches remain on needle, make 1 yarn over, knit 2 together and finish by knitting 1. On next row (wrong side) knit the yarn over to make a hole. Decrease first buttonhole right after rib in the neck, then decrease the next 4-4-4-5-5-5 buttonholes as explained above approx. 9 cm = 3½" apart. INCREASE TIP-1: BEFORE MARKER: The new stitch is twisted towards the right. Use left needle to pick up yarn between 2 stitches from round below, pick up yarn from the back and knit stitch in front loop of stitch. AFTER MARKER: The new stitch is twisted towards the left. Use left needle to pick up yarn between 2 stitches from round below, pick up yarn from the front and knit stitch in back loop of stitch. INCREASE TIP-2 (evenly): To calculate how to increase evenly, use the total number of stitches on row (e.g. 209 stitches), minus bands (= 10 stitches) and divide the remaining stitches by number of increases to be done (e.g. 42) = 4.7. In this example increase by making 1 yarn over after approx. every 5th stitch and do not increase over bands. On next row work yarn overs twisted to avoid holes. DECREASE TIP (applies to sleeves): Decrease 1 stitch on each side of marker thread as follows: Work until 3 stitches remain before stitch with marker thread, knit 2 together, knit 3 (stitch with marker thread is in the middle of these stitches), slip 1 stitch knitwise, knit 1, pass slipped stitch over stitch worked. BIND-OFF TIP: To avoid a tight bind-off edge when binding off, you may use a larger needle. If this still is too tight make 1 yarn over after approx. every 4th stitch while binding off (bind off yarn overs as stitches). ---------------------------------------------------------- START THE PIECE HERE: ---------------------------------------------------------- JACKET - SHORT OVERVIEW OF THE PIECE: Work neck edge back and forth on circular needle. Then divide the piece for front pieces, back piece and saddle shoulder. Then work each saddle shoulder back and forth separately, before stitches from the thread are placed back on needle, and pick up stitches for front pieces and back piece (along the sides on saddle shoulders). Then work the rest of yoke back and forth, at the same time while increasing on sleeves and on front pieces and back piece. Now divide yoke for body and sleeves. Work body back and forth on circular needle, top down. Work sleeves in the round on double pointed needles/short circular needle, top down. NECK EDGE: Cast on 119-119-131-131-139-139 stitches (including 5 band stitches in each side towards mid front) on circular needle size 3.5 MM = US 4 with DROPS Sky. Purl 1 row (= wrong side). Work next row as follows from right side: Work 5 band stitches in GARTER STITCH - read explanation above - * knit 1, purl 1 *, work from *-* until 6 stitches remain, knit 1 and finish with 5 band stitches in garter stitch. Continue rib like this for 2½ cm = 1". SADDLE SHOULDER: Slip the first 25-25-28-28-30-30 stitches on a thread, slip the next 18 stitches on a short circular needle size 4 MM = US 6, slip the next 33-33-39-39-43-43 stitches on a thread, slip the next 18 stitches on a thread and slip the last 25-25-28-28-30-30 stitches on a thread. Work in stockinette stitch over the first 18 stitches on needle, AT THE SAME TIME on first row cast on 1 edge stitch in each side = 20 stitches. Work edge stitches in garter stitch. Work back and forth over these 20 stitches for 8-8-10-10-11-11 cm = 3⅛"-3⅛"-4"-4"-4⅜"-4⅜", on last row bind off 1 edge stitch in each side = 18 stitches. Cut the yarn. Put these stitches on a thread. Work the same way over the 18 stitches from the thread in the other side. Cut the yarn. YOKE: Now pick up stitches along the sides on saddle shoulder, begin from right side and mid front on circular needle size 4 MM = US 6 as follows: Work the first 25-25-28-28-30-30 stitches from thread, pick up 17-17-20-20-24-24 stitches inside an edge stitch on the side of saddle shoulder (= 42-42-48-48-54-54 stitches for left front piece), insert 1st marker in next stitch, knit the 16 stitches on saddle shoulder, insert 2nd marker in next stitch, pick up 17-17-20-20-24-24 stitches inside 1 edge stitch on the side of saddle shoulder, work the 33-33-39-39-43-43 stitches from thread, pick up 17-17-20-20-24-24 stitches inside 1 edge stitch on the side of saddle shoulder (= 67-67-79-79-91-91 stitches on back piece), insert 3rd marker in next stitch, knit the 16 stitches on saddle shoulder, insert 4th marker in next stitch, pick up 17-17-20-20-24-24 stitches inside an edge stitch on the side of saddle shoulder, and knit the last 25-25-28-28-30-30 stitches from thread (= 42-42-48-48-54-54 stitches on right front piece) = 187-187-211-211-235-235 stitches in total on needle. Purl 1 row (continue bands in garter stitch). Insert a marker thread inside band stitches at the beginning of row mid front – NOW MEASURE PIECE FROM HERE. Decrease for BUTTONHOLES on right band - read explanation above. Now work pattern as explanation below, and increase for sleeve as follows: SLEEVE INCREASE: Increase AFTER 1st and 3rd marker and increase BEFORE 2nd and 4th marker – read INCREASE TIP-1. Increase now only on sleeves and number of stitches on front pieces and back piece is the same. Work the increased stitches in stockinette stitch. REMEMBER THE KNITTING GAUGE! WORK PATTERN AS FOLLOWS: 5 stitches in garter stitch, A.1A (= 3 stitches), A.1B over the next 30-30-36-36-42-42 stitches (= 5-5-6-6-7-7 repetitions of 6 stitches), A.1C (= 4 stitches), work in stockinette stitch over stitches on sleeve (i.e. between 1st and 2nd marker), A.1A (= 3 stitches), A.1B over the next 60-60-72-72-84-84 stitches (= 10-10-12-12-14-14 repetitions of 6 stitches), work A.1C (= 4 stitches) work in stockinette stitch over stitches on sleeve (i.e. between 3rd and 4th marker), A.1A, A.1B over the next 30-30-36-36-42-42 stitches (= 5-5-6-6-7-7 repetitions of 6 stitches), A.1C (= 4 stitches), and finish with 5 stitches in garter stitch. The 4 stitches with a marker are worked in stockinette stitch. Increase on sleeves every other row 9-6-10-8-10-6 times in total = 36-30-38-34-38-30 stitches between markers on. Piece now measures approx. 6-4-7-4-7-4 cm = 2⅜"-1½"-2¾"-1½"-2¾"-1½". When increases on sleeve are done, continue with pattern and increases for yoke (there are now 223-211-251-243-275-259 stitches on needle). YOKE INCREASE: On next row from right side increase 8 stitches for yoke by increasing both before and after each of the 4 stitches with marker - remember INCREASE TIP-1. Increase stitch on front pieces, back piece and both sleeve, and work the increase stitch in pattern on front pieces and back piece and in stockinette stitch on sleeves. Increase like this every other round 12-18-18-24-24-30 times in total = 319-355-395-435-467-499 stitches. When all increases are done, the piece measures approx. 15-17-20-23-24-26 cm = 6"-6¾"-8"-9"-9½"-10¼" from marker at the neck. Continue with pattern and stockinette stitch as before until piece measures 18-20-21-23-24-27 cm = 7"-8"-8¼"-9"-9½"-10⅝". Now divide piece for body and sleeves. Work next row as follows – from wrong side: Work the first 54-60-66-72-78-84 stitches (= right front piece), slip the next 60-66-74-82-86-90 stitches on a thread for sleeve, cast on 5 new stitches on needle (= in the side under sleeve), work the next 91-103-115-127-139-151 stitches (= back piece), slip the next 60-66-74-82-86-90 stitches on a thread for sleeve, cast on 5 new stitches on needle (= in the side under sleeve), work the last 54-60-66-72-78-84 stitches on needle (= left front piece). BODY: = 209-233-257-281-305-329 stitches on needle. Work as follows - from right side: 5 stitches in garter stitch, A.1A (= 3 stitches), A.1B over the next 192-216-240-264-288-312 stitches (= 32-36-40-44-48-52 repetitions of 6 stitches), A.1C (= 4 stitches), 5 stitches in garter stitch. Continue this pattern like this until piece measures 24-24-25-25-26-25 cm = 9½"-9½"-9¾"-9¾"-10¼"-9¾". Purl 1 row from wrong side while increasing 42-44-52-56-62-66 stitches evenly - read INCREASE TIP-2 = 251-277-309-337-367-395 stitches. Switch to circular needle size 3.5 MM = US 4. Work as follows - from right side: 5 stitches in garter stitch, work rib (= knit 1/purl 1), until 6 stitches remain, knit 1 and 5 stitches in garter stitch. Continue like this until rib measures 6 cm = 2⅜", bind off with knit over knit , and purl over purl - read BIND-OFF TIP. Piece measures approx. 52-54-56-58-60-62 cm = 20½"-21¼"-22"-22¾"-23⅝"-24⅜" from shoulder. SLEEVES: Slip the 60-66-74-82-86-90 stitches from thread in the one side back on double pointed needles/short circular needle size 4 MM = US 6 and pick in addition up 1 stitch in each side of the 5 new stitches cast on in the side under sleeve = 65-71-79-87-91-95 stitches. Insert a marker thread in the middle stitch under sleeve. Work in stockinette stitch in the round. When sleeve measures 3-3-3-2-2-2 cm = 1⅛"-1⅛"-1⅛"-¾"-¾"-¾" from division, decrease 1 stitch on each side of marker thread - read DECREASE TIP. Decrease like this approx. every 4½-3-2-1½-1-1 cm = 1⅝"-1⅛"-¾"-½"-⅜"-⅜" 6-8-11-14-15-16 times in total = 53-55-57-59-61-63 stitches. Then work until sleeve measures 30-29-26-25-23-21 cm = 11¾"-11⅜"-10¼"-9¾"-9"-8¼" from division, now knit 1 round while increasing 1 stitch = 54-56-58-60-62-64 stitches. Switch to double pointed needles size 3.5 MM = US 4. Work rib knit 1/purl 1 over all stitches for 6 cm = 2⅜". Bind off stitches with knit over knit and purl over purl. Sleeve measures 54-55-53-54-53-54 cm = 21¼"-21⅝"-21"-21¼"-21"-21¼" in total from the top of shoulder and down. Work the other sleeve the same way. ASSEMBLY: Sew the buttons on to left band. |
||||||||||||||||||||||
Diagram explanations |
||||||||||||||||||||||
|
||||||||||||||||||||||
|
||||||||||||||||||||||
|
||||||||||||||||||||||
|
||||||||||||||||||||||
|
Have you made this or any other of our designs? Tag your pictures in social media with #dropsdesign so we can see them! Do you need help with this pattern?You'll find tutorial videos, a Comments/Questions area and more by visiting the pattern on garnstudio.com. © 1982-2024 DROPS Design A/S. We reserve all rights. This document, including all its sub-sections, has copyrights. Read more about what you can do with our patterns at the bottom of each pattern on our site. |
||||||||||||||||||||||


With over 40 years in knitting and crochet design, DROPS Design offers one of the most extensive collections of free patterns on the internet - translated to 17 languages. As of today we count 304 catalogs and 11422 patterns - 11417 of which are translated into English (US/in).
We work hard to bring you the best knitting and crochet have to offer, inspiration and advice as well as great quality yarns at incredible prices! Would you like to use our patterns for other than personal use? You can read what you are allowed to do in the Copyright text at the bottom of all our patterns. Happy crafting!
Comments / Questions (23)
Hvor mange pinde / omgange skal man strikke A1A A1B A1C i højden ? Kan ikke få mønstret til at passer hvis jeg fortsætter med 2. og 3. pind i diagrammet
09.03.2022 - 21:42DROPS Design answered:
Hei Helle. Hva spesifikk tenker du på? Hvor i oppskrifter er du og hvilken str. strikker du? Man strikker diagrammene / mønsteret til arbeidet måler 24-24-25-25-26-25 cm. mvh DROPS Design
14.03.2022 - 13:03I want to make sure about the increases in sleeve and yoke. It's written that I do the increase every other row. Does that mean I do it every right side row? Thanks a lot.
11.01.2022 - 05:58DROPS Design answered:
Hi Neysa, Yes, the increases are on every row from the right side. Happy knitting!
11.01.2022 - 07:38I am a little bit confused with the neck edge. in the wrong side, am I supposed to do all purl stitches or "garter 5, *purl 1, knit 1*, purl 1, garter 5", or the same as the right side? (which is "garter 5, *knit 1, purl 1*, knit 1, garter 5"
10.01.2022 - 14:26DROPS Design answered:
Dear Mrs Azzahra, from WS work: 5 sts in garter st, *Purl 1, Knit 1*, repeat from *-* until 6 sts remain, work Purl 1, 5 sts in garter stitch. Happy knitting!
10.01.2022 - 16:07Como é que se faz a 3 linha do diagrama A1? Não se consegue fazer a sequência A1b ( repetir 5 vezes) separado de A1a e A1c.
29.11.2021 - 00:40DROPS Design answered:
Bom dia, Deve fazer os aumentos das mangas ao mesmo tempo que faz o diagrama A.1 no encaixe. "Tricotar, então, no ponto fantasia como explicado abaixo e aumentar para as mangas da seguinte maneira:"... Bons tricôs! Boas Festas!
29.11.2021 - 12:07Bonjour, Je tricote le gilet Cotswolds en taille L. Je suis bloquée au niveau de l’augmentation de l’empiècement pour tricoter les augmentations des devants et du dos en point fantaisie. Après avoir augmenté au premier tour mes 8 mailles, au 3ème tour, comment est-ce que je tricote pour le devant cette maille supplémentaire par rapport au diagramme, pour le dos, j’aurai deux mailles supplémentaires comment est-ce que je les tricote ? Merci pour votre aide.
25.11.2021 - 13:17DROPS Design answered:
Bonjoru Mme Van der Zyppe, les augmentations de l'empiècement se tricotent en jersey jusqu'à ce que vous ayez suffisamment de mailles pour tricoter un motif supplémentaires (attention à ce qu'il y ait autant de jetés que de diminutions dans le point ajouré). Au début du dos/du devant, tricotez les nouvelles mailles comme un nouveau motif qui vient se placer avant le précédent, à la fin du dos/du devant, augmentez comme pour créer un nouveau motif. Bon tricot!
25.11.2021 - 16:36Nej jag räknade ju fel 😂
19.11.2021 - 00:42Storlek M, har lagt upp 119 m. När jag ska sticka sadelaxlarna stämmer ju inte maskantalet med det ni anger... 25+18+33+18+25=127
19.11.2021 - 00:34DROPS Design answered:
Hej. Jo det stämmer, 25+18+33+18+25=119 (inte 127) m. Mvh DROPS Design
19.11.2021 - 09:25Vielen Dank für die schnelle Antwort!!! Ist nur die 1.Reihe in Abschnitten A.1A, A1B und A1.C unterteilt und die anderen Reihen wiederholen sich gemäss Rapport? Ich habe es so gestrickt, die 1.Reihe habe ich in diesen Abschnitten so gestrickt. Dann die 2.Reihe alles links, die 3.Reihe gemäss Rapport (=13 Maschen) mit Umschl und zusammenstricken, die 4.Reihe wieder alle M links und bei der 5. Reihe ist die letzte M re. Dieser Rapport beginnt dann wieder mit einer rechten M. Ist das so korrekt?
26.10.2021 - 07:08DROPS Design answered:
Liebe Frau Schneeberge, die Rück-Reihen werden stets links gestrickt, da müssen Sie also auf die Unterteilung nicht achten. Bei den Hin-Reihen müssen Sie aber darauf achten, dass Sie auch weiterhin gemäß der Unterteilung A, B und C stricken, d.h. an den Vorderteilen und am Rückenteil wie in der 1. Reihe A (= 3 Maschen) und C (= 4 Maschen) jeweils 1 x am Anfang und am Ende und dazwischen B (= 6 Maschen) stets wiederholen.
26.10.2021 - 22:39Ich gehe davon aus, dass das Diagramm von unten nach oben gelesen wird. Die 5. Reihe von unten nach oben endet mit einer rechten Masche und der gleiche Rapport fängt wieder mit einer rechten Masche an. Dann ergibt das zwei rechte Maschen bei der Wiederholung vom Rapport? Bei mir geht diese Reihenfolge nicht auf. Oder muss ich beim Ärmel einfach mit dem Muster enden und auf der anderen Seite vom Ärmel mit dem Muster neu anfangen?
25.10.2021 - 15:16DROPS Design answered:
Liebe Frau Schneeberge, Sie stricken ja nicht durchweg den kompletten Rapport A.1 in der Breite, sondern die unterschiedlichen Abschnitte, d.h. A.1A 1x am Anfang, A.1B wird mehrfach wiederholt und A.1C wird am Ende des Musters 1x gestrickt. Die Ärmel-Maschen stricken Sie glatt rechts und beginnen dann wieder mit A.1A, d.h. das Muster wird nur an den Vorderteilen und am Rückenteil gestrickt und nicht an den Ärmeln. Gutes Gelingen!
25.10.2021 - 19:35I like the neat fit (so many look as if they are 3 sizes too big for the model), and the attractive stitch.
09.08.2021 - 10:41