
Popular categories
Looking for a yarn?


|
||||||||||||||||||||||
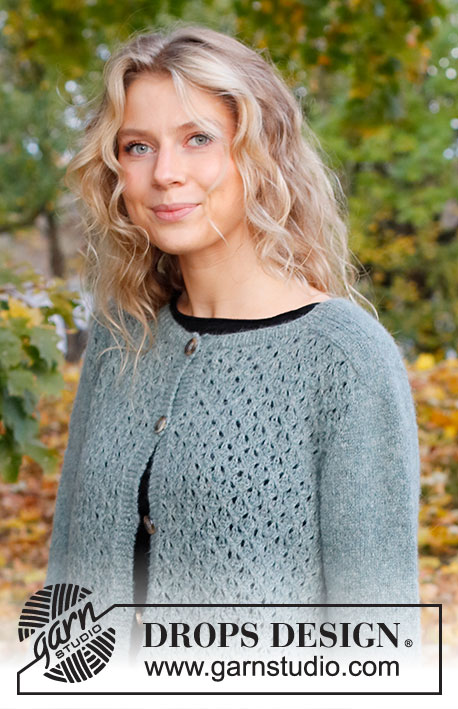
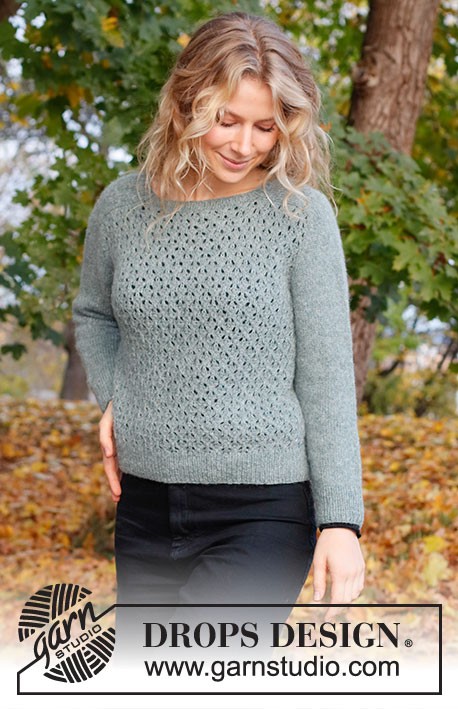
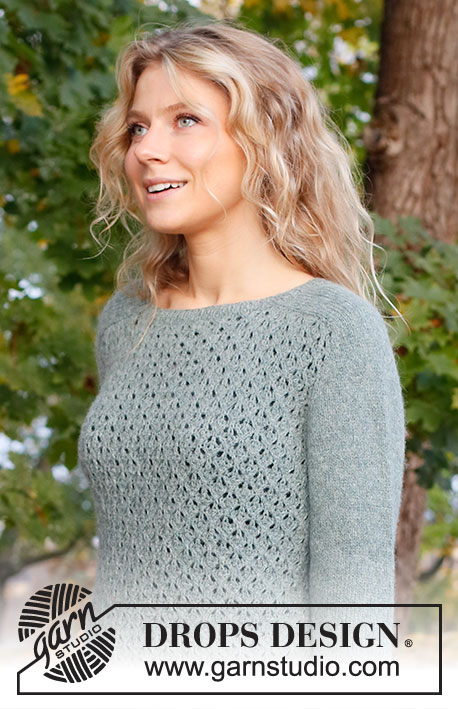
Cotswolds Sweater |
||||||||||||||||||||||
 |
 |
|||||||||||||||||||||
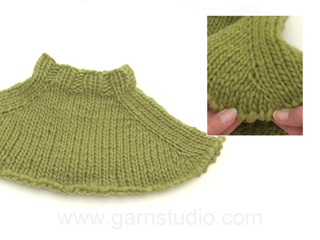
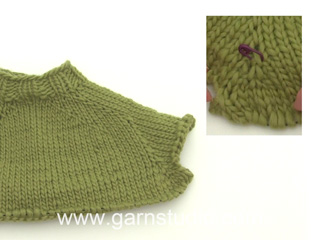
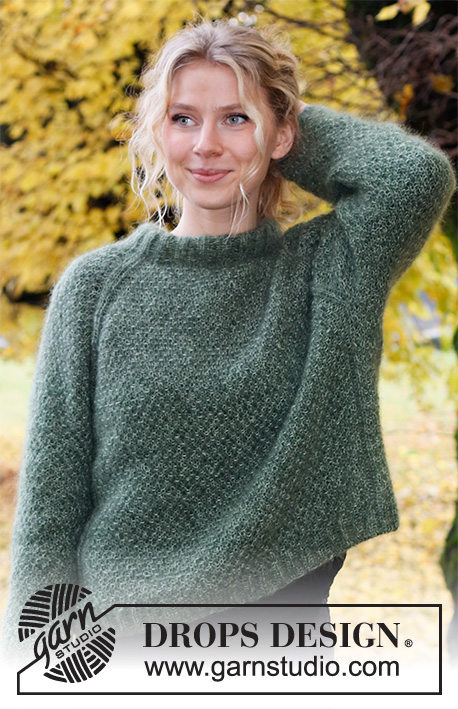
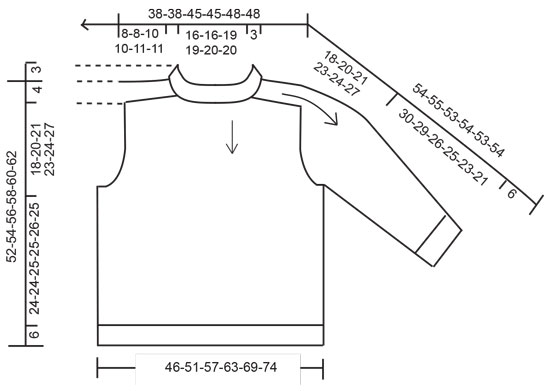
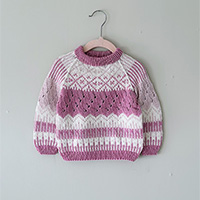
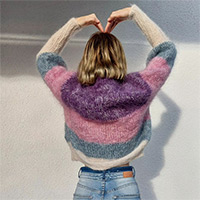
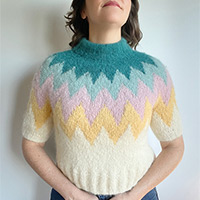
Knitted sweater in DROPS Sky. Piece is knitted top down with lace pattern and saddle shoulder. Size: S - XXXL
DROPS 226-12 |
||||||||||||||||||||||
|
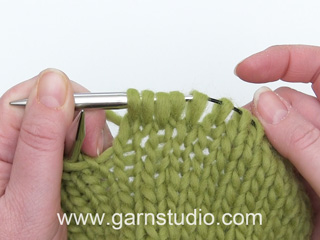
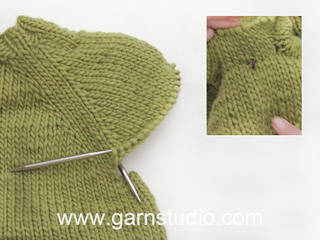
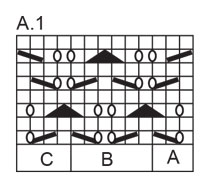
---------------------------------------------------------- EXPLANATION FOR THE PATTERN: ---------------------------------------------------------- GARTER STITCH (back and forth): Knit all rows. 1 ridge vertically = knit 2 rows. PATTERN: See diagram A.1. INCREASE TIP: BEFORE MARKER: The new stitch is twisted towards the right. Use left needle to pick up yarn between 2 stitches from round below, pick up yarn from the back and knit stitch in front loop of stitch. AFTER MARKER: The new stitch is twisted towards the left. Use left needle to pick up yarn between 2 stitches from round below, pick up yarn from the front and knit stitch in back loop of stitch. INCREASE TIP-2 (evenly): To calculate how to increase evenly, use the total number of stitches on row (e.g. 192 stitches) , and divide stitches by number of increases to be done (e.g. 38) = 5.1. In this example increase by making 1 yarn over after approx. every 5th stitch. On next round work yarn overs twisted to avoid holes. DECREASE TIP (applies to sleeves): Decrease 1 stitch on each side of marker thread as follows: Work until 3 stitches remain before stitch with marker thread, knit 2 together, knit 3 (stitch with marker thread is in the middle of these stitches), slip 1 stitch knitwise, knit 1, pass slipped stitch over stitch worked. BIND-OFF TIP: To avoid a tight bind-off edge when binding off, you may use a larger needle. If this still is too tight make 1 yarn over after approx. every 4th stitch while binding off (bind off yarn overs as stitches). ---------------------------------------------------------- START THE PIECE HERE: ---------------------------------------------------------- SWEATER - SHORT OVERVIEW OF THE PIECE: Neck edge is worked in the round. Then divide the piece for front piece, back piece and saddle shoulder. Then work each saddle shoulder back and forth separately, before stitches from the thread are placed back on needle, and pick up stitches for front piece and back piece (along the sides on saddle shoulders). Then work the rest of yoke in the round at the same time while increasing on sleeves and on front and back piece. Now divide yoke for body and sleeves. Work body in the round on needle, top down. Work sleeves in the round on double pointed needles/short circular needle, top down. NECK EDGE: Cast on 102-102-114-114-122-122 stitches on short circular needle size 3.5 MM = US 4 with DROPS Sky. Knit 1 round. Then work rib (knit 1/purl 1). Continue rib like this for 2 ½ cm = 1". SADDLE SHOULDER: Slip the first 33-33-39-39-43-43 stitches on a thread, slip the next 18 stitches on a short circular needle size 4 MM = US 6, slip the next 33-33-39-39-43-43 stitches on a thread, slip the last 18 stitches on a stitch thread. Work in stockinette stitch over the first 18 stitches, AT THE SAME TIME on first row cast on 1 edge stitch in each side = 20 stitches. Work edge stitches in GARTER STITCH - see explanation above. Work back and forth over these 20 stitches for 8-8-10-10-11-11 cm = 3⅛"-3⅛"-4"-4"-4⅜"-4⅜", on last row bind off 1 edge stitch in each side = 18 stitches. Cut the yarn. Work the same way over the 18 stitches from the thread in the other side. YOKE: Now knit up stitches along the side on saddle shoulder on circular needle size 4 MM = US 6 as follows. Begin at the edge on one saddle shoulder, knit up 17-17-20-20-24-24 stitches inside an edge stitch on the side of saddle shoulder, knit the 33-33-39-39-43-43 stitches from the thread, pick up 17-17-20-20-24-24 stitches inside an edge stitch on the side of saddle shoulder (= 67-67-79-79-91-91 stitches on back piece), insert 1st marker in next stitch, knit the 16 stitches on shoulder, insert 2nd marker in next stitch, pick up 17-17-20-20-24-24 stitches inside 1 edge stitch on the side of saddle shoulder, knit the 33-33-39-39-43-43 stitches from the thread, pick up 17-17-20-20-24-24 stitches inside 1 edge stitch on the side of saddle shoulder (= 67-67-79-79-91-91 stitches on front piece), insert 3rd marker in next stitch, knit the 16 stitches on saddle shoulder, insert 4th marker in next stitch = 170-170-194-194-218-218 stitches in total on needle. Insert a marker thread at the beginning of round – NOW MEASURE PIECE FROM HERE. Begin round in transition between left shoulder and back piece. Now work pattern as explanation below, and increase for sleeve as follows: INCREASE FOR SLEEVE: Increase 1 stitch AFTER 1st and 3rd marker and increase 1 stitch BEFORE 2nd and 4th marker – remember INCREASE TIP. Increase only on sleeves and number of stitches on front and back piece is the same. Work the increased stitches in stockinette stitch. REMEMBER THE KNITTING GAUGE! WORK PATTERN AS FOLLOWS: A.1A (= 3 stitches), A.1B over the next 60-60-72-72-84-84 stitches (= 10-10-12-12-14-14 repetition of 6 stitches), finish with A.1C (= 4 stitches), work in stockinette stitch over stitches on sleeve (i.e. between 1st and 2nd marker), A.1A (= 3 stitches), A.1B over the next 60-60-72-72-84-84 stitches (= 10-10-12-12-14-14 repetitions of 6 stitches), finish with A.1C (= 4 stitches), work in stockinette stitch over the stitches on sleeve (i.e. between 3rd and 4th marker). The 4 stitches with a marker are worked in stockinette stitch. Increase on sleeves every other round 9-6-10-8-10-6 times in total = 36-30-38-34-38-30 stitches between markers on. Piece now measures approx. 6-4-7-6-7-4 cm = 2⅜"-1½"-2¾"-2⅜"-2¾"-1½". When increases on sleeve are done, continue pattern and increases for yoke (there are now 206-194-234-226-258-242 stitches on needle). YOKE INCREASE: On next round increase 8 stitches for yoke by increasing both before and after each of the 4 stitches with marker - remember INCREASE TIP. NOTE: To avoid the pattern from displacing work as follows: Increase 1 stitch at the beginning of round (= after 4th marker), increase 1 stitch on each side of 1st, 2nd and 3rd marker, and increase 1 stitch before 4th marker at the end of round. Increase stitch on front piece, back piece and both sleeve, and work the increase stitch in pattern on front and back piece and in stockinette stitch on sleeves. Increase like this every other round 12-18-18-24-24-30 times in total = 302-338-378-418-450-482 stitches. When all increases are done, the piece measures approx. 15-17-20-23-24-26 cm = 6"-6¾"-8"-9"-9½"-10¼" from marker at the neck. Continue with pattern and stockinette stitch as before until piece measures 18-20-21-23-24-27 cm = 7"-8"-8¼"-9"-9½"-10⅝". Now divide piece for body and sleeves. Work next row as follows: Work the first 91-103-115-127-139-151 stitches (= back piece), slip the next 60-66-74-82-86-90 stitches on a thread for sleeve, cast on 5 new stitches on needle (= in the side under sleeves), work the next 91-103-115-127-139-151 stitches (= front piece), slip the next 60-66-74-82-86-90 stitches on a thread for sleeve, cast on 5 new stitches on needle (= in the side under sleeve). BODY: = 192-216-240-264-288-312 stitches on needle. Continue with A.1B over all stitches (= 32-36-40-44-48-52 repetitions of 6 stitches). Continue this pattern like this until piece measures 24-24-25-25-26-25 cm = 9½"-9½"-9¾"-9¾"-10¼"-9¾". Knit 1 round while increasing 38-42-48-52-58-62 stitches evenly - read INCREASE TIP-2 = 230-258-288-316-346-374 stitches. Switch to circular needle size 3.5 MM = US 4. Work rib (= knit 1/purl 1). Continue like this until rib measures 6 cm = 2⅜", bind off with knit over knit , and purl over purl - read BIND-OFF TIP. Piece measures approx. 52-54-56-58-60-62 cm = 20½"-21¼"-22"-22¾"-23⅝"-24⅜" from shoulder. SLEEVES: Slip the 60-66-74-82-86-90 stitches from the thread back on double pointed needles/short circular needle size 4 MM = US 6 and pick in addition up 1 stitch in each of the 5 new stitches cast on in the side under sleeve = 65-71-79-87-91-95 stitches. Insert a marker thread in the middle stitch under sleeve. Work in stockinette stitch in the round. When sleeve measures 3-3-3-2-2-2 cm = 1⅛"-1⅛"-1⅛"-¾"-¾"-¾" from division, decrease 1 stitch on each side of marker thread - read DECREASE TIP. Decrease like this approx. every 4½-3-2-1½-1-1 cm = 1⅝"-1⅛"-¾"-½"-⅜"-⅜" 6-8-11-14-15-16 times in total = 53-55-57-59-61-63 stitches. Then work until sleeve measures 30-29-26-25-23-21 cm = 11¾"-11⅜"-10¼"-9¾"-9"-8¼" from division, now knit 1 round while increasing 1 stitch = 54-56-58-60-62-64 stitches. Switch to double pointed needles size 3.5 MM = US 4. Work rib knit 1/purl 1 over all stitches for 6 cm = 2⅜". Bind off stitches with knit over knit and purl over purl. Sleeve measures 54-55-53-54-53-54 cm = 21¼"-21⅝"-21"-21¼"-21"-21¼" in total from the top of shoulder and down. Work the other sleeve the same way. |
||||||||||||||||||||||
Diagram explanations |
||||||||||||||||||||||
|
||||||||||||||||||||||
|
||||||||||||||||||||||
|
||||||||||||||||||||||
|
Have you made this or any other of our designs? Tag your pictures in social media with #dropsdesign so we can see them! Do you need help with this pattern?You'll find tutorial videos, a Comments/Questions area and more by visiting the pattern on garnstudio.com. © 1982-2024 DROPS Design A/S. We reserve all rights. This document, including all its sub-sections, has copyrights. Read more about what you can do with our patterns at the bottom of each pattern on our site. |
||||||||||||||||||||||

With over 40 years in knitting and crochet design, DROPS Design offers one of the most extensive collections of free patterns on the internet - translated to 17 languages. As of today we count 304 catalogs and 11422 patterns - 11417 of which are translated into English (US/in).
We work hard to bring you the best knitting and crochet have to offer, inspiration and advice as well as great quality yarns at incredible prices! Would you like to use our patterns for other than personal use? You can read what you are allowed to do in the Copyright text at the bottom of all our patterns. Happy crafting!
Comments / Questions (16)
Bonjour, Je ne sais pas du tout comment faire les augmentations empiècement. J'ai l'impression que dans tous les cas le schéma se décale... La maille avec le marqueur étant une maille jersey et que j'augmente une maille après le marqueur. Au tour suivant la maille marqueur sera toujours en jersey mais le jeté du diagramme sera au dessus de celle ajouter et non au dessus du jeté précèdent...
16.01.2024 - 15:28DROPS Design answered:
Bonjour Mme Simon, les augmentations se font avant et après les diagrammes, elles vont se tricoter en jersey jusqu'à ce que vous ayez assez de mailles pour les incorporer dans le point ajouré. Pour vous aider, vous pouvez ajouter des marqueurs entre vos diagrammes pour bien pouvoir visualiser quand vous pourrez augmenter, et tricotez les nouvelles mailles en suivant d'abord A.1C au début du point fantaisie et A.1A à la fin du point fantaisie dès que vous avez augmenté suffisamment de mailles pour 1 motif en plus de ces mailles, puis après 6 augmentations, vous avez 1 nouveau motif B de chaque côté. Bon tricot!
17.01.2024 - 08:51Bonjour, je souhaite réaliser le modèle 226-12, je ne comprend pas comment faire le point qui est écrit tricoter en point fantaisie : A1 B au dessus des 60 mailles 10x14 motifs de 6 mailles. Je dois répéter la partie B 10 fois pour le premier rang cela est bon ensuite comment faire pour les rangs suivant alors que les motifs des points sont coupés ? est ce que la partie B se tricote sur tous les rangs du diagramme ? En vous remerciant pour votre aide cdt
29.03.2023 - 13:39DROPS Design answered:
Bonjour Mme Bigaud, c'est bien ainsi que l'on doit faire: le diagramme A est pour le début du motif, on répète le B et on termine par le C. Au 3ème rang, tricotez la dernière maille de A avec les 2 premières m de B (vous avez bien 3 m dans A), puis tricotez la dernière maille de chaque B avec les 2 premières mailles du B suivant puis de C. Bon tricot!
29.03.2023 - 15:47Le graphique du dessin, doit on continuer par A1-B1-C1 continuellement a chaque rang? Merci , Nelly
07.01.2023 - 17:03DROPS Design answered:
Bonjour Nelly, le point ajouré va se tricoter ainsi: A.1 sur les 3 premières mailles (début du motif), on répète ensuite les 6 mailles de la partie A.1B jusqu'à ce qu'il reste 4 mailles et on termine le point ajouré par les 4 mailles de A.1C. Bon tricot!
09.01.2023 - 09:11Bonjour, \r\nComment ne pas décaler le motif dans les augmentations empiècement, étant donné que le tour commence par une augmentation ?\r\nMerci pour votre aide :-)
19.11.2022 - 21:03DROPS Design answered:
Bonjour Carole, tricotez les nouvelles mailles en jersey jusqu'à ce que vous en ayez augmenté suffisamment pour continuer le motif ajouré, entre temps, tricotez bien A.1A, B et C comme avant. Bon tricot!
21.11.2022 - 09:01Bedankt voor de toelichting! Ik heb inderdaad wat moeite om de beschrijving te volgen. Het meerderen 'iedere andere naald' ging ook al mis, omdat ik niet begreep welke 'andere' naald er bedoeld werd. Ik had daarom maar gewoon elke naald gemeerderd. Maar dat kwam dus niet goed... (Meestal staat er in Nederlandse patronen iets als 'om de naald' of 'elke 2e naald'.) Maar goed, nu gestaag op weg. Het gaat nog helemaal goedkomen met m'n trui ;)
05.11.2022 - 15:35Hoi, vraagje: de zadelschouder wordt eerst gebreid, over 18 steken, die even tijdelijk 20 worden om een kantsteek te hebben en dan weer 18 worden. Vervolgens neem je voor de pas steken op langs de zadel, gebruik je de wachtende steken van het pand, neem je weer op langs de zadel, en dan is de volgende instructie: 'brei de 16 steken op de schouder recht'. Waarom 16 en niet 18? Wat gebeurt er met de overige 2 steken? Ook wegminderen? Of is dit een typefout? Alvast bedankt!
03.11.2022 - 17:05DROPS Design answered:
Dag Yvonne,
Als het goed is heb je in de 2 buitenste steken van de zadeschouders 1 markeerdraad geplaatst, waardoor er 16 steken tussen zitten. In totaal zitten er dus nog wel 18 steken op elke zadelschouder.
05.11.2022 - 14:21It doesn’t tell me how much yarn I need in the materials section, just the type of yarn.please advise. Thank you
15.02.2022 - 08:42DROPS Design answered:
Dear Mrs Kiely, you will find under MATERIALS in the header of the pattern the total weigt of yarn required in each size, ie in S you need 250 g DROPS Sky / 50 g a ball Sky = 5 balls DROPS Sky are required in size S. Happy knitting!
15.02.2022 - 09:19How much yarn do I need to make this jumper? I can’t find it anywhere in the pattern instructions?
15.02.2022 - 07:59DROPS Design answered:
Hi Julia, The amounts are listed under Materials at the top of the page. Depending on the size you want to work, you need 250-300-350-350-400-450 g corresponding to sizes S-M-L-XL-XXL-XXXL. Happy knitting!
15.02.2022 - 08:15Bonjour, je ne comprends pas pourquoi ce modèle doit être si compliqué, j'ai vraiment abandonné car je trouve que ce ne sont pas des manches marteau en circulaire du moment qu'il faut tricoter les épaules séparément. Il serait plus agréable d'avoir des explications pour faire évoluer le diagramme au fur à mesure que l'on fait les épaules marteau. Dommage je vais partir sur un autre modèle.
07.01.2022 - 21:19DROPS Design answered:
Bonjour Fabienne, la constuction des manches marteau peut se faire de différentes façon, effectivement elles se tricotent ici d'abord en rangs, retrouvez ici tous nos pulls avec ce type de manches, vous trouverez peut-être un autre modèle qui vous convient. Bon tricot!
10.01.2022 - 07:36Kunne godt have ønsket mig lidt flere oplysninger om udtagning på mønster siden. "Nye masker strikkes løbende med i mønsteret" har betydet at jeg nu har 24 masker for meget på for- og bagstykke. Kan ikke finde ud af hvor fejlen er opstået og overvejer at finde en anden opskrift.
23.10.2021 - 10:04