
Popular categories
Looking for a yarn?


Comments / Questions (49)
![]() Ywonne wrote:
Ywonne wrote:
Hej Stämmer det verkligen att 2 rapporter av A4 ska bli 10.5cm på bredden? 2*3 bågar? En rapport blir ca 7.5 cm med en mindre nål för mig. Verkar konstigt.
14.02.2026 - 23:15DROPS Design answered:
Hei Ywonne. A.4 består av 2 halve og 2 hele luftmaskebuer (=3 luftmaskebuer, ikke 4), og heklefastheten som er oppgitt skal stemme. mvh DROPS Design
16.02.2026 - 14:10
![]() Josefina wrote:
Josefina wrote:
Hej igen, jag undrar också, stämmer det verkligen att två rapporter av A.4 ska bli 10,5 cm? Blir inte det alldeles för mycket? Borde det inte vara bara en rapport A.4, dvs att fyra bågar på första varvet i digrammet ska bli 10.5 cm?
15.06.2025 - 17:36DROPS Design answered:
Hei Josefina. Stemmer med det som er oppgitt i oppskriften. A.4 består av 2 halve og 2 hele luftmaskebuer (=3 luftmaskebuer, ikke 4). mvh DROPS Design
16.06.2025 - 13:57
![]() Josefina wrote:
Josefina wrote:
Hej, stämmer det verkligen att man gör första varvet helt i stolpar? På bilden ser hela koftan ut att vara virkad i spetsmönster. Är det meningen att varvet med stolpar ska sitta på axeln ? I diagrammet ser det ut som att A1-17 virkas direkt i luftmaskkedjan.
15.06.2025 - 15:35DROPS Design answered:
Hei Josafina. Vanskelig å se på bildet, men ja, det stemmer. Når bakstykket skal hekles, hekles det i luftmaske raden fra oppleggskanten på forstykkene, slik at man ikke får 2 rader med staver. Diagram A.1 - A.7 hekles ikke før høyre og venstre skulder er ferdig heklet og A.7 hekles kun på høyre forstykke og A.1 kun på venstre forstykke = A.1 & A.7 = stolpene midt foran. mvh DROPS Design
16.06.2025 - 13:51
![]() JUDITH PILOT wrote:
JUDITH PILOT wrote:
Les explications sont très difficiles à comprendre. Je n'arrive pas à exécuter ce gilet.
22.02.2025 - 11:22
![]() Ria wrote:
Ria wrote:
Ik heb a8 gehaakt en moet nu een nieuwe draad nemen en 22 losse haken. Hoe ga ik dan verder. Wat moet ik met die 22 losse doen.
01.07.2024 - 15:58DROPS Design answered:
Dag Ria,
Die 22 lossen laatje gewoon hangen, hier haak je later over voor de hals.
01.07.2024 - 20:43
![]() Mary B wrote:
Mary B wrote:
Would you please explain to me the vertical part A8! Like how does it work to do A8 over A6 vertically? Thanks
20.06.2024 - 03:21DROPS Design answered:
Dear Mary B, instead of working A.6 work now A.8, ie on first row crochet 1 single crochet in the chain from previous row, then crochet 6 chains (A.8), A.5, A.4, A.3, A.2 as before, then turn and work as before: A.2 to A.5 then finish row with A.8 and so on. Happy crocheting!
20.06.2024 - 08:18
![]() Ferrero Monique wrote:
Ferrero Monique wrote:
Bonjour c'est la première fois que je n'arrive pas à faire un de vos modèles, je vais me diriger ver un autre modèle d'hommage
26.10.2023 - 17:32DROPS Design answered:
Bonjour Mme Ferrero, rappelez-vous que vous pouvez volontiers poser votre question dans cette rubrique, nous pourrons ainsi essayer de vous aider. Votre magasin peut également vous apporter son assistance, même par mail ou téléphone. Bon crochet!
27.10.2023 - 09:43
![]() Gudrun wrote:
Gudrun wrote:
Wo wird A1 gehäkelt, beginne ich wirklich mit A2?
25.06.2022 - 18:53DROPS Design answered:
Liebe Gudrun, A.1 gilt für die Blende, das stricken Sie bei den Vorderteilen; beim Rückenteil beginnen Sie mit A.2 (entweder 1 oder 3 Luftmasche am Anfang der Reihe und enden Sie mit A.6 (1 fM oder1 Stb) am Ende der Reihe. Viel Spaß beim häkeln!
27.06.2022 - 08:22
![]() Christine wrote:
Christine wrote:
Je vous remercie pour votre réponse mais je ne comprends toujours pas puisque l'augmentation pour l'encolure débute sur le même rang, le rang 7, Si l'on fait les 6 premiers rangs du devant droit A2 se trouve au début du rang et on ne peut donc pas terminer par A9 au dessus de A2
20.06.2022 - 08:40DROPS Design answered:
Bonjour Christine, pour le devant droit, vous avez crocheté A.8 en fin de rang (= à gauche, vu sur l'endroit), pour le devant droit, vous crochetez A.9 en début de rang (vous commencez et non terminez par A.9, la correction va être faîte). Bon crochet!
20.06.2022 - 08:58
![]() Christine wrote:
Christine wrote:
Bonjour, Je ne comprends pas ce modèle : si on crochète le devant gauche comme le devant droit, l\'encolure ne va-t-elle pas se retrouver du même côté ?
19.06.2022 - 22:27DROPS Design answered:
Bonjour Christine, vous ne crochetez que les 6 premiers rangs comme le devant droit, autrement dit la partie "épaule "droite"", avant d'augmenter pour l'encolure, et vous crochèterez pour le devant gauche A.9 au lieu de A.8 pour le devant droit. Ainsi, les devants sont en "miroir". Bon crochet!
20.06.2022 - 08:02
|
|||||||||||||||||||||||||
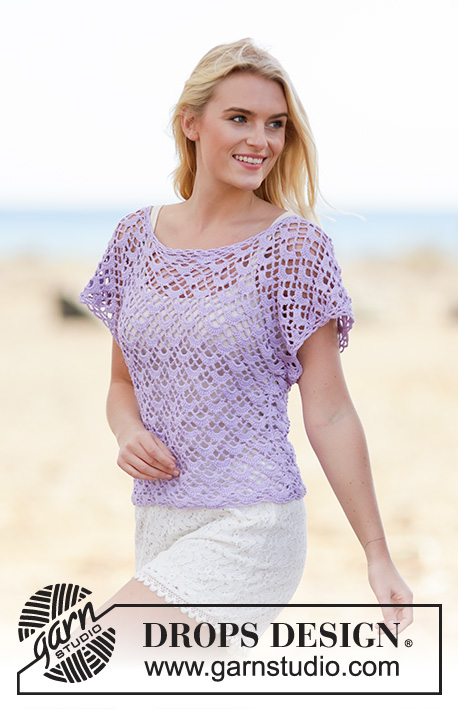
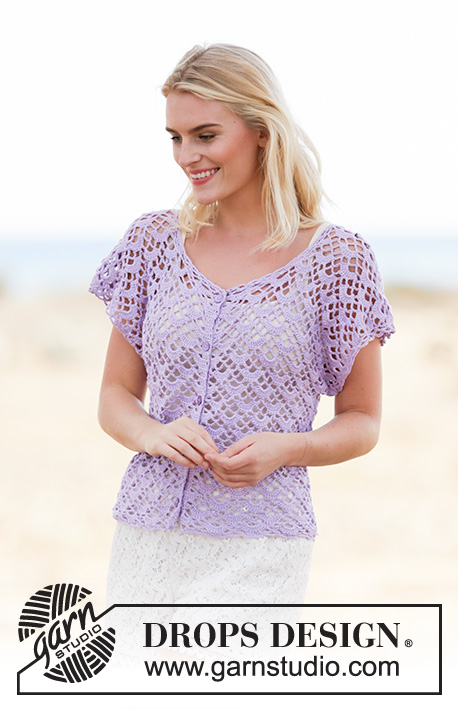
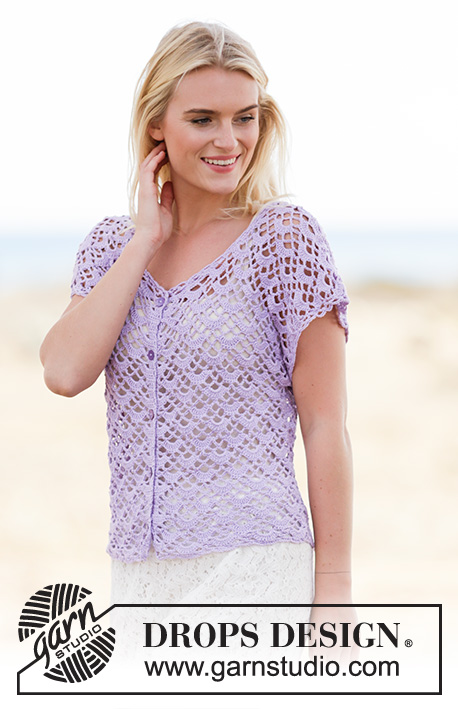
Shy Violet Cardigan#shyvioletcardigan |
|||||||||||||||||||||||||
 |
 |
||||||||||||||||||||||||
Crochet DROPS jacket with fan pattern, worked top down in ”Safran”. Size S-XXXL.
DROPS 162-14 |
|||||||||||||||||||||||||
|
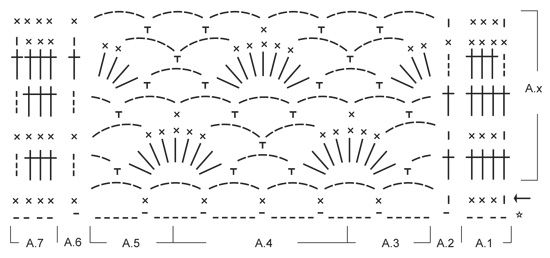
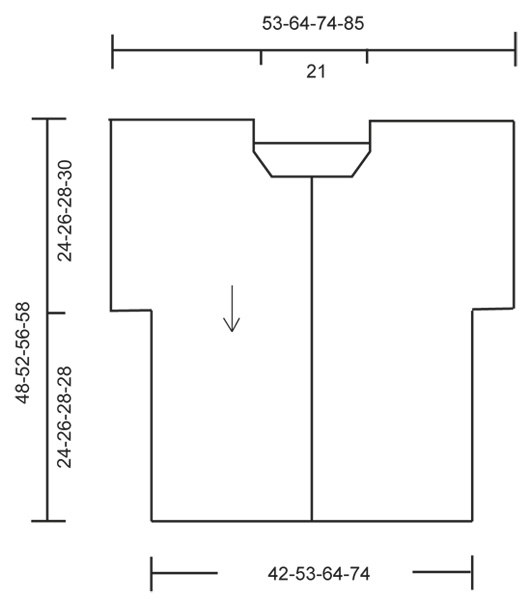
PATTERN: See diagrams A.1 to A.9. The diagrams show all rows in pattern seen from RS. BUTTONHOLES: Measure from neck edge at the front and sew buttons on left band: SIZE S/M: 1, 9, 17, 25 and 33 cm / 3/8", 3½", 6¾", 9¾", 13". SIZE L: 1, 10, 19, 28 and 37 cm / 3/8", 4", 7½", 11", 14½" SIZE XL/XXL: 1, 8, 16, 24, 32 and 40 cm / 3/8", 3⅛", 6¼", 9½", 12½", 15¾". SIZE XXXL: 1, 9, 17, 25, 33 and 41 cm / 3/8", 3½", 6¾", 9¾", 13", 16⅛" ---------------------------------------------------------- JACKET: The piece is worked top down. RIGHT FRONT PIECE: Work 69-92-114-137 ch (includes 3 ch to turn with) on hook size 3.5 mm/E/4 with Safran. ROW 1 (= WS): Work 1 dc in 4th ch from hook (= 2 dc), 1 dc in each of the next 5-3-5-3 ch, * skip ch 1, work 1 dc in each of the next 4 ch *, repeat from *-* the entire row = 55-73-91-109 dc. NOW MEASURE PIECE FROM HERE! Now work according to diagram, i.e. work as follows: ROW 1-6: (1st row = RS): Work A.2, A.3, A.4 2-3-4-5 times in total, A.5, A.6. REMEMBER THE CROCHET GAUGE! ROW 7 (= RS): Work last row in A.2-A.5 as before but finish with A.8 over A.6. Continue until A.8 has been worked 1 time vertically, in A.2-A.5 repeat rows in A.x. Do not cut the yarn. Take a new strand and work 1 sl st in 3rd ch at beg of last row and 22 ch for neck. Cut the yarn and continue with first strand. Work over all sts, beg from RS as follows: A.2, A.3, A.4 4-5-6-7 times in total, A.5, finish with A.7 (= band). Continue like this. When piece measures approx. 24-26-28-30 cm / 9½"-10¼"-11"-11¾" – adjust after 7th row, sleeves are done. Then work as follows, beg from WS: Work A.7 (= band), A.5, A.4 3-4-5-6 times in total, A.3, finish with A.2 (do not work the last 3 ch-spaces). Continue like this until piece measures approx. 48-52-56-58 cm / 19"-20½"-22"-22¾", adjust after 5th row in diagram. Fasten off. LEFT FRONT PIECE: Work as right front piece to and with 6th row. ROW 7 (= RS): Work last row in A.3-A.6 as before but start with A.9 over A.2. Continue until A.9 has been worked 1 time vertically, in A.3-A.6 repeat rows in A.x. Work 22 ch at the end of row for neck. Now work over all sts, beg from RS as follows: A.1 (= band), A.3, A.4 4-5-6-7 times in total, A.5, finish with A.6. Continue like this. When piece measures approx. 24-26-28-30 cm / 9½"-10¼"-11"-11¾" – adjust after right front piece, sleeves are done. Cut the yarn. Then work as follows, beg from WS: Skip 3 ch-space, beg by working in next sc as follows: A.6, A.5, A.4 3-4-5-6 times in total, A.3, finish with A.1 (= band). Continue like this until piece measures approx. 48-52-56-58 cm / 19"-20½"-22"-22¾", adjust after right front piece. Fasten off. BACK PIECE: Work left shoulder in ch-row from cast on edge (work in same ch as dc's, i.e. in the 55-73-91-109 dc) from left front piece as follows: ROW 1-6: (1st row = RS): Work A.2, A.3, A.4 2-3-4-5 times in total, A.5, A.6. Cut the yarn. Work right shoulder as left shoulder but in right front piece - NOTE! Instead of cutting the yarn work 71 ch for neck at the end of row, fasten with 1 sl st in first ch at beg of last row on left shoulder. Cut the yarn. Now work over all sts, beg from RS as follows: NOTE: (Work first row as first row in diagram A1-A.6, then A.x) Work A.2, A.3, A.4 9-10-11-12 times in total, A.5, finish with A.6. Continue like this. When piece measures approx. 24-26-28-30 cm / 9½"-10¼"-11"-11¾" – adjust after front piece, sleeves are done. Cut the yarn. Then work as follows, beg from WS: Skip 3 ch-space, beg by working in next sc as follows: A.6, A.5, A.4 7-8-9-10 times in total, A.3, finish with A.2 (do not work the last 3 ch-spaces). Continue like this until piece measures approx. 48-52-56-58 cm / 19"-20½"-22"-22¾", adjust after front piece. Fasten off. ASSEMBLY: Sew side and underarm seams in one. Sew buttons on to the left band - see explanation above. Button through a hole in right front piece. EDGES: Work an edge along the neck, beg from band on right front piece as follows: Work * 1 sc, 5 ch *, repeat from *-* along the neck with approx. 2 cm / ¾" between every sc until band on left front piece. Turn piece with 5 ch and work as follows: 1 sc in first ch-space, * ch 5, 1 sc in next ch-space*, repeat from *-* the entire row and finish with 5 ch and 1 sc in first ch from previous row. Fasten off. Work an edge at the bottom along front and back piece the same way, beg from band on left front piece. Work an edge around the sleeve the same way, beg from mid under sleeve. |
|||||||||||||||||||||||||
Diagram explanations |
|||||||||||||||||||||||||
|
|||||||||||||||||||||||||
 |
|||||||||||||||||||||||||
 |
|||||||||||||||||||||||||
 |
|||||||||||||||||||||||||
Have you finished this pattern?Tag your pictures with #dropspattern #shyvioletcardigan or submit them to the #dropsfan gallery. Do you need help with this pattern?You'll find 6 tutorial videos, a Comments/Questions area and more by visiting the pattern on garnstudio.com. © 1982-2026 DROPS Design A/S. We reserve all rights. This document, including all its sub-sections, has copyrights. Read more about what you can do with our patterns at the bottom of each pattern on our site. |
|||||||||||||||||||||||||


With over 40 years in knitting and crochet design, DROPS Design offers one of the most extensive collections of free patterns on the internet - translated to 17 languages. As of today we count 325 catalogs and 12298 patterns - 12288 of which are translated into English (US/in).
We work hard to bring you the best knitting and crochet have to offer, inspiration and advice as well as great quality yarns at incredible prices! Would you like to use our patterns for other than personal use? You can read what you are allowed to do in the Copyright text at the bottom of all our patterns. Happy crafting!
Post a comment to pattern DROPS 162-14
We would love to hear what you have to say about this pattern!
If you want to leave a question, please make sure you select the correct category in the form below, to speed up the answering process. Required fields are marked *.