
Popular categories
Looking for a yarn?


|
|||||||||||||||||||||||||
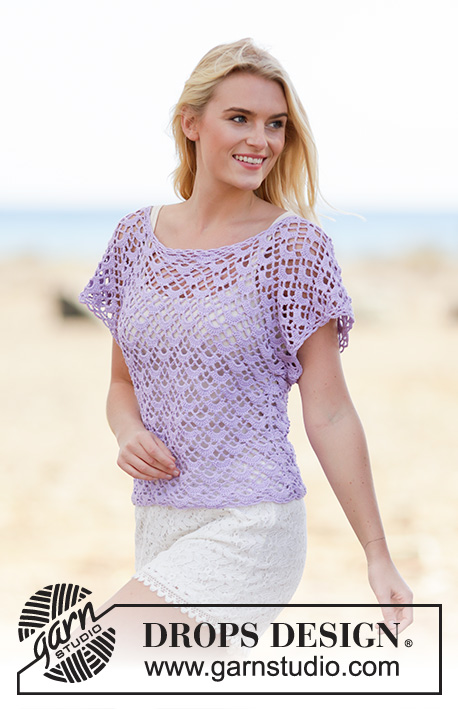
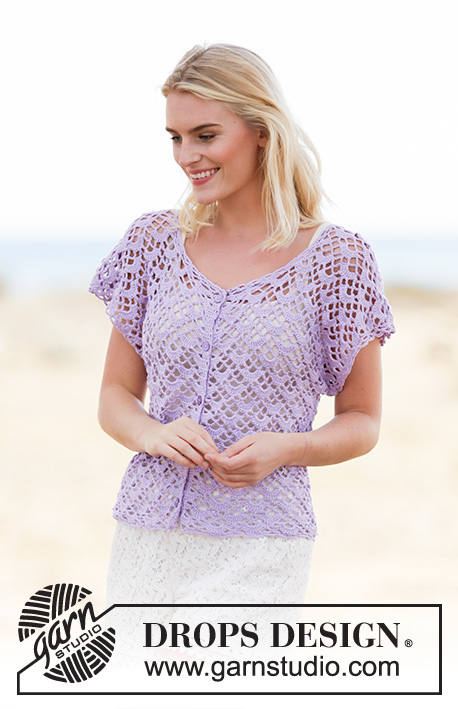
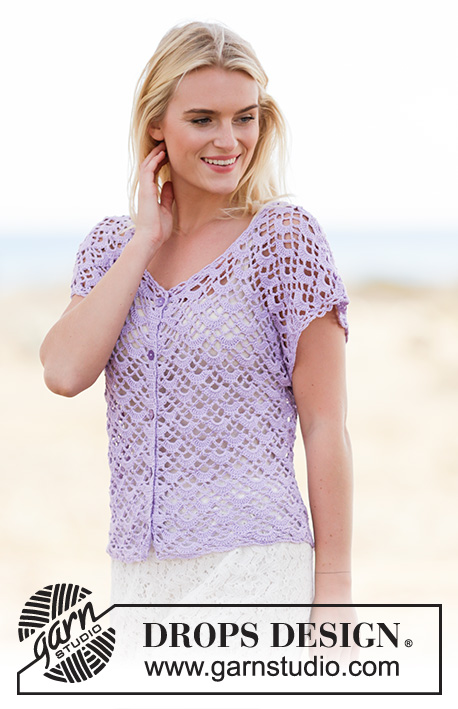
Shy Violet Cardigan |
|||||||||||||||||||||||||
 |
 |
||||||||||||||||||||||||
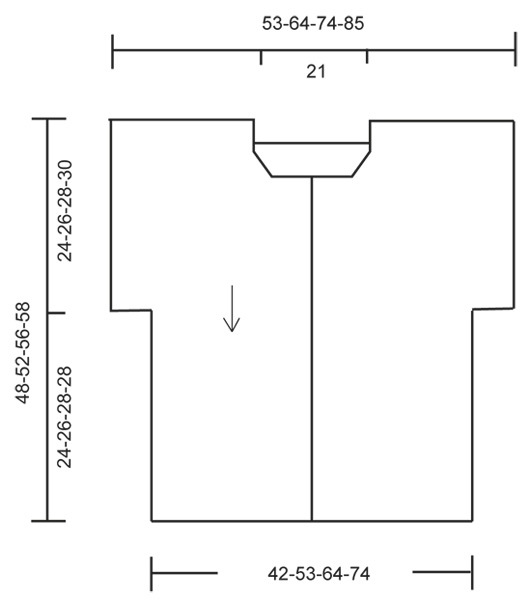
Crochet DROPS jacket with fan pattern, worked top down in ”Safran”. Size S-XXXL.
DROPS 162-14 |
|||||||||||||||||||||||||
|
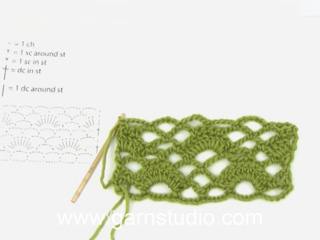
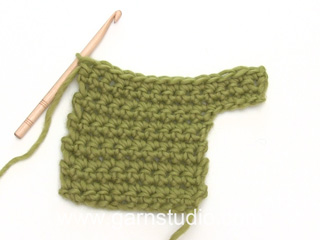
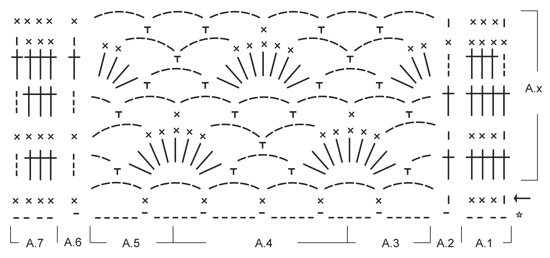
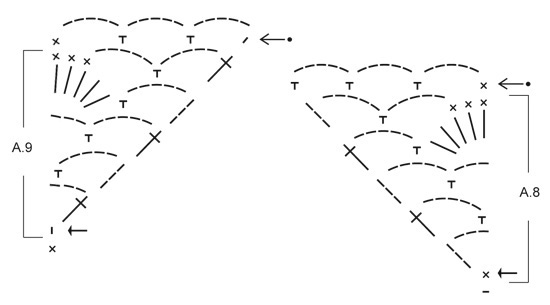
PATTERN: See diagrams A.1 to A.9. The diagrams show all rows in pattern seen from RS. BUTTONHOLES: Measure from neck edge at the front and sew buttons on left band: SIZE S/M: 1, 9, 17, 25 and 33 cm / 3/8", 3½", 6¾", 9¾", 13". SIZE L: 1, 10, 19, 28 and 37 cm / 3/8", 4", 7½", 11", 14½" SIZE XL/XXL: 1, 8, 16, 24, 32 and 40 cm / 3/8", 3⅛", 6¼", 9½", 12½", 15¾". SIZE XXXL: 1, 9, 17, 25, 33 and 41 cm / 3/8", 3½", 6¾", 9¾", 13", 16⅛" ---------------------------------------------------------- JACKET: The piece is worked top down. RIGHT FRONT PIECE: Work 69-92-114-137 ch (includes 3 ch to turn with) on hook size 3.5 mm/E/4 with Safran. ROW 1 (= WS): Work 1 dc in 4th ch from hook (= 2 dc), 1 dc in each of the next 5-3-5-3 ch, * skip ch 1, work 1 dc in each of the next 4 ch *, repeat from *-* the entire row = 55-73-91-109 dc. NOW MEASURE PIECE FROM HERE! Now work according to diagram, i.e. work as follows: ROW 1-6: (1st row = RS): Work A.2, A.3, A.4 2-3-4-5 times in total, A.5, A.6. REMEMBER THE CROCHET GAUGE! ROW 7 (= RS): Work last row in A.2-A.5 as before but finish with A.8 over A.6. Continue until A.8 has been worked 1 time vertically, in A.2-A.5 repeat rows in A.x. Do not cut the yarn. Take a new strand and work 1 sl st in 3rd ch at beg of last row and 22 ch for neck. Cut the yarn and continue with first strand. Work over all sts, beg from RS as follows: A.2, A.3, A.4 4-5-6-7 times in total, A.5, finish with A.7 (= band). Continue like this. When piece measures approx. 24-26-28-30 cm / 9½"-10¼"-11"-11¾" – adjust after 7th row, sleeves are done. Then work as follows, beg from WS: Work A.7 (= band), A.5, A.4 3-4-5-6 times in total, A.3, finish with A.2 (do not work the last 3 ch-spaces). Continue like this until piece measures approx. 48-52-56-58 cm / 19"-20½"-22"-22¾", adjust after 5th row in diagram. Fasten off. LEFT FRONT PIECE: Work as right front piece to and with 6th row. ROW 7 (= RS): Work last row in A.3-A.6 as before but start with A.9 over A.2. Continue until A.9 has been worked 1 time vertically, in A.3-A.6 repeat rows in A.x. Work 22 ch at the end of row for neck. Now work over all sts, beg from RS as follows: A.1 (= band), A.3, A.4 4-5-6-7 times in total, A.5, finish with A.6. Continue like this. When piece measures approx. 24-26-28-30 cm / 9½"-10¼"-11"-11¾" – adjust after right front piece, sleeves are done. Cut the yarn. Then work as follows, beg from WS: Skip 3 ch-space, beg by working in next sc as follows: A.6, A.5, A.4 3-4-5-6 times in total, A.3, finish with A.1 (= band). Continue like this until piece measures approx. 48-52-56-58 cm / 19"-20½"-22"-22¾", adjust after right front piece. Fasten off. BACK PIECE: Work left shoulder in ch-row from cast on edge (work in same ch as dc's, i.e. in the 55-73-91-109 dc) from left front piece as follows: ROW 1-6: (1st row = RS): Work A.2, A.3, A.4 2-3-4-5 times in total, A.5, A.6. Cut the yarn. Work right shoulder as left shoulder but in right front piece - NOTE! Instead of cutting the yarn work 71 ch for neck at the end of row, fasten with 1 sl st in first ch at beg of last row on left shoulder. Cut the yarn. Now work over all sts, beg from RS as follows: NOTE: (Work first row as first row in diagram A1-A.6, then A.x) Work A.2, A.3, A.4 9-10-11-12 times in total, A.5, finish with A.6. Continue like this. When piece measures approx. 24-26-28-30 cm / 9½"-10¼"-11"-11¾" – adjust after front piece, sleeves are done. Cut the yarn. Then work as follows, beg from WS: Skip 3 ch-space, beg by working in next sc as follows: A.6, A.5, A.4 7-8-9-10 times in total, A.3, finish with A.2 (do not work the last 3 ch-spaces). Continue like this until piece measures approx. 48-52-56-58 cm / 19"-20½"-22"-22¾", adjust after front piece. Fasten off. ASSEMBLY: Sew side and underarm seams in one. Sew buttons on to the left band - see explanation above. Button through a hole in right front piece. EDGES: Work an edge along the neck, beg from band on right front piece as follows: Work * 1 sc, 5 ch *, repeat from *-* along the neck with approx. 2 cm / ¾" between every sc until band on left front piece. Turn piece with 5 ch and work as follows: 1 sc in first ch-space, * ch 5, 1 sc in next ch-space*, repeat from *-* the entire row and finish with 5 ch and 1 sc in first ch from previous row. Fasten off. Work an edge at the bottom along front and back piece the same way, beg from band on left front piece. Work an edge around the sleeve the same way, beg from mid under sleeve. |
|||||||||||||||||||||||||
Diagram explanations |
|||||||||||||||||||||||||
|
|||||||||||||||||||||||||
|
|||||||||||||||||||||||||
|
|||||||||||||||||||||||||
|
|||||||||||||||||||||||||
|
Have you made this or any other of our designs? Tag your pictures in social media with #dropsdesign so we can see them! Do you need help with this pattern?You'll find tutorial videos, a Comments/Questions area and more by visiting the pattern on garnstudio.com. © 1982-2024 DROPS Design A/S. We reserve all rights. This document, including all its sub-sections, has copyrights. Read more about what you can do with our patterns at the bottom of each pattern on our site. |
|||||||||||||||||||||||||


With over 40 years in knitting and crochet design, DROPS Design offers one of the most extensive collections of free patterns on the internet - translated to 17 languages. As of today we count 304 catalogs and 11422 patterns - 11417 of which are translated into English (US/in).
We work hard to bring you the best knitting and crochet have to offer, inspiration and advice as well as great quality yarns at incredible prices! Would you like to use our patterns for other than personal use? You can read what you are allowed to do in the Copyright text at the bottom of all our patterns. Happy crafting!
Comments / Questions (44)
Charlene Boardman wrote:
I am beginning this cardigan. Row 1: What does A.2 say to do? Ch 1 and skip st? Also why does A.4 end in 3rd chain of 5ch loop? If I move immediately to 2nd repeat beginning at A.2, what happens to the loop? I just do not understand the chart and have crocheted many things from charts. What am I doing or seeing wrong? I am so frustrated! Drops is not sold in my country, so have nobody to ask.
12.09.2016 - 15:21DROPS Design answered:
Dear Mrs Boardman, on row 1 in A.2 work 1 ch (= 1st dc (UK-English)/sc (US-English) - A.3 ends with 2 ch, A.4 beg with 3 ch (= 5-ch-space) and ends with 2 ch then A.5 beg with 3 ch (= 5-ch-space). You can get DROPS yarn and further assistance from your DROPS store all around the world, see here. Happy crocheting!
12.09.2016 - 16:18Buongiorno. Sono arrivata per entrambi i lati davanti alle 22 catenelle ma poi non riesco a capire come proseguire. Devo fare la prima riga dei diagrammi indicati (quella con la freccia tutta a sequenze di 5 catenelle) o la prima del diagramma A.x? Grazie.
21.07.2016 - 08:37DROPS Design answered:
Buongiorno Paola. Deve iniziare i diagrammi dalla riga con la freccia; è la riga tra la sequenza di cat e il diagramma A.x, quella che per i diagrammi A.3, A.4 e A.5 è formata da archi di cat e 1 m.b. Buon lavoro!
21.07.2016 - 09:06Hallo Ich habs nun mit der gleichen Anzahl Luftmaschen wie Stäbchen in der 1. Reihe versucht, ein paar Reihen gehäkelt. Und dann anschliessend am Anschlag für den Rücken angehäkelt....ich habe viel zu viele Stäbchen, es wellt und wird mit allem ziehen nicht glatt. Was mache ich falsch? Ich kanns nicht verstehen. Gibts eine Alternative? liebe Grüsse
26.06.2016 - 10:14DROPS Design answered:
Liebe Helga, wenn Sie der längere Luftmaschenanschlag stört, häkeln Sie nur so viele Lm (aber möglichst locker, damit es nicht spannt) wie nachher Stäbchen angegeben sind. Sonst passiert es, dass Sie zu viele Stb haben und es zu weit ist bzw. wellt. Aber wenn ich Sie richtig verstanden habe, haben Sie dies bereits getan. Ich kann von hier aus nicht ganz nachvollziehen, wieso Ihre Häkelarbeit dann wellig wird.
05.07.2016 - 15:53Danke für die Antwort. Wie schon erwähnt wird mein Anschlag respektive durch die 1. Reihe total wellig.....es ist nicht möglich, die Häkelarbeit nur schon gerade auszulegen. Sieht aus wie Rüschen.........so kann man doch nicht zusammensetzen oder anhäkeln.
24.06.2016 - 21:57DROPS Design answered:
Liebe Helga, siehe Antwort weiter oben.
05.07.2016 - 15:53Weil die erste Reihe dann etwas länger wird, also nicht zu stramm.
24.06.2016 - 20:17Hallo Ich verstehe den Sinn der 1. Reihe nicht. Warum kann man nicht soviele Luftmaschen anschlagen, wie man dann auch Stäbchen drauf häkelt? Ich habe mit dieser angegebenen Variante (4 Stäbchen in je 1 Luftmasche, 1 Luftmasche überspringen usw) einen völlig welligen Anfangsrand, wo ich mich jetzt schon frage, wie man das dann mit dem Rückenteil verbinden will.
24.06.2016 - 18:01DROPS Design answered:
Liebe Helga, siehe Antwort weiter oben.
05.07.2016 - 15:54Hallo allemaal, Ik begrijp de 2e helft van toer 7 niet. '...maar eindig met A8 boven A6.' Hoe moet ik dit zien? Heb je dan een losse 'driehoek' hangen of waar moet dat aan vast? De regel daarna is me ook niet duidelijk: 'Ga verder tot A8 een keer in de hoogte is gehaakt, herhaal in A2-A5 de toeren in AX.' Alvast bedankt voor de hulp!
26.08.2015 - 19:00DROPS Design answered:
Hoi Corina. Je haakt van boven naar beneden en moet nu meerderen voor de hals van het voorpand (zie ook foto). Dus je moet nu A.8 haken boven A.6 = 1 v. Dus als je begint met A.8 heb je ook een v en in de volgende toeren ga je meerderen en het voorpand wordt breder. Je haakt dus A.8 één keer in de hoogte en tegelijkertijd haak je door volgens A.X boven A.2/A.5
02.09.2015 - 16:45Noeleen wrote:
How much yarn is required for this garment? i.e how many 50g balls as i don't understand what 250-350-350-400g refers to in materials
02.08.2015 - 09:40DROPS Design answered:
Dear Noelen, yarn requirements are given for each size, ie you need 250 g DROPS Safran in 1st size / 50 g a ball DROPS Safran = 5 balls in first size (350 g/ 50 g = 7 balls in 2nd size and so on). Happy crocheting!
03.08.2015 - 09:48Salve vi ringrazio per le informazioni finora ottenute. ho realizzato il cardigan e la mia mamma ne vorrebbe uno uguale ma di una taglia inferiore. quindi le catenelle saranno 92 ..............per ottenere quanti punti alti??? aiutatemi come avete fatto nella precedente richiesta che vi ho sottoposto ......grazie attendo impaziente la risposta
29.06.2015 - 08:03DROPS Design answered:
Buongiorno Franca. Avvia 92 cat. Lavora la prima riga di m.a così: salta 3 cat (contano come 1 m.a), 1 m.a nella 4a cat, 1 m.a in ognuna delle 3 cat successive (fino a qui: 5 m.a). Poi deve: saltare 1 cat e lavorare 1 m.a in ognuna delle 4 cat successive, saltare 1 cat e lavorare 1 m.a nelle 4 cat successive e così via, in tutto 17 volte (68 m.a). Ottiene così 5 + 68 = 73 m.a. Buon lavoro!
29.06.2015 - 09:55Ho fatto i 2 davanti ora lavoro sulle cat iniziali 1 p. basso 5 cat salto 5 p.alti si formano cosi' gli archetti. quando faccio 71 cat per il dietro collo come e quando si fanno gli archetti???
16.06.2015 - 17:41DROPS Design answered:
Buonasera Franca. Dopo aver avviato le 71 cat e unito queste cat alla spalla sinistra, taglia il filo e iniziando sul diritto del lavoro, lavora la prima riga dei diagrammi A.2 – A.6 come segue: diagramma A.2, diagramma A.3, diagramma A.4 9-10-11-12 volte, diagramma A.5, e infine diagramma A.6. Prosegue poi con il diagramma A.x. Buon lavoro!
16.06.2015 - 19:57