
Categorie popolari
State cercando un filato?


Lasciare un commento sul modello DROPS 216-9
Noi saremmo felici di ricevere i tuoi commenti e opinioni su questo modello!
Se vuoi fare una domanda, fai per favore attenzione a selezionare la categoria corretta nella casella qui sotto per velocizzare il processo di risposta. I campi richiesti sono indicati da *.
|
|||||||||||||
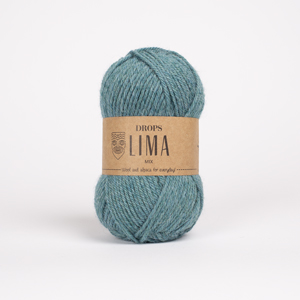
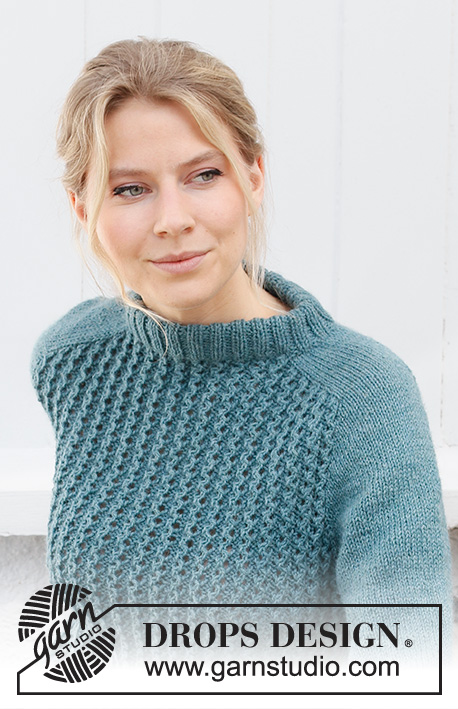
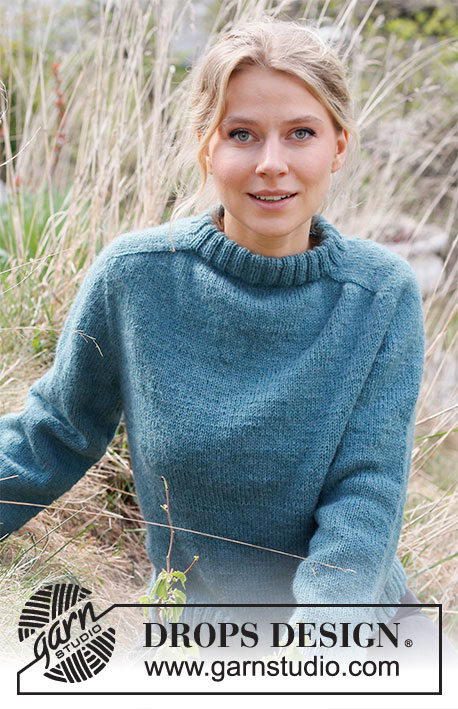
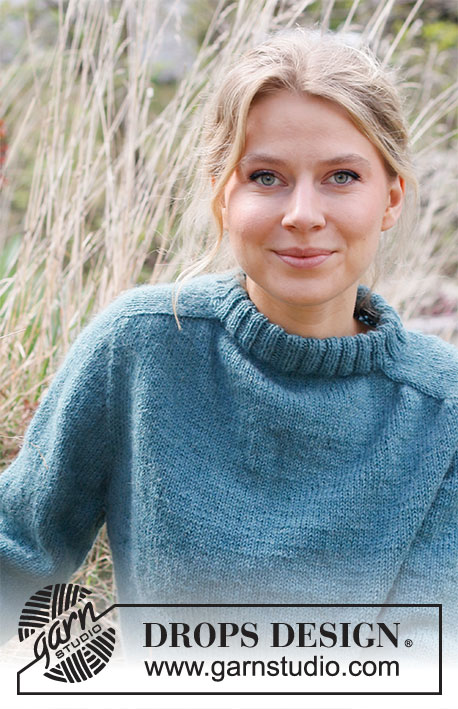
Glacier Waters |
|||||||||||||
 |
 |
||||||||||||
Maglione ai ferri con maniche a sella in DROPS Lima o DROPS Soft Tweed. Lavorato dall’alto verso il basso. Taglie: Dalla S alla XXXL.
DROPS 216-9 |
|||||||||||||
|
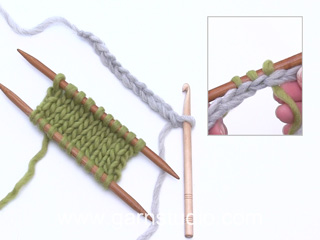
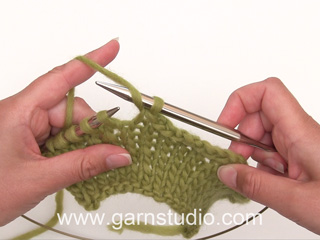
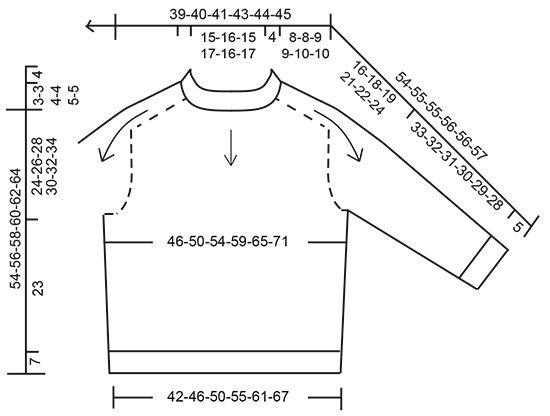
------------------------------------------------------- TECNICHE IMPIEGATE: ------------------------------------------------------- SUGGERIMENTO PER GLI AUMENTI (a intervalli regolari): Per calcolare ogni quante maglie aumentare a intervalli regolari, dividere il numero complessivo delle maglie sul ferro (p.es: 96 maglie) per il numero di aumenti da fare (p.es 12) = 8. Quindi, in questo esempio, per aumentare 1 maglia, fare 1 maglia gettata dopo ogni 8 maglie. Al giro successivo, lavorare le maglie gettate ritorte per evitare buchi. SUGGERIMENTO PER GLI AUMENTI-2: AUMENTARE 1 MAGLIA PRIMA DEL SEGNO: La nuova maglia verrà lavorata ritorta e inclinata a destra. Usare il ferro sinistro per sollevare il filo tra 2 maglie del ferro sottostante, prendere il filo da dietro e lavorare questa maglia a diritto nel filo davanti. AUMENTARE 1 MAGLIA DOPO IL SEGNO: La nuova maglia verrà lavorata ritorta e inclinata a sinistra. Usare il ferro sinistro per sollevare il filo tra 2 maglie del ferro sottostante, riprendere il filo dal davanti e lavorarlo a diritto nel filo dietro. SUGGERIMENTO PER LE DIMINUZIONI (sui lati del davanti / dietro e delle maniche): Diminuire 1 maglia da ciascun lato del segno come segue: lavorare finché non rimangono 3 maglie prima del segno, 2 maglie insieme a diritto, 2 maglie diritto (il segno si trova tra queste 2 maglie), passare 1 maglia a diritto senza lavorarla, 1 maglia diritto, accavallare la maglia passata sulla maglia lavorata. SUGGERIMENTO PER CHIUDERE LE MAGLIE: Per evitare un bordo di chiusura delle maglie troppo stretto, chiudere le maglie usando ferri di una misura più grande. Se il bordo è ancora troppo stretto, fare 1 maglia gettata dopo ogni 4 maglie circa; chiudere le maglie gettate come fossero maglie normali. ------------------------------------------------------- IL LAVORO INIZIA QUI: ------------------------------------------------------- MAGLIONE – BREVI INDICAZIONI PER IL LAVORO: Lavorare il collo e lo sprone dall’alto verso il basso, in tondo con i ferri circolari. Aumentare le maglie per le spalle e poi per le maniche. Dividere lo sprone per il davanti / dietro e le maniche e continuare il davanti / dietro in tondo, con i ferri circolari. Lavorare le maniche con i ferri a doppia punta, dall’alto verso il basso. COLLO: Avviare 92-96-100-108-112-116 maglie sui ferri circolari n° 3,5 ed il filato Lima. Lavorare 1 giro a diritto. Proseguire a coste (= 2 maglie diritto. 2 maglie rovescio) in tondo per 8½ cm. Lavorare 1 giro a diritto e durante questo giro, aumentare 12-12-20-20-24-28 maglie a intervalli regolari – vedere il SUGGERIMENTO PER GLI AUMENTI-1 = 104-108-120-128-136-144 maglie. Passare ai ferri circolari n° 4,5. Inserire un segno all’inizio del giro (centro sul dietro). DA ADESSO IN AVANTI, MISURARE IL LAVORO DA QUESTO PUNTO! SPRONE: Inserire 4 segni nel lavoro, senza lavorare le maglie; inserire i segni tra una maglia e l’altra, come segue: Contare 18-19-20-22-22-24 maglie (= metà dietro), inserire il segno-1, contare 16-16-20-20-24-24 maglie (= spalla), inserire il segno-2, contare 36-38-40-44-44-48 maglie (= davanti), inserire il segno-3, contare 16-16-20-20-24-24 maglie (= spalla), inserire il segno-4; ci sono 18-19-20-22-22-24 maglie dopo l’ultimo segno (= metà dietro). AUMENTI PER LE SPALLA A SELLA: Proseguire a maglia rasata e aumentare per le spalle come segue: Aumentare 1 maglia PRIMA dei segni -1 e -3 e DOPO i segni -2 e -4 – vedere il SUGGERIMENTO PER GLI AUMENTI-2 (= 4 maglie aumentate); ci sono aumenti sul dietro e sul davanti, il numero delle maglie per le spalle (maglie tra i segni) rimane lo stesso. Lavorare le maglie aumentate a maglia rasata. Aumentare in questo modo ad ogni giro in tutto 21-21-24-24-26-26 volte = 188-192-216-224-240-248 maglie. Il lavoro misura circa 8-8-9-9-10-10 cm dal segno sul collo. RICORDARSI DI MANTENERE LA CORRETTA TENSIONE DEL LAVORO! AUMENTI PER LE MANICHE: Aumentare ora per le maniche come segue: Aumentare 1 maglia DOPO i segni -1 e -3 e PRIMA dei segni -2 e -4 (= 4 maglie aumentate). Gli aumenti sono solo sulle spalle e il numero di maglie del davanti e dietro rimane lo stesso. Aumentare in questo modo ogni 2 giri in tutto 17-18-18-17-17-17 volte = 256-264-288-292-308-316 maglie. Il lavoro misura circa 21-22-23-22-23-23 cm a partire dal collo. Se il vostro lavoro è più corto, proseguire a maglia rasata senza aumentare finché il lavoro non misura 21-22-23-22-23-23 cm. AUMENTI PER LO SPRONE: Aumentare ora 1 maglia da ciascun lato di tutti i segni, come segue: Lavorare finché non rimane 1 maglia prima dei segni -1 e -3, aumentare 1 maglia PRIMA di questi segni, lavorare 1 maglia, passare il segno sul ferro destro e aumentare 1 maglia DOPO questi segni. Lavorare fino ai segni -2 e -4, aumentare 1 maglia PRIMA di questi segni, passare il segno sul ferro destro, lavorare 1 maglia e aumentare 1 maglia DOPO questi segni - ricordarsi del SUGGERIMENTO PER GLI AUMENTI-2 (= in tutto 8 maglie aumentate). Aumentare in questo modo ogni 2 giri in tutto 4-5-6-10-11-14 volte = 288-304-336-372-396-428 maglie. Terminati tutti gli aumenti, il lavoro misura circa 24-26-28-30-32-34 cm a partire dal collo. Al giro successivo, dividere il lavoro per il davanti / dietro e le maniche come segue: Lavorare le prime 42-45-49-54-59-65 maglie (metà dietro), mettere in attesa su un ferma maglie le 60-62-70-78-80-84 maglie successive per la manica, avviare 8-10-10-10-12-12 maglie sotto la manica, lavorare 84-90-98-108-118-130 maglie (= davanti), mettere in attesa su un ferma maglie le 60-62-70-78-80-84 maglie successive per la manica, avviare 8-10-10-10-12-12 maglie sotto la manica, lavorare le ultime 42-45-49-54-59-65 maglie (= metà dietro). Finire il davanti / dietro e le maniche separatamente. DAVANTI E DIETRO: = 184-200-216-236-260-284 maglie. Inserire 1 segno al centro delle 8-10-10-10-12-12 maglie avviate sotto ogni manica; serviranno per le diminuzioni ai lati. Lavorare a maglia rasata in tondo. Quando il lavoro misura 4 cm dalla divisione, diminuire 1 maglia da ciascun lato di ognuno dei due segni – vedere il SUGGERIMENTO PER LE DIMINUZIONI (= 4 maglie diminuite). Diminuire in questo modo ogni 5 cm in tutto 4 volte = 168-184-200-220-244-268 maglie. Quando il lavoro misura 23 cm dalla divisione, lavorare 1 giro a diritto e durante questo giro, aumentare 40 maglie a intervalli regolari = 208-224-240-260-284-308 maglie. Passare ai ferri circolari n° 3,5 e lavorare a coste (= 2 maglie diritto, 2 maglie rovescio) per 7 cm. Intrecciare lavorando a diritto le maglie a diritto e a rovescio le maglie a rovescio – vedere il SUGGERIMENTO PER CHIUDERE LE MAGLIE! MANICHE: Riportare sui ferri a doppia punta n° 4,5 le 60-62-70-78-80-84 maglie messe in attesa sul ferma maglie su uno dei lati del lavoro e riprendere 1 maglia in ognuna delle 8-10-10-10-12-12 maglie avviate sotto la manica = 68-72-80-88-92-96 maglie. Inserire un segno al centro delle 8-10-10-10-12-12 maglie sotto la manica; diminuire da ciascun lato di questo segno. Lavorare a maglia rasata in tondo. Quando il lavoro misura 3 cm dalla divisione, diminuire 1 maglia da ciascun lato del segno – ricordarsi il SUGGERIMENTO PER LE DIMINUZIONI. Diminuire in questo modo ogni 6-5-3-2-2-1½ cm in tutto 5-6-9-12-13-14 volte = 58-60-62-64-66-68 maglie. Continuare finché la manica non misura 33-32-31-30-29-28 cm dalla divisione. Lavorare 1 giro a diritto e durante questo giro, aumentare 18-16-18-16-18-16 maglie a intervalli regolari = 76-76-80-80-84-84 maglie. Passare ai ferri a doppia punta n° 3,5 mm e lavorare a coste (= 2 maglie diritto, 2 maglie rovescio) per 5 cm. Intrecciare lavorando a diritto le maglie a diritto e a rovescio le maglie a rovescio – ricordarsi il SUGGERIMENTO PER CHIUDERE LE MAGLIE. Lavorare l’altra manica in modo uguale. CONFEZIONE: Piegare il collo sul rovescio del lavoro e cucirlo. Per evitare che il collo sia troppo stretto e che si pieghi, è importante che la cucitura sia morbida. |
|||||||||||||
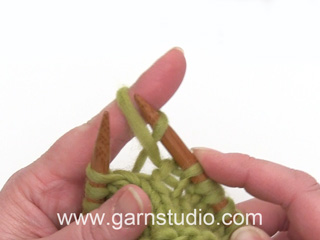
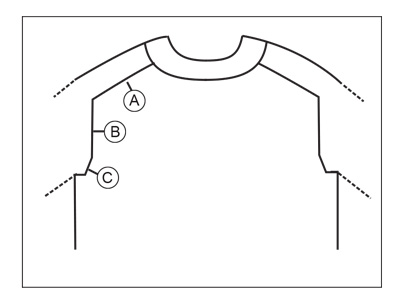
Spiegazioni del diagramma |
|||||||||||||
|
|||||||||||||
|
|||||||||||||
|
|||||||||||||
|
Avete realizzato questo o un altro dei nostri modelli? Taggate le vostre foto nei social media con #dropsdesign in modo che possiamo vederle! Avete bisogno di aiuto con questo modello?Troverete video tutorial, una sezione per i commenti/domande e molto altro guardando il modello su www.garnstudio.com © 1982-2024 DROPS Design A/S. Ci riserviamo tutti i diritti. Questo documento, compreso tutte le sue sotto-sezioni, è protetto dalle leggi sul copyright. Potete leggere quello che potete fare con i nostri modelli alla fine di ogni modello sul nostro sito. |
|||||||||||||


Con oltre 40 anni di esperienza nel design di modelli di maglia e uncinetto, DROPS Design offre la più estesa collezione di modelli gratuiti su internet - tradotti in 17 lingue. Ad oggi vi possiamo fornire 304 cataloghi e 11422 modelli - 8666 dei quali sono tradotti in Italiano.
Ci stiamo impegnando molto per darvi il meglio che vi possiamo offrire in termini di maglia e uncinetto, ispirazioni e consigli così come filati di grande qualità ad un prezzo incredibile! Volete utilizzare i nostri modelli per qualcosa d'altro oltre al vostro uso personale? Potete leggere tutto ciò che è consentito nel testo sul Copyright in basso su tutte le pagine dei nostri modelli. Buon lavoro!
Commenti / Domande (42)
My son would like me to knit this jumper for him, but I am concerned about one aspect of the design. I doesn't appear to have any shaping that allows for the front neckline to be lower than the back. The photos show a fold below the chin, and several knitters have commented on this in Ravelry. Do you have any patterns that have this type of detail, as I'm not confident enough to try modifying the pattern myself. Thanks, Robyn
24.03.2024 - 09:21DROPS Design answered:
Dear Robyn, usually what we do is work an elevation for the back of the neck, instead of lowering the front piece. Since it's not a beginner technique we only use them in some patterns and not all of them, so that there are easier beginner friendly patterns and more advanced patterns for each type of knitter. For example, you have the following sweater, which has an elevation at the back, and has saddle shoulders as in this pattern: https://www.garnstudio.com/pattern.php?id=11723&cid=19. If you prefer it, you could also adapt this elevation for the current pattern or work the new pattern but in stocking stitch instead of the knot charts. Happy knitting!
25.03.2024 - 00:27Thank you, it's working out perfectly, thanks a mill!
01.03.2024 - 09:42I'm about to start the sleeve increases on Galcier Waters. Do I make the increases after the first stitch of the shoulder piece and before the last stitch of them. If I increase immediiatelly after marker 1 and 3, and before 2 and 4, the increase is directly beside the increases for the yoke. So I'm not able to figure out how to differentiate between yoke and sleeve increases. Thank you.
29.02.2024 - 19:39DROPS Design answered:
Dear Carmel, you first work the saddle shoulder increases. Then, after these are finished, start with the sleeve increases, positioned as indicated in the pattern. Then, after finishing the increases for the sleeves, start with the yoke increases. You increase 1 stitch BEFORE markers 1 and 3 for the saddle shoulders and yoke and AFTER markers 1 and 3 for the sleeves. In the case of markers 2 and 4, you increase AFTER these for the saddle shoulders and yoke and BEFORE them for the sleeves. Happy knitting!
29.02.2024 - 22:33Hi i knitted the glacier jumper in soft tweed but when i washed it as per the instructions it ended up really stretched especially the ribbed sections even though i dried it flat, what did i do wrong?
05.02.2024 - 15:09DROPS Design answered:
Dear Trish, you will find all washing instructions on the label and even more advices on the shadecard, do not hesitate to contact your DROPS Store for any further help & assistance, they will be able to help you even per mail or telephone. Happy knitting!
05.02.2024 - 15:54Beim Stricken des "Rumpfteiles" steht :" Bei einer Länge von 23 cm ab der Teilung 1 Runde rechts stricken und dabei gleichzeitig 40 Maschen gleichmäßig verteilt zunehmen = 208-224-240-260-284-308 Maschen. Zu Rundnadel Nr. 3,5 wechseln und 7 cm in Runden im Rippenmuster stricken." Das würde ja bedeuten, dass der Pulli vorm Bündchen WEITER wird, kann das denn sein??? Normalerweise ist das Bündchen doch enger, als das Rumpfteil mfg Sandra Faber
03.02.2024 - 21:11DROPS Design answered:
Liebe Frau Faber, hier wird das Bündchen nicht enger, so wird man zuerst zunehmen dann das Bündchen mit den kleineren Nadeln stricken. Viel Spaß beim stricken!
05.02.2024 - 08:41Wissen Sie, was total toll wäre? Wenn sie eine schriftliche Anleitung erstellen könnten, wie man einen Pullover mit Sattelschulter selbst berechnen kann. Welche Maße muss man wissen, um selbst berechnen zu können, wie und wo man welche Zunahmen macht? Es gibt dazu nirgends im Netz etwas zu finden. Klar kann man stur der Anleitung folgen, aber es wäre echt schön, wenn man fähig wäre, Modelle die nicht ganz passen, selbst abzuändern. Ist so etwas denn geplant oder bereits vorhanden?
28.02.2023 - 12:13DROPS Design answered:
Liebe Frau Fuchs, hier finden Sie alle unsere Modellen, die mit Sattelschulter gestrickt werden, es sind dabei verschieden Maschenprobe, Größe (Babies, Kinder, Männer, Frauen) und Schnitte, vielleicht kann es Ihnen weiterhelfen. Viel Spaß beim stricken!
28.02.2023 - 13:31Hej, jag undrar om rundstickorna ska vara 40 eller 80 cm lång, båda måtten står i beskrivningen. Tack!
28.01.2023 - 20:55DROPS Design answered:
Hei Rebecka Du trenger begge lengdene, både 40 cm og 80 cm. Du starter med 40 cm og når du har nok masker/økt masker, kan du bytte til 80 cm. mvh DROPS Design
30.01.2023 - 11:59Are sleeve and yoke increases done in Increase Tip-1 or Increase Tip-2?
11.10.2022 - 21:00DROPS Design answered:
Hi Ann, The yoke and sleeves are increased using the instructions in Increase tip-2. Happy knitting!
12.10.2022 - 07:00Hello! Would it be okay if I just use Merino Extra Fine yarn instead of Lima?
31.01.2022 - 15:27DROPS Design answered:
Hi Filip, yes, it is the same group of yarns. Please check exact amount of yarn nedded using our yarn converter HERE . Happy knitting!
31.01.2022 - 15:48Hello! When do you change from 16" needles to 32" needles? Thank you!
22.01.2022 - 19:20DROPS Design answered:
Dear Sara, you start working in the round with the shorter needles. When you start feeling uncomfortable when working, due to the high amount of stitches, you change to the longer needles. Happy knitting!
23.01.2022 - 20:37