
Categorie popolari
State cercando un filato?


Lasciare un commento sul modello DROPS 205-40
Noi saremmo felici di ricevere i tuoi commenti e opinioni su questo modello!
Se vuoi fare una domanda, fai per favore attenzione a selezionare la categoria corretta nella casella qui sotto per velocizzare il processo di risposta. I campi richiesti sono indicati da *.
|
||||||||||||||||||||||||||||||||||
In Pieces |
||||||||||||||||||||||||||||||||||
 |
 |
|||||||||||||||||||||||||||||||||
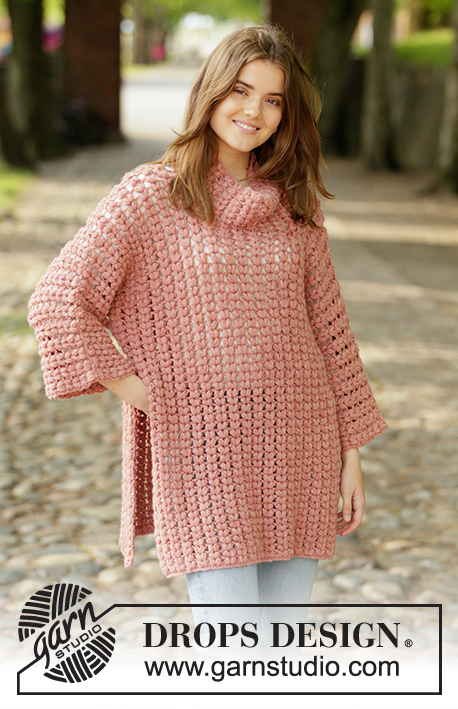
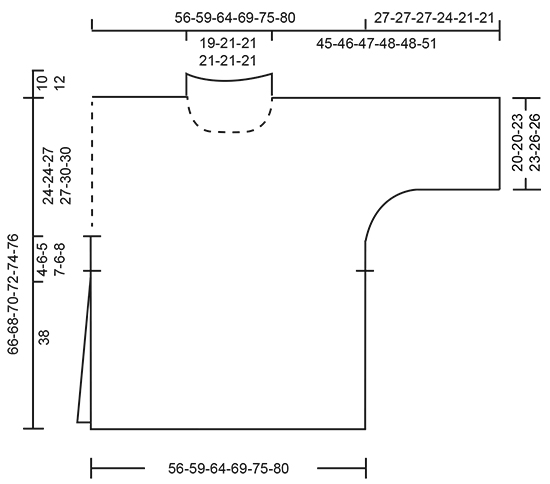
Maglione-Poncho lavorato ai ferri in DROPS Sky. Lavorato con puff stitches, maniche a kimono e spacchi laterali. Taglie: S - XXXL.
DROPS 205-40 |
||||||||||||||||||||||||||||||||||
|
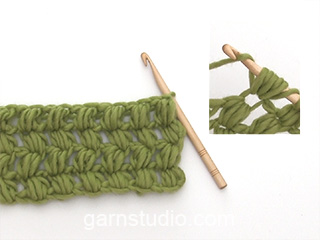
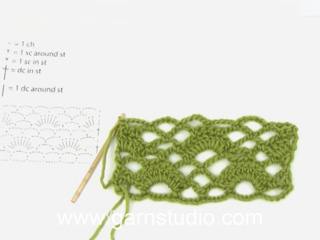
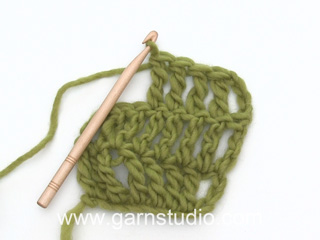
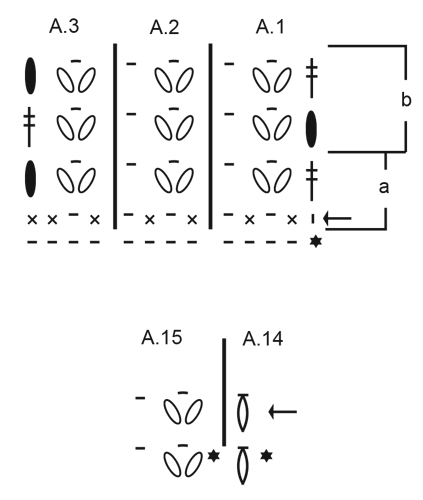
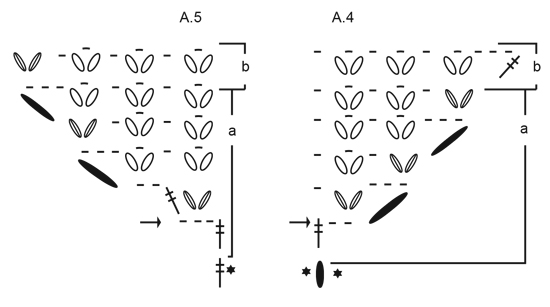
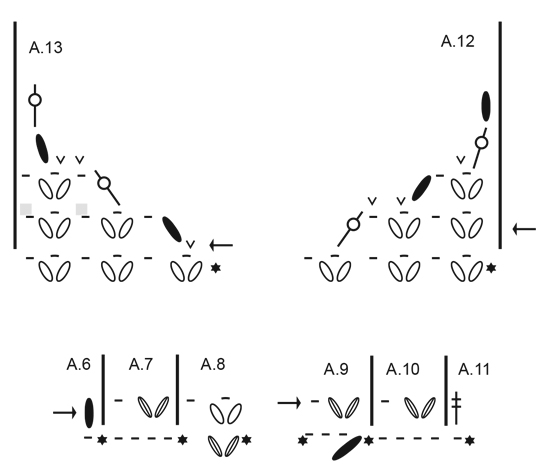
------------------------------------------------------- PRIMA DI INIZIARE: ------------------------------------------------------- CATENELLE: Se lavorate principalmente vicino alla punta dell’uncinetto, le catenelle risulteranno più tirate; 1 catenella deve essere lunga come la larghezza di 1 maglia bassa. MOTIVO: Vedere i diagrammi A.1 - A.15. NOTA: È importante che il filo sia della lunghezza corretta (2 cm) durante la lavorazione dei puff stitches ------------------------------------------------------- INIZIO DEL LAVORO: ------------------------------------------------------- MAGLIONE A PONCHO – BREVE RIASSUNTO DEL LAVORO: Lavorare il davanti e il dietro in modo separato. Avviare le maglie per le maniche. Lavorare il collo in tondo. DAVANTI: Avviare 84-88-96-104-112-120 catenelle – leggere CATENELLE, con l’uncinetto n° 5 mm e Sky preso doppio (per rendere elastico il bordo di avvio). Poi continuare con 1 capo di Sky e lavorare come segue: Lavorare A.1a sulle prime 4 catenelle, ripetere A.2a fino a quando rimangono 4 catenelle (= 19-20-22-24-26-28 ripetizioni di 4 catenelle) e finire con A.3a sulle ultime 4 catenelle. Alla fine di A.1a - A.3a, continuare con A.1b - A.3b. Ripetere A.1b - A.3b in altezza. FARE ATTENZIONE ALLA TENSIONE DEL LAVORO! Lavorare fino a quando il lavoro misura circa 42-44-43-45-44-46 cm. Ora avviare le maglie per le maniche a ogni lato; quindi tagliare il filo e iniziare dal rovescio del lavoro come segue: Lavorare A.5a (= aumenti per le maniche), ripetere A.2b sui puff stitches (= 21-22-24-26-28-30 ripetizioni) e finire con A.4a (= aumenti per le maniche). Alla fine di A.4a e A.5a, tagliare il filo. Avviare 25-25-25-21-17-17 catenelle lasse per le maniche, continuare con A.4b, lavorare A.2b come prima, lavorare A.5b e finire con 25-25-25-21-17-17 catenelle lasse per la manica (maniche più corte per le taglie più grandi a causa delle spalle più ampie). Lavorare la riga successiva come segue dal rovescio del lavoro: Lavorare A.6 sulla 1° catenella, A.7 sulle 24-24-24-20-16-16 catenelle successive (= 6-6-6-5-4-4 ripetizioni di 4 catenelle), A.8 sul puff stitch successivo, ripetere A.2b sui 27-28-30-32-34-36 puff stitches successivi, lavorare A.9 sull’arco di catenelle successivo, A.10 sulle 24-24-24-20-16-16 catenelle successive (= 6-6-6-5-4-4 ripetizioni di 4 catenelle) e finire con A.11 sull’ultima catenella. Gli aumenti per le maniche ora sono finiti = 41-42-44-44-44-46 puff stitches sulla riga. Continuare come segue: Lavorare A.1b sul 1° puff stitch, A.2b sui 39-40-42-42-42-44 puff stitches successivi e finire con A.3b sull’ultimo puff stitch. Continuare a ripetere A.1b - A.3b in altezza. Quando il lavoro misura circa 61-63-65-66-68-70 cm – aggiustarlo in modo che la riga successiva sia dal diritto del lavoro, dividere il lavoro e finire le spalle in modo separato come segue: SPALLA SINISTRA: (prima riga = diritto del lavoro): lavorare A.1b sul 1° puff stitch, ripetere A.2b sui 16-16-17-17-17-18 puff stitches successivi e finire con A.12 sugli ultimi 3 puff stitches. Alla fine di A.12 lavorare la riga successiva come segue dal diritto del lavoro: A.1b sul 1° puff stitch, A.2b sui 12-12-13-13-13-14 puff stitches successivi e finire con A.3b sull’ultimo puff stitch. Continuare in questo modo fino a quando ci sono 5-5-5-6-6-6 righe in totale sulla spalla. Il lavoro misura circa 66-68-70-72-74-76 cm. Tagliare e affrancare il filo. SPALLA DESTRA: (prima riga = diritto del lavoro): Saltare i 1-2-2-2-2-2 puff stitches centrali (= collo), lavorare A.13 sui 3 puff stitches successivi, ripetere A.2b sui 16-16-17-17-17-18 puff stitches successivi e finire con A.3b sull’ultimo puff stitch. Alla fine di A.13 lavorare come segue dal diritto del lavoro: A.1b sul 1° puff stitch, A.2b sui 12-12-13-13-13-14 puff stitches successivi e finire con A.3b sull’ultimo puff stitch. Continuare in questo modo fino a quando ci sono 5-5-5-6-6-6 righe sul ferro. Il lavoro misura circa 66-68-70-72-74-76 cm. Tagliare e affrancare il filo. DIETRO: Lavorare come per il davanti fino alla fine degli aumenti = 41-42-44-44-44-46 puff stitches. Lavorare A.1b sul 1° puff stitch, ripetere A.2b per un totale di 39-40-42-42-42-44 volte e finire con A.3b sull’ultimo puff stitch. Ripetere A.1b - A.3b in altezza. Continuare fino a quando il lavoro misura circa 66-68-70-72-74-76 cm – aggiustarlo in modo che combaci con il davanti. Tagliare e affrancare il filo. CONFEZIONE: Cucire i margini delle spalle. Cucire le maniche e i lati lasciando un’apertura di circa 38 cm in basso (= spacco). COLLO: Lavorare il collo in tondo. Iniziare con 1 maglia bassissima sulla spalla destra e lavorare 4 catenelle, lavorare 1 puff stitch attorno a ognuno dei 7-8-8-8-8-8 puff stitches sul dietro come prima, 2 puff stitches attorno a ognuna delle 1-1-1-2-2-2 righe successive sul davanti, 1 puff stitch attorno a ognuno dei 7-8-8-8-8-8 puff stitches sul davanti, 2 puff stitches attorno a ognuna delle ultime 1-1-1-2-2-2 righe sul davanti e finire con 1 maglia bassissima nella 4° catenella all’inizio del giro = 18-20-20-24-24-24 puff stitches. Poi lavorare in tondo come segue: A.14 (mostra come inizia e finisce il giro), lavorare A.15 fino alla fine del giro. Continuare fino a quando sono stati lavorati 7-7-7-8-8-8 puff stitches in altezza sul collo. Tagliare e affrancare il filo. |
||||||||||||||||||||||||||||||||||
Spiegazioni del diagramma |
||||||||||||||||||||||||||||||||||
|
||||||||||||||||||||||||||||||||||
|
||||||||||||||||||||||||||||||||||
|
||||||||||||||||||||||||||||||||||
|
||||||||||||||||||||||||||||||||||
|
||||||||||||||||||||||||||||||||||
|
Avete realizzato questo o un altro dei nostri modelli? Taggate le vostre foto nei social media con #dropsdesign in modo che possiamo vederle! Avete bisogno di aiuto con questo modello?Troverete video tutorial, una sezione per i commenti/domande e molto altro guardando il modello su www.garnstudio.com © 1982-2024 DROPS Design A/S. Ci riserviamo tutti i diritti. Questo documento, compreso tutte le sue sotto-sezioni, è protetto dalle leggi sul copyright. Potete leggere quello che potete fare con i nostri modelli alla fine di ogni modello sul nostro sito. |
||||||||||||||||||||||||||||||||||


Con oltre 40 anni di esperienza nel design di modelli di maglia e uncinetto, DROPS Design offre la più estesa collezione di modelli gratuiti su internet - tradotti in 17 lingue. Ad oggi vi possiamo fornire 304 cataloghi e 11422 modelli - 8666 dei quali sono tradotti in Italiano.
Ci stiamo impegnando molto per darvi il meglio che vi possiamo offrire in termini di maglia e uncinetto, ispirazioni e consigli così come filati di grande qualità ad un prezzo incredibile! Volete utilizzare i nostri modelli per qualcosa d'altro oltre al vostro uso personale? Potete leggere tutto ciò che è consentito nel testo sul Copyright in basso su tutte le pagine dei nostri modelli. Buon lavoro!
Commenti / Domande (14)
Is there a written pattern somewhere I can use. I’ve tried several times to read the chart but have failed. Please and thankyou.
26.09.2021 - 09:55DROPS Design answered:
Dear Crochetingbeauty, we do not have a written out pattern not only because our patterns are available in several languages, but asle, because we believe that with diagrams, you can see not only the very next step, abut also, the bigger picture, as hoe the rows and stitches relate to each other en-large. However, we do have a lesson on howe to read the diagrams HERE, and you can always ask for help (either over the phone or in person) in the store, where you bought your DROPS yarn from. Happy Stitching!
27.09.2021 - 03:27What does it mean when it says for the sleeves you have to 'cast on stitches'? I've never heard of that in crocheting only in knitting but is it the same thing? How do I do that?
09.03.2021 - 02:38DROPS Design answered:
Dear Lavender, you will now crochet new stitches as shown in diagram (= A.5a starts at the arrow with 3 chains + 1 double treble in the first stitch on body), work body as before and finish with A.4 (starting with 1 double treble in the last stitch on body + 2 chains + 4 chains to turn with). Happy crocheting!
09.03.2021 - 07:52Would it be alright if I asked someone to do a tutorial video on making this pattern? Of course, they would, in turn, ask you directly I'm sure
01.09.2020 - 08:34DROPS Design answered:
Hi Maria, did you see this one?: How to crochet puff stitches shaped like hearts
02.09.2020 - 15:40Is there any help you can offer to make the pattern tighter so there are not openings to see through ?
10.07.2020 - 14:41DROPS Design answered:
Dear Mrs Robasco, we are unfortunately not able to adapt every pattern to every single request - please contact your store for any individual assistance - or check our our crocheted patterns for sweaters. Happy crocheting!
10.07.2020 - 16:38Hej Jag är på vänster axel nu och förstår inte riktigt mönstret. Enligt beskrivningen så ska jag virka 1+12+1 (STL M) när jag är klar med A12 på höjden men då blir det tre puffmaskor över eftersom man ska virka 1+16+ A12 över de bästa tre så totalt 20.
31.03.2020 - 12:04DROPS Design answered:
Hej Jenny, vi forstår ikke rigtigt dit spørgsmål, men du hækler puffm som tidligere og hækler A.12 over de sidste 3 mod halsen, så du tager ind ifølge diagrammet. God fornøjelse!
21.04.2020 - 09:26For the beginning chain it is stated that one has to work with 2 strands of Sky for elasticity. But in de US english version it is stated 1 single strand. Is this an errorin the US version?
29.02.2020 - 16:06DROPS Design answered:
Dear Mrs Aarden, it looks like yes, thanks for your feedback, US-pattern will be edited, and cast on the fundation chain with 2 strands Sky (so that it will be more elastic). Happy crocheting!
02.03.2020 - 11:51Hallo, ich würde gerne wissen, in welche Masche man das erste Doppelstäbchen von A.4b häkelt? Vielen Dank für eine baldige Antwort. Liebe Grüße
11.11.2019 - 13:01DROPS Design answered:
Liebe Helena, das letzte Doppelstäbchen in A.4b (diese Reihe ist eine Rückreihe und wird links nach rechts gelesen) wird in die erste Puff-Masche am Anfang der vorrigen Reihen gehäkelt. Viel Spaß beim häkeln!
11.11.2019 - 13:11Bonjour, je ne comprend pas comment faire les augmentations pour les manches A5a. Dois je commencer par 3 mailles en l’air? Sont-elles rattachées au devant déjà crocheté? Quel est le début des 4 lignes du diagramme A5a? Merci pour votre éclaircissement.
23.09.2019 - 17:54DROPS Design answered:
Bonjour Corinne, avant les augmentations des manches, vous avez coupé le fil, vous commencez ensuite A.5a = 3 mailles en l'air, 1 double-bride dans la 1ère maille, crochetez A.2b comme avant et terminez par A.4a = 1 double-bride dans la dernière maille, 2 maille en l'air + 4 mailles en l'air pour tourner. Au rang suivant, crochetez: A.4a (=3 ml, 1 point soufflé, 1 ml), A.2a comme avant et A.5a (= 1 point soufflé dans la 2ème des 3 ml du début du rang précédent, 1 double bride dans la dernière maille en l'air, 2 mailles en l'air (+ les 4 ml du début du rang suivant)). Continuez ensuite ainsi en suivant A.5 et A.4 pour les augmentations de chaque côté. Bon crochet!
24.09.2019 - 10:17Crejann 27.08.2019 - 13:10: Komt dit mooie patroon ook nog in het Nederlands? Ja hoor nu wel !!! Bedankt voor dit leuke patroon
30.08.2019 - 09:26Komt dit mooie patroon ook nog in het Nederlands?
27.08.2019 - 13:10DROPS Design answered:
Dag Crejann,
Het patroon staat er nu in het Nederlands op. Veel haakplezier!
31.08.2019 - 13:09