
Popular categories
Looking for a yarn?


|
|||||||||||||||||||
Desert Whispers |
|||||||||||||||||||
 |
 |
||||||||||||||||||
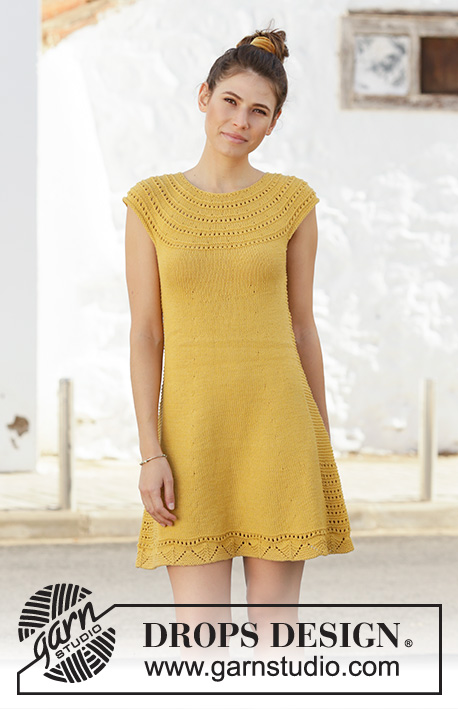
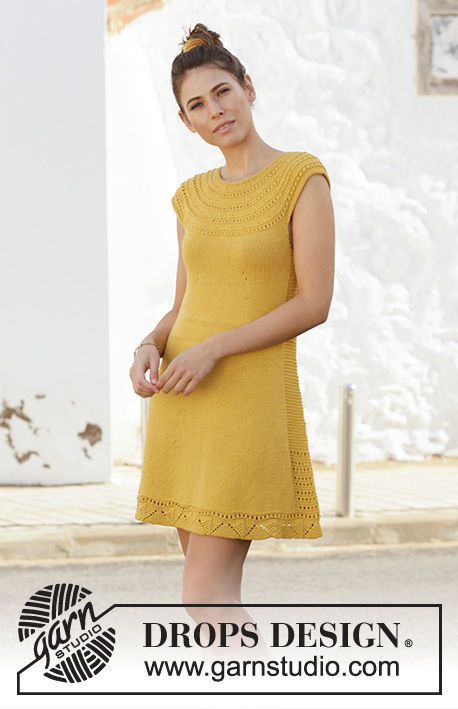
Knitted dress in DROPS Cotton Light. The piece is worked top down, with lace pattern, garter stitch and stockinette stitch. Sizes S – XXXL.
DROPS 200-2 |
|||||||||||||||||||
|
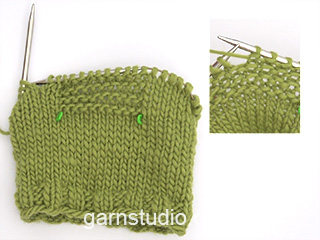
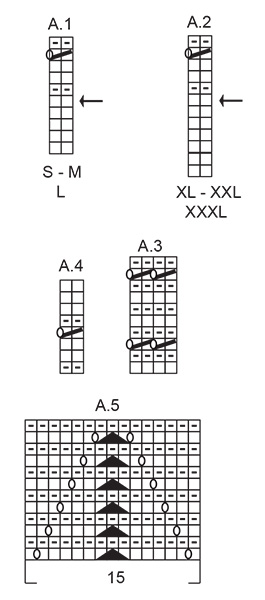
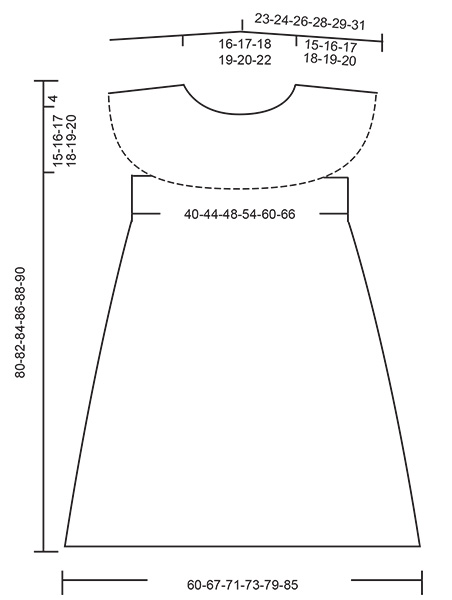
------------------------------------------------------- EXPLANATIONS FOR THE PATTERN: ------------------------------------------------------- RIDGE/GARTER STITCH (worked in the round): 1 ridge in height = 2 rounds; Knit 1 round and purl 1 round. RIDGE/GARTER STITCH (worked back and forth): Knit all rows. 1 ridge in height = Knit 2 rows. PATTERN: See diagrams A.1, A.2, A.3, A.4 and A.5. Choose diagram A.1/A.2 for your size. INCREASE TIP-1 (evenly spaced): To work out how to increase evenly, count the total number of stitches on the needle (e.g. 100 stitches) and divide by the number of increases to be made (e.g. 32) = 3.1. In this example, increase by making 1 yarn over after approx. each 3rd stitch. On the next round knit the yarn overs twisted to avoid holes. INCREASE TIP-2: Increase with yarn over, work the yarn over twisted on next round. When increasing stitches at 1st, 3rd, 4th and 6th marker, make 1 yarn over. On the next round, knit the yarn over twisted. When increasing stitches at the 2nd and 5th marker, make 1 yarn over on each side of 2 knit stitches (the marker sits between these 2 stitches). On the next round, work the yarn overs twisted and continue in garter stitch. ------------------------------------------------------- START THE PIECE HERE: ------------------------------------------------------- DRESS – SHORT OVERVIEW OF THE PIECE: The yoke with button-band on the back is worked back and forth with circular needle, top down. Then stitches are bind off for armholes and the piece is continued in the round. YOKE: Cast on 100-104-108-114-118-124 stitches with circular needle size 4 mm = US 6 and Cotton Light. Knit 1 row from the wrong side. Work 1 RIDGE – see description above. Knit 1 row from the right side and increase 32-36-40-42-46-50 stitches evenly spaced - READ INCREASE TIP! = 132-140-148-156-164-174 stitches on row. Purl 1 row from the wrong side. READ THE WHOLE OF THIS SECTION BEFORE CONTINUING! Now work according to diagrams A.1 and A.2 in the different sizes as follows, from the right side: SIZES S, M and L: Work 3 band stitches in GARTER STITCH, work A.1 until there are 3 stitches left and 3 band stitches in GARTER STITCH. SIZES XL, XXL and XXXL: Work 3 band stitches in GARTER STITCH, work A.2 until there are 3 stitches left and 3 band stitches in GARTER STITCH. REMEMBER THE KNITTING GAUGE! On the row marked with arrow, increase 40-44-50-52-56-62 stitches evenly spaced. Repeat the diagram and increase a total of 4-3-4-3-3-3 times in height. SIZES M, XL, XXL and XXXL: Work the diagram 1 more time in height, but at the arrow increase 48-54-62-64 stitches. ALL SIZES: The diagram has now been worked 4 times in all sizes and there are 292-320-348-366-394-424 stitches on the needle. The piece measures approx. 14-14-14-17-17-17 cm = 5½"-5½"-5½"-6¾"-6¾"-6¾". Continue working according to diagram A.1/A.2 (without increasing) and with 3 band stitches in garter stitch on each side until the piece measures 15-16-17-18-19-20 cm = 6"-6¼"-6¾"-7"-7½"-8" from the cast-on edge. The next row is worked as follows from the wrong side: Work 3 band stitches in garter stitch, purl 36-41-46-48-53-59 stitches (= half back piece), knit 68-72-76-81-85-88 stitches (= sleeve), purl 78-88-98-102-112-124 stitches (= front piece), knit 68-72-76-81-85-88 stitches (= sleeve), purl 36-41-46-48-53-59 stitches and finish with 3 band stitches in garter stitch= half back piece). Work as follows from the right side: Knit the first 39-44-49-51-56-62 stitches, bind off the next 68-72-76-81-85-88 stitches (= sleeve), knit 78-88-98-102-112-124 stitches (= front piece), bind off the next 68-72-76-81-85-88 stitches (= sleeve) and knit to end of row. You have now bind off stitches for the armholes in each side. BODY: You now work in the round (start the round mid back). Knit 39-44-49-51-56-62 stitches, cast on 8-8-8-12-14-14 new stitches in the side, knit 78-88-98-102-112-124 stitches, cast on 8-8-8-12-14-14 new stitches in the side and knit 39-44-49-51-56-62 stitches = 172-192-212-228-252-276 stitches. Continue with stockinette stitch, but the 8-8-8-12-14-14 new stitches on each side are worked in GARTER STITCH – see description above. When the piece measures 8-8-9-9-10-10 cm = 3⅛"-3⅛"-3½"-3 1/"-4"-4" from the division, insert 6 markers in the piece (start mid back) as follows: Work 13-15-17-17-19-21 stitches in stockinette stitch and place 1st marker in the last of these stitches. Work 26-29-32-34-37-41 stitches in stockinette stitch, work 4-4-4-6-7-7 stitches in garter stitch and place 2nd marker on needle here. Work 4-4-4-6-7-7 stitches in garter stitch, work 27-30-33-35-38-42 stitches in stockinette stitch and place 3rd marker in the last of these stitches. Work 25-29-33-33-37-41 stitches in stockinette stitch and place 4th marker in the last of these stitches. Work 26-29-32-34-37-41 stitches in stockinette stitch, work 4-4-4-6-7-7 stitches in garter stitch and place 5th marker on needle here. Work 4-4-4-6-7-7 stitches in garter stitch, work 27-30-33-35-38-42 stitches in stockinette stitch and place 6th marker in the last of these stitches. Work 12-14-16-16-18-20 stitches in stockinette stitch to the beginning of the round. Continue in stockinette stitch and garter stitch as before and increase as follows on next round: Increase 1 stitch before 1th and 4th marker, increase 1 stitch after 3rd and 6th marker. Increase 2 stitches at 2nd and 5th marker – READ INCREASE TIP-2! = 8 stitches increased on round. Repeat this increase every 13th-13th-13th-14th-14th-15th round a total of 11-11-11-10-10-10 times – AT THE SAME TIME when the piece measures 43-44-45-46-47-48 cm from the division, work diagram A.3 over the garter stitches on each side (adjust so that the increases are made on a knitted round in A.3). When all the increases are finished there are 260-280-300-308-332-356 stitches on the needle. When the piece measures 56-57-58-59-61-61 cm = 22"-22½"-22¾"-23¼"-24"-24" from the division, knit 1 round where you increase 10-20-15-22-13-19 stitches evenly spaced = 270-300-315-330-345-375 stitches. Work diagram A.4 over all stitches (in sizes L, XXL and XXXL knit 1 stitch at the end of the 4th round so the stitches fit). After diagram A.4 work diagram A.5 over all stitches. When diagram A.5 is finished, bind off with knit on the next round. The piece measures approx. 61-62-63-64-65-66 cm = 24"-24⅜"-24¾"-25¼"-25½"-26" from the division and approx. 80-82-84-86-88-90 cm = 31½"-32¼"-33"-33⅞"-34⅝"-35½" from the shoulder. ASSEMBLY: Crochet 3 buttonhole straps along left side on opening at the back. 1 strap = work with hook size 3.5 mm = US E/4 and Cotton Light as follows: 1 single crochet in edge stitch at the top by neck, 4 chain stitches and then 1 slip stitch in the same stitch as the single crochet was worked in, fasten off. Work 2 more straps along the opening. Sew buttons on to the right side of opening. |
|||||||||||||||||||
Diagram explanations |
|||||||||||||||||||
|
|||||||||||||||||||
|
|||||||||||||||||||
|
|||||||||||||||||||
|
Have you made this or any other of our designs? Tag your pictures in social media with #dropsdesign so we can see them! Do you need help with this pattern?You'll find tutorial videos, a Comments/Questions area and more by visiting the pattern on garnstudio.com. © 1982-2024 DROPS Design A/S. We reserve all rights. This document, including all its sub-sections, has copyrights. Read more about what you can do with our patterns at the bottom of each pattern on our site. |
|||||||||||||||||||


With over 40 years in knitting and crochet design, DROPS Design offers one of the most extensive collections of free patterns on the internet - translated to 17 languages. As of today we count 304 catalogs and 11422 patterns - 11417 of which are translated into English (US/in).
We work hard to bring you the best knitting and crochet have to offer, inspiration and advice as well as great quality yarns at incredible prices! Would you like to use our patterns for other than personal use? You can read what you are allowed to do in the Copyright text at the bottom of all our patterns. Happy crafting!
Comments / Questions (36)
Witam, jak możliwe jest osiągnięcie w dodawaniu oczek do karczku liczby 320 (rozmiar m), skoro przy dodaniu wszystkich oczek wychodzi 326 (140+44+44+44+54).
06.03.2024 - 08:04DROPS Design answered:
Witaj Aleksandro, przy ostatnim dodawaniu oczek dodasz nie 44, a 48 oczek (patrz - "ROZMIARY M, XL, XXL i XXXL: przerobić schemat jeszcze 1 raz na wysokość, ale dodając 48-54-62-64 oczka w rzędzie oznaczonym strzałką"). Pozdrawiamy!
06.03.2024 - 08:23Hi! I want to knit this dress in large, but with no button stuff. How can I just work in the round for the yolk (not doing wrong side knitting/purling)? Would I just be adding a certain number of stitches? Should it be a multiple of the A1 pattern so that it stays even? Thanks!
27.02.2024 - 21:53DROPS Design answered:
Dear Mrs Davidson, yes probably, make sure you get the correct number of stitches to keep the correct width for yoke. Happy knitting!
28.02.2024 - 09:24Hello, I made a mistake at the increase part, the fourth time I increased on the 16th round instead of the 13th. Do I have to go back or continue as before or should i increase after 8 rounds to make up for it ?
03.01.2024 - 14:36DROPS Design answered:
Dear Ghana, it's always best to keep the increase evenly distributed to get a better shape, 3 rounds difference might not be such a problem, but if you want to be sure rather go back. Happy knitting!
04.01.2024 - 07:46Hi, please I didn't really understand how the knitting goes in the diagrams. In A. 1 and A. 2, if I knit the row with the increase, does it mean that the two following rows are knitted too? And if I purl it, are the next two rows purled as well? That's how I understood the "knit from right/wrong side" and "purl from right/wrong side".
09.12.2023 - 23:59DROPS Design answered:
Dear Ghada, since you start working the charts from the right side and the increase round is on an odd round, you will always knit this row in these charts. As shown in the charts, the next two rows are knit from the wrong side and knit from the right side. Happy knitting!
10.12.2023 - 20:35Hi, the 8 stitch increase for every 13th round - do you count the last increase round as the first? Because if I count the the next round (after last increase) as the first, then the 13th round falls on a Purl row for the 2nd and 5th marker ... then I would have to do next increase every 12th round or 14th round. Please clarify, thank you :))
24.11.2023 - 10:33DROPS Design answered:
Dear Tina, when increasing on every 13th round, work as follows: *1 round with increases, 12 rounds without increasing*, repeat from *-*. Happy knitting!
24.11.2023 - 11:22Hi, I'm not sure which size to choose. The measurements on the dress body area below the yoke - is that the Bust measurement or Waist measurement please?
02.11.2023 - 16:17DROPS Design answered:
Dear Tina, they are the bust measurements. Happy knititng-!
02.11.2023 - 18:04Leider stimmt die Garnverbrauchsangabe nicht und ich musste für Größe S ein weiteres Knäuel nachbestellen, obwohl mein Gestricktes perfekt mit der Maschenprobe überein stimmt.
20.06.2022 - 10:00Ik vind het raar dat aan het lijf de ene 14 ribbelsteken aan de voorkant vallen en de andere 14 ribbelsteken aan de achterkant. In het patroon staat 62 steken 14 ribbelsteken, 124 steken voorpand dan weer 14 ribbelsteken en dan 62 achterpand dit resulteert in ribbel voorkant ribbe achterkant?
05.06.2021 - 17:10Cuantos puntos desde arriba para comenzarlo? Gracias.
04.02.2021 - 22:42DROPS Design answered:
Hola Paqui, tienes que montar 100-104-108-114-118-124 puntos con aguja circular de 4 mm (para las tallas S - M - L - XL - XXL - XXXL). Es decir que si tienes la talla S debes montar 100 puntos. Buen trabajo!
05.02.2021 - 17:33Hei! Luetaanko nuo mallikuvat ylhäältä alas vai alhaalta ylös? Mihin kohtaan merkki aina siirretään? En hahmota.
20.10.2020 - 21:13DROPS Design answered:
Piirrokset luetaan alhaalta ylös. Merkit kiinnitetään ohjeen mukaisesti, aloittaen keskeltä takaa. Eli esim. koossa S ensimmäinen merkki kiinnitetään kerroksen 13. silmukkaan.
07.12.2020 - 18:35