Clicking the ORDER button will redirect you to Mallia Kouvaria - pleko.gr. website
The yarn cost is calculated from the pattern’s smallest size and the yarn’s cheapest product type. Looking for an even better price? You might find it on the DROPS Deals!
-------------------------------------------------------
Alternative Yarn – See how to change yarns here
Yarn Groups A to F – Use the same pattern and change the yarn here
Yarn usage using an alternative yarn – Use our yarn converter here
-------------------------------------------------------
Clicking the ORDER button will redirect you to Mallia Kouvaria - pleko.gr. website
The yarn cost is calculated from the pattern’s smallest size and the yarn’s cheapest product type. Looking for an even better price? You might find it on the DROPS Deals!
= knitting direction |
Each of our patterns has specific tutorial videos to help you.
These step-by-step tutorials might also help you:
Why is the knitting/crochet tension so important?
Knitting tension is what determines the final measurements of your work, and is usually measured per 10 x 10 cm. It is provided like so: number of stitches in width x number of rows in height - eg: 19 stitches x 26 rows = 10 x 10 cm.
The knitting tension is very individual; some people knit/crochet loosely while others work tightly. You adjust the knitting tension with the needle size, which is why the suggested needle size is only meant as a guide! You need to adjust this (up or down) to ensure that YOUR knitting tension matches the knitting tension provided in the pattern. If you work with a different knitting tension than provided you will have a different yarn consumption, and your work will have different measurements than what the pattern suggests.
The knitting tension also determines which yarns can replace each other. As long as you achieve the same knitting tension you can replace one yarn with another.
See DROPS lesson: How to measure your tension/gauge
See DROPS video: How to make a gauge tension swatch
How do I know how many balls of yarn I need?
The required amount of yarn is provided in grams, eg: 450 g. To calculate how many balls you’ll need you first need to know how many grams are in 1 ball (25g, 50g or 100g). This information is available if you click on the individual yarn quality on our pages. Divide the amount required with the amount of each ball. For example, if each ball is 50g (the most common amount), the calculation will be as follows: 450 / 50 = 9 balls.
Can I use a different yarn than what the pattern suggests?
The important thing when changing from one yarn to another is that the knitting/crochet tension remains the same. This is so that the measurements of the finished piece will be the same as on the sketch provided. It is easier to achieve the same knitting tension using yarns from the same yarn group. It is also possible to work with multiple strands of a thinner yarn to achieve the knitting tension of a thicker one. Please try our yarn converter. We recommend you to always work a test swatch.
Please NOTE: when changing yarn the garment might have a different look and feel to the garment in the photo, due to individual properties and qualities of each yarn.
See DROPS lesson: Can I use a different yarn than the one mentioned in the pattern?
What are the yarn groups?
All our yarns are categorised into yarn groups (from A to F) according to thickness and knitting tension – group A contains the thinnest yarns and group F the thickest. This makes it easier for you to find alternative yarns to our patterns, should you wish to switch yarn. All yarns within the same group have a similar knitting tension and can easily replace each other. However, different yarn qualities have different structures and properties which will give the finished work a unique look and feel.
How do I use the yarn calculator?
At the top of all our patterns you’ll find a link to our yarn calculator, which is a helpful tool should you wish to use a different yarn than suggested. By filling in the yarn quality you wish to replace, the amount (in your size) and number of strands, the calculator will present good alternative yarns with the same knitting tension. Additionally it will tell you how much you’ll require in the new qualities and whether you’ll need to work with multiple strands. Most skeins are 50g (some are 25g or 100g).
If the pattern is worked with multiple colours, every colour will have to be calculated separately. Similarly, if the pattern is worked with several strands of different yarns (for example 1 strand Alpaca and 1 strand Kid-Silk) you will have to find alternatives for each, individually.
Why do you show discontinued yarns in the patterns?
Since different yarns have different qualities and textures we have chosen to keep the original yarn in our patterns. However, you can easily find options among our available qualities by using our yarn calculator, or simply pick a yarn from the same yarn group.
It is possible that some retailers still have discontinued yarns in stock, or that someone has a few skeins at home that they would like to find patterns for.
The yarn calculator will provide both alternative yarn as well as required amount in the new quality.
What size should I knit?
If you think it's hard to decide what size to make, it can be a good idea to measure a garment you own already and like the size of. Then you can pick the size by comparing those measures with the ones available in the pattern's size chart.
You'll find the size chart at the bottom of the pattern.
See DROPS lesson: How to read size chart
Why do I get the wrong knitting tension with the suggested needle size?
The needle size provided in the pattern serves only as a guide, the important thing is to follow the knitting tension. And since knitting tension is very individual, you will have to adjust the needle size to ensure that YOUR tension is the same as in the pattern – maybe you’ll have to adjust 1, or even 2 needle sizes, up or down to achieve the correct tension. For this, we recommend that you work test swatches.
Should you work with a different knitting tension than the one provided, the measurements of the finished garment might deviate from the measurement sketch.
See DROPS lesson: How to measure your tension/gauge
See DROPS video: How to make a tension/gauge swatch
Why is the pattern worked top-down?
Working a garment top-down provides more flexibility and room for personal adjustment. For example it is easier to try the garment on while working, as well as making adjustments to length of yoke and shoulder caps.
The instructions are carefully explaining every step, in the correct order. Diagrams are adjusted to the knitting direction and are worked as usual.
How do I work according to a knitting diagram?
The diagram depicts all rows/rounds, and every stitch seen from the right side. It is read from bottom to top, from right to left. 1 square = 1 stitch.
When working back and forth, every other row is worked from the right side and every other row is worked from the wrong side. When working from the wrong side, the diagram will have to be worked reversed: from left to right, knit stitches are purled, purl stitches are knit etc.
When working in the round every round is worked from the right side and the diagram are worked from right to left on all rounds.
See DROPS lesson: How to read knitting diagrams
How do I work according to a crochet diagram?
The diagram depicts all rows/rounds, and every stitch seen from the right side. It is worked from bottom to top, from right to left.
When working back and forth every other row is worked from the right side: from right to left and every other row is worked from the wrong side: from left to right.
When working in the round, every row in the diagram are worked from the right side, from right to left.
When working a circular diagram you start in the middle and work your way outwards, counter clockwise, row by row.
The rows usually start with a given number of chain stitches (equivalent to the height of the following stitch), this will either be depicted in the diagram or explained in the pattern.
See DROPS lesson: How to read crochet diagrams
How do I work several diagrams simultaneously on the same row/round?
Instructions for working several diagrams after each other on the same row/round, will often be written like so: “work A.1, A.2, A.3 a total of 0-0-2-3-4 times". This means you work A.1 once, then A.2 is worked once, and A.3 is repeated (in width) the number of times provided for your size – in this case like so: S = 0 times, M = 0 times, L=2 times, XL= 3 times and XXL = 4 times.
The diagrams are worked as usual: begin with the first row in A.1, then work the first row in A.2 etc.
See DROPS lesson: How to read knitting diagrams
See DROPS lesson: How to read crochet diagrams
Why are the sleeves shorter in larger sizes?
The total width of the garment (from wrist-to-wrist) will be larger in the larger sizes, despite the actual sleeves being shorter. The larger sizes have longer sleeve caps and wider shoulders, so there will be a good fit in all sizes.
Where on the garment is the length measured?
The measurement sketch/schematic drawing provides information regarding the full length of the garment. If it’s a jumper or a jacket the length is measured from the highest point on the shoulder closest to the neckline, and straight down to the bottom of the garment. It is NOT measured from the tip of shoulder. Similarly, the length of yoke is measured from the highest point on the shoulder and down to where yoke is split into body and sleeves.
On a jacket measures are never taken along bands, unless specifically stated. Always measure inside band stitches when measuring the length.
See DROPS lesson: How to read a schematic drawing
What is a repeat?
Diagrams are often repeated on the round or in height. 1 repeat is the diagram the way it appears in the pattern. If it says to work 5 repeats of A.1 in the round, then you work A.1 a total of 5 times after/next to each other in the round. If it says to work 2 repeats of A.1 vertically/in height you work the entire diagram once, then begin again at the start and work the entire diagram one more time.
Why does the piece start with more chain stitches than it’s worked with?
Chain stitches are slightly narrower than other stitches and to avoid working the cast-on edge too tight, we simply chain more stitches to begin with. The stitch count will be adjusted on the following row to fit the pattern and measurement sketch.
Why increase before the rib edge when the piece is worked top-down?
The rib edge is more elastic and will contract slightly compared to, for example, stocking stitch. By increasing before the rib edge, you avoid a visible difference in width between the rib edge and the rest of the body.
Why increase in the cast-off edge?
It’s very easy to cast off too tightly, and by making yarn overs while casting off (and simultaneously casting these off) you avoid a too tight cast off edge.
See DROPS video: How to bind off with yarn overs (yo)
How do I increase/decrease on every 3rd and 4th row/round alternately?
To achieve an even increase (or decrease) you can increase on, for example: every 3rd and 4th row alternately, like so: work 2 rows and increase on the 3rd row, work 3 rows and increase on the 4th. Repeat this until the increase is complete.
See DROPS lesson: Increase or decrease 1 st on every 3rd and 4th row alternately
How can I work a jacket in the round instead of back and forth?
Should you prefer to work in the round instead of back and forth, you may of course adjust the pattern. You’ll need to add steeks mid-front (usually 5 stitches), and follow the instructions. When you would normally turn and work from the wrong side, simply work across the steek and continue in the round. At the end you’ll cut the piece open, pick up stitches to work bands, and cover the cut edges.
See DROPS video: How to knit steeks and cut open
Can I work a jumper back and forth instead of in the round?
Should you prefer to work back and forth instead of in the round, you may of course adjust the pattern so you work the pieces separately and then assemble them at the end. Divide the stitches for the body in 2, add 1 edge stitch in each side (for sewing) and work the front and back pieces separately.
See DROPS lesson: Can I adapt a pattern for circular needles into straight needles?
Why is the pattern slightly different than what I see in the photo?
Pattern repeats can vary slightly in the different sizes, in order to get the correct proportions. If you’re not working the exact same size as the garment in the photo, yours might deviate slightly. This has been carefully developed and adjusted so that the complete impression of the garment is the same in all sizes.
Make sure to follow instructions and diagrams for your size!
How do I make a women’s size garment into a men’s size one?
If you have found a pattern you like which is available in women’s size it’s not very difficult to convert it to men’s size. The biggest difference will be the length of sleeves and body. Start working on the women size that you think would fit across the chest. The additional length will be worked right before you cast off for the armhole/sleeve cap. If the pattern is worked top-down you can add the length right after the armhole or before the first decrease on sleeve.
Regarding additional yarn amount, this will depend on how much length you add, but it is better with a skein too many than too few.
How do I prevent a hairy garment from shedding?
All yarns will have excess fibres (from production) that might come off as lint or shedding. Brushed yarns (ie hairier yarns) have more of these loose, excess fibres, causing more shedding.
Shedding also depends on what is worn under or over the garment, and whether this pulls at the yarn fibres. It’s therefore not possible to guarantee that there will be no shedding
Below are some tips on how to get the best result when working with hairier yarns:
1. When the garment is finished (before you wash it) shake it vigorously so the looser hairs come off. NOTE: do NOT use a lint roller, brush or any method that pulls at the yarn.
2. Place the garment in a plastic bag and put it in your freezer - the temperature will cause the fibres to become less attached to each other, and excess fibres will come off easier.
3. Leave in the freezer for a few hours before taking it out and shaking it again.
4. Wash the garment according to the instructions on the yarn label.
Why does my garment pill?
Pilling is a natural process that happens to even the most exclusive of fibers. It's a natural sign of wear and tear that is hard to avoid, and that is most visible in high friction areas of your garment like a sweater's arms and cuffs.
You can make your garment look as new by removing the pilling, using a fabric comb or a pill/lint remover.
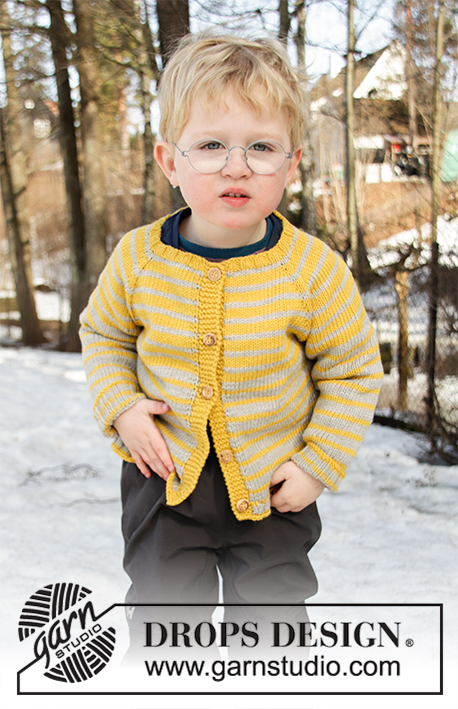
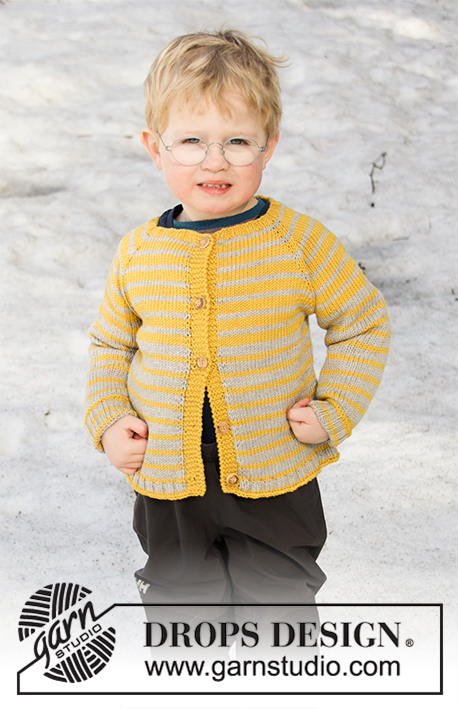
Sunny Day Stripes Jacket |
||||
|
|
|||
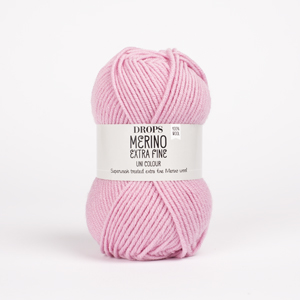
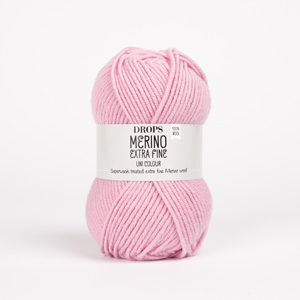
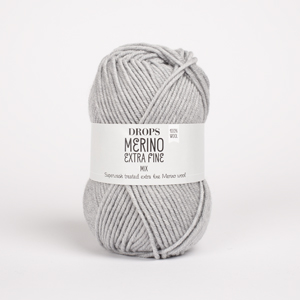
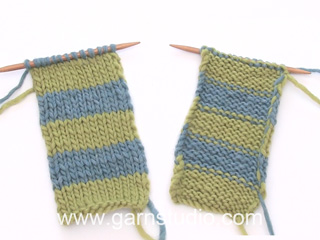
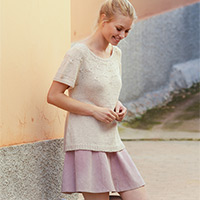
Knitted jacket for children with raglan in DROPS Merino Extra Fine or DROPS Muskat. The piece is worked top down with stripes. Sizes 2 – 12 years.
DROPS Children 32-14 |
||||
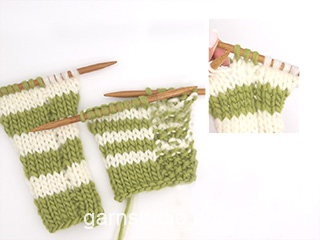
EXPLANATIONS FOR THE PATTERN: ------------------------------------------------------- RIDGE/GARTER STITCH (worked back and forth): 1 ridge = Knit 2 rows. STRIPES: The piece is worked in stripes (apart from the bands); there are different stripes on yoke and body/sleeves. Do not cut the strand after each stripe; allow it to follow your work onwards. The first row in each stripe is always worked from the right side. Stripes on yoke: Work * 4 rows with mustard / vanilla yellow, 2 rows with light beige / light beige *, work from *-* until the yoke is finished. Adjust so that you finish after 4 rows with mustard / vanilla yellow (in other words you may need to divide the piece for body and sleeves and continue the yoke-stripes until you have worked 4 rows with mustard / vanilla yellow). Then continue with stripes on body and sleeves as follows: Work * 4 rows/rounds with light beige / light beige, 2 rows/rounds with mustard / vanilla yellow *, work from *-* until body/sleeves are finished. KNITTING TIP (for bands): The whole band is worked in mustard / vanilla yellow. In other words use 1 ball of mustard / vanilla yellow for each band where needed (i.e. on the rows where mustard / vanilla yellow is not part of the pattern). Change strand between band and yoke/body (so you do not get a change of strands outermost on band). When changing strands, twist the strands together so that the stitches stay together. INCREASE TIP-1 (for raglan): All increases are made from the right side. Work until there is 1 stitch left before the marker, 1 yarn over (= 1 stitch increased), knit 2 (the marker sits between these 2 stitches), 1 yarn over (= 1 stitch increased). Increase like this at all markers (= a total of 8 stitches increased). The yarn overs are purled twisted on the next row (= from the wrong side), to avoid holes. INCREASE TIP-2 (evenly spaced): To work out how to increase evenly, count the total number of stitches on the needles (e.g. 138 stitches), minus the bands (= 128 stitches) and divide the remaining stitches by the number of increases to be made (e.g. 30) = 4.3. In this example, increase by making 1 yarn over after approx. each 4th stitch; do not increase over the bands. On the next row work the yarn overs twisted to avoid holes. DECREASE TIP (for sleeves): Decrease 1 stitch on each side of the marker thread as follows: Work until there are 3 stitches left before the marker thread, knit 2 stitches together, knit 2 (the marker thread sits between these 2 stitches), slip 1 stitch as if to knit, knit 1 and pass the slipped stitch over the knitted stitch. BUTTONHOLES: Work buttonholes on the right band (when the garment is worn). Work as follows when there are 3 stitches left on the row: Make 1 yarn over, knit the next 2 stitches together and knit the last stitch. On the next row knit the yarn over to leave a hole. The first buttonhole is worked when the piece measures approx. 1-1½ cm. Then work the next 4-4-5-5-6-6 buttonholes with approx. 6-7-6½-7-7-7 cm between each one. ------------------------------------------------------- START THE PIECE HERE: ------------------------------------------------------- JACKET - SHORT OVERVIEW OF THE PIECE: The yoke and body are worked back and forth with circular needle, top down. The sleeves are worked in the round with double pointed needles. YOKE: Cast on 88-92-96-100-104-108 stitches (including 5 band stitches in each side) with circular needle size 3 mm and mustard / vanilla yellow. The piece is worked in STRIPES – read description above and read KNITTING TIP. Work 5 band stitches in GARTER STITCH – read description above, rib (= knit 2 / purl 2) until there are 7 stitches left, knit 2 and finish with 5 band stitches in garter stitch. When you have worked 4 rows like this, change to circular needle size 4 mm. Remember BUTTONHOLE – read description above. Continue the piece in stocking stitch with 5 band stitches in garter stitch and insert 4 markers for raglan on the next row from the right side as follows: Work 5 band stitches in garter stitch, work 15-15-17-17-19-19 stitches, insert 1 marker, work 10 stitches AT THE SAME TIME as you increase 3 stitches evenly over these stitches, insert 1 marker, work 28-32-32-36-36-40 stitches, insert 1 marker, work 10 stitches AT THE SAME TIME as you increase 3 stitches evenly over these stitches, insert 1 marker, work 15-15-17-17-19-19 stitches and finish with 5 band stitches in garter stitch = 94-98-102-106-110-114 stitches. Purl 1 row from the wrong side with 5 band stitches in garter stitch in each side. On the next row from the right side begin to increase to raglan. Increase 1 stitch on each side of each marker – read INCREASE TIP-1, every 2nd row a total of 15-16-17-18-19-20 times = 214-226-238-250-262-274 stitches. Continue with stocking stitch, garter stitch over the bands and stripes as before until the piece measures 13-14-15-16-17-18 cm from the cast-on edge. On the next row divide the piece for body and sleeves as follows: Work 5 band stitches in garter stitch, 29-31-33-35-37-39 stitches in stocking stitch (= front piece), place the next 44-46-48-50-52-54 stitches on 1 thread for sleeve and cast on 6 stitches under the sleeve, 58-62-66-70-74-78 stitches in stocking stitch (= back piece), place the next 44-46-48-50-52-54 stitches on 1 thread for sleeve and cast on 6 stitches under the sleeve, 29-31-33-35-37-39 stitches in stocking stitch and finish with 5 band stitches in garter stitch (= front piece) = 138-146-154-162-170-178 stitches. BODY: Continue working in stocking stitch with 5 band stitches in garter stitch in each side and stripes. When the piece measures 15-17-20-23-26-29 cm from where body and sleeves were divided, increase 30-34-34-38-42-42 stitches evenly on the next row from the right side – read INCREASE TIP-2 = 168-180-188-200-212-220 stitches. Change to circular needle size 3 mm. The next row from the wrong side is worked as follows: 5 band stitches in garter stitch, work rib (= purl 2 / knit 2) until there are 7 stitches left, purl 2 and finish with 5 band stitches in garter stitch. Cast off with knit from the right side when the piece measures 17-19-22-25-28-31 cm from where body and sleeves were divided; make sure that the cast-off edge is not tight, you can use a larger size needle when casting off if this is a problem. The jacket measures a total of approx. 33-36-40-44-48-52 cm, measured from the shoulder down. SLEEVE: Place the 44-46-48-50-52-54 stitches from the thread on the one side of the piece on double pointed needles size 4 mm and knit up 1 stitch in each of the 6 stitches cast on under the sleeve = 50-52-54-56-58-60 stitches. Continue with stripes in the same way as on the body, in stocking stitch and in the round. Insert 1 marker thread mid under sleeve. When the sleeve measures 2 cm from where body and sleeve were divided, decrease 1 stitch on each side of the marker thread (= 2 stitches decreased) – read DECREASE TIP. Decrease like this every 4-4-5-5-7-6 cm a total of 5-6-5-6-5-6 times = 40-40-44-44-48-48 stitches. When the sleeve measures 19-23-27-31-35-38 cm from where body and sleeve were divided, change to double pointed needles size 3 mm and work rib over all stitches (= knit 2 / purl 2) for 4 cm. Cast off with knit. The sleeve measures a total of 23-27-31-35-39-42 cm from where body and sleeve were divided. Work the other sleeve in the same way. ASSEMBLY: Sew buttons onto left band. |
||||
Diagram explanations |
||||
|
||||
Have you made this or any other of our designs? Tag your pictures in social media with #dropsdesign so we can see them! Do you need help with this pattern?You'll find tutorial videos, a Comments/Questions area and more by visiting the pattern on garnstudio.com. © 1982-2024 DROPS Design A/S. We reserve all rights. This document, including all its sub-sections, has copyrights. Read more about what you can do with our patterns at the bottom of each pattern on our site. |
With over 40 years in knitting and crochet design, DROPS Design offers one of the most extensive collections of free patterns on the internet - translated to 17 languages. As of today we count 304 catalogues and 11422 patterns - 11422 of which are translated into English (UK/cm).
We work hard to bring you the best knitting and crochet have to offer, inspiration and advice as well as great quality yarns at incredible prices! Would you like to use our patterns for other than personal use? You can read what you are allowed to do in the Copyright text at the bottom of all our patterns. Happy crafting!
Comments / Questions (11)
Jan C wrote:
I was wondering why all the stitch increases right before you start the ribbing hem? Doesn't this make the lower edge of the sweater flare out? Thanks!
27.01.2024 - 01:03DROPS Design answered:
Dear Jan C, this increases we done because the ribb pattern would "shrink" and there will be a marked difference between the plain knitted part of the jacket and the elastic ribbing hem. Happy knitting!
27.01.2024 - 06:53Monica wrote:
Den randiga koftan är väl stickad ändå stickad i slätsticknng och nye rätstickning?? Så ser det i alla fall ut på bilden!
01.08.2022 - 13:40DROPS Design answered:
Hej Monica, du börjar vid halsen med resår, sedan stickas koftan i slätstickning med framkanter i rätstickning... men allt står i beskrivningen :)
05.08.2022 - 08:50Jacqueline wrote:
En augmentant pour le raglan 15 fois, vous dites obtenir 214 mailles. En séparant les parties devant, manches 6 illes, dos, 6 mailles et devant vous me dites avoir 138 mailles. Qu'en est-il exactement? Merci pour votre réponse
15.01.2022 - 18:35DROPS Design answered:
Bonjour Jacqueline, tout à fait, vous avez bien 214 mailles en 2 ans quand toutes les augmentations sont faites; puis, lorsque vous allez diviser l'ouvrage pour terminer le dos/le devant et les manches séparément, vous aurez alors 138 mailles pour le dos/le devant. Bon tricot!
17.01.2022 - 08:25Mabel Rodriguez wrote:
Thank you so much for sharing this pattern. I'm having some difficulties between the yoke and the body. When I finished the yoke, I have 214 st. Then I have to knit: 5+29+44+6+58+44+6+29+5=226. I'm 12 st short. And then, the pattern said I suppose to have 138 st on the needle, but 226-100 (sleeves)=126 not 138, again 12 st short. I don't know what I'm doing wrong or if I misunderstood the instructions.
17.08.2021 - 06:12DROPS Design answered:
Hi Mabel, I think you have forgotten to include the 6 stitches cast on under each sleeve, which add 12 stitches to the body and 6 stitches to each sleeve. Hope this helps and happy knitting!
17.08.2021 - 09:40Karin Brandt wrote:
Ich habe die Jacke jetzt beendet und es hat alles sehr gut geklappt. Danke für die Hilfe. Liebe Grüße
18.05.2021 - 09:58Karin Brandt wrote:
Hallo, es kann ja sein, dass ich einen Denkfehler bei der Arbeit habe, aber ich verstehe die Rechnung an der Passe nicht. Wenn ich mit 94 M. beginne die Markierer zu setzen und 15x in jeder 2. Reihe 4x2 Maschen zunehme (jeweils vor und hinter dem Markierer), wie komme ich dann nur auf 214 Maschen?
14.05.2021 - 19:28DROPS Design answered:
Liebe Frau Brandt, es wird für den Raglan jeweils 8 Maschen zugenommen und insgesamt 15 Mal in jeder 2. Reihe (= bei jeder Hinreihe) = 8x15= 120 M + die 94 M = 214 Maschen. Viel Spaß beim stricken!
17.05.2021 - 08:38Sylviane wrote:
Je n'ai pas bien lu les instructions et je viens de remarquer que les diminutions se faisaient selon la taille tous les tant de cm.Désolée de vous avoir déranger inutilement.
23.01.2019 - 15:04Sylviane wrote:
Bonjour pour les diminutions de la manche pouvez-vous m'indiquer si il faut le faire tous les 2 rangs.Merci.Cordialement.Sylviane
23.01.2019 - 14:47DROPS Design answered:
Bonjour Sylviane, on diminue pour les manches 2 mailles pour toutes les tailles, mais en fonction de la taille, vous diminuerez 5-6-5-6-5-6 fois au total tous les 4-4-5-5-7-6 cm. - mesurez dans une partie jersey le nombre de cm correspondant à la hauteur indiquée pour votre taille pour savoir le nombre de rangs correspondant. Bon tricot!
23.01.2019 - 16:07Fillette wrote:
Je ne sais pas comment reprendre les 6 mailles sous la manche. pouvez vous m’aider ? serait il possible de les monter lorsque l’on reprend la manche après séparation des différentes parties merci
29.11.2018 - 17:22DROPS Design answered:
Bonjour Fillette, cette vidéo montre comment tricoter un pull de haut en bas, vous monterez les mailles sous les manches de la même façon (à partir du time code 6:50 environ: on met les mailles des manches en attente), et, plus tard, vous relèverez les mailles pour les manches comme dans la vidéo. Bon tricot!
30.11.2018 - 08:05Ilana wrote:
Hello I like this pattern and knitt already 11/5 cm.from the beginning(middle back mesure) I began with 92 st.( for a 3 y old child) and worked as written. 10cm=21 st. as written..... Why the back is already 31 cm??? the sleeve 22 cm.??? Must be a mistake somewhere... Can you help me? Thanks
30.09.2018 - 11:20DROPS Design answered:
Dear Hana, with 21 sts = 10 cm, the 32 sts for back piece will be 15 cm and the 13 sts on sleeve will be 6 cm. Please make sure you get the correct tension, adjust needle size if necessary. Happy knitting!
01.10.2018 - 09:10