
Categorías populares
¿Buscas un hilo?


Escribe un comentario sobre DROPS 156-42
¡Nos encantaría saber qué piensas acerca de este patrón!
Si quieres escribir una pregunta referente al patrón, por favor asegúrate de elegir la categoría correcta en el formulario debajo, para acelerar el proceso de respuesta. Los campos obligatorios están marcados con un *.
|
||||||||||||||||||||||
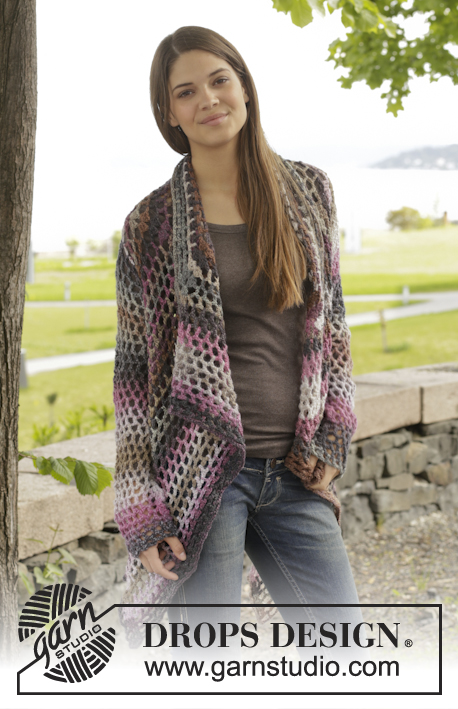
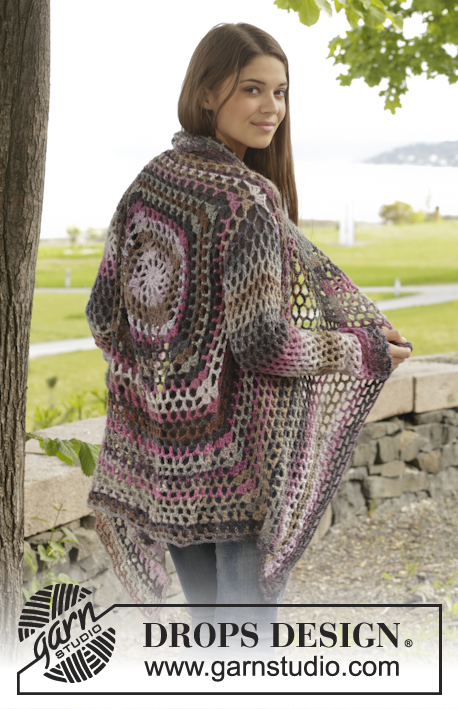
Around the World |
||||||||||||||||||||||
 |
 |
|||||||||||||||||||||
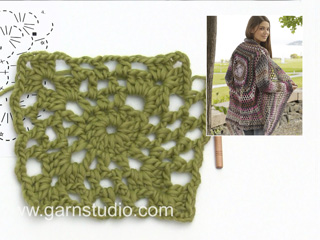
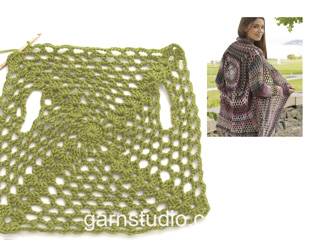
Chaqueta de ganchillo DROPS con patrón de calados en ”Big Delight”. Talla: S - XXXL
DROPS 156-42 |
||||||||||||||||||||||
|
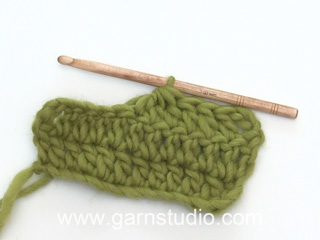
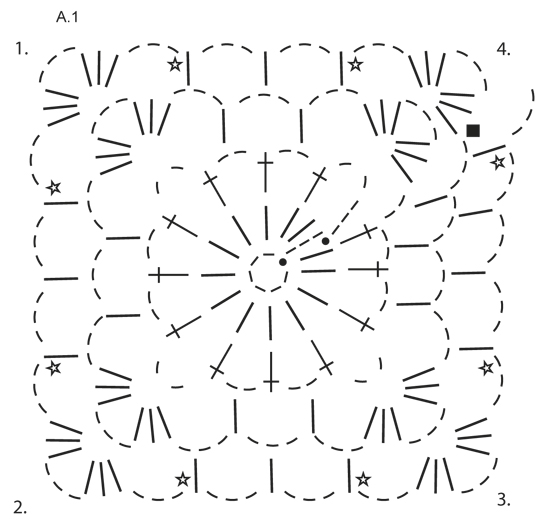
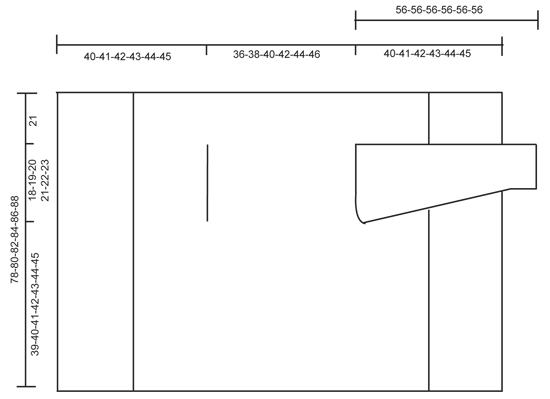
PATRÓN: Ver el diagrama A.1 TIP PARA LAS DISMINUCIONES (se aplica a las mangas): Para dism 1 repetición (= 1 p.a. + 3 p.de cad.) dejar sin trabajar p.de cad, pero trabajar 2 p.a. dentro de 1 p.a. como sigue: Trabajar 1 p.a. pero sin trabajar la última lazada (= 2 bucles en el ganchillo), ahora trabajar el sig p.a. pero en la última lazada pasar el hilo por todos los bucles en el ganchillo. ---------------------------------------------------------------------------------------------------------------------------------------------- CUERPO: Se trabaja en redondo desde el centro de la espalda. Trabajar 6 p.de cad. con ag de ganchillo tamaño 5 mm con Big Delight y formar un anillo con 1 p.e. en el primer p.de cad. Trabajar según el diagrama A.1, es decir trabajar como sigue: VUELTA 1: Trabajar 3 p.de cad., 13 p.a. dentro del anillo, finalizar con 1 p.e. en el 3er p.de cad. del inicio de la vta. VUELTA 2: 5 p.de cad., saltar 1 p.a. 1 p.a. en el sig p.a., *2 p.de cad., 1 p.a. en el sig p.a*, repetir de * a * la vta entera, finalizar con 2 p.de cad. = 12 p.a. + 2 p.de cad. VUELTA 3: Ahora trabajar el círculo en un cuadrado, es decir como sigue: Trabajar 3 p.a. + 3 p.de cad.+ 3 p.a. (= esquina) en el primer arco de p.de cad., 3 p.de cad., 1 p.a. en el sig arco, 3 p.de cad., 1 p.a. en el sig arco, 3 p.de cad., * 3 p.a. + 3 p.de cad.+ 3 p.a. (= esquina) en el sig arco, 3 p.de cad., 1 p.a. en el sig arco, 3 p.de cad., 1 p.a. en el sig arco, 3 p.de cad.*, repetir de * a * un total de 3 vcs , 1 p.a. en el sig arco (= quedan 2 p.de cad. de la vta anterior), 3 p.de cad. VUELTA 4: Trabajar 3 p.a. + 3 p.de cad.+ 3 p.a. (= esquina) en el primer arco de p.de cad., *3 p.de cad., 1 p.a. en el sig arco, 3 p.de cad., 1 p.a. en el sig arco, 3 p.de cad., 1 p.a. en el sig arco, 3 p.de cad., 3 p.a. + 3 p.de cad.+ 3 p.a. (= esquina) en el sig arco*, repetir de * a * un total de 3 vcs , 3 p.de cad., 1 p.a. en el sig arco, 3 p.de cad., 1 p.a. en el sig arco, 3 p.de cad., 1 p.a. en el sig arco, 3 p.de cad., 1 p.a. en el sig arco, 3 p.de cad. RECUERDE MANTENER LA MISMA TENSIÓN DE LA MUESTRA. Repetir la 4ª vta con aum, es decir trabajar 1 p.a. + 3 p.de cad. más entre cada esquina en cada vta (= 4 aum por vta), AL MISMO TIEMPO en cada 6ª vta aum 1 p.a.+ 3 p.de cad. extra a cada lado de cada esquina - ver la estrella en el diagrama (= 8 aum extra por vta). Continuar de la misma manera hasta que el cuadrado mida 36-38-40-42-44-46 cm x 36-38-40-42-44-46 cm. Ahora trabajar la sisa como sigue: Trabajar como antes hasta la primera esquina, trabajar 3 p.a. + 3 p.de cad.+ 3 p.a. en el arco de la esquina. Ahora trabajar p.de cad. hasta el centro del sig lado (es decir el centro entre la 1ª y 2ª esquina) como sigue: Trabajar 1 p.de cad. por cada p.de cad/p.a. saltado. Ahora trabajar el patrón como antes hasta el centro entre la 3ª y 4ª esquina. Ahora trabajar p.de cad. hasta inicio de la vta como sigue: Trabajar 1 p.de cad. por cada p.de cad/p.a. saltado. En la sig vta trabajar el patrón y aum como antes sobre todos los pts, incl los p.de cad. de las sisas. Continuar de la misma manera hasta que el cuadrado mida 78-80-82-84-86-88 cm x 78-80-82-84-86-88 cm (es decir 21 cm para todas las tallas desde la sisa). Asegurar el hilo. DELANTERO: Ahora trabajar de ida y vta entre la 1ª y la 2ª esquina. ATENCIÓN! Trabajar el delantero sin aumentos. Fila 1: trabajar en la 1ª esquina como sigue: 3 p.a. en el arco de la esquina, *3 p.de cad, 1 p.a. en el arco*, repetir de *a* y finalizar con 3 p.de cad y 3 p.a. en la esquina. Fila 2: girar y trabajar como sigue: 1 p.a. en cada uno de los primeros 3 p.a., *1 p.a. en el arco, 3 p.de cad*, repetir de *a* y finalizar con 1 p.a. en el último arco y 1 p.a. en cada uno de los 3 p.a. Fila 3: girar y trabajar como sigue: 1 p.a. en cada uno de los primeros 3 p.a., *3 p.de cad, 1 p.a. en el arco*, repetir de *a* y finalizar con 3 p.de cad y 1 p.a. en cada uno de los últimos 3 p.a. Continuar repitiendo las Filas 2 y 3. Trabajar de esta manera hasta haber trabajado 19-20-21-22-23-24 cm de ida y vta, asegurar el hilo. Repetir en el otro lado, ahora trabajar de ida y vta de la 3ª a la 4ª esquina. Finalmente trabajar una vta alrededor del cuadrado entero. trabajar el patrón como antes pero en los arcos de las esquinas trabajar 6 p.a. Asegurar el hilo. MANGA: Trabajar en redondo , de arriba abajo desde la sisa, comenzar desde el centro bajo la manga por el LD. VUELTA 1: Trabajar 6 p.de cad. (= 1 p.a. + 3 p.de cad.), * 1 p.a. en el sig arco, 3 p.de cad.*, repetir de * a * un total de 16-17-18-19-20-21 vcs, trabajar 1 p.de cad., finalizar con 1 p.e. en el 3er p. de cad. del inicio de la vta. VUELTA 2: Trabajar 5 p.de cad., * 1 p.a. en el sig arco, 3 p.de cad.*, repetir de * a * un total de 16-17-18-19-20-21 vcs, trabajar 1 p.de cad., finalizar con 1 p.e. en el 3er p. de cad. del inicio de la vta. Repetir las VUELTAS 1 y 2 - AL MISMO TIEMPO dism 1 p.a. + 3 p.de cad. al inicio de la 4ª-6ª-6ª-8ª-8ª-6ª vta trabajando 2 p.a. juntos - LEER TIP PARA LAS DISMINUCIONES - centro bajo la manga. Repetir las dism cada 6ª-6ª-6ª-4ª-4ª-4ª vta = 12-12-13-13-14-14 p.a. Repetir la vta sin dism hasta que la manga mida aprox 56 cm en todas las tallas. Asegurar el hilo. Trabajar otra manga. |
||||||||||||||||||||||
Explicaciones del diagrama |
||||||||||||||||||||||
|
||||||||||||||||||||||
|
||||||||||||||||||||||
|
||||||||||||||||||||||
|
¿Has realizado este u otro de nuestros modelos? ¡Etiqueta tus fotografías en las redes sociales con #dropsdesign para que podamos verlos! ¿Necesitas ayuda con este patrón?Encontrarás videos tutoriales, un espacio para comentarios/preguntas y más visitando la página del patrón en garnstudio.com © 1982-2024 DROPS Design A/S. Todos los derechos reservados. Este documento, incluyendo todas sus sub-secciones, está protegido por los derechos de autor (copyright). Lee más acerca de lo que puedes hacer con nuestros patrones en la parte de abajo de cada patrón de nuestro sitio. |
||||||||||||||||||||||


Con más de 40 años en el diseño de modelos de punto y de ganchillo, DROPS Design ofrece una de las más vastas colecciones de patrones gratuitos en el internet - traducidos en 17 idiomas. Al día de hoy, contamos con 304 catálogos y 11422 patrones - de los cuales 10435 están traducidos en español.
Nosotros trabajamos con mucho esmero para brindarte lo mejor que las labores de punto y ganchillo tienen para ofrecer,inspiración y consejos, así como hilos de magnífica calidad a precios increíbles! Te gustaría usar nuestros patrones para otro fin además del uso personal? Puedes leer acerca de lo que estás permitida a hacer en el texto de Copyright en la parte de abajo de todos nuestros patrones. Felices labores!
Comentarios / Preguntas (128)
Moet je na de armsgaten als je verder haakt in het patroon ook elke zesde toer extra blijven meerderen?
26.10.2015 - 17:18DROPS Design answered:
Hoi Barbara. Ja, jeg gaat door met de vierkant tot het vierkantje 21 cm meet vanaf het armsgat. Pas bij het haken van de voorpanden maak je geen meerderingen meer.
27.10.2015 - 14:40Ik heb een vraag over de toer ná de armsgaten. Je moet volgens het patroon haken, ook over de losse van de armsgaten. Dus drie lossen en een stokje neem ik aan. Als ik op de losse haak, om de hoeveel steken komt dan mijn stokje?
23.10.2015 - 13:08DROPS Design answered:
Hoi Barbara. Je haakt om de lossen, je hoeft ze niet te tellen en in te haken.
23.10.2015 - 13:47Theresa Lambert wrote:
I'm not understanding what to do on row 4 would you please help me says something and adding another dc? Please help me out.
20.10.2015 - 00:23DROPS Design answered:
Dear Theresa, it is just to clear, that there is 1 dc + 3 ch more between each corner on every round. Just follow previous instructions.
18.12.2015 - 11:53I think this is my last question on the armholes- thank you for all your help - I understand I am counting the side of the pattern and then chaining that many for the hole in the sleeve- do I attach it in the middle between both corners on the side of this or do I attached it to the other corner before doing my pattern again??
19.10.2015 - 13:43DROPS Design answered:
Dear Mrs De Maria, when you have crocheted the chain for armhole and skipped the number of sts matching between first (1st armhole) corner and mid between 1st and 2nd corner, crochet as before from middle between 1st and 2nd corner to the 2nd corner. For 2nd armhole, crochet as before from 3rd corner to middle side before 4th corner, crochet a chain skipping the matching number of sts to the 4th corner. Happy crocheting!
19.10.2015 - 14:10Lorraine De Maria wrote:
Thank you so much - I think I understand now- I will get back to you if I have any questions in the future - Love your site!!
16.10.2015 - 19:38Maybe this is a better way to ask- I will follow for the armhole on the answer that says to chain as many chains as it would take to reach the middle of the square - then do I attach it with a chain where I counted 1/2 before the corner?? or do I attach it in the corner I am working on? and how many sets of double crochets and chains do I put in the corner before doing this long chain??
15.10.2015 - 22:38DROPS Design answered:
Dear Mrs De Maria, after you have skipped half the side (from the corner to middle between both corners), continue in pattern as before to next corner. Number of chains will depend of number of sts you will skip - count the number of sts skipped to the middle between both corners and chain this number. Happy crocheting!
16.10.2015 - 09:28I sent a question early about the sleeves (armholes) and I see others have wrote for help on the same subject and I have been crocheting for years and I am still confused- one answer is saying to decrease - the other is saying count the stitches half way to the next corner and chain that amount - then attach it where? and which one is it?
15.10.2015 - 22:10DROPS Design answered:
Dear Mrs De Maria, when working armhole, work as before until first corner, then work 3 dc+3 ch+ 3 dc in corner (as before), then crochet a ch to create armhole (number of ch = number of sts skipped from 1st corner to the middle of the side between 1st and 2nd corner), and continue as before and repeat armhole between 3rd and 4th corner: work from 3rd corner as before to middle of side between both corners, ch same number of ch as for 1st armhole and 3dc,3ch,3dc in 4th corner, then work as before to the beg of round. Happy crocheting!
16.10.2015 - 09:24I bought the yarn for the drops Pattern (around the world) I had no trouble with it until I got to the Sleeves - I don't understand - do I just do a DC and then ch 3 in each of the corners on the square of the Pattern instead of the 3dc, ch3 and 3dc??
15.10.2015 - 21:20DROPS Design answered:
Dear Mrs De Maria, on 1st round of sleeve, work around armhole, ie in last row on square (skipped sts when working armhole) + in the ch/1st row after armhole and work around 1 dc in each ch-space with 3 ch between each dc. Happy crocheting!
16.10.2015 - 09:14Please can to tell me where I can find instructions on how to do a crochet tension square. In relation to this pattern. As I can only find how too do Knitted ones.
14.10.2015 - 14:20DROPS Design answered:
Dear Helen, you can work the first 7 rounds to check your tension as stated on the tab "materials" at the right side of the picture. Happy crocheting!
14.10.2015 - 16:42Kathie wrote:
This is the most confusing pattern I have ever tried to follow. No matter how many times I start over I end up with an extra DC and Ch 3 space on the final side of the A-1 Diagram. It does not matter if I follow the written pattern or the chart. If this is so easily written I would think that you would just make a video of how to do the actual pattern instead of videos just showing the stitches that are used.
01.10.2015 - 02:35