
Categorías populares
¿Buscas un hilo?


Escribe un comentario sobre DROPS 156-42
¡Nos encantaría saber qué piensas acerca de este patrón!
Si quieres escribir una pregunta referente al patrón, por favor asegúrate de elegir la categoría correcta en el formulario debajo, para acelerar el proceso de respuesta. Los campos obligatorios están marcados con un *.
|
||||||||||||||||||||||
Around the World |
||||||||||||||||||||||
 |
 |
|||||||||||||||||||||
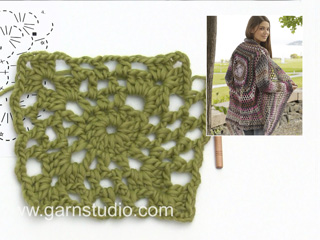
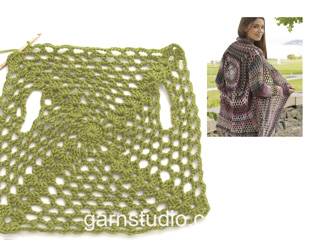
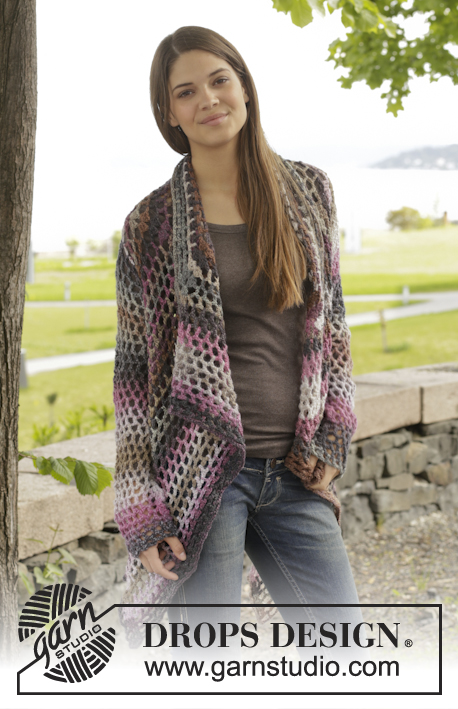
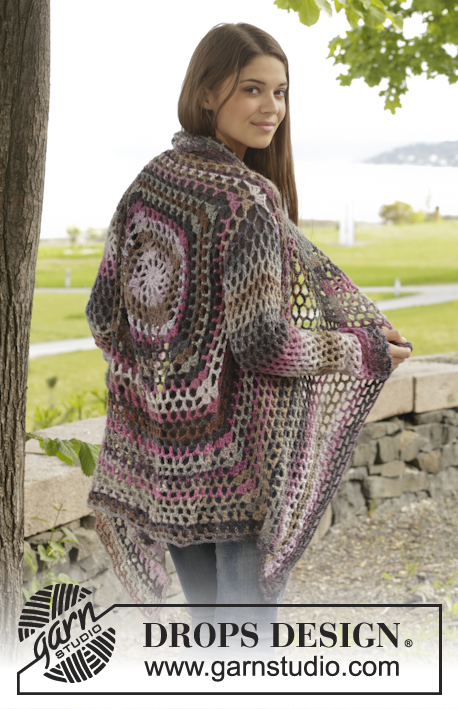
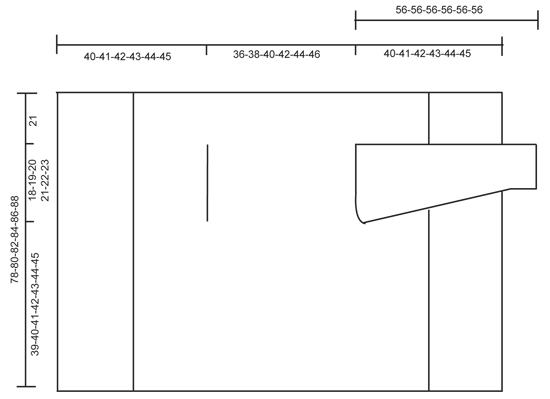
Chaqueta de ganchillo DROPS con patrón de calados en ”Big Delight”. Talla: S - XXXL
DROPS 156-42 |
||||||||||||||||||||||
|
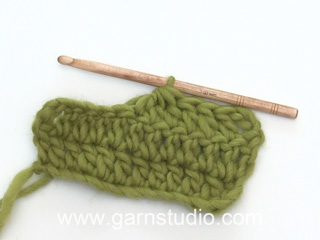
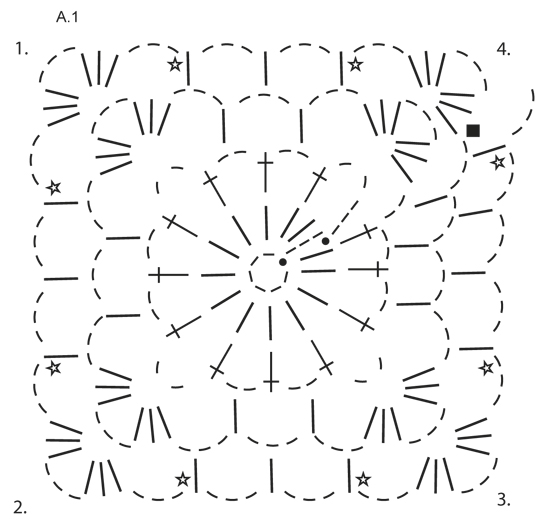
PATRÓN: Ver el diagrama A.1 TIP PARA LAS DISMINUCIONES (se aplica a las mangas): Para dism 1 repetición (= 1 p.a. + 3 p.de cad.) dejar sin trabajar p.de cad, pero trabajar 2 p.a. dentro de 1 p.a. como sigue: Trabajar 1 p.a. pero sin trabajar la última lazada (= 2 bucles en el ganchillo), ahora trabajar el sig p.a. pero en la última lazada pasar el hilo por todos los bucles en el ganchillo. ---------------------------------------------------------------------------------------------------------------------------------------------- CUERPO: Se trabaja en redondo desde el centro de la espalda. Trabajar 6 p.de cad. con ag de ganchillo tamaño 5 mm con Big Delight y formar un anillo con 1 p.e. en el primer p.de cad. Trabajar según el diagrama A.1, es decir trabajar como sigue: VUELTA 1: Trabajar 3 p.de cad., 13 p.a. dentro del anillo, finalizar con 1 p.e. en el 3er p.de cad. del inicio de la vta. VUELTA 2: 5 p.de cad., saltar 1 p.a. 1 p.a. en el sig p.a., *2 p.de cad., 1 p.a. en el sig p.a*, repetir de * a * la vta entera, finalizar con 2 p.de cad. = 12 p.a. + 2 p.de cad. VUELTA 3: Ahora trabajar el círculo en un cuadrado, es decir como sigue: Trabajar 3 p.a. + 3 p.de cad.+ 3 p.a. (= esquina) en el primer arco de p.de cad., 3 p.de cad., 1 p.a. en el sig arco, 3 p.de cad., 1 p.a. en el sig arco, 3 p.de cad., * 3 p.a. + 3 p.de cad.+ 3 p.a. (= esquina) en el sig arco, 3 p.de cad., 1 p.a. en el sig arco, 3 p.de cad., 1 p.a. en el sig arco, 3 p.de cad.*, repetir de * a * un total de 3 vcs , 1 p.a. en el sig arco (= quedan 2 p.de cad. de la vta anterior), 3 p.de cad. VUELTA 4: Trabajar 3 p.a. + 3 p.de cad.+ 3 p.a. (= esquina) en el primer arco de p.de cad., *3 p.de cad., 1 p.a. en el sig arco, 3 p.de cad., 1 p.a. en el sig arco, 3 p.de cad., 1 p.a. en el sig arco, 3 p.de cad., 3 p.a. + 3 p.de cad.+ 3 p.a. (= esquina) en el sig arco*, repetir de * a * un total de 3 vcs , 3 p.de cad., 1 p.a. en el sig arco, 3 p.de cad., 1 p.a. en el sig arco, 3 p.de cad., 1 p.a. en el sig arco, 3 p.de cad., 1 p.a. en el sig arco, 3 p.de cad. RECUERDE MANTENER LA MISMA TENSIÓN DE LA MUESTRA. Repetir la 4ª vta con aum, es decir trabajar 1 p.a. + 3 p.de cad. más entre cada esquina en cada vta (= 4 aum por vta), AL MISMO TIEMPO en cada 6ª vta aum 1 p.a.+ 3 p.de cad. extra a cada lado de cada esquina - ver la estrella en el diagrama (= 8 aum extra por vta). Continuar de la misma manera hasta que el cuadrado mida 36-38-40-42-44-46 cm x 36-38-40-42-44-46 cm. Ahora trabajar la sisa como sigue: Trabajar como antes hasta la primera esquina, trabajar 3 p.a. + 3 p.de cad.+ 3 p.a. en el arco de la esquina. Ahora trabajar p.de cad. hasta el centro del sig lado (es decir el centro entre la 1ª y 2ª esquina) como sigue: Trabajar 1 p.de cad. por cada p.de cad/p.a. saltado. Ahora trabajar el patrón como antes hasta el centro entre la 3ª y 4ª esquina. Ahora trabajar p.de cad. hasta inicio de la vta como sigue: Trabajar 1 p.de cad. por cada p.de cad/p.a. saltado. En la sig vta trabajar el patrón y aum como antes sobre todos los pts, incl los p.de cad. de las sisas. Continuar de la misma manera hasta que el cuadrado mida 78-80-82-84-86-88 cm x 78-80-82-84-86-88 cm (es decir 21 cm para todas las tallas desde la sisa). Asegurar el hilo. DELANTERO: Ahora trabajar de ida y vta entre la 1ª y la 2ª esquina. ATENCIÓN! Trabajar el delantero sin aumentos. Fila 1: trabajar en la 1ª esquina como sigue: 3 p.a. en el arco de la esquina, *3 p.de cad, 1 p.a. en el arco*, repetir de *a* y finalizar con 3 p.de cad y 3 p.a. en la esquina. Fila 2: girar y trabajar como sigue: 1 p.a. en cada uno de los primeros 3 p.a., *1 p.a. en el arco, 3 p.de cad*, repetir de *a* y finalizar con 1 p.a. en el último arco y 1 p.a. en cada uno de los 3 p.a. Fila 3: girar y trabajar como sigue: 1 p.a. en cada uno de los primeros 3 p.a., *3 p.de cad, 1 p.a. en el arco*, repetir de *a* y finalizar con 3 p.de cad y 1 p.a. en cada uno de los últimos 3 p.a. Continuar repitiendo las Filas 2 y 3. Trabajar de esta manera hasta haber trabajado 19-20-21-22-23-24 cm de ida y vta, asegurar el hilo. Repetir en el otro lado, ahora trabajar de ida y vta de la 3ª a la 4ª esquina. Finalmente trabajar una vta alrededor del cuadrado entero. trabajar el patrón como antes pero en los arcos de las esquinas trabajar 6 p.a. Asegurar el hilo. MANGA: Trabajar en redondo , de arriba abajo desde la sisa, comenzar desde el centro bajo la manga por el LD. VUELTA 1: Trabajar 6 p.de cad. (= 1 p.a. + 3 p.de cad.), * 1 p.a. en el sig arco, 3 p.de cad.*, repetir de * a * un total de 16-17-18-19-20-21 vcs, trabajar 1 p.de cad., finalizar con 1 p.e. en el 3er p. de cad. del inicio de la vta. VUELTA 2: Trabajar 5 p.de cad., * 1 p.a. en el sig arco, 3 p.de cad.*, repetir de * a * un total de 16-17-18-19-20-21 vcs, trabajar 1 p.de cad., finalizar con 1 p.e. en el 3er p. de cad. del inicio de la vta. Repetir las VUELTAS 1 y 2 - AL MISMO TIEMPO dism 1 p.a. + 3 p.de cad. al inicio de la 4ª-6ª-6ª-8ª-8ª-6ª vta trabajando 2 p.a. juntos - LEER TIP PARA LAS DISMINUCIONES - centro bajo la manga. Repetir las dism cada 6ª-6ª-6ª-4ª-4ª-4ª vta = 12-12-13-13-14-14 p.a. Repetir la vta sin dism hasta que la manga mida aprox 56 cm en todas las tallas. Asegurar el hilo. Trabajar otra manga. |
||||||||||||||||||||||
Explicaciones del diagrama |
||||||||||||||||||||||
|
||||||||||||||||||||||
|
||||||||||||||||||||||
|
||||||||||||||||||||||
|
¿Has realizado este u otro de nuestros modelos? ¡Etiqueta tus fotografías en las redes sociales con #dropsdesign para que podamos verlos! ¿Necesitas ayuda con este patrón?Encontrarás videos tutoriales, un espacio para comentarios/preguntas y más visitando la página del patrón en garnstudio.com © 1982-2024 DROPS Design A/S. Todos los derechos reservados. Este documento, incluyendo todas sus sub-secciones, está protegido por los derechos de autor (copyright). Lee más acerca de lo que puedes hacer con nuestros patrones en la parte de abajo de cada patrón de nuestro sitio. |
||||||||||||||||||||||


Con más de 40 años en el diseño de modelos de punto y de ganchillo, DROPS Design ofrece una de las más vastas colecciones de patrones gratuitos en el internet - traducidos en 17 idiomas. Al día de hoy, contamos con 304 catálogos y 11422 patrones - de los cuales 10435 están traducidos en español.
Nosotros trabajamos con mucho esmero para brindarte lo mejor que las labores de punto y ganchillo tienen para ofrecer,inspiración y consejos, así como hilos de magnífica calidad a precios increíbles! Te gustaría usar nuestros patrones para otro fin además del uso personal? Puedes leer acerca de lo que estás permitida a hacer en el texto de Copyright en la parte de abajo de todos nuestros patrones. Felices labores!
Comentarios / Preguntas (128)
Kan iemand mij uitleggen hoe de mouwen gehaakt worden. Ik begrijp het principe wel, maar als ik op de goede kant haak en met de 5 losse de nieuwe toeren begin loopt de hele mindering gedraaid over de voorkant van de mouw. Ik heb overigens ook meer losse bogen dan aangegeven in het patroon. Dit kan ik oplossen door midden onder te minderen maar hoe voorkom ik dat het begin van de rondes over de mouw lopen?
03.01.2016 - 18:02DROPS Design answered:
Hoi Loele. Je moet ervoor zorgen, dat de minderingen steeds op dezelfde plek worden gemaakt. Het lijkt dat je de minderingen op de toer opschuift waardoor ze zich verplaatsen en het mouw "draait". Ik zou ook kijken of je het patroon volgt zodat er niet steeds meer bogen komen.
05.01.2016 - 15:39Meine Frage vom 20.12.15 wurde leider noch nicht beantwortet. Darf ich mich nochmal in Erinnerung rufen? Vielen Dank.
30.12.2015 - 17:33DROPS Design answered:
Sie müssen bis zur Mitte einer Seite des Quadrats häkeln, Sie häkeln also die Hälfte dieser Seite, dann überspringen Sie den Rest der Seite (also die andere Hälfte), indem Sie statt der Maschen die entsprechende Anzahl an Luftmaschen häkeln. Die Ecke häkeln Sie dann wieder normal und wiederholen das Ganze dann an der gegenüberliegenden Seite. Die Armausschnitte umfassen also jeweils die Hälfte einer Seite.
05.01.2016 - 19:18Are any further questions being answered????? I have a customer waiting on this item to be made. Can someone else help me if the creator isnt available to help me?
29.12.2015 - 16:55DROPS Design answered:
Dear Mrs Hohenstein, please find answer below and thank you very much for your patience. Happy crocheting!
02.01.2016 - 15:17I am so confused as to how to do the sleeve. I got the first corner done. But from there I do not understand the written instructions I have also read many comments and answers and am still confused is there anyway that you can try and in a very simple way explain how to do the first side including the first sleeve? Please and thank you
27.12.2015 - 21:39DROPS Design answered:
Dear Mrs Hohenstein, to shape armholes, work to 1st corner, work 3 dc+3ch+3 dc in corner, then you will work a chain to shape the hole for the sleeve as follows: count number of sts from the 1st corner to the middle of side between 1st and 2nd corner and chain this number of sts, continue working as before from middle of this side to 2nd corner, continue as before to the 3rd corner, then work as before from the corner to the mid of side between 3rd and 4th corner, you will now skip the next sts to the 4th corner and replace these skipped sts by a chain of the number of skipped sts. Finish round as before. Happy crocheting!
02.01.2016 - 14:19Ich habe Probleme mit den Ärmelausschnitten. Verstehe ich das richtig, dass ich ein Stäbchen gehäkelt habe, dann 3 Lfm + nochmal 3 Lfm um das nächste Stb.zu überspringen,dann wieder 3 Lfm und das nächste Stb häkele? Wenn ja, wie wiederhole ich dass in der nächsten Runde? Verdoppele ich die Lfm zum überspringen, da ja auch der Luftmaschenbogen breiter ist? Ich hoffe, ich habe mich einigermaßen verständlich ausgedrückt. Vielen Dank.
20.12.2015 - 18:15DROPS Design answered:
Antwort siehe oben!
25.01.2016 - 11:09Sorry, I wasn't talking about the armholes, but the sides. It's under the "Front Piece" section of the pattern.
18.11.2015 - 02:35DROPS Design answered:
Dear Tara and sorry, my mistake - the 2nd front piece is worked as you did for the first side but this time crochet between the 3rd and 4th corner (seen from RS): crochet row 1 starting in the 3rd corner and finishing in the 4th corner. Happy crocheting!
18.11.2015 - 09:44This is under the Front section: Repeat on the other side, now work back and forth from third to fourth corner. So am I working this on 3 out of 4 sides? If so, on the bottom side, do I go all the way to the front corners or just the middle to connect the sides (which would not make the sides any longer in front)? I hope this makes sense. I appreciate the help!
17.11.2015 - 14:32DROPS Design answered:
Dear Tara, first armhole is worked between 1st corner and middle of side before 2nd corner, 2nd armhole is worked from middle of side after 3rd corner (work to the middle of the side as before) to the 4th corner (ch same number of ch you crocheted for 1st armhole and skip same number of sts as for 1st armhole). Happy crocheting!
17.11.2015 - 16:39I have read through all the comments and I am confused on Lauren's question. She said that on the 4th side there is an extra DC + 3ch but you said there should not be. However, in the diagram if you count the DC lines it shows 4 on the 4th side and 3 on the other side. When does this get straightened out to be an equal number of DC's on each side? Thanks in advance.
11.11.2015 - 03:10DROPS Design answered:
Dear Tara, your question has been forwarded. Thank you in advance for your patience and comprehension.
12.11.2015 - 09:49Helen Watt wrote:
Hi there! I would like some clarification regarding the increase on the body after the chain for the armhole. The pattern reads"On next round work pattern and inc as before OVER ALL STS, also in ch for armholes." To increase over all sts would make the garment very large? I assume this is incorrect and the increase is the same as previous to the making the armhole. Therefore increasing every 6th row? I just want to make sure that this is correct.
05.11.2015 - 10:06DROPS Design answered:
Dear Mrs Watt, yes that's correct, you continue as before and increase as you did before (= continue increasing every 6h row). Happy crocheting!
05.11.2015 - 10:27I am not sure what to do on round 5, it says to increase on each corner, which is a total of 4 increases? Correct? Where do i increase and do i still do the extra treble and chain 3 in the last chain space?
01.11.2015 - 17:42DROPS Design answered:
Dear Sarah, on round 5 continue as before (there will be 3 ch, 1 tr more between corners), and on round 6 start inc with 1 tr + 3 ch more in every place with a star in the diagram. Happy crocheting!
02.11.2015 - 09:22