
Popular categories
Looking for a yarn?


|
|
Black Pearl |
|
|
|
|
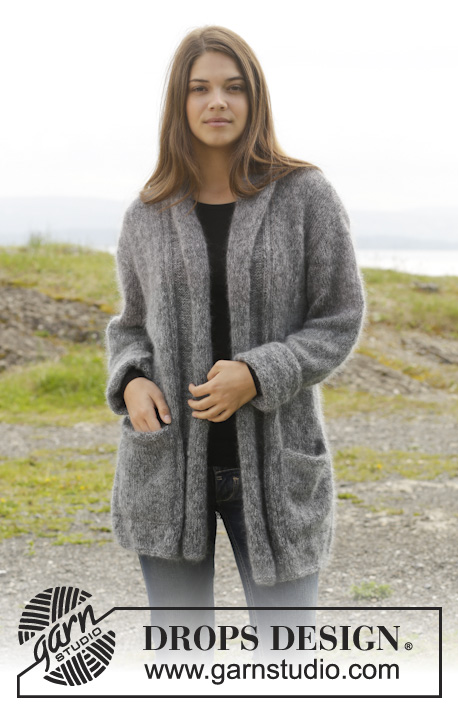
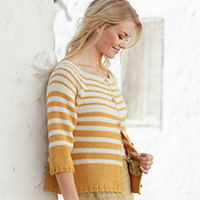
Knitted DROPS jacket in "Cotton Merino" or "Belle". Size: S - XXL.
DROPS 157-41 |
|
|
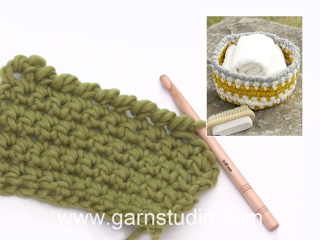
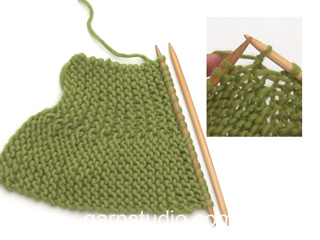
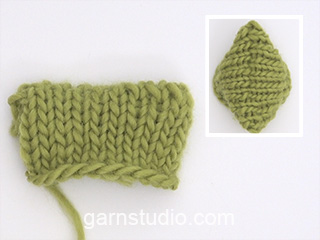
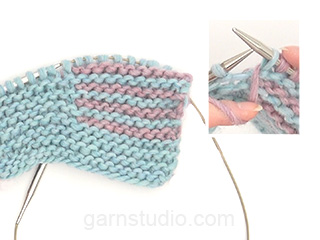
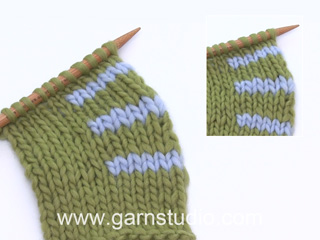
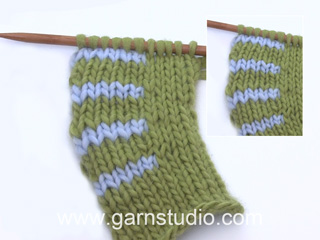
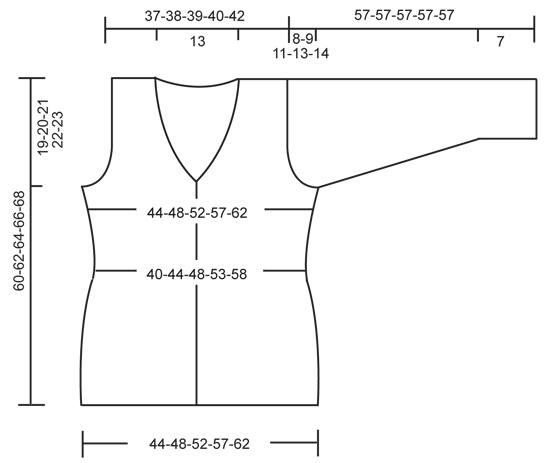
GARTER ST (back and forth on needle): K all rows. 1 ridge = 2 rows K. PATTERN (1st row = WS): * K 1 row from WS, K 1 row from RS, P 1 row from WS and K 1 row from RS *, repeat from *-*. INCREASE TIP (applies to collar): Inc by working 2 sts in the second and next last st. DECREASE TIP (applies to neckline): All dec are done from RS! Dec inside 5 band sts + inc sts for collar. Dec as follows before sts in garter st: K 2 tog. Dec as follows after sts in garter st: Slip 1 st as if to K, K 1, psso. BUTTONHOLES: Dec for buttonholes on right band. 1 buttonhole = K tog 3rd and 4th st from mid front and make 1 YO. Dec for buttonholes when piece measures: SIZE S: 21, 28 and 35 cm SIZE M: 22, 29 and 36 cm SIZE L: 23, 30 and 37 cm SIZE XL: 24, 31 and 38 cm SIZE XXL: 25, 32 and 39 cm ---------------------------------------------------------- BACK PIECE: Worked back and forth on circular needle to make room for all the sts. Cast on 90-98-106-116-126 sts (incl 1 edge st in each side) on circular needle size 4 mm with Cotton Merino or Belle. Work 5 ridges in GARTER ST - see explanation above. Switch to circular needle size 4.5 mm and continue in stocking st. REMEMBER THE KNITTING TENSION! When piece measures 5-6-7-8-9 cm, dec 1 st in each side every 4 cm 4 times = 82-90-98-108-118 sts. When piece measures 24-25-26-27-28 cm, inc 1 st in each side every 4 cm 4 times in total = 90-98-106-116-126 sts. At the same time when piece measures 35 cm, work PATTERN - see explanation above - over all sts until finished measurements. When piece measures 41-42-43-44-45 cm, cast off for armhole in each side on every other row: 4 sts 1 time, 3 sts 0-1-1-2-2 times, 2 sts 1-1-2-2-4 times and 1 st 2-2-3-4-3 times = 74-76-78-80-84 sts. When piece measures 58-60-62-64-66 cm, cast off the middle 22 sts for neck. Continue to dec on each side of neck on every other row: 1 st 2 times = 24-25-26-27-29 sts remain on each shoulder. Cast off when piece measures 60-62-64-66-68 cm. LEFT FRONT PIECE: Worked back and forth on circular needle. Cast on 50-54-58-63-68 sts (incl 1 edge st in the side and 5 band sts towards mid front) on circular needle size 4 mm with Cotton Merino or Belle. Work 5 ridges, switch to needles size 4.5 mm and continue in stocking st and 5 band sts in garter st. At the same time when piece measures 5-6-7-8-9 cm, dec and inc in the side as on back piece = 50-54-58-63-68 sts. Read all of the following section before continuing. When piece measures 35 cm, work pattern over all sts (except band which is worked in garter st) until finished measurements. Collar: When piece measures 35-36-37-38-39 cm, inc 2 sts inside first band st towards mid front. On next row work 1 ridge only over the outermost 7 sts towards mid front (do not work the other sts on needle). Then work all sts - at the same time inc 1 st inside outermost band st - SEE INCREASE TIP: 10 times on every other row and then 4 times on every 4th row = 16 sts inc for collar - work the inc sts in garter st. Neckline: At the same time when piece measures 39-40-41-42-43 cm, dec for neckline - SEE DECREASE TIP! 1 st on every other row 18 times. Armholes: At the same time when piece measures 41-42-43-44-45 cm, cast off for armhole in the side as on back piece. After all dec for armhole and neck line, 40-41-42-43-45 sts remain on needle. Work until piece measures 60-62-64-66-68 cm. Now cast off 24-25-26-27-29 sts on shoulder = 16 collar sts in garter st remain on needle. Collar: Continue to work in garter st over collar as follows: * 1 ridge over all sts, 1 ridge over only the outermost 10 sts towards mid front *, repeat from *-* until collar measures approx. 7 cm at the inside (it will then measure approx. 14 cm at the edge). Slip the sts on 1 stitch holder. RIGHT FRONT PIECE: Cast on and work as left but dec for armhole and neck in the opposite side. Dec in addition for BUTTONHOLES - see explanation above - on band. SLEEVE: Worked back and forth on circular needle. Cast on 47-47-49-53-53 sts (incl 1 edge st in each side) on circular needle size 4 mm with Cotton Merino or Belle. Read all of the following section before continuing. Work in garter st for 7 cm, switch to circular needle size 4.5 mm and continue in stocking. At the same time after ridges, inc 1 st in each side every 3.5-3-2.5-2.5-2 cm 12-14-15-15-17 times in total = 71-75-79-83-87 sts. At the same time when sleeve measures 38-36-34-32-30 cm, work PATTERN - see explanation above - until finished measurements. When sleeve measures 49-48-46-44-43 cm, cast off for sleeve cap in each side on every other row: 4 sts 1 time, 3 sts 1 time, 2 sts 2 times, 1 st 3-4-6-7-11 times, then cast off 2 sts in each side until piece measures 56 cm, then dec 3 sts 1 time each side. Cast off the remaining sts, the piece measures approx. 57 cm. ASSEMBLY: Sew the shoulder seams. Sew collar tog mid back with invisible stitches and sew collar on to neck line at the back of neck. Sew in sleeves. Sew sleeve and side seams in one inside 1 edge st. Sew the buttons on to the left band. CROCHET EDGE: Crochet an edge with 2 strands Cotton Merino or Belle on hook size 5 mm along left band, around the collar and down along right band as follows: Work reverse crochet, i.e. work dc from left to right. |
|
|
|
|
Have you made this or any other of our designs? Tag your pictures in social media with #dropsdesign so we can see them! Do you need help with this pattern?You'll find tutorial videos, a Comments/Questions area and more by visiting the pattern on garnstudio.com. © 1982-2024 DROPS Design A/S. We reserve all rights. This document, including all its sub-sections, has copyrights. Read more about what you can do with our patterns at the bottom of each pattern on our site. |


With over 40 years in knitting and crochet design, DROPS Design offers one of the most extensive collections of free patterns on the internet - translated to 17 languages. As of today we count 304 catalogues and 11422 patterns - 11422 of which are translated into English (UK/cm).
We work hard to bring you the best knitting and crochet have to offer, inspiration and advice as well as great quality yarns at incredible prices! Would you like to use our patterns for other than personal use? You can read what you are allowed to do in the Copyright text at the bottom of all our patterns. Happy crafting!
Comments / Questions (28)
I skriver som følger: "Ærmegab: Samtidig når arb måler 41-42-43-44-45 cm lukkes der af til ærmegab i siden som på rygstk. Efter alle aflukninger til ærmegab og halsudskæring er der 40-41-42-43-45 m på p. Strik videre til arb måler 60-62-64-66-68 cm. Nu lukkes der 24-25-26-27-29 m af på skulderen = 16 retstrikkede-kravem tilbage på p." Det må vel være ialt 21 retstrikkede kravemasker der er tilbage.
26.10.2016 - 17:47DROPS Design answered:
Hej Margot. Hvorfor? 40-24 = 16 (det samme gaelder for de andre str).
01.11.2016 - 14:18Van nr 157-41 vest, begrijp ik niet hoe de v-hals moet breien, kan het met een filmpje uitgelegd worden?
22.10.2016 - 18:54DROPS Design answered:
Hoi Wies. Betreft het de kraag inclusief de hals? Je moet eerst meerderen om de kraag breder te maken. Dit doet je door 2 st te breien in de tweede st en een na laatste st. Daarna moet je ook minderen voor de hals. Dit doet je in de st tussen de kraag en het voorpand. Je breit dus eerste de st voor de kraag (5 st + nieuwe st), dan 1 r afh, 1 r, afgeh st overh. Brei de nld tot 2 st voor de kraagsteken aan de andere kant en brei deze 2 st r samen. Je mindert dus alleen in de st op het voorpand, maar aantal kraagsteken blijft gelijk, en je vormt de hals.
25.10.2016 - 12:49Bonjour merci pour votre précédente aide mais je suis a ouvreau bloquée au niveau du devant gauche je ne comprends pas l'explication pour le col vous parlez de 7 cm du côté le plus court et que le col doit mesurer 14cm sur l'extérieur ce n'est pas très clair est çe que cela veut dire que l'on doit mesurer à partir du moment ou l'on fait la première côté mousse du côté de l'emenchure pour compter 7 cm ?
06.10.2016 - 19:53DROPS Design answered:
Bonjour Karen, mesurez à partir des mailles rabattues pour l'épaule, c'est le côté le plus court du col qui sera ensuite assemblé le long de l'encolure dos. Côté extérieur (début de rang sur l'envers, quand vous avez fait les rangs raccourcis), vous aurez ainsi plus de rangs qui formeront le col châle. Bon tricot!
07.10.2016 - 09:04Bonjour je suis bloquée sur l'avant gauche du tricot vous parlez a 35cm d'augmenter 2m a 1m du bord côté milieu devant puis une cote mousse sur les 7 mailles côté milieu devant sans tricoter les autres mailles... Je ne comprends pas où se situent ces augmentations sur les tricot et comment doit on les faire merci par avance
06.10.2016 - 02:22DROPS Design answered:
Bonjour Karen, au devant gauche, augmentez 2 m à 1 m du bord (cf "AUGMENTATIONS (col)" au début des explications) côté bordure devant (= milieu devant), c'est-à-dire avant la dernière m sur l'endroit. Au rang suivant sur l'envers, tricotez les 7 premières m seulement, tournez et tricotez ces 7 m (rangs raccourcis). Continuez ensuite en augmentant pour le col 1 m à 1 m du bord tous les 2 puis tous les 4 rangs (en même temps, diminuez ensuite pour l'encolure à 39 cm). Bon tricot!
06.10.2016 - 09:29Ich habe eine Frage zu den Ab-und Zunahmen beim Vorderteil. In der Anleitung steht für die Seitenschrägung ab-und zunehmen wie beim Rückenteil.Wie nehme ich denn am Anfang auf Seite der Blende z.b. ab ohne das sich die Blende verändert?Dienen die Videos über die verkürzten Reihen dem Ausgleich in der Höhe aufgrund der unterschiedlichen Muster?Vielen Dank im Voraus ☺
06.04.2016 - 12:25DROPS Design answered:
Liebe Nicole, die Seitenschrägung bezieht sich wirklich nur auf die Seiten der Jacke, nicht auf die vordere Blende. Die verkürzten Reihen brauchen Sie beim Kragen.
07.04.2016 - 07:10Hi! Maybe a hint on how to work the short rows for the collar will help fellow knitters. It took me some time - and several holes in the rows - until I remembered that there was a trick :-)
03.10.2015 - 18:46Shrabani wrote:
Hi, I dont know if my previous question got posted or not as its not visible.So asking again. I am stuck at the final bindoffs of the sleeve . Need to know the number of stitches remaining on the needle before the 2 stitches bindoff and after the 3 stitches decrease. The pattern just says to continue to the 2 stitches bindoff till 56 cms. I am doing the XXL size. Any help will be useful
21.06.2015 - 21:58DROPS Design answered:
See below.
22.06.2015 - 10:43Hi, I cannot understand the final instructions for sleeve bindoff. As per my understanding I have to again start binding off 2 stitches each side after std bindoff. My query is finally how many stitches are remaining on the needle [before the 2 stitches bindoff starts and also just before the 3 stitches decrease]. Its just written to continue till 56 cms. *PS: I am doing for the size XXL. Thanks.
21.06.2015 - 21:47DROPS Design answered:
Dear Mrs Shrabani, depending on how many rows you need for 10 cm, you may have to work more/less rows. After the first sts are cast off each side, continue binding off 2 sts in each side until sleeve measures 56 cm, then bind off 3 sts 1 time in each side. Happy knitting!
22.06.2015 - 10:42I cannot for the life of me understand the written instructions on the neckline decreases. Before/after garter stitch? "Inside" band and collar? I don't get it, and am stuck there. Can someone please clarify? Thanks!
22.01.2015 - 19:15DROPS Design answered:
Dear Mrs Strickholm, you decrease for neckline after all sts for front band + inc sts for collar (on right front piece) and before all sts for front band + inc sts for collar (on left front piece) - decrease are all done from RS. Happy knitting!
23.01.2015 - 10:43I am having trouble understanding the collar instructions on this particular pattern. Can you tell me where I might see a tutorial on what to do when I increase for the start of the collar. I love the Lame yarn. Working up very nicely. Thank You.
16.12.2014 - 23:58DROPS Design answered:
Dear Mrs Kirkpatrick, first inc for collar is done working 2 inc inside 1 edge st towards mid front - then work short rows (1 row over the first 7 sts towards mid front, turn and work return row), then inc for collar inside 1 edge st towards mid front (=knit front & back loop of st). Happy knitting!
17.12.2014 - 08:49