
Categorías populares
¿Buscas un hilo?


Escribe un comentario sobre DROPS 157-18
¡Nos encantaría saber qué piensas acerca de este patrón!
Si quieres escribir una pregunta referente al patrón, por favor asegúrate de elegir la categoría correcta en el formulario debajo, para acelerar el proceso de respuesta. Los campos obligatorios están marcados con un *.
|
||||||||||||||||||||||
Shining Star |
||||||||||||||||||||||
 |
 |
|||||||||||||||||||||
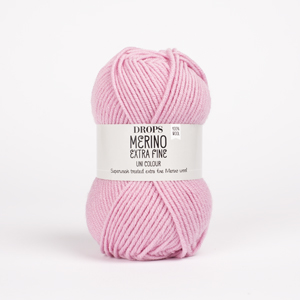
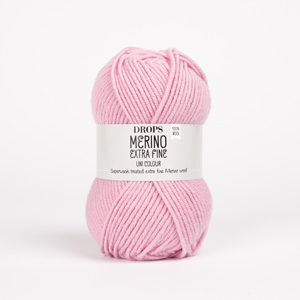
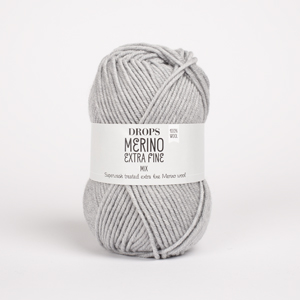
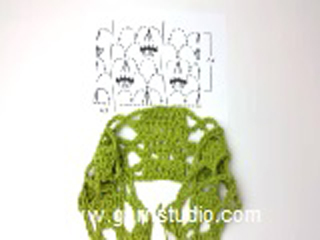
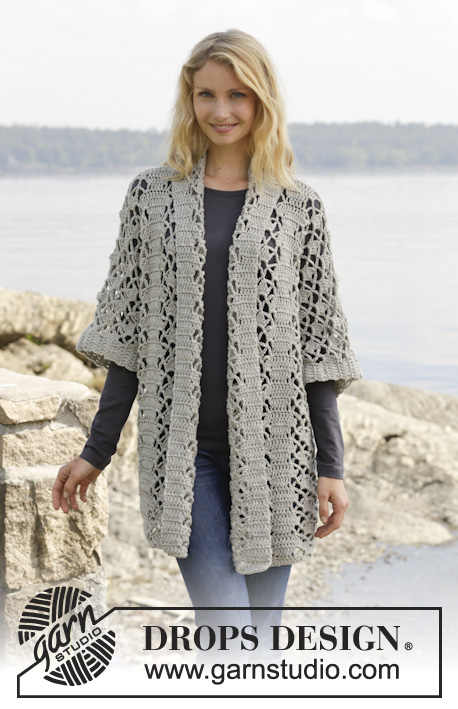
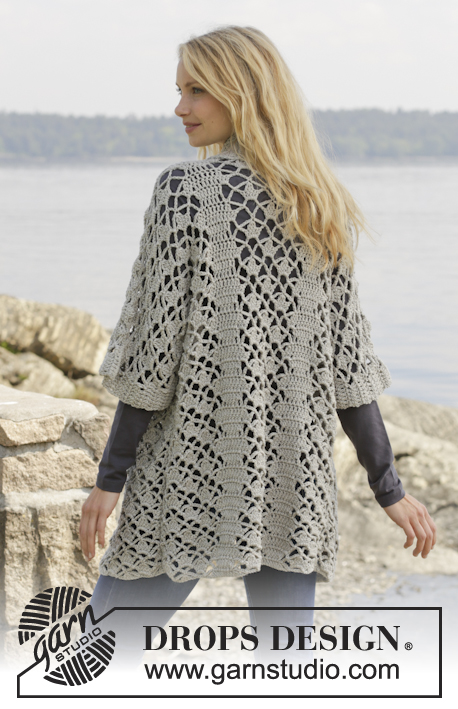
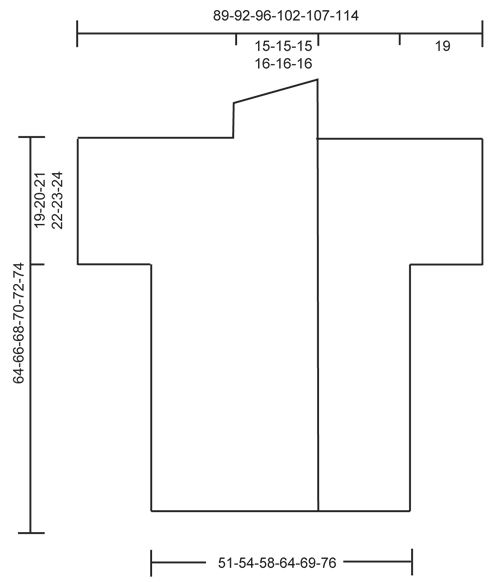
Chaqueta de ganchillo DROPS con patrón de calados y cuello chal en ”Merino Extra Fine”. Talla: S - XXXL.
DROPS 157-18 |
||||||||||||||||||||||
|
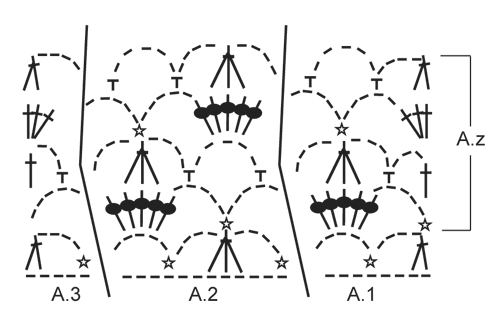
INFORMACIÓN PARA REALIZAR EL TRABAJO: Sustituir el primer p.a. del inicio de cada fila de p.a. por 3 p.de cad. PATRÓN: Ver los diagramas A.1-A.3. ---------------------------------------------------------------------------------------------------------------------------------------------- ESPALDA: Se trabaja de ida y vta. Trabajar 83-87-93-101-111-121 p.de cad. con ag de ganchillo tamaño 5 mm y con Merino Extra Fine. Ahora trabajar como sigue por el LD: Trabajar A.1 - ver explicaciones arriba, sobre los primeros 8 p.de cad. ATENCIÓN: Sustituir el 1er p.a. por 3 p.de cad. - ver INFORMACIÓN PARA REALIZAR EL TRABAJO arriba, A.2 sobre los sig 12-12-12-12-24-24 p.de cad., A.3 sobre los sig 5 p.de cad., 1 p.a. en cada uno de los sig 4-6-9-13-6-11 p.de cad., A.1, A.2, A.3, 1 p.a. en cada uno de los sig 4-6-9-13-6-11 p.de cad., A.1, A.2 sobre los sig 12-12-12-12-24-24 p.de cad. y A.3. Ahora repetir A.z en vertical hasta finalizar las medidas. ATENCIÓN: En la 1ª fila de A.z (= por el LR) trabajar como sigue: A.3, A.2 1-1-1-1-2-2 vcs en ancho, A.1, 3 p.de cad. (= 1 p.a.), 1 p.a. en cada uno de los sig 2-4-7-11-4-9 p.a., 3 p.de cad. (= 1 p.a.), A.3, A.2, A.1, 3 p.de cad.(= 1 p.a.), 1 p.a. en cada uno de los sig 2-4-7-11-4-9 p.a., 3 p.de cad. (= 1 p.a.), A.3, A.2 1-1-1-1-2-2 vcs en ancho y A.1. RECUERDE MANTENER LA MISMA TENSIÓN DE LA MUESTRA! Cuando la labor mida aprox 45-46-47-48-49-50 cm, ajustar para finalizar con la 2ª fila de A.z.- cortar el hilo. Ahora trabajar la manga como sigue: trabajar flojo 29 p.de cad, comenzar por el LR y continuar con A.3, A.2 y A.1 y p.a. sobre la espalda como antes, finalizar con 31 p.de cad flojos, girar la labor. Ahora trabajar la 1ª fila de A.1 - A.3 sobre los p.de cad por el LD, AL MISMO TIEMPO continuar con el patrón sobre la espalda como antes (es decir, trabajar la 4ª fila de A.z sobre estos pts) como sigue: Trabajar 1 p.a. en cada uno de los primeros 6 p.de cad, A.1 sobre los sig 8 p.de cad, A.2 2 vcs en el ancho (es decir, trabajar el último A.2 sobre los últimos 5 p.de cad, después trabajar el resto de A.2 sobre A.1), trabajar A.2 1-1-1-1-2-2 vcs en el ancho como antes, A.3, 1 p.a. en cada uno de los sig 4-6-9-13-6-11 p.a., A.1, A.2, A.3, 1 p.a. en cada uno de los sig 4-6-9-13-6-11 p.a., A.1, A.2 1-1-1-1-2-2 vcs en el ancho, ahora trabajar A.2 2 vcs en el ancho (es decir, trabajar el primer A.2 sobre A.3 y los sig 6 p.de cad), A.3 sobre los sig 5 p.de cad y 1 p.a. en cada uno de los últimos 6 p.de cad. Continuar con este patrón hasta que la labor mida aprox 62-64-66-68-70-72 cm - ajustar para finalizar después de la fila del LR. Después finalizar cada hombro/manga por separado como sigue: HOMBRO/MANGA DERECHA: Trabajar 6 p.a., A.1 una vez y A.2 3-3-3-3-4-4 vcs, A.3, 1 p.a. en cada uno de los sig 4-6-9-13-6-11 p.a. Girar y trabajar el patrón como antes. Continuar de la misma manera hasta que la labor mida un total de 64-66-68-70-72-74 cm, ajustar para finalizar con una repetición completa de A.z. Asegurar el hilo. HOMBRO/MANGA IZQUIERDA: Trabajar de la misma manera que el hombro derecho pero a la inversa, trabajar A.1 en lugar de A.3 al inicio de la fila. DELANTERO DERECHO: Se trabaja de ida y vta. Trabajar 63-65-70-74-81-86 p.de cad (incl 3 p.de cad para girar) con ag de ganchillo tamaño 5 mm y con Merino Extra Fine. Trabajar 1 p.a. en el 4º p.de cad desde el ganchillo, 1 p.a. en cada uno de los sig 5-5-7-7-9-9 p. de cad (= cenefa), A.1 sobre los sig 8 p.de cad, A.2 sobre los sig 12 p.de cad, A.3 sobre los sig 5 p.de cad, 1 p.a. en cada uno de los sig 4-6-9-13-6-11 p. de cad, A.1 sobre los sig 8 p.de cad, A.2 sobre cada uno de los sig 12-12-12-12-24-24 p.de cad, A.3 sobre los últimos 5 p.de cad. Ahora trabajar repeticiones de A.z en vertical hasta finalizar las medidas. ATENCIÓN: en la primera fila de A.z (= por el LR) trabajar como sigue: A.3, A.2 1-1-1-1-2-2 vcs en el ancho, A.1, 3 p.de cad. (= 1 p.a.), 1 p.a. en cada uno de los sig 2-4-7-11-4-9 p.a, 3 p.de cad. (= 1 p.a.), A.3, A.2, A.1, 3 p.de cad.(= 1 p.a.), 1 p.a. en cada uno de los sig 5-5-7-7-9-9 p.a. Cuando la labor mida aprox 45-46-47-48-49-50 cm, ajustar para finalizar con la 2º fila de A.z. Cortar el hilo. Ahora trabajar 29 p.de cad flojos para la manga y continuar como la espalda Cuando la labor mida 62-64-66-68-70-72 cm - ajustar para finalizar con una repetición completa de A.z (es decir, la última fila se trabaja por el LD) - cortar el hilo. Ahora trabajar el cuello chal. CUELLO CHAL: El cuello chal se trabaja de ida y vta. Comenzar por el LD como sigue: trabajar 1 p.a. en cada uno de los primeros 6-6-8-8-10-10 p.a., 1 p.a. en el primer p.a. de A.1, * 3 p.a. en el sig arco*, repetir de * a * 2 vcs más, 1 p.a. en el sig p.a., *3 p.a. en el sig arco*, repetir de * a * 2 vcs más, 1 p.a. en el último p.a. de A.3, 0-0-0-1-1-1 p.a. en el sig p.a. = 27-27-29-30-32-32 p.a. Ahora trabajar filas acortadas sobre los pts de la cenefa como sigue: FILA 1 (= LR): 5 p.b., 5 p.m.a., 17-17-19-20-22-22 p.a. FILA 2 (= LD): Trabajar 1 p.a. en cada uno de los 27-27-29-30-32-32 pts. Repetir estas 2 filas hasta que la labor mida aprox 10 cm en la parte más estrecha - ajustar para finalizar con la 2ª fila (= LD). Asegurar el hilo. DELANTERO IZQUIERDO: Trabajar de la misma manera que el delantero derecho pero a la inversa. Trabajar según el diagrama A.3 en lugar de A.1 al inicio de la fila. Cuando la labor mida 45-46-47-48-49-50 cm, ajustar para finalizar con la 2ª fila de A.z - trabajar como antes sobre el delantero por el LR, después trabajar 31 p.de cad. flojos para la manga. Cuando la labor mida 64-66-68-70-72-74 cm, ajustar para finalizar con una repetición completa de A.z (es decir, la última fila se trabaja por el LD) , trabajar el cuello chal. ATENCIÓN: Aquí no es necesario cortar el hilo. TERMINACIÓN: Colocar los delanteros en la parte superior de la espalda y trabajar los hombros como sigue: 1 p.b. pinchando ambas partes, *3 p.de cad., 1 p.b. en el sig arco*, repetir de * a * a lo largo del hombro/manga entera y acabar con 1 p.b. Unir los lados como sigue: 1 p.b., *3 p.de cad., 1 p.b. en el arco de la sig fila*, repetir de * a * a lo largo del lado entero y finalizar con 1 p.b. Unir bajo la manga como sigue: *1 p.b. en el p.de cad. del sig arco, 3 p.de cad.*, repetir de * a * y finalizar con 1 p.b. |
||||||||||||||||||||||
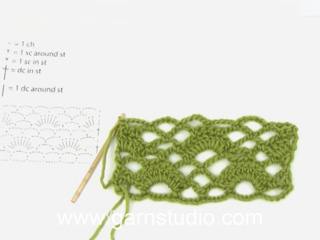
Explicaciones del diagrama |
||||||||||||||||||||||
|
||||||||||||||||||||||
|
||||||||||||||||||||||
|
||||||||||||||||||||||
|
¿Has realizado este u otro de nuestros modelos? ¡Etiqueta tus fotografías en las redes sociales con #dropsdesign para que podamos verlos! ¿Necesitas ayuda con este patrón?Encontrarás videos tutoriales, un espacio para comentarios/preguntas y más visitando la página del patrón en garnstudio.com © 1982-2024 DROPS Design A/S. Todos los derechos reservados. Este documento, incluyendo todas sus sub-secciones, está protegido por los derechos de autor (copyright). Lee más acerca de lo que puedes hacer con nuestros patrones en la parte de abajo de cada patrón de nuestro sitio. |
||||||||||||||||||||||


Con más de 40 años en el diseño de modelos de punto y de ganchillo, DROPS Design ofrece una de las más vastas colecciones de patrones gratuitos en el internet - traducidos en 17 idiomas. Al día de hoy, contamos con 304 catálogos y 11422 patrones - de los cuales 10439 están traducidos en español.
Nosotros trabajamos con mucho esmero para brindarte lo mejor que las labores de punto y ganchillo tienen para ofrecer,inspiración y consejos, así como hilos de magnífica calidad a precios increíbles! Te gustaría usar nuestros patrones para otro fin además del uso personal? Puedes leer acerca de lo que estás permitida a hacer en el texto de Copyright en la parte de abajo de todos nuestros patrones. Felices labores!
Comentarios / Preguntas (199)
Aftrer casting on 29 ch and work back piece and cast on 31ch, turn and work A1-A3 on the 31 ch, I keep on ending up with 3ch before backpiece, I did use 3ch in very beginning for the first dc of the cluster, can you please assist, I'm confussed, because you need to add 29 and 31 stitches and work A1-A3 over those ch but the diagram for A1-A3 only consist out of 25 ch, Thank you
06.03.2019 - 06:05DROPS Design answered:
Dear Elize, at the beg of row the first 3 chains are for turning, so that you work over the 29 sts: 6 tr, A.1 over the next 8 ch, A.2 2 times in width (i.e. work last A.2 over the last 5 ch, then work the rest of A.2 over A.1) = 6+8+12+5 = 31 (with first 3 ch= 1st tr). And at the end of row: A.2 2 times in width (i.e. work the first A.2 over A.3 and the next 6 ch), A.3 over the next 5 ch and 1 tr in each of the last 6 ch = 6+12+5+6= 29 chains. Happy crocheting!
06.03.2019 - 09:57It is Donna again I did get the back worked now have a question about how the shawl collar attaches to the back piece .Do you work it with the front and then sew it to the back or is it someway worked into the back neck ?
05.03.2019 - 16:57DROPS Design answered:
Dear Donna, collar is worked over the 6-8-10 sts mid front with short rows (different height of sts to get a curved shape) starting from WS on right front piece and from RS on left front piece, worked for 10 cm. Then sew both collar (right and left) tog then sew collar along neckline on back piece. Happy crocheting!
06.03.2019 - 08:50I am working with this pattern and I don't usually work with diagram patterns . I have got to the point where I don't know what I am suppose to do . Can you help me ? I have the Back worked to the area where you start sleeve .The pattern says cut yarn Then work sleeve as follows Please someone take a look at this pattern Drops 157-18 and tell me where I can understand what to do from here. Thanks
03.03.2019 - 20:41DROPS Design answered:
Dear Donna, after you have cut the yarn, you will crochet new chains (=29 chains) for first sleeve, then work next row from WS over the sts on back piece as before, and crochet 31 chains for 2nd sleeve. Turn and work now 1st row in A.1-A.3 over the chains and continue over back piece as before (= 4th row in A.z). Happy crocheting!
04.03.2019 - 11:12This is a very beautiful pattern but very confusing to read and follow....hope it turns out good as i do love the pattern.
02.12.2018 - 14:44DROPS Design answered:
Dear Mrs Franklin, should you have any question, feel free to ask them here and remember you can contact your DROPS store - even per mail or telephone - for any individual assistance. Happy crocheting!
03.12.2018 - 10:48Barbara wrote:
I've complete sweater to shawl collar. Can you please give instructions on how to work this part of the pattern? Pattern states 30 dc, for my size, but then says work short rows over band, 20 sts. Repeat ROW 2 until 4" on the most narrow part. I'm confused and don't understand.
01.12.2018 - 21:17DROPS Design answered:
Dear Barbara, you will work short rows so that the collar will be larger outwards and shorter innwards(towards shoulder), on row 1 (from WS) work 5 sc, 5 hd, 20 dc, turn and work 30 dc (row 2 = from RS), turn and repeat these 2 rows. The outside of collar will be higher/longer than the inside due to row 2. Continue repeating these 2 rows until the shorter side measures approx. 4" from the shoulder. Happy crocheting!
03.12.2018 - 09:00Hoi, ik begrijp de instructies om de delen aan elkaar te haken niet goed. In de beschrijving staat dat je de schouders met 1 v door beide lagen (panden) haakt, dan 3 l, dan 1 v in de vlg losse lus. Is die v ook door beide lagen dus door 2 losse lussen tegelijk van de 2 panden? Of is het zoals in de video van vierkanten samen haken 1 v in 1 laag, dan 3 l, dan 1 v in de volgende laag, dan weer 3 l en dan zigzaggen heen en weer tussen de panden? Alvast bedankt!
21.10.2018 - 18:07DROPS Design answered:
Dag Vera,
In dit geval maak je geen 'zigzaggend' patroon, maar haak je steeds door beide lagen bij het in elkaar haken van de delen.,
24.10.2018 - 21:18Judith Matisons wrote:
Hello I would really like to tackle this pattern. My question is: After casting on and completing the first four lines of the pattern, the instruction says "Then repeat A.z vertically until finished measurements" What does A.z refer to please? Is it the entire pattern from A.1 to A.3?
06.10.2018 - 05:42DROPS Design answered:
Dear Mrs Matisons, you should repeat A.1-A.2 and A.3 in width as before and repeat A.z (= the last 4 rows) in height. Happy crocheting!
08.10.2018 - 08:00Ik ben een beginnende haakster en snap het patroon wel maar ik zet 111 lossen op dan volg ik a1 a2 en a3 maar dan komen er stkjes tussen hoeveel moet ik er precies tussen doen ook 4 zoals in het filmpje want dan komt het niet uit bij mij hopelijk begrijpt u mijn vraag alvast bedankt
05.09.2018 - 11:41DROPS Design answered:
Dag Jacqueline, Bij de beschrijving van het achterpand staat op een gegeven moment dat je 1 stk in elke van de volgende 4-6-9-13-6-11 lossen moet haken. In de video wordt de kleinse maat gehaakt, dus dan zijn het 4 stokjes. In jou geval moet je dan dus 2 stokjes haken.
06.09.2018 - 10:32Im having trouble with the number of dc between each section as you work rows az. I seem to be confused only in that part. Wouldnt ot be better to do a chart for the whole row including the dc sections between the repeats.
22.08.2018 - 10:54DROPS Design answered:
Dear Mrs Zander, our customer are not used to read full diagrams that's why whe choose diagrams for the repeats and written explanations to the whole pattern. This video below shows how to crochet A.1, A.2 and A.3 with dc in between as in pattern, showing how to replace the first dc on 1st row in A.z from WS. Happy crocheting!
03.09.2018 - 15:17Ik begrijp niet waar ik moet beginnen met aanhaken als ik bij het onderdeel ‘sjaalkraag’ ben. Voor mij is de uitleg onduidelijk. Al gekeken bij andere patronen met sjaalkraag, maar daar is de beschrijving hetzelfde. Begin je middenachter bij het achterpand of aan het midden van het voorpand of nog ergens anders ? Ik loop steeds vast en moet het weer uithalen. Het komt er nl. niet zo uit te zien als op de tekening.
21.07.2018 - 08:46DROPS Design answered:
Dag Linda, De sjaalkraag haak je aan beide voorpanden (niet aan het achterpand) en je hoeft de draad niet af te knippen voordat je begint aan de sjaalkraag. Je haakt a.h.w. een stukje bovenop het voorpand, maar dan niet over de hele breedte van het voorpand (dit kun je ook in de schematekening zien). Dit extra stuk maak je aan beide voorpanden en op het eind worden ze midden achter samengenaaid en aan de hals van het achterpand.
22.07.2018 - 12:08