
Popular categories
Looking for a yarn?


|
|
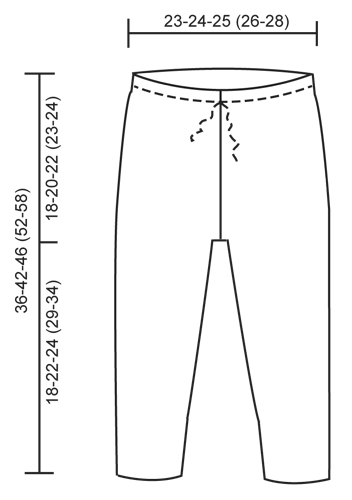
Heartthrob Pants |
|
|
|
|
Crochet baby pants with tie-waist in DROPS Alpaca. Size 0 – 4 years.
DROPS Baby 25-24 |
|
|
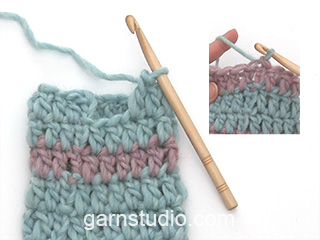
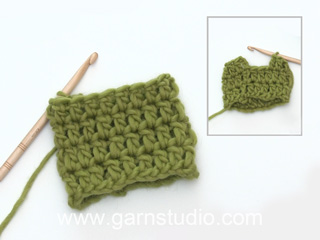
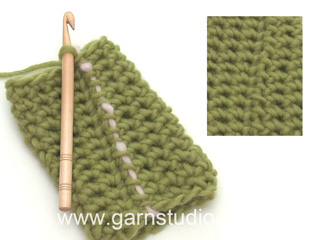
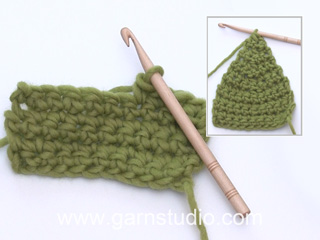
CROCHET TIP: Beg every round with dc with 1 ch and finish round with 1 sl st in ch from beg of round. Beg every round with tr with 3 ch and finish round with 1 sl st in 3rd ch from beg of round. NOTE: These ch do NOT replace first dc/tr on round. STRIPE PATTERN: ROUND 1 (= from WS with off white): Work 1 tr in every dc. ROUND 2 (= from RS with off white): Work 1 dc in every tr. ROUND 3 (= from WS with off white): Work 1 tr in every dc. ROUND 4 (= from RS with off white): Work 1 dc in every tr. ROUND 5 (= from WS with light steel blue): Work 1 tr in every dc. ROUND 6 (= from RS with light steel blue): Work 1 dc in every tr. ROUND 7 (= from WS with light steel blue): Work 1 tr in every dc. ROUND 8 (= from RS with light steel blue): Work 1 dc in every tr. Repeat rounds 1 to 8. DECREASE TIP: Dec 1 dc by working 2 dc tog as follows: Insert hook in first st and pull yarn through, insert hook in next st and pull yarn through, make 1 YO and pull yarn through all 3 sts on hook. Dec 1 tr by working 2 tr tog as follows: Work 1 tr but wait with last YO and pull through, work next tr but pull last YO through all 3 sts on hook. ---------------------------------------------------------- PANTS: Worked in the round, top down, but turn piece after every round to work alternately from RS and WS. Work 140-147-154 (161-168) ch on hook size 3 mm with light steel blue and form a ring with 1 sl st in first ch. Insert a marker at beg of round = mid back. Work first round as follows: 1 ch, then * 1 dc in each of the first 6 ch, skip 1 ch *, repeat from *-* the entire round, finish with 1 sl st in first dc from beg of round = 120-126-132 (138-144) dc. Continue with 1 dc in every dc for 2 more rounds. Then work 1 round with holes for tie as follows: 4 ch (= 1 tr + 1 ch), * skip 1 dc, 1 tr in next dc, 1 ch *, repeat from *-* the entire round, finish with 1 sl st in 3rd ch from beg of round. On next round work 1 dc in every ch and in every tr. Work 1 more round with 1 dc in every dc. Now work an elevation in the back as follows: Work 10 dc past marker mid back, turn and work 1 dc in each of the first 20 dc, turn, work 1 dc in each of the first 30 dc, continue like this by work 10 dc more on every turn until 80-80-100 (100-120) dc in total have been worked. Turn and work back to mid back again. Continue in the round over all sts with STRIPE PATTERN - see explanation above. REMEMBER THE CROCHET TENSION! When piece measures 15-17-18 (19-20) cm mid front, insert 1 marker mid front as well, there should be 60-63-66 (69-72) sts between markers mid front and mid back. On next round inc 1 st on each side of marker front and back by working 2 dc/tr in same st. Repeat inc every round 3-3-4 (4-4) more times (= 4-4-5 (5-5) inc in total) = 136-142-152 (158-164) sts in total on round. Then finish legs separately. LEG: Work sl sts over the first 5 dc on round, then work dc over the next 58-61-66 (69-72) sts and finish with sl sts over the next 5 dc. Cut the yarn. Work now in the round and continue with stripe pattern over these 58-61-66 (69-72) sts. Insert 1 marker at beg of round = inside of leg. When leg measures 2-2-2 (3-3) cm, dec 1 dc on each side of marker – READ DECREASE TIP. Repeat dec every 2-2½-3 (3½-4½) cm 6-6-6 (5-5) more times (= 7-7-7 (6-6) dec in total) = 44-47-52 (57-60) dc. Continue to work until leg measures 16-20-22 (27-32) cm (finish after a stripe with off white). Then work 8 rounds dc with light steel blue. Fasten off. Work the other leg the same way. The 10 sts mid front and mid back = gusset. ASSEMBLY: Sew tog opening between legs edge to edge to avoid a chunky seam. TIE: Work with off white on hook size 3 mm as follows: * 2 ch, 1 dc in first ch *, repeat from *-* until tie measures approx. 80-85-90 (95-100) cm, fasten off. Thread the tie in the round with eyelet holes at the top of pants – start and finish mid front. |
|
|
|
|
Have you made this or any other of our designs? Tag your pictures in social media with #dropsdesign so we can see them! Do you need help with this pattern?You'll find tutorial videos, a Comments/Questions area and more by visiting the pattern on garnstudio.com. © 1982-2024 DROPS Design A/S. We reserve all rights. This document, including all its sub-sections, has copyrights. Read more about what you can do with our patterns at the bottom of each pattern on our site. |


With over 40 years in knitting and crochet design, DROPS Design offers one of the most extensive collections of free patterns on the internet - translated to 17 languages. As of today we count 304 catalogues and 11422 patterns - 11422 of which are translated into English (UK/cm).
We work hard to bring you the best knitting and crochet have to offer, inspiration and advice as well as great quality yarns at incredible prices! Would you like to use our patterns for other than personal use? You can read what you are allowed to do in the Copyright text at the bottom of all our patterns. Happy crafting!
Comments / Questions (42)
Hvorfor skal hæklestykket vendes efter hver omgang, det snor sig helt vildt?
16.11.2015 - 10:38DROPS Design answered:
Hej Lisa, du må gerne hækle rundt, men mønsteret bliver anderledes. God fornøjelse!
25.11.2015 - 15:41Hallo Ich bin gerade am Anfang fürs erste Beinchen und versteh das Ganze mit dem Zwickel nicht Ich versteh den Teil mit den Kett-M überhaupt nicht... übergeh ich die dann bei der nächsten runde und hab dann automatisch weniger Maschen oder mach ich das bis zum ende des beines immer insges. 10 Kett- M pro Bein und so entsteht mein Zwickel? Lg
28.05.2015 - 19:31DROPS Design answered:
Die Kett-M lassen Sie außer Acht beim Häkeln des Beins. Sie häkeln also nur über die 58-61-66 (69-72) M weiter, in die Sie die fM gehäkelt haben, und zwar in Runden. Es bleiben dann an der anderen Seite auch 5 M bis zur Mitte der Hose übrig, Bsp Gr. S: 136 M gesamt, die Hälfte davon sind 68 M, also 5 Kett-M, 58 M häkeln, 5 M unbehäkelt lassen. Das an der andere Seite ebenso, dann haben Sie vorne 10 M und hinten 10 M unbehäkelt. Die Kett-M werden dabei nur deshalb gehäkelt, um den Faden nicht abschneiden zu müssen, sie sind eigentlich als unbehäkelte M zu verstehen. Sie könnten den Faden also auch nach den ersten 5 M neu ansetzen und diese 5 M einfach auslassen.
31.05.2015 - 09:57Bjr ou puisje trouver les explications pour la rehausse dos de ce pantalon ?? Merci d'avance
14.04.2015 - 13:35DROPS Design answered:
Bonjour Mme Viard, pour la ré-hausse dos, procédez ainsi: crochetez 10 ms après le marqueur du milieu dos, tournez et crochetez 20 ms (soit 10 ms avant le marqueur et 10 ms après le marqueur), tournez et crochetez 30 ms, tournez et crochetez 40 ms, tournez et continuez ainsi en crochetant 10 ms en plus à chaque rang jusqu'à ce que vous ayez crocheté un total de 80-100-120 ms (cf taille). Bon crochet!
14.04.2015 - 16:05Hallo, häkel mit der Anleitung meine erste Hose und hänge nun leider schon an der "Runde " wo die verkürzten Runden gehäkelt werden. Ich habe mir die anfangsmasche markiert gehabt. Nun verstehe ich leider nicht, wenn ich 10 fm häkel,wie dann 10 weiter häkeln soll ( da ja der Abstand immer größer zur vorderen Reihe wird). Vielleicht denke ich auch nur zu kompliziert. Aber ich hoffe man kann mir helfen,ich danke schonmal. Liebe grüße
19.02.2015 - 23:33DROPS Design answered:
Die verkürzten Reihen häkeln Sie hin und zurück. Sie häkeln 10 M über den Markierer hinaus, wenden und häkeln 20 M zurück, also 10 M über den Markierer in die andere Richtung. Dann wenden Sie wieder und häkeln 30 fM, d.h. 20 fM in die R, die Sie gerade gehäkelt haben und 10 fM in 10 fM der darunter liegenden R, in die Sie in der R davor nicht gehäkelt haben. Wenden und ebenso 40 fM häkeln usw.
23.02.2015 - 09:53Bin bei der Anleitung für 1-3 Monate, hänge am Beinanfang. Habe 136M in Arbeit. 5km je Seite für Zwickel, 58M pro Bein in Arbeit. Wären 63M je Seite, also 126 gesamt. Fehlen 10M? Oder muss ich die 5km auch vor und nach jeder Markierung (also 10km je Bein) machen? Danke für eine kurze Hilfe
28.01.2015 - 23:59DROPS Design answered:
Genau, Sie haben vorne und hinten jeweils 10 M für den Zwickel, also insgesamt 20 M in der Mitte zwischen den Beinen, die nicht behäkelt werden.
29.01.2015 - 00:05Angående forhøjningen, når der står hækl 10 masker forbi mærket midt bagpå, hvor skal jeg så starte med at hækle? Midt bagpå eller fem masker fra midt bag på? Og hvis det er fem masker fra midt bagpå, hvordan kommerciel så derhen ?
17.11.2014 - 00:05DROPS Design answered:
Hej Maria. Starten af din omgang (hvor maerket sidder er midt bagpaa), saa her begynder du ogsaa med forhöjningen. Saa du haekler 10 fm fra maerket, vender og haekler tilbage over 20 fm (du er saa 10 fm paa den anden side af maerket, vend og haekl 30 fm (20 m paa den anden side af maerket) og saa videre.
19.11.2014 - 15:14Hva menes det med å hekle kjm over de første 5 på omg. Altså hvordan starter jeg med bena?
06.11.2014 - 15:11DROPS Design answered:
Hej Susanne. Du skal hekle benene hver for sig. Du starter med at hekle 1 km i hver af de förste 5 m paa omgangen og saa hekler du fm over de naeste 58-61-66 (69-72) m og fortsaetter rundt over disse masker. Gentag i den anden side.
07.11.2014 - 12:46Det var synd. Jeg forstår ikke helt hvordan den hekles utifra forklaringen.
31.10.2014 - 12:16Finnes det bilde eller video av forhøyningen bak?
30.10.2014 - 15:36DROPS Design answered:
Hej Hilde. Nej, desvaerre ikke endnu, men det staar paa vores liste.
31.10.2014 - 08:56Eine Frage:In der Anleitung steht:In der nächsten Rd auf jeder Seite der vorderen und hinteren Markierung je 1 M aufnehmen.Diese Aufnahmen in jeder Runde noch 3x wdh(= insgesamt 4Aufnahmen)=136M in der Rd.4x2 Maschen aufnehmen sind dann doch aber nur 8 Maschen mehr,also 128.Muss ich 8x Maschen aufnehmen?Und wann genau fange ich mit den Beinen an?Wenn ich acht mal die Frabe gewechselt habe oder wenn ich eine bestimmte Länge gehäkelt habe?
01.09.2014 - 10:00DROPS Design answered:
Liebe Maren, Sie nehmen jeweils beidseitig jeder Markierung zu, also an jedem Markierer 2 M = 4 M pro Rd. Dann haben Sie also insgesamt 16 zugenommene M. Mit den Beinen fangen Sie direkt nach der letzten Zunahme-Rd an.
01.09.2014 - 12:13