
Categorias populares
Procura um fio?


Deixe um comentário acerca do modelo DROPS 149-37
Gostaríamos muito de saber o que tem a dizer-nos acerca deste modelo!
Se deixar uma pergunta acerca do modelo, certifique-se de que escolhe a categoria adequada no formulário abaixo para acelerar o processo relativo à resposta. Os campos obrigatórios estão assinalados com um *.
|
|||||||||||||
Waterfall |
|||||||||||||
|
|
|||||||||||||
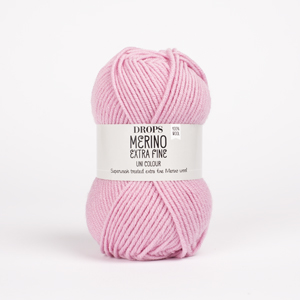
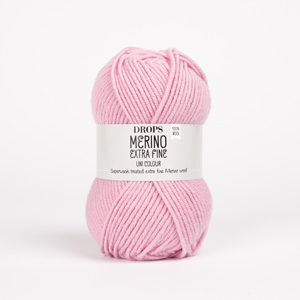
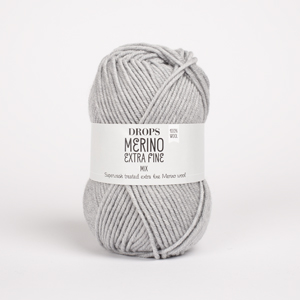
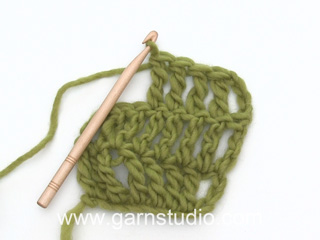
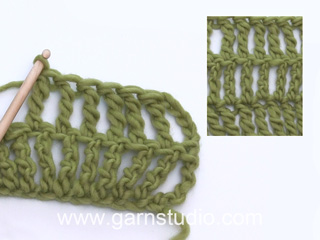
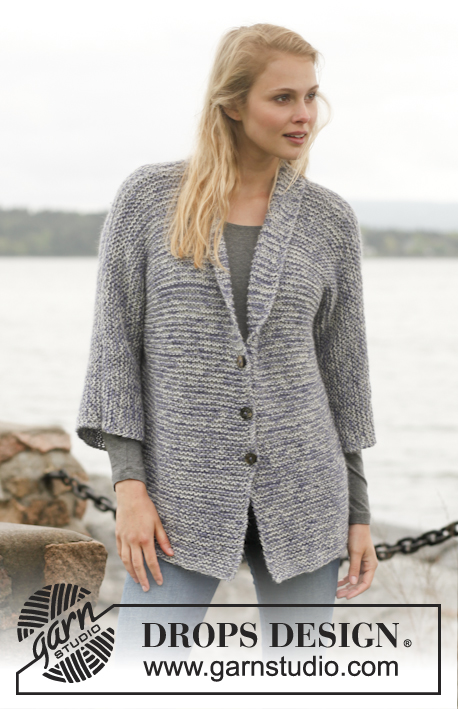
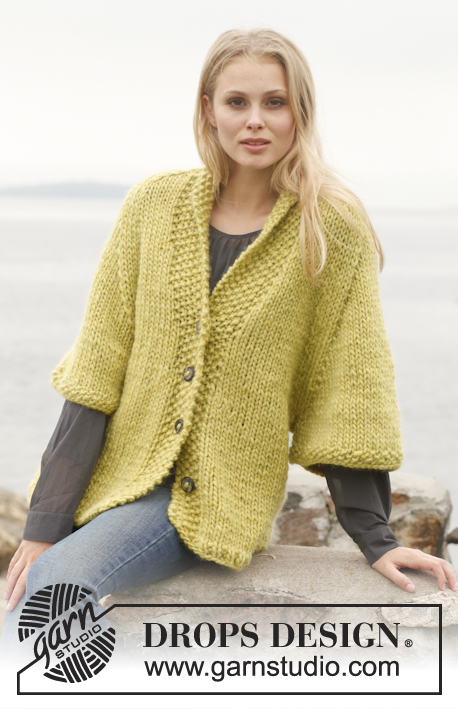
Casaco DROPS em croché, com gola xaile, em ”Merino Extra Fine”. Do S ao XXXL.
DROPS 149-37 |
|||||||||||||
|
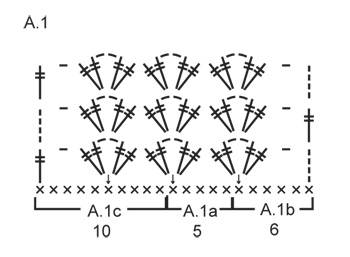
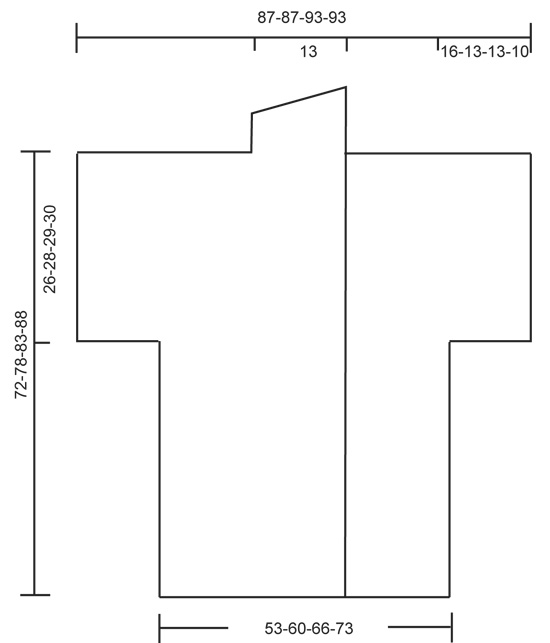
---------------------------------------------------------- NOTA: Existem termos diferentes de tricô e croché em português de Portugal e do Brasil. TRICÔ : Malha = Ponto Canelado = Barra Ponto Jarreteira = Cordões de Tricô Ponto Liga = Ponto Tricô CROCHÉ : mpa – meio ponto alto pa – ponto alto pad – ponto alto duplo pat – ponto alto triplo pb – ponto baixo pbx – ponto baixíssimo pc – ponto corrente ---------------------------------------------------------- GRUPOS DE PAD: 1 grupo de pad = 2 pad + 2 pc + 2 pad. PONTO FANTASIA: Ver diagrama A.1. ---------------------------------------------------------- COSTAS: Crocheta-se em idas e voltas. Montar uma corrente de 108-120-133-145 pc com a agulha de croché 5 mm e o fio Merino Extra Fine. Crochetar a 1.ª carreira da seguinte maneira (= pelo avesso): 1 pb no 2.º pc a partir da agulha de croché e 1 pb em cada um dos 3 pc seguintes, * saltar 1 pc, 1 pb em cada um dos 4 pc seguintes *, repetir de * a * até restarem 3-5-3-5 pc, saltar 1 pc, 1 pb em cada um dos 2-4-2-4 pc seguintes = 86-96-106-116 pb. Continuar da seguinte maneira: CARREIRA 1 (= pelo direito): Crochetar 1 vez A.1b 1, depois, A.1a (= 14-16-18-20 vezes) até restarem 10 pb e terminar com 1 vez A.1c. NÃO ESQUECER DE MANTER A MESMA TENSÃO DA INDICADA PARA A AMOSTRA ! CARREIRA 2 (= pelo avesso): Virar e crochetar 1 vez A.1c, A.1a (= 14-16-18-20 vezes), 1 vez A.1b. CARREIRA 3 (= pelo direito): Virar e crochetar 1 vez A.1b, A.1a (= 14-16-18-20 vezes), 1 vez A.1c. Repetir as carreiras 2 e 3 até a peça medir cerca de 46-50-54-58 cm – ajustar a altura para terminar com uma carreira 3 (= pelo direito). Arrematar. Montar frouxamente uma corrente de 30-25-25-20 pc, começando pelo avesso, e continuar A.1 acima dos pontos das costas como antes e terminar, montando frouxamente 34-29-29-24 pc, virar. Continuar da seguinte maneira: CARREIRA 1 (= pelo direito): No 10.º pc a partir da agulha de croché, crochetar 2 pad + 2 pc + 2 pad (= A.1b), crochetar 4-3-3-2 vezes A.1a ao todo, saltar os 4 últimos pc, no pad no princípio das costas, crochetar 2 pad + 2 pc + 2 pad (= 1 grupo de pad), e crochetar então A.1a acima das costas como antes mas no último pad no fim das costas, crochetar 2 pad + 2 pc + 2 pad, e crochetar então acima dos 30-25-25-20 últimos pc da seguinte maneira: saltar os 4 pc seguintes, 4-3-3-2 vezes A.1a ao todo e 1 vez A.1c, virar. CARREIRA 2 (= pelo avesso): Virar e crochetar 1 vez A.1c, 24-24-26-26 vezes A.1a e terminar com 1 vez A.1b. CARREIRA 3 (= pelo direito): Virar e crochetar 1 vez A.1b, 24-24-26-26 vezes A.1a e terminar com 1 vez A.1c. Repetir as carreiras 2 e 3 até a peça medir cerca de 70-76-81-86 cm – ajustar a altura para terminar com uma carreira 3 (= pelo direito). Crochetar então 11-11-12-12 grupos de pad, terminar com 1 pc e 1 pad no aro do grupo de pad seguinte. Arrematar. Saltar 2 grupos de pad (= decote). Crochetar 1 pbx no aro do grupo de pad seguinte, e crochetar então 5 pc, depois, 11-11-12-12 grupos de pad. Arrematar. FRENTE DIREITA : Crocheta-se em idas e voltas. Montar uma corrente de 98-104-110-117 pc com a agulha de croché 5 mm e o fio Merino Extra Fine. Crochetar 1 pb no 2.º pc a partir da agulha de croché e 1 pb em cada um dos 3 pc seguintes, * saltar 1 pc, 1 pb em cada um dos 4 pc seguintes *, repetir de * a * até restarem 3-4-5-2 pc, saltar 1 pc, crochetar 1 pb em cada um dos 2-3-4-1 pc seguintes = 78-83-88-93 pb. CARREIRA 1 (= pelo direito): 4 pc (= 1 pad), 1 pad em cada um dos 32 pb seguintes (= 33 pad para a orla da frente) - NOTA: crocheta-se a orla alternadamente a cada 2 carreiras em pad e em pat. Crochetar então 1 pc, saltar 4 pb, 2 pad + 2 pc + 2 pad no pb seguinte, e crochetar então A.1a num total de 6-7-8-9 vezes, terminar com 1 vez A.1c. CARREIRA 2 (= pelo avesso): Virar e crochetar 1 vez A.1c, 6-7-8-9 vezes A.1a, 2 pad + 2 pc + 2 pad no grupo de pad seguinte, 1 pc, crochetar 1 pat em cada um dos 33 pad seguintes. CARREIRA 3 (= pelo direito): 4 pc (= 1 pad), 1 pad em cada um dos 32 pat seguintes (= 33 pad), 1 pc, 2 pad + 2 pc + 2 pad no 1.º grupo de pad, e crochetar então 6-7-8-9 vezes A.1a ao todo, terminar com 1 vez A.1c. Repetir as carreiras 2 e 3 até a peça medir 46-50-54-58 cm. Ajustar a altura para terminar depois de uma carreira 3 (= pelo direito). Arrematar. Crochetar frouxamente 30-25-25-20 pc, começando pelo avesso, e crochetar então A.1 e pat acima dos pontos da orla da frente como antes, virar. Continuar a crochetar da seguinte maneira: CARREIRA 1 (= pelo direito): 4 pc (= 1 pad), 1 pad em cada um dos 32 pad seguintes (= 33 pad), 1 pc, 2 pad + 2 pc + 2 pad no aro do grupo de pad seguinte, crochetar A.1a até restar 1 pad para a frente, crochetar 2 pad + 2 pc + 2 pad no pad, e crochetar então acima dos últimos 30-25-25-20 pc da seguinte maneira: 4-3-3-2 vezes A.1a ao todo e 1 vez A.1c. CARREIRA 2 (= pelo avesso): Virar e crochetar 1 vez A.1c, 11-11-12-12 vezes A.1a, 2 pad + 2 pc + 2 pad no grupo de pad seguinte, 1 pc, depois, 1 pat em cada um dos 33 últimos pad. CARREIRA 3 (= pelo direito): 4 pc (= 1 pad), 1 pad em cada um dos 32 pad seguintes (= 33 pad), 1 pc, 2 pad + 2 pc + 2 pad no 1.º grupo de pad, e crochetar então 11-11-12-12 vezes A.1a ao todo, terminar com 1 vez A.1c . Repetir as carreiras 2 e 3 até a peça medir 72-78-83-88 cm. Terminar com uma carreira 2 . GOLA XAILE : A 72-78-83-88 cm de altura total, crochetar apenas acima dos pontos da orla da frente (= 32 pad/ pat). Crochetar então carreiras encurtadas acima destes pontos da seguinte maneira: CARREIRA 1 (pelo direito): 32 pad, virar. CARREIRA 2 (pelo avesso): 11 pad, 5 pa, 5 mpa, 11 pb, virar. Repetir estas 2 carreiras até a peça medir 10-10-11-11 cm do lado mais estreito – ajustar a altura para terminar com uma carreira 1 (pelo direito). FRENTE ESQUERDA: Crochetar como a frente direita, mas em sentido contrário. NOTA: A cerca de 46-50-54-58 cm de altura total (ajustar a altura para que a última carreira seja pelo direito), crochetar a carreira seguinte pelo avesso da seguinte maneira: 33 pat, crochetar os grupos de pad como antes acima da frente e terminar com 34-29-29-24 pc, virar e começar a carreira como se fez para as costas. Crochetar os pontos de orla da frente como se fez para a frente direita, terminar a gola xaile com uma carreira 1 (pelo avesso em vez de ser pelo direito). MONTAGEM : Unir a gola a meio das costas da seguinte maneira: 1 pb, 1 pc, 1 pb no ponto seguinte., repetir de * a *. Colocar a frente acima das costas e crochetar os ombros e as orlas das frentes ao decote das costas da seguinte maneira : * 1 pb nas 2 partes, 3 pc, saltar 2 pa *. Crochetar os lados juntamente da seguinte maneira: 1 pb, * 3 pc, 1 pb no pc da carreira seguinte*, repetir de * a *. Crochetar sob as mangas da seguinte maneira: * 1 pb no pc seguinte do grupo de pad, 3 pc *, repetir de * a * e terminar com 1 pb. |
|||||||||||||
Explicações do diagrama |
|||||||||||||
|
|||||||||||||
|
|||||||||||||
|
|||||||||||||
|
Fez este modelo ou outro das nossas colecções? Marque as suas fotos nas redes sociais com o hashtag #dropsdesign para que possamos vê-las! Precisa de ajuda para este modelo?Encontrará turotiais em vídeo, uma rubrica Comentários/Perguntas e muito mais ao visitar a página do modelo em www.garnstudio.com © 1982-2024 DROPS Design A/S. Todos os direitos reservados. Este documento, incluuindo as suas su-secções, tem copyrights. Saia mais o que pode fazer com os nossos modelos no fim de cada uma das páginas do nosso site. |
|||||||||||||


Com mais de 40 anos no design de modelos de tricô e de croché, a DROPS Design oferece uma das mais vastas colecções demodelos gratuitos na Internet - traduzidos em 17 línguas. Neste dia de hoje, temos 304 catálogos e 11422 modelos - dos quais 11114 estão traduzidos em português.
Trabalhamos com muito empenho para lhe proporcionar o melhor que o tricô e o croché têm para oferecer, para lhe fornecer inspiração e conselhos bem como fios da mais elevada qualidade a preços incríveis! Gostaria de usar os nossos modelos para outros fins que não uso pessoal? Pode ler o que lhe é permitido fazer no Copyright texto que se encontra na parte de baixo de todos os nossos modelos. Bom tricô! Bom croché!
Comentários / Perguntas (85)
Wie sieht es mit den Wendemaschen aus beim Schalkragen? Vier Luftmaschen für die D-Stb und eine für die feste Masche? Es sind dann also auch wieder 33 Maschen. Die Anleitung ist undeutlich, zumindest für mich.
29.11.2017 - 19:28DROPS Design answered:
Liebe Carmen, wenn Sie die 32 D-Stb arbeiten beginnen Sie mit 4 Lm, aber bei den Rückreihen häkeln Sie 11 fM, 5 H-Stb, 5 Stb, 11 D-Stb, dh 32 Maschen aber mit fM, H-Stb, Stb und D-Stb so daß der Kragen höher an der Seite mit nur D-Stb wird (und dann kleiner an der Seite mit fM). Bei den Rückreihen wenden Sie mit 1 Lm. Viel Spaß beim häkeln!
30.11.2017 - 08:34Sofia wrote:
Thank you for all your help. I finished the 3 part but can't understand the assembly part. What do you mean by work collar together mid back? Are the 2 side parts connect together into the back part ?? This is the first time for me to crochet a piece of clothing . Please help
14.08.2016 - 23:13DROPS Design answered:
Dear Sofia, you will first crochet tog the 32 sts from shawl collar on right front piece to the 32 sts from shawl collar on left front piece. You will have to join the pieces as in the video below but remember video is only showing technique, remember to follow pattern, ie (1ch, 1 sc in next st working in both layers). Happy assembly!
15.08.2016 - 11:19Sofia wrote:
Sorry, I am not sure what do you mean by : working as right but reverse. is the RS for the left the WS??
05.08.2016 - 18:30DROPS Design answered:
Dear Sofia, left front piece should be mirored image from right front piece, ie front band sts are on the left of piece seen from RS and sleeve is at the right side of piece seen from RS. Happy crocheting!
08.08.2016 - 08:46Sofia wrote:
Hello, after the collar on the first front side do I have to fasten off?? Also, for the other side..do i start exactly the same but work the sleeve on the other side??
05.08.2016 - 17:17DROPS Design answered:
Dear Sofia, when collar on right front piece is done you can fasten off and work left front piece. Working reverse mean here start from RS from the side (ie side with seam to back piece) towards mid front, ie the 33 sts for front band sts will be worked at the end of row from RS. Happy crocheting!
08.08.2016 - 08:45Sofia wrote:
Hello and Thank you. I started over and still confused. I started on the sleeves and I have 28 of 2tr+ 2 ch+ 2tr. Is this correct?? I don't see a different between 2tr+2ch+2tr and 1a. May be I read the pattern wrong??
24.07.2016 - 03:30DROPS Design answered:
Dear Sofia, in 1st size you should have a total of 26 times 2 tr,2ch,2 tr on the row including A.1b and A.1c - work the tr groups evenly on sleeve as explained below and in pattern so that your number of tr-groups will match. Happy crocheting!
25.07.2016 - 09:29Sofia wrote:
Hello, I need some help with the sleeves. I finished Row 2 and I have A.1a 26 instead of 24. I am doing the S/M size and wondering if the sleeves will just bigger and I can continue on. I think it happened because each side has 2tr+ 2 ch+ 2 tr. any suggestions?
20.07.2016 - 22:29DROPS Design answered:
Dear Sofia, when working first row on sleeve you should have A.1b (2 tr, 2ch, 2 tr) in the 10th ch of hook, then 4 x A.1a + 2tr,2ch,2 tr (=A1a 1 time) in the tr at beg of back piece, then repeat A.1a as before (= 14 times), work A.1a 1 time in the last tr at the end of back piece + A.1a 4 times in the chain ans finish with A.1c = A.1a is worked: 4+1+14+1+4= 24 times between A.1b and A.1c. Happy crocheting!
21.07.2016 - 09:09Bell wrote:
I am having trouble with the sleeves part, i have finished the back part but unsure where the sleeves connect as such
09.06.2016 - 14:47DROPS Design answered:
Dear Mrs Bell, when you have worked back part before armhole, cut the yarn, then crochet some chains (see size) for fundation of 1st sleeve, crochet next row in A.1 as bevore over the sts on back piece and crochet some chains for 2nd sleeve = you have now created the "fundation of sleeves". On next row, turn and crochet row 1 from RS as explained, you will now crochet the first row on each sleeve and continue back piece in A.1 as before. Happy crocheting!
10.06.2016 - 08:34Hallo, ik ben nog niet zo ervaren en nu begrijp ik iets niet. Ik heb het achterpand gehaakt tot "haak 11-11-12-12 dstk groepen etc". Ik heb echt geen flauw idee wat daarmee bedoeld word.... Alvast bedankt. MVG.
30.04.2016 - 16:34DROPS Design answered:
Hoi Annelies. Je haakt 11 of 12 dstk groepen afhankelijk van welke maat je maakt. (Dus bijvoorbeeld 11 dstk groepen voor maat S/M)
02.05.2016 - 11:04Hi Thank you for the help previously but Im still confused. After fasten off the back. Do I join on the ws with 20 chain and work A.1 5 ch then skip 4ch and work 2tr.2ch.2tr and then ch 24?
18.04.2016 - 06:23DROPS Design answered:
Dear Mrs Hulton, from WS: work the 20 ch (first sleeve), work A.1c (= start with 1 tr), A.1a and A.1b as before, then cast on 24 ch (= 2nd sleeve), then work row 1 from RS: 2 tr, 2ch, 2 tr in 10th ch from hook (the 9 ch = beg of A.1b), then work A.1a, and at the end of row, (work in the 20 ch at beg of previous WS row as indicated) finish with A.1c in the last of the 20 ch for sleeve. Happy crocheting!
18.04.2016 - 11:27I just finished back piece and I'm confused on the next step. It tells me to chain 20 and after following pattern from back it says I should have 24 ch but there are no increases to give extra stitches
14.04.2016 - 21:02DROPS Design answered:
Dear Mrs Hulton, before casting on these chain, you have cut the yarn. The 20 new ch you cast on at the beg of row from WS are for the sleeve, work A1 as before over back piece, and cast on 24 ch at the end of this row. Then continue working following Row 1 from RS, row 2 from WS and row 3 from RS. Happy crocheting!
15.04.2016 - 09:05