
Categorías populares
¿Buscas un hilo?


Escribe un comentario sobre DROPS 149-37
¡Nos encantaría saber qué piensas acerca de este patrón!
Si quieres escribir una pregunta referente al patrón, por favor asegúrate de elegir la categoría correcta en el formulario debajo, para acelerar el proceso de respuesta. Los campos obligatorios están marcados con un *.
|
|||||||||||||
Waterfall |
|||||||||||||
|
|
|||||||||||||
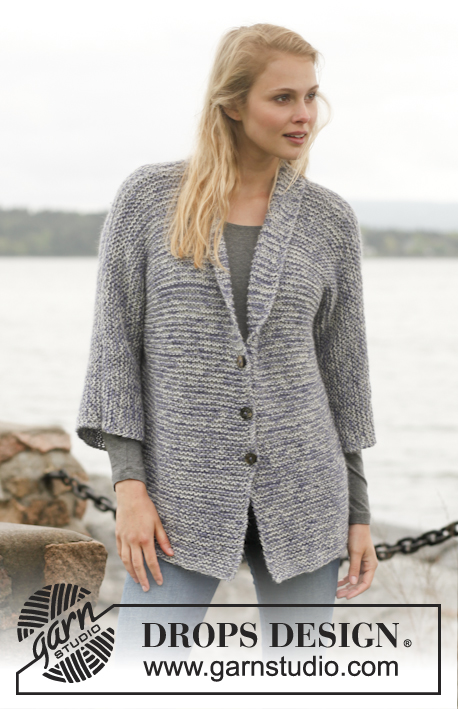
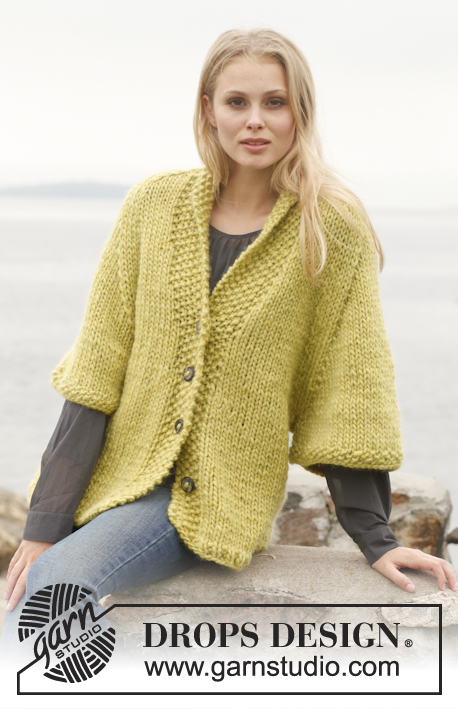
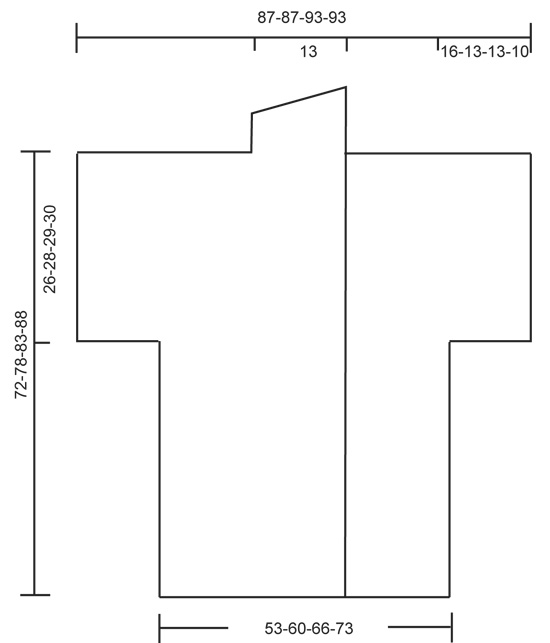
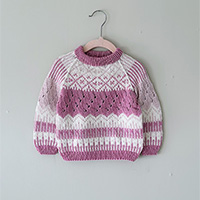
Chaqueta a ganchillo DROPS con cuello chal en “Merino Extra Fine”. Talla: S – XXXL.
DROPS 149-37 |
|||||||||||||
|
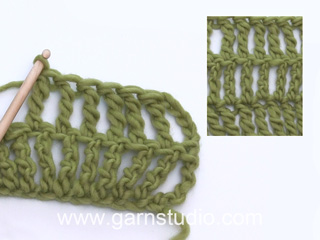
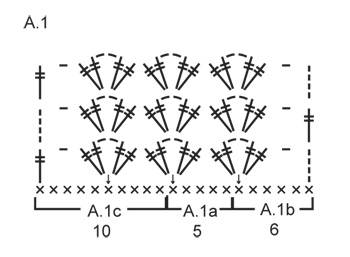
GRUPOS DE P.A.D.: 1 grupo de p.a.d. = 2 p.a.d. + 2 cad + 2 p.a.d. PATRÓN: Ver diagrama A.1. ------------------------------------------------------ ESPALDA: Trabajada de ida y vuelta. Mon 108-120-133-145 cad en ag de ganchillo tamaño 5 mm con Merino Extra Fine. Trabajar la 1ª hilera de la manera sig (= LR): 1 p.b. en la 2ª cad a partir de la ag y después 1 p.b. en cada una de las 3 cad sig, * saltar 1 cad, 1 p.b. en cada una de las 4 cad sig *, repetir de *a* hasta que resten 3-5-3-5 cad, saltar 1 cad, 1 p.b. en cada una de las 2-4-2-4 cad sig = 86-96-106-116 p.b. Continuar trabajando de la manera sig: HILERA 1 ( LD): Hacer A.1b 1 vez, después trabajar A.1a hasta que resten 10 p.b. (= 14-16-18-20 veces en anchura) y terminar con A.1c 1 vez. RECUERDE MANTENER LA MISMA TENSIÓN DE LA MUESTRA! HILERA 2 (= LR): Virar la pieza y trabajar A.1c 1 vez, A.1a (= 14-16-18-20 veces en anchura), A.1b 1 vez. HILERA 3 (= LD): Virar la pieza y trabajar A.1b 1 vez, A.1a (= 14-16-18-20 veces en anchura), A.1c 1 vez. Repetir la 2ª y la 3ª hilera hasta que la pieza mida aprox 46-50-54-58 cm – ajustar para terminar con la 3ª hilera (= LD). Cortar el hilo. Mon 30-25-25-20 cad flojas, empezar por el LR y continuar A.1 sobre la pieza de la espalda como antes y terminar con 34-29-29-24 cad flojas, virar la pieza. Continuar trabajando de la manera sig: HILERA 1 (= LD): En la 10ª cad a partir de la ag hacer 2 p.a.d. + 2 cad + 2 p.a.d. (= A.1b), trabajar A.1a 4-3-3-2 veces en total, saltar las últimas 4 cad, en el p.a.d. al inicio de la pieza de la espalda hacer 2 p.a.d. + 2 cad + 2 p.a.d. (= 1 grupo de p.a.d.), después trabajar A.1a sobre la pieza de la espalda como antes, pero en el último p.a.d. al final de la pieza de la espalda hacer 2 p.a.d. + 2 cad + 2 p.a.d., después trabajar sobre las últimas 30-25-25-20 cad de la manera sig: Saltar las 4 cad sig, A.1a 4-3-3-2 veces en total y después A.1c 1 vez, virar la pieza. HILERA 2 (= LR): Virar la pieza y trabajar A.1c 1 vez, A.1a 24-24-26-26 veces y terminar con A.1b 1 vez. HILERA 3 (= LD): Virar la pieza y trabajar A.1b 1 vez, A.1a 24-24-26-26 veces y terminar con A.1c 1 vez. Repetir la 2ª y la 3ª hilera hasta que la pieza mida aprox 70-76-81-86 cm – ajustar para terminar con la 3ª hilera (= LD). Hacer 11-11-12-12 grupos de p.a.d., terminar con 1 cad y 1 p.a.d. en el arco de cad del grupo de p.a.d. sig. Cortar y asegurar el hilo. Saltar 2 grupos de p.a.d. (= escote). Hacer 1 p.bjs en el arco de cad del grupo de p.a.d. sig, después hacer 5 cad. Hacer 11-11-12-12 grupos de p.a.d. Cortar y asegurar el hilo. DELANTERO DERECHO: Trabajado de ida y vuelta. Mon 98-104-110-117 cad en ag de ganchillo tamaño 5 mm con Merino Extra Fine. Hacer 1 p.b. en la 2ª cad a partir de la ag y después 1 p.b. en cada una de las 3 cad sig, * saltar 1 cad, 1 p.b. en cada una de las 4 cad sig *, repetir de *a* hasta que resten 3-4-5-2 cad, saltar 1 cad, hacer 1 p.b. en cada una de las 2-3-4-1 cad sig = 78-83-88-93 p.b. HILERA 1 (= LD): 4 cad (= 1 p.a.d.), 1 p.a.d. en cada uno de los 32 p.b. sig (= 33 p.a.d. para el borde) NOTA: Trabajar el borde alternadamente a cada 2 hileras con p.a.d. y con p.a. triples. Después hacer 1 cad, saltar 4 p.b., 2 p.a.d. + 2 cad + 2 p.a.d. en el p.b. sig, después trabajar A.1a 6-7-8-9 veces en total, terminar con A.1c 1 vez. HILERA 2 (= LR): Virar la pieza y trabajar A.1c 1 vez, A.1a 6-7-8-9 veces, 2 p.a.d. + 2 cad + 2 p.a.d. en el grupo de p.a.d. sig, 1 cad, hacer 1 p.a. triple en cada uno de los 33 p.a.d. sig. HILERA 3 (= LD): 4 cad (= 1 p.a.d.), 1 p.a.d. en cada uno de los 32 p.a. triples sig (= 33 p.a.d.), 1 cad, 2 p.a.d. + 2 cad + 2 p.a.d. en el primer grupo de p.a.d., después trabajar A.1a 6-7-8-9 veces en total, terminar con A.1c 1 vez. Repetir la 2ª y la 3ª hilera hasta que la pieza mida 46-50-54-58 cm. Ajustar para terminar después de la 3ª hilera (= LD). Cortar el hilo. Mon 30-25-25-20 cad flojas, empezar por el LR y después trabajar A.1 y p.a. triples sobre el borde como antes, virar la pieza. Continuar trabajando de la manera sig: HILERA 1 (= LD): 4 cad (= 1 p.a.d.), 1 p.a.d. en cada uno de los 32 p.a.d. sig (= 33 p.a.d.), 1 cad, 2 p.a.d. + 2 cad + 2 p.a.d. en el arco de cad del grupo de p.a.d. sig, trabajar A.1a hasta que reste 1 p.a.d. en la pieza del frente, hacer 2 p.a.d. + 2 cad + 2 p.a.d. en el p.a.d., después trabajar sobre las últimas 30-25-25-20 cad de la manera sig: A.1a 4-3-3-2 veces en total y después A.1c 1 vez. HILERA 2 (= LR): Virar la pieza y trabajar A.1c 1 vez, A.1a 11-11-12-12 veces, 2 p.a.d. + 2 cad + 2 p.a.d. en el grupo de p.a.d. sig, 1 cad, después 1 p.a. triple en cada uno de los últimos 33 p.a.d. HILERA 3 (= LD): 4 cad (= 1 p.a.d.), 1 p.a.d. en cada uno de los 32 p.a.d. sig (= 33 p.a.d.), 1 cad, 2 p.a.d. + 2 cad + 2 p.a.d. en el primer grupo de p.a.d., después trabajar A.1a 11-11-12-12 veces en total, terminar con A.1c 1 vez. Repetir la 2ª y la 3ª hilera hasta que la pieza mida 72-78-83-88 cm. Terminar con la 2ª hilera. CUELLO CHAL: Cuando la pieza mida 72-78-83-88 cm, únicamente trabajar sobre los pts del borde (= 32 p.a.d./p.a. triples). Después trabajar vueltas cortas sobre los pts del borde de la manera sig: HILERA 1 (LD): 32 p.a.d., virar la pieza. HILERA 2 (LR): 11 p.b., 5 p.m.a., 5 p.a., 11 p.a.d., virar la pieza. Repetir estas 2 hileras hasta que la pieza mida 10-10-11-11 cm en la parte más angosta – ajustar para terminar con la 1ª hilera (LD). DELANTERO IZQUIERDO: Tejer como el delantero derecho, pero en sentido inverso. NOTA: Cuando la pieza mida aprox 46-50-54-58 cm (ajustar para que la última hilera sea por el LD), trabajar la hilera sig por el LR de la manera sig: 33 p.a. triples, trabajar grupos de p.a.d. como antes sobre la pieza del frente y terminar con 34-29-29-24 cad, virar la pieza y empezar la hilera como se hizo en la pieza de la espalda. Trabajar los pts del borde como se hizo en la pieza del delantero derecho, terminar el cuello chal con la 1ª hilera (por el LR en vez de por el LD). ENSAMBLAJE: Unir el cuello al centro de la espalda de la manera sig: 1 p.b., * 1 cad, 1 p.b. * en el pt sig, repetir de *a*. Colocar la pieza del frente por encima de la pieza de la espalda y unir los hombros y los pts del borde para la línea del escote de la espalda de la manera sig: * 1 p.b. a través de ambas partes, 3 cad, saltar 2 p.a. *, repetir de *a*. Unir los lados de la manera sig: 1 p.b., * 3 cad, 1 p.b. en la cad de la hilera sig *, repetir de *a*. Unir la parte bajo las mangas de la manera sig: * 1 p.b. en la cad sig del grupo de p.a.d., 3 cad *, repetir de *a* y terminar con 1 p.b. |
|||||||||||||
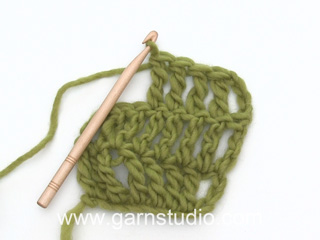
Explicaciones del diagrama |
|||||||||||||
|
|||||||||||||
|
|||||||||||||
|
|||||||||||||
|
¿Has realizado este u otro de nuestros modelos? ¡Etiqueta tus fotografías en las redes sociales con #dropsdesign para que podamos verlos! ¿Necesitas ayuda con este patrón?Encontrarás videos tutoriales, un espacio para comentarios/preguntas y más visitando la página del patrón en garnstudio.com © 1982-2024 DROPS Design A/S. Todos los derechos reservados. Este documento, incluyendo todas sus sub-secciones, está protegido por los derechos de autor (copyright). Lee más acerca de lo que puedes hacer con nuestros patrones en la parte de abajo de cada patrón de nuestro sitio. |
|||||||||||||


Con más de 40 años en el diseño de modelos de punto y de ganchillo, DROPS Design ofrece una de las más vastas colecciones de patrones gratuitos en el internet - traducidos en 17 idiomas. Al día de hoy, contamos con 304 catálogos y 11422 patrones - de los cuales 10403 están traducidos en español.
Nosotros trabajamos con mucho esmero para brindarte lo mejor que las labores de punto y ganchillo tienen para ofrecer,inspiración y consejos, así como hilos de magnífica calidad a precios increíbles! Te gustaría usar nuestros patrones para otro fin además del uso personal? Puedes leer acerca de lo que estás permitida a hacer en el texto de Copyright en la parte de abajo de todos nuestros patrones. Felices labores!
Comentarios / Preguntas (85)
Wie sieht es mit den Wendemaschen aus beim Schalkragen? Vier Luftmaschen für die D-Stb und eine für die feste Masche? Es sind dann also auch wieder 33 Maschen. Die Anleitung ist undeutlich, zumindest für mich.
29.11.2017 - 19:28DROPS Design answered:
Liebe Carmen, wenn Sie die 32 D-Stb arbeiten beginnen Sie mit 4 Lm, aber bei den Rückreihen häkeln Sie 11 fM, 5 H-Stb, 5 Stb, 11 D-Stb, dh 32 Maschen aber mit fM, H-Stb, Stb und D-Stb so daß der Kragen höher an der Seite mit nur D-Stb wird (und dann kleiner an der Seite mit fM). Bei den Rückreihen wenden Sie mit 1 Lm. Viel Spaß beim häkeln!
30.11.2017 - 08:34Sofia wrote:
Thank you for all your help. I finished the 3 part but can't understand the assembly part. What do you mean by work collar together mid back? Are the 2 side parts connect together into the back part ?? This is the first time for me to crochet a piece of clothing . Please help
14.08.2016 - 23:13DROPS Design answered:
Dear Sofia, you will first crochet tog the 32 sts from shawl collar on right front piece to the 32 sts from shawl collar on left front piece. You will have to join the pieces as in the video below but remember video is only showing technique, remember to follow pattern, ie (1ch, 1 sc in next st working in both layers). Happy assembly!
15.08.2016 - 11:19Sofia wrote:
Sorry, I am not sure what do you mean by : working as right but reverse. is the RS for the left the WS??
05.08.2016 - 18:30DROPS Design answered:
Dear Sofia, left front piece should be mirored image from right front piece, ie front band sts are on the left of piece seen from RS and sleeve is at the right side of piece seen from RS. Happy crocheting!
08.08.2016 - 08:46Sofia wrote:
Hello, after the collar on the first front side do I have to fasten off?? Also, for the other side..do i start exactly the same but work the sleeve on the other side??
05.08.2016 - 17:17DROPS Design answered:
Dear Sofia, when collar on right front piece is done you can fasten off and work left front piece. Working reverse mean here start from RS from the side (ie side with seam to back piece) towards mid front, ie the 33 sts for front band sts will be worked at the end of row from RS. Happy crocheting!
08.08.2016 - 08:45Sofia wrote:
Hello and Thank you. I started over and still confused. I started on the sleeves and I have 28 of 2tr+ 2 ch+ 2tr. Is this correct?? I don't see a different between 2tr+2ch+2tr and 1a. May be I read the pattern wrong??
24.07.2016 - 03:30DROPS Design answered:
Dear Sofia, in 1st size you should have a total of 26 times 2 tr,2ch,2 tr on the row including A.1b and A.1c - work the tr groups evenly on sleeve as explained below and in pattern so that your number of tr-groups will match. Happy crocheting!
25.07.2016 - 09:29Sofia wrote:
Hello, I need some help with the sleeves. I finished Row 2 and I have A.1a 26 instead of 24. I am doing the S/M size and wondering if the sleeves will just bigger and I can continue on. I think it happened because each side has 2tr+ 2 ch+ 2 tr. any suggestions?
20.07.2016 - 22:29DROPS Design answered:
Dear Sofia, when working first row on sleeve you should have A.1b (2 tr, 2ch, 2 tr) in the 10th ch of hook, then 4 x A.1a + 2tr,2ch,2 tr (=A1a 1 time) in the tr at beg of back piece, then repeat A.1a as before (= 14 times), work A.1a 1 time in the last tr at the end of back piece + A.1a 4 times in the chain ans finish with A.1c = A.1a is worked: 4+1+14+1+4= 24 times between A.1b and A.1c. Happy crocheting!
21.07.2016 - 09:09Bell wrote:
I am having trouble with the sleeves part, i have finished the back part but unsure where the sleeves connect as such
09.06.2016 - 14:47DROPS Design answered:
Dear Mrs Bell, when you have worked back part before armhole, cut the yarn, then crochet some chains (see size) for fundation of 1st sleeve, crochet next row in A.1 as bevore over the sts on back piece and crochet some chains for 2nd sleeve = you have now created the "fundation of sleeves". On next row, turn and crochet row 1 from RS as explained, you will now crochet the first row on each sleeve and continue back piece in A.1 as before. Happy crocheting!
10.06.2016 - 08:34Hallo, ik ben nog niet zo ervaren en nu begrijp ik iets niet. Ik heb het achterpand gehaakt tot "haak 11-11-12-12 dstk groepen etc". Ik heb echt geen flauw idee wat daarmee bedoeld word.... Alvast bedankt. MVG.
30.04.2016 - 16:34DROPS Design answered:
Hoi Annelies. Je haakt 11 of 12 dstk groepen afhankelijk van welke maat je maakt. (Dus bijvoorbeeld 11 dstk groepen voor maat S/M)
02.05.2016 - 11:04Hi Thank you for the help previously but Im still confused. After fasten off the back. Do I join on the ws with 20 chain and work A.1 5 ch then skip 4ch and work 2tr.2ch.2tr and then ch 24?
18.04.2016 - 06:23DROPS Design answered:
Dear Mrs Hulton, from WS: work the 20 ch (first sleeve), work A.1c (= start with 1 tr), A.1a and A.1b as before, then cast on 24 ch (= 2nd sleeve), then work row 1 from RS: 2 tr, 2ch, 2 tr in 10th ch from hook (the 9 ch = beg of A.1b), then work A.1a, and at the end of row, (work in the 20 ch at beg of previous WS row as indicated) finish with A.1c in the last of the 20 ch for sleeve. Happy crocheting!
18.04.2016 - 11:27I just finished back piece and I'm confused on the next step. It tells me to chain 20 and after following pattern from back it says I should have 24 ch but there are no increases to give extra stitches
14.04.2016 - 21:02DROPS Design answered:
Dear Mrs Hulton, before casting on these chain, you have cut the yarn. The 20 new ch you cast on at the beg of row from WS are for the sleeve, work A1 as before over back piece, and cast on 24 ch at the end of this row. Then continue working following Row 1 from RS, row 2 from WS and row 3 from RS. Happy crocheting!
15.04.2016 - 09:05