DROPS Karisma
DROPS Karisma
100% Wool
from 5.00 BGN /50g
Get the yarn to make this pattern from 30.00BGN.

The yarn cost is calculated from the pattern’s smallest size and the yarn’s cheapest product type. Looking for an even better price? You might find it on the DROPS Deals!

DROPS Super Sale

Amelie Smiles

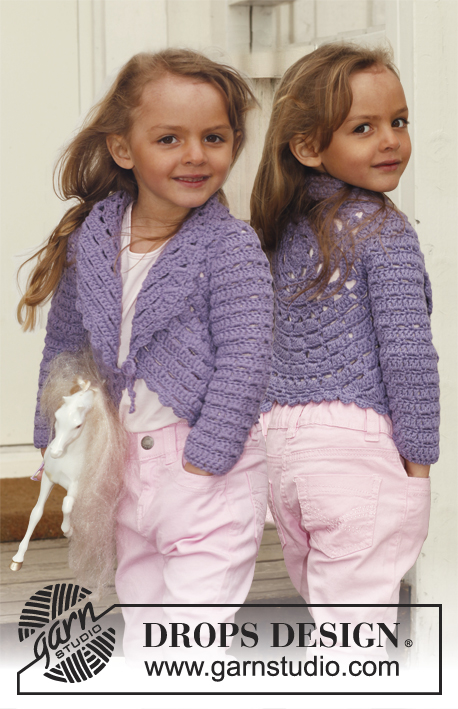
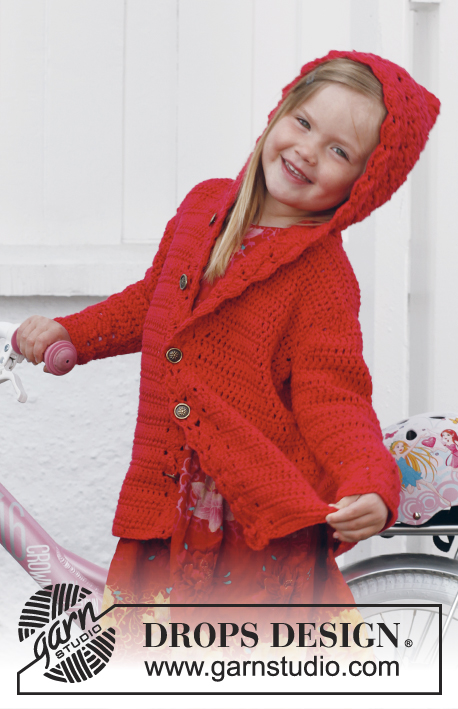
Crochet jacket with lace pattern and round yoke, worked top down in DROPS Karisma. Size children 3 - 12 years.

DROPS Children 24-38
DROPS design: Pattern no u-061-bn
Yarn group B
--------------------------------------------------------
Size: 3/4 - 5/6 - 7/8 - 9/10 - 11/12 years
Size in cm: 98/104 - 110/116 - 122/128 - 134/140 - 146/152
Materials:
DROPS KARISMA from Garnstudio
300-350-350-400-450 g colour no 40, light old pink

DROPS CROCHET HOOK SIZE 4 mm – or size needed to get 17 sts x 15 rows of diagram A.1 = 10 x 10 cm. 1 repetition of A.2 measures approx. 6 cm vertically.
DROPS MOTHER-OF-PEARL BUTTON w/HOLES, NO 521: 5-5-6-6-6 pieces

-------------------------------------------------------

Alternative Yarn – See how to change yarns here
Yarn Groups A to F – Use the same pattern and change the yarn here
Yarn usage using an alternative yarn – Use our yarn converter here

-------------------------------------------------------

DROPS Karisma
DROPS Karisma
100% Wool
from 5.00 BGN /50g
Get the yarn to make this pattern from 30.00BGN.

The yarn cost is calculated from the pattern’s smallest size and the yarn’s cheapest product type. Looking for an even better price? You might find it on the DROPS Deals!

Pattern instructions

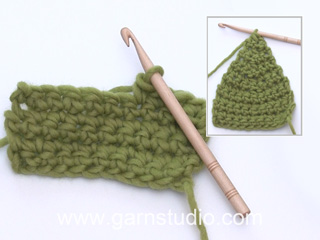
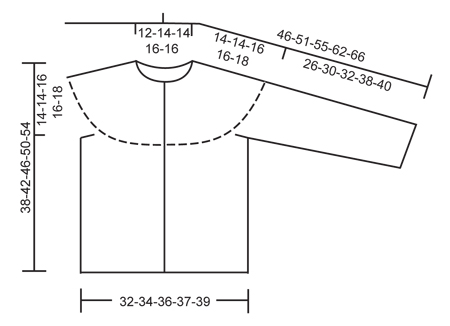
CROCHET INFO:
Replace first dc on every dc row with 1 ch.
Replace first tr on every tr row with 3 ch.

PATTERN:
See diagrams A.1 and A.2.

INCREASE TIP:
Inc by working 2 sts in 1 st, first on the one side of all markers on row, next time on the other side of all markers on row, continue inc like this alternately before and after markers.

DECREASE TIP:
Dec 1 st by working 2 sts tog.
Work 2 dc tog as follows: Insert hook in first st and pull thread through, insert hook in next st and pull thread through, make 1 YO and pull thread through all 3 loops on hook.
Work 2 tr tog as follows: Work 1 tr in first st but wait with last pull through, work 1 tr in next st but on last pull through, pull thread through all 3 loops on hook.
----------------------------------------------------------

BODY:
The piece is worked top down. Worked back and forth from mid front.
Work 77-85-85-92-100 ch (incl 1 ch to turn with) on hook size 4 mm with Karisma. Work next row as follows: 1 dc in 2nd ch, 1 dc in each of the next 5-3-3-5-3 ch, * skip 1 ch, 1 dc in each of the next 4 ch *, repeat from *-* the entire row = 63-69-69-75-81 dc (ch at beg of row = 1 dc) – READ CROCHET INFO! Insert 14-15-16-17-18 markers in the piece as follows: First marker after 5-6-4-5-6 sts, then insert 13-14-15-16-17 markers 4 sts apart, after last marker there are 6-7-5-6-7 sts. Work back and forth according to diagram A.1 - AT THE SAME TIME on next row inc 1 st at all markers – READ INCREASE TIP! Repeat inc every other row 5-5-3-3-2 more times and then every 4th row 0-0-2-2-3 times = 147-159-165-177-189 sts. REMEMBER THE CROCHET TENSION! Continue to work A.2 as follows: 1 tr in each of the first 4 dc (= band), a over the next 7 dc, then b until 10 dc remain, c over the next 6 dc and 1 tr in each of the last 4 dc (= band). Work diagram 1 time vertically – NOTE: On the first 2 rows work the four first and the last 4 sts in each side in tr, then work the pattern as before - inc at the markers as before on 4th row in diagram. On 7th row in diagram inc 16-13-16-15-12 sts evenly (do not inc over the first and last 4 band sts) = 177-187-197-209-219 sts.
Work last row in A.2 as follows: 28-30-31-33-34 dc (= front piece), 6 ch (= under sleeve), skip 36-38-40-43-45 dc (to be used for sleeve later), work 49-51-55-57-61 dc (= back piece), 6 ch (= under sleeve), skip 36-38-40-43-45 dc (to be used for sleeve later) and work 28-30-31-33-34 dc (= front piece).
There are now 117-123-129-135-141 sts on body. Remove all markers on yoke and insert a new marker in the middle of the 6 ch under each sleeve. Beg on 1st row in A.2 again and work a, b and c the same way as last time (every ch under sleeve = 1 dc) - the first and last 4 sts in each side = bands, only work these in tr on the first 2 rows. Continue A.2 until repetition has been worked 4-4-4-5-5 times in total after yoke, piece measures now approx. 24-24-24-30-30 cm from armhole and down. The smallest size is now done. Continue with diagram A.1 for 0-4-6-4-6 cm, i.e. piece measures 24-28-30-34-36 cm from armhole and down. Fasten off.

SLEEVE:
To get the same texture as on body, work back and forth. There are now 42-44-46-49-51 sts in total on sleeve.
Beg to work mid under sleeve in 3rd ch worked for armhole on body – work first row from WS. Work 1 row with 1 dc in every ch/dc, AT THE SAME TIME dec 6 dc evenly = 36-38-40-43-45 dc. Work next row as follows – from RS: Work 1 tr in each of the first 3-1-2-0-1 dc, then work diagram A.2 as follows: a over 7 sts, then b until 8-6-7-6-7 sts remain, c over 6 sts and finish with 1 tr in each of the last 2-0-1-0-1 dc. Turn and work as follows: On 4th row first time diagram is worked, dec 5-1-3-0-2 sts evenly – SEE DECREASE TIP = 31-37-37-43-43 sts. No of sts will now fit the repetition so next time you start A.2, no tr are worked mid under sleeve in any size. Continue with A.2 downwards 3-4-4-5-5 more times – AT THE SAME TIME, third time repetition is worked, dec 0-6-6-6-6 sts evenly = 31-31-31-37-37 sts. When A.2 are worked a total of 4-5-5-6-6 times on sleeve (piece measures approx. 24-30-30-36-36 cm), continue with diagram A.1 until sleeve measures 26-30-32-38-40 cm. Cut the yarn – make it long and use it to sew tog sleeve mid under.
Work the other sleeve the same way.

ASSEMBLY:
Sew sleeve seams edge to edge to avoid a chunky seam. Sew on buttons evenly down on left band – top button should be 1 cm from the top. Button through sts on right band.

Diagram

symbols = 1 ch
symbols = 1 dc
symbols = 1 tr
diagram
diagram
Do you have a question? See a list of frequently asked questions (FAQ)

Knitting tension is what determines the final measurements of your work, and is usually measured per 10 x 10 cm. It is provided like so: number of stitches in width x number of rows in height - eg: 19 stitches x 26 rows = 10 x 10 cm.

The knitting tension is very individual; some people knit/crochet loosely while others work tightly. You adjust the knitting tension with the needle size, which is why the suggested needle size is only meant as a guide! You need to adjust this (up or down) to ensure that YOUR knitting tension matches the knitting tension provided in the pattern. If you work with a different knitting tension than provided you will have a different yarn consumption, and your work will have different measurements than what the pattern suggests.

The knitting tension also determines which yarns can replace each other. As long as you achieve the same knitting tension you can replace one yarn with another.

See DROPS lesson: How to measure your tension/gauge

See DROPS video: How to make a gauge tension swatch

The required amount of yarn is provided in grams, eg: 450 g. To calculate how many balls you’ll need you first need to know how many grams are in 1 ball (25g, 50g or 100g). This information is available if you click on the individual yarn quality on our pages. Divide the amount required with the amount of each ball. For example, if each ball is 50g (the most common amount), the calculation will be as follows: 450 / 50 = 9 balls.

The important thing when changing from one yarn to another is that the knitting/crochet tension remains the same. This is so that the measurements of the finished piece will be the same as on the sketch provided. It is easier to achieve the same knitting tension using yarns from the same yarn group. It is also possible to work with multiple strands of a thinner yarn to achieve the knitting tension of a thicker one. Please try our yarn converter. We recommend you to always work a test swatch.

Please NOTE: when changing yarn the garment might have a different look and feel to the garment in the photo, due to individual properties and qualities of each yarn.

See DROPS lesson: Can I use a different yarn than the one mentioned in the pattern?

All our yarns are categorised into yarn groups (from A to F) according to thickness and knitting tension – group A contains the thinnest yarns and group F the thickest. This makes it easier for you to find alternative yarns to our patterns, should you wish to switch yarn. All yarns within the same group have a similar knitting tension and can easily replace each other. However, different yarn qualities have different structures and properties which will give the finished work a unique look and feel.

Click here for an overview of the yarns in each yarn group

At the top of all our patterns you’ll find a link to our yarn calculator, which is a helpful tool should you wish to use a different yarn than suggested. By filling in the yarn quality you wish to replace, the amount (in your size) and number of strands, the calculator will present good alternative yarns with the same knitting tension. Additionally it will tell you how much you’ll require in the new qualities and whether you’ll need to work with multiple strands. Most skeins are 50g (some are 25g or 100g).

If the pattern is worked with multiple colours, every colour will have to be calculated separately. Similarly, if the pattern is worked with several strands of different yarns (for example 1 strand Alpaca and 1 strand Kid-Silk) you will have to find alternatives for each, individually.

Click here to see our yarn calculator

Since different yarns have different qualities and textures we have chosen to keep the original yarn in our patterns. However, you can easily find options among our available qualities by using our yarn calculator, or simply pick a yarn from the same yarn group.

It is possible that some retailers still have discontinued yarns in stock, or that someone has a few skeins at home that they would like to find patterns for.

The yarn calculator will provide both alternative yarn as well as required amount in the new quality.

If you think it's hard to decide what size to make, it can be a good idea to measure a garment you own already and like the size of. Then you can pick the size by comparing those measures with the ones available in the pattern's size chart.

You'll find the size chart at the bottom of the pattern.

See DROPS lesson: How to read size chart

The needle size provided in the pattern serves only as a guide, the important thing is to follow the knitting tension. And since knitting tension is very individual, you will have to adjust the needle size to ensure that YOUR tension is the same as in the pattern – maybe you’ll have to adjust 1, or even 2 needle sizes, up or down to achieve the correct tension. For this, we recommend that you work test swatches.

Should you work with a different knitting tension than the one provided, the measurements of the finished garment might deviate from the measurement sketch.

See DROPS lesson: How to measure your tension/gauge

See DROPS video: How to make a tension/gauge swatch

Working a garment top-down provides more flexibility and room for personal adjustment. For example it is easier to try the garment on while working, as well as making adjustments to length of yoke and shoulder caps.

The instructions are carefully explaining every step, in the correct order. Diagrams are adjusted to the knitting direction and are worked as usual.

The diagram depicts all rows/rounds, and every stitch seen from the right side. It is read from bottom to top, from right to left. 1 square = 1 stitch.

When working back and forth, every other row is worked from the right side and every other row is worked from the wrong side. When working from the wrong side, the diagram will have to be worked reversed: from left to right, knit stitches are purled, purl stitches are knit etc.

When working in the round every round is worked from the right side and the diagram are worked from right to left on all rounds.

See DROPS lesson: How to read knitting diagrams

The diagram depicts all rows/rounds, and every stitch seen from the right side. It is worked from bottom to top, from right to left.

When working back and forth every other row is worked from the right side: from right to left and every other row is worked from the wrong side: from left to right.

When working in the round, every row in the diagram are worked from the right side, from right to left.

When working a circular diagram you start in the middle and work your way outwards, counter clockwise, row by row.

The rows usually start with a given number of chain stitches (equivalent to the height of the following stitch), this will either be depicted in the diagram or explained in the pattern.

See DROPS lesson: How to read crochet diagrams

Instructions for working several diagrams after each other on the same row/round, will often be written like so: “work A.1, A.2, A.3 a total of 0-0-2-3-4 times". This means you work A.1 once, then A.2 is worked once, and A.3 is repeated (in width) the number of times provided for your size – in this case like so: S = 0 times, M = 0 times, L=2 times, XL= 3 times and XXL = 4 times.

The diagrams are worked as usual: begin with the first row in A.1, then work the first row in A.2 etc.

See DROPS lesson: How to read knitting diagrams

See DROPS lesson: How to read crochet diagrams

The total width of the garment (from wrist-to-wrist) will be larger in the larger sizes, despite the actual sleeves being shorter. The larger sizes have longer sleeve caps and wider shoulders, so there will be a good fit in all sizes.

The measurement sketch/schematic drawing provides information regarding the full length of the garment. If it’s a jumper or a jacket the length is measured from the highest point on the shoulder closest to the neckline, and straight down to the bottom of the garment. It is NOT measured from the tip of shoulder. Similarly, the length of yoke is measured from the highest point on the shoulder and down to where yoke is split into body and sleeves.

On a jacket measures are never taken along bands, unless specifically stated. Always measure inside band stitches when measuring the length.

See DROPS lesson: How to read a schematic drawing

Diagrams are often repeated on the round or in height. 1 repeat is the diagram the way it appears in the pattern. If it says to work 5 repeats of A.1 in the round, then you work A.1 a total of 5 times after/next to each other in the round. If it says to work 2 repeats of A.1 vertically/in height you work the entire diagram once, then begin again at the start and work the entire diagram one more time.

Chain stitches are slightly narrower than other stitches and to avoid working the cast-on edge too tight, we simply chain more stitches to begin with. The stitch count will be adjusted on the following row to fit the pattern and measurement sketch.

The rib edge is more elastic and will contract slightly compared to, for example, stocking stitch. By increasing before the rib edge, you avoid a visible difference in width between the rib edge and the rest of the body.

It’s very easy to cast off too tightly, and by making yarn overs while casting off (and simultaneously casting these off) you avoid a too tight cast off edge.

See DROPS video: How to bind off with yarn overs (yo)

To achieve an even increase (or decrease) you can increase on, for example: every 3rd and 4th row alternately, like so: work 2 rows and increase on the 3rd row, work 3 rows and increase on the 4th. Repeat this until the increase is complete.

See DROPS lesson: Increase or decrease 1 st on every 3rd and 4th row alternately

Should you prefer to work in the round instead of back and forth, you may of course adjust the pattern. You’ll need to add steeks mid-front (usually 5 stitches), and follow the instructions. When you would normally turn and work from the wrong side, simply work across the steek and continue in the round. At the end you’ll cut the piece open, pick up stitches to work bands, and cover the cut edges.

See DROPS video: How to knit steeks and cut open

Should you prefer to work back and forth instead of in the round, you may of course adjust the pattern so you work the pieces separately and then assemble them at the end. Divide the stitches for the body in 2, add 1 edge stitch in each side (for sewing) and work the front and back pieces separately.

See DROPS lesson: Can I adapt a pattern for circular needles into straight needles?

Pattern repeats can vary slightly in the different sizes, in order to get the correct proportions. If you’re not working the exact same size as the garment in the photo, yours might deviate slightly. This has been carefully developed and adjusted so that the complete impression of the garment is the same in all sizes.

Make sure to follow instructions and diagrams for your size!

If you have found a pattern you like which is available in women’s size it’s not very difficult to convert it to men’s size. The biggest difference will be the length of sleeves and body. Start working on the women size that you think would fit across the chest. The additional length will be worked right before you cast off for the armhole/sleeve cap. If the pattern is worked top-down you can add the length right after the armhole or before the first decrease on sleeve.

Regarding additional yarn amount, this will depend on how much length you add, but it is better with a skein too many than too few.

All yarns will have excess fibres (from production) that might come off as lint or shedding. Brushed yarns (ie hairier yarns) have more of these loose, excess fibres, causing more shedding.

Shedding also depends on what is worn under or over the garment, and whether this pulls at the yarn fibres. It’s therefore not possible to guarantee that there will be no shedding

Below are some tips on how to get the best result when working with hairier yarns:

1. When the garment is finished (before you wash it) shake it vigorously so the looser hairs come off. NOTE: do NOT use a lint roller, brush or any method that pulls at the yarn.

2. Place the garment in a plastic bag and put it in your freezer - the temperature will cause the fibres to become less attached to each other, and excess fibres will come off easier.

3. Leave in the freezer for a few hours before taking it out and shaking it again.

4. Wash the garment according to the instructions on the yarn label.

Pilling is a natural process that happens to even the most exclusive of fibers. It's a natural sign of wear and tear that is hard to avoid, and that is most visible in high friction areas of your garment like a sweater's arms and cuffs.

You can make your garment look as new by removing the pilling, using a fabric comb or a pill/lint remover.

Still can't find the answer you need? Then scroll down and leave your question so one of our experts can try to help you. This will be done normally within 5 to 10 working days.
In the meantime, you can read the questions and answers that others have left to this pattern or join the DROPS Workshop on Facebook to get help from fellow knitters/crocheters!

You might also like...

s24-38 Amelie Smiles

Frances, Canada

Post a comment to pattern DROPS Children 24-38

We would love to hear what you have to say about this pattern!

If you want to leave a question, please make sure you select the correct category in the form below, to speed up the answering process. Required fields are marked *.

Comments / Questions (94)

country flag Soledad wrote:

La explicación de cómo poner los marcadores de puntos es bastante confusa, ya que dice que el primero va DESPUES de 5 pb y no EN el punto número 5, y también dice que hay que dejar 4 puntos ENTRE los marcadores, y en realidad los puntos que quedan en el medio son 3. Esto lo deduje después de leer los comentarios de alguna gente con el mismo problema, voy a tener que deshacer el trabajo por tercera vez...

09.10.2019 - 09:52

country flag Frances wrote:

Hi On the sleeves for size 5/6 it says sleeves should measure 11 3/4 I just wanted to check and make sure this final measurement was correct for that size. As all other sizes this measurement changes from the row before. (piece measures approx. 24-30-30-36-36 cm / 9½"-11 3/4"-11 3/4"-14 1/4"-14 1/4"), continue with diagram A.1 until sleeve measures 26-30-32-38-40 cm / 10 1/4"-11 3/4"-12½"15"-15 3/4". 24-30-30-36-36 / 26-30??-32-38-40 Thank you

04.09.2019 - 20:32

DROPS Design answered:

Dear Frances, in size 5/6 you won't have to crochet A.1, sleeve is finished after you have worked A.2 a total of 5 times. Happy crocheting!

05.09.2019 - 09:16

country flag Frances Brown wrote:

A over the next 7 sc, then b until 10 sc remain, c over the next 6 sc and 1 dc in each of the last 4 sc (= band). What is a over???????? please explain this row can you please just give written instructions for this row. I looked up crochet terms - a over I could not find anything for this??

29.08.2019 - 13:56

DROPS Design answered:

Dear Mrs Brown, you will crochet diagrams A.2 as follows: first start with 4 dc (= front band), then work A.2a (= 7 sts) over the next 7 stitches, repeat A.2b (= 6 sts) until 10 sts remain, work now A.2c (= 6 stitches) and finish with 4 dc (= front band). read more here about crochet diagrams. Happy crocheting!

29.08.2019 - 14:37

country flag Michelle M wrote:

I am really confused by the "chain 6 " for under the sleeve. Do you leave the chain 6 hanging down? Or do you attach it to the row? When you skip the stitches in the final A.2 row to make room for the sleeve, do I start counting 6 stitches after the scs to include the chain 6? Also, in order to skip the stitches, am I fastening off and reattaching my thread 38 stitches later? Thank you

26.07.2019 - 05:39

DROPS Design answered:

Dear Michelle, the 6 chains are worked for under the sleeves, when you skip the stitches for sleeves by dividing piece, ie you first work 30 sts for front piece, chain 6, skip the 38 sts for sleeve (will be worked later), then continue working the 51 stitches on back piece, chain 6, skip the 38 sts for sleeve, and finish row with the 30 sts on front piece (= 2nd size). Happy crocheting!

06.08.2019 - 10:18

country flag Maria wrote:

Me encanto la explicación es buena, el único inconveniente que encuentro, son los nombres de los hilados, pero lo he visto subsanado cunado da la explicacion de los cabos que tiene la lana .Atte Maria

22.07.2019 - 14:54

country flag Nathalie wrote:

Bonjour, J'ai une question qui peut paraître bête, mais.... Au début du dos/devant (3ème ligne), vous indiquez de sauter une ml sur 5 ("* sauter 1 ml, 1 ms dans chacune des 4 ml suivantes *"). Quand on saute une ml, est-ce qu'on crochète une ml (un peu comme dans le diagramme de A2), ou est-ce qu'on la saute purement et simplement (ce qui diminuerait le nombre de mailles) ? Merci de votre aide

02.07.2019 - 07:36

DROPS Design answered:

Bonjour Nathalie, on saute simplement la maille en l'air indiquée, la chaînette de base est souvent trop serrée, et pour éviter que le 1er rang ne le soit, on crochète plus de mailles en l'air pour la base, et on saute des mailles en l'air à intervalles réguliers au premier rang pour avoir la bonne largeur. (voir aussi ici). Bon crochet!

02.07.2019 - 09:02

country flag Nathalie wrote:

Bonjour, Je suis tentée pour faire ce modèle, mais j'aimerais remplacer le Karisma par du Muskat, qui a les mêmes caractéristiques d'épaisseur je pense. Cela me fait un peu peur car le modèle ne comporte pas d'échantillon pour vérifier. Pensez-vous que ce soit adapté ou non ? Merci!

12.06.2019 - 09:33

DROPS Design answered:

Bonjour Nathalie, Karisma et Muskat appartiennent effectivement au même groupe, comme elles sont différentes, le résultat sera également différent (plsu d'infos ici) mais vous pouvez vous baser sur le même échantillon qu'indiqué dans ce modèle - cf dans l'en-tête: 17 m x 15 rangs en point fantaisie du diagramme A.1 = 10 x 10 cm. Bon crochet!

12.06.2019 - 10:40

country flag Inge Soenen wrote:

Op mijn eigen vraag heb ik het antwoord gevonden nadat ik 31 rijen had gehaakt, zag dat het model niet goed was en het patroon nog eens opnieuw heb gelezen. Ik moet een toer meerderen, dan een toer niet en dat 5keer. Ik had het helemaal verkeerd begrepen en dacht dat ik iedere 5 toeren moest meerderen. Niet dus.

12.03.2019 - 13:11

country flag Inge Soenen wrote:

Hallo, Heb ik het juist dat, tegen dat je alle meerderingen hebt gedaan in de kleinste maat, 27 rijen hebt gehaakt? En dat ik dan nog moet afwerken tot het patroon A1 nog eens volledig is gehaakt? Ik heb dan 5 keer A1 gehaakt.

11.03.2019 - 20:33

DROPS Design answered:

Dag Inge,

Nadat je de markeerders hebt geplaatst begin je met het haken van A.1 waarbij je tegelijkertijd begint met meerderen voor de raglan. Dit meerderen doe je om de naald en in totaal 6 keer, dus dan heb je in totaal 12 toeren van A.1 gehaakt. Je herhaalt A.1 dus steeds in de hoogte tot het meerderen voor de raglan klaar is. Daarna ga je verder met A.2 zoals beschreven in het patroon.

12.03.2019 - 15:19

country flag Fiona wrote:

Für die kleinste Größe: Ich habe die korrekte Anzahl der Maschen in der 2. Reihe und möchte die 14 Markierungen setzen. Wenn ich mich an die Anweisung halte die 1. Markierung in die 5. Masche zu setzen und die letzen 6 Maschen frei lasse und zwischen jeder Markierung 4 Maschen frei zu lassen, komme ich nicht auf die benötigte Anzahl an Markierungen. Was mache falsch?

05.03.2019 - 07:01

DROPS Design answered:

Liebe Fiona, setzen Sie die Markierung wie folgt: 5 Maschen, 1 Markierung, (4 Maschen, 1 Markierung) x 13, 6 Maschen bleiben = 5+ 4x13 + 6 = 63 Maschen (1 + 13 Markierungen = 14 Markierungen). Viel Spaß beim häkeln!

05.03.2019 - 11:35