DROPS Karisma
DROPS Karisma
100% Wool
from 4.15 CAD /50g
Get the yarn to make this pattern from 24.90CAD.

The yarn cost is calculated from the pattern’s smallest size and the yarn’s cheapest product type. Looking for an even better price? You might find it on the DROPS Deals!

DROPS Super Sale

Amelie Smiles

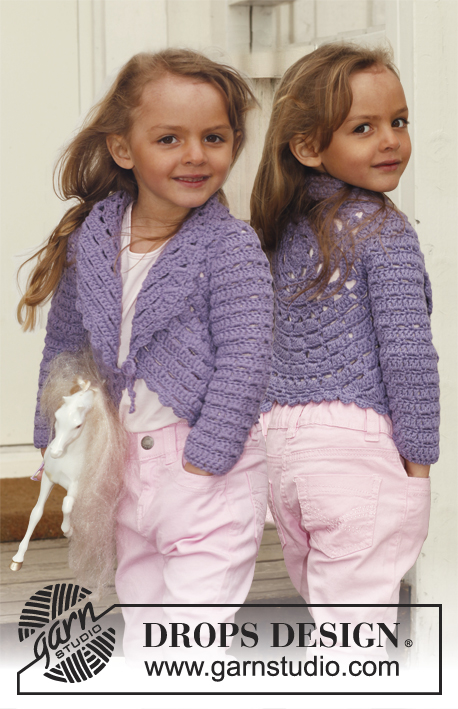
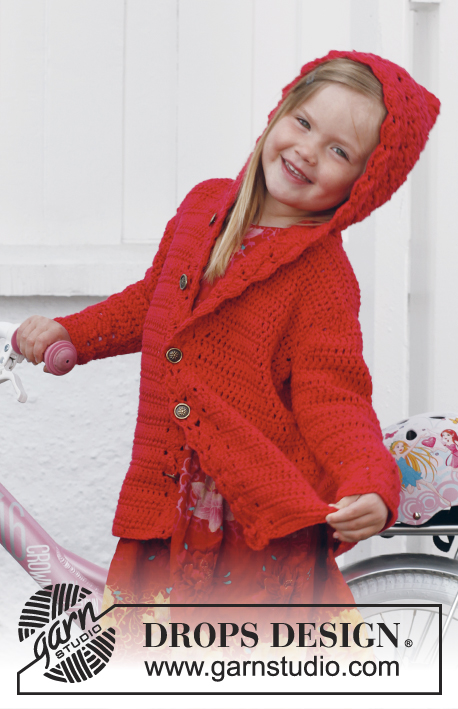
Crochet jacket with lace pattern and round yoke, worked top down in DROPS Karisma. Size children 3 - 12 years.

DROPS Children 24-38
DROPS design: Pattern no u-061-bn
Yarn group B
--------------------------------------------------------
Size: 3/4 - 5/6 - 7/8 - 9/10 - 11/12 years
Finished measurements:
Bust: 64-68-72-74-78 cm / 25¼"-26¾"-28½"-29"-30¾"
Full length: 38-42-46-50-54 cm / 15"-16½"-18"-19¾"-21¼"

Materials:
DROPS KARISMA from Garnstudio
300-350-350-400-450 g color no 40, light old pink

DROPS CROCHET HOOK size 4 mm / G/6 – or size needed to get 17 sts x 15 rows of diagram A.1 = 10 x 10 cm / 4" x 4".
1 repetition of A.2 measures approx. 6 cm / 2½" vertically.

DROPS MOTHER-OF-PEARL BUTTON w/HOLES, NO 521: 5-5-6-6-6 pieces

-------------------------------------------------------

Alternative Yarn – See how to change yarns here
Yarn Groups A to F – Use the same pattern and change the yarn here
Yarn usage using an alternative yarn – Use our yarn converter here

-------------------------------------------------------

DROPS Karisma
DROPS Karisma
100% Wool
from 4.15 CAD /50g
Get the yarn to make this pattern from 24.90CAD.

The yarn cost is calculated from the pattern’s smallest size and the yarn’s cheapest product type. Looking for an even better price? You might find it on the DROPS Deals!

Pattern instructions

NOTE: This pattern is written in American English. All measurements in charts are in cm. For conversion from inches to cm - click here. There are different terms for crocheting in American and British English. If this pattern includes crochet, click for "crochet terms" here. For this pattern in British English, please click here.
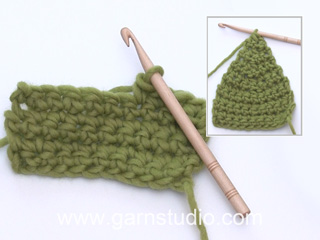
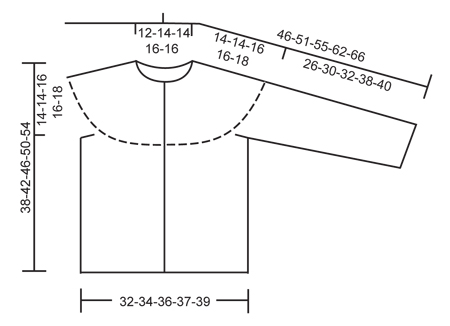
CROCHET INFO:
Replace first sc on every sc row with 1 ch.
Replace first dc on every dc row with 3 ch.

PATTERN:
See diagrams A.1 and A.2.

INCREASE TIP:
Inc by working 2 sts in 1 st, first on the one side of all markers on row, next time on the other side of all markers on row, continue inc like this alternately before and after markers.

DECREASE TIP:
Dec 1 st by working 2 sts tog.
Work 2 sc tog as follows: Insert hook in first st and pull thread through, insert hook in next st and pull thread through, make 1 YO and pull yarn through all 3 loops on hook.
Work 2 dc tog as follows: Work 1 dc in first st but wait with last pull through, work 1 dc in next st but on last pull through, pull yarn through all 3 loops on hook.

----------------------------------------------------------

BODY:
The piece is worked top down.
Worked back and forth from mid front.
Ch 77-85-85-92-100 (includes 1 ch to turn with) on hook size 4 mm / G/6 with Karisma. Work next row as follows: 1 sc in 2nd ch, 1 sc in each of the next 5-3-3-5-3 ch, * skip ch 1, 1 sc in each of the next 4 ch *, repeat from *-* the entire row = 63-69-69-75-81 sc (ch at beg of row = 1 sc) – READ CROCHET INFO! Insert 14-15-16-17-18 markers in the piece as follows:
First marker after 5-6-4-5-6 sts, then insert 13-14-15-16-17 markers 4 sts apart, after last marker there are 6-7-5-6-7 sts.
Work back and forth according to diagram A.1 - AT THE SAME TIME on next row inc 1 st at all markers – READ INCREASE TIP!
Repeat inc every other row 5-5-3-3-2 more times and then every 4th row 0-0-2-2-3 times = 147-159-165-177-189 sts. REMEMBER THE CROCHET GAUGE!
Continue to work A.2 as follows: 1 dc in each of the first 4 sc (= band), a over the next 7 sc, then b until 10 sc remain, c over the next 6 sc and 1 dc in each of the last 4 sc (= band). Work diagram 1 time vertically – NOTE: On the first 2 rows work the four first and the last 4 sts in each side in dc, then work the pattern as before - inc at the markers as before on 4th row in diagram. On 7th row in diagram inc 16-13-16-15-12 sts evenly (do not inc over the first and last 4 band sts) = 177-187-197-209-219 sts.
Work last row in A.2 as follows: 28-30-31-33-34 sc (= front piece), 6 ch (= under sleeve), skip 36-38-40-43-45 sc (to be used for sleeve later), work 49-51-55-57-61 sc (= back piece), 6 ch (= under sleeve), skip 36-38-40-43-45 sc (to be used for sleeve later) and work 28-30-31-33-34 sc (= front piece).
There are now 117-123-129-135-141 sts on body. Remove all markers on yoke and insert a new marker in the middle of the 6 ch under each sleeve.
Beg on 1st row in A.2 again and work a, b and c the same way as last time (every ch under sleeve = 1 sc) - the first and last 4 sts in each side = bands, only work these in dc on the first 2 rows.
Continue A.2 until repetition has been worked 4-4-4-5-5 times in total after yoke, piece measures now approx. 24-24-24-30-30 cm / 9½"-9½"-9½"-11¾"-11¾" from armhole and down. The smallest size is now done.
Continue with diagram A.1 for 0-4-6-4-6 cm / 0-1½"-2½"-1½"-2½", i.e. piece measures 24-28-30-34-36 cm / 9½"-11"-11¾"-13½"-14¼" from armhole and down.
Fasten off.

SLEEVE:
To get the same texture as on body, work back and forth. There are now 42-44-46-49-51 sts in total on sleeve.
Beg to work mid under sleeve in 3rd ch worked for armhole on body – work first row from WS.
Work 1 row with 1 sc in every ch/sc, AT THE SAME TIME dec 6 sc evenly = 36-38-40-43-45 sc. Work next row as follows – from RS: Work 1 dc in each of the first 3-1-2-0-1 sc, then work diagram A.2 as follows: a over 7 sts, then b until 8-6-7-6-7 sts remain, c over 6 sts and finish with 1 dc in each of the last 2-0-1-0-1 sc.
Turn and work as follows: On 4th row first time diagram is worked, dec 5-1-3-0-2 sts evenly – SEE DECREASE TIP = 31-37-37-43-43 sts. No of sts will now fit the repetition so next time you start A.2, no dc are worked mid under sleeve in any size.
Continue with A.2 downwards 3-4-4-5-5 more times – AT THE SAME TIME, third time repetition is worked, dec 0-6-6-6-6 sts evenly = 31-31-31-37-37 sts.
When A.2 are worked a total of 4-5-5-6-6 times on sleeve (piece measures approx. 24-30-30-36-36 cm / 9½"-11¾"-11¾"-14¼"-14¼"), continue with diagram A.1 until sleeve measures 26-30-32-38-40 cm / 10¼"-11¾"-12½"15"-15¾".
Cut the yarn – make it long and use it to sew tog sleeve mid under. Work the other sleeve the same way.

ASSEMBLY:
Sew sleeve seams edge to edge to avoid a chunky seam. Sew on buttons evenly down on left band – top button should be 1 cm / ½" from the top.
Button through sts on right band.

Diagram

symbols = 1 ch
symbols = 1 sc
symbols = 1 dc
diagram
diagram
Do you have a question? See a list of frequently asked questions (FAQ)

Knitting tension is what determines the final measurements of your work, and is usually measured per 10 x 10 cm. It is provided like so: number of stitches in width x number of rows in height - eg: 19 stitches x 26 rows = 10 x 10 cm.

The knitting tension is very individual; some people knit/crochet loosely while others work tightly. You adjust the knitting tension with the needle size, which is why the suggested needle size only serve as a guide! You need to adjust this (up or down) to ensure that YOUR knitting tension matches the knitting tension provided in the pattern. If you work with a different knitting tension than provided you will have a different yarn consumption, and your work will have different measurements than what the pattern suggests.

The knitting tension also determines which yarns can replace each other. As long as you achieve the same knitting tension you can replace one yarn with another.

See DROPS lesson: How to measure your tension/gauge

See DROPS video: How to make a gauge tension swatch

The required amount of yarn is provided in grams, eg: 450 g. To calculate how many balls you’ll need you first need to know how many grams are in 1 ball (25g, 50g or 100g). This information is available if you click on the individual yarn quality on our pages. Divide the amount required with the amount of each ball. For example, if each ball is 50g (the most common amount), the calculation will be as follows: 450 / 50 = 9 balls.

The important thing when changing from one yarn to another is that the knitting/crochet tension remains the same. This is so that the measurements of the finished piece will be the same as on the sketch provided. It is easier to achieve the same knitting tension using yarns from the same yarn group. It is also possible to work with multiple strands of a thinner yarn to achieve the knitting tension of a thicker one. Please try our yarn converter. We recommend you to always work a test swatch.

Please NOTE: when changing yarn the garment might have a different look and feel to the garment in the photo, due to individual properties and qualities of each yarn.

See DROPS lesson: Can I use a different yarn than the one mentioned in the pattern?

All our yarns are categorised into yarn groups (from A to F) according to thickness and knitting tension – group A contains the thinnest yarns and group F the thickest. This makes it easier for you to find alternative yarns to our patterns, should you wish to switch yarn. All yarns within the same group have a similar knitting tension and can easily replace each other. However, different yarn qualities have different structures and properties which will give the finished work a unique look and feel.

Click here for an overview of the yarns in each yarn group

At the top of all our patterns you’ll find a link to our yarn converter, which is a helpful tool should you wish to use a different yarn than suggested. By filling in the yarn quality you wish to replace, the amount (in your size) and number of strands, the converter will present good alternative yarns with the same knitting tension. Additionally it will tell you how much you’ll require in the new qualities and whether you’ll need to work with multiple strands. Most skeins are 50g (some are 25g or 100g).

If the pattern is worked with multiple colours, every colour will have to be converted separately. Similarly, if the pattern is worked with several strands of different yarns (for example 1 strand Alpaca and 1 strand Kid-Silk) you will have to find alternatives for each, individually.

Click here to see our yarn converter

Since different yarns have different qualities and textures we have chosen to keep the original yarn in our patterns. However, you can easily find options among our available qualities by using our yarn converter, or simply pick a yarn from the same yarn group.

It is possible that some retailers still have discontinued yarns in stock, or that someone has a few skeins at home that they would like to find patterns for.

The yarn converter will provide both alternative yarn as well as required amount in the new quality.

If you think it's hard to decide what size to make, it can be a good idea to measure a garment you own already and like the size of. Then you can pick the size by comparing those measures with the ones available in the pattern's size chart.

You'll find the size chart at the bottom of the pattern.

See DROPS lesson: How to read size chart

The needle size provided in the pattern serves only as a guide, the important thing is to follow the knitting tension. And since knitting tension is very individual, you will have to adjust the needle size to ensure that YOUR tension is the same as in the pattern – maybe you’ll have to adjust 1, or even 2 needle sizes, up or down to achieve the correct tension. For this, we recommend that you work test swatches.

Should you work with a different knitting tension than the one provided, the measurements of the finished garment might deviate from the measurement sketch.

See DROPS lesson: How to measure your tension/gauge

See DROPS video: How to make a gauge tension swatch

Working a garment top-down provides more flexibility and room for personal adjustment. For example it is easier to try the garment on while working, as well as making adjustments to length of yoke and shoulder caps.

The instructions are carefully explaining every step, in the correct order. Diagrams are adjusted to the knitting direction and are worked as usual.

The diagram depicts all rows/rounds, and every stitch seen from the right side. It is read from bottom to top, from right to left. 1 square = 1 stitch.

When working back and forth, every other row is worked from the right side and every other row is worked from the wrong side. When working from the wrong side, the diagram will have to be worked reversed: from left to right, knit stitches are purled, purl stitches are knit etc.

When working in the round every round is worked from the right side and the diagram are worked from right to left on all rounds.

See DROPS lesson: How to read knitting diagrams

The diagram depicts all rows/rounds, and every stitch seen from the right side. It is worked from bottom to top, from right to left.

When working back and forth every other row is worked from the right side: from right to left and every other row is worked from the wrong side: from left to right.

When working in the round, every row in the diagram are worked from the right side, from right to left.

When working a circular diagram you start in the middle and work your way outwards, counter clockwise, row by row.

The rows usually start with a given number of chain stitches (equivalent to the height of the following stitch), this will either be depicted in the diagram or explained in the pattern.

See DROPS lesson: How to read crochet diagrams

Instructions for working several diagrams after each other on the same row/round, will often be written like so: “work A.1, A.2, A.3 a total of 0-0-2-3-4 times". This means you work A.1 once, then A.2 is worked once, and A.3 is repeated (in width) the number of times provided for your size – in this case like so: S = 0 times, M = 0 times, L=2 times, XL= 3 times and XXL = 4 times.

The diagrams are worked as usual: begin with the first row in A.1, then work the first row in A.2 etc.

See DROPS lesson: How to read knitting diagrams

See DROPS lesson: How to read crochet diagrams

The total width of the garment (from wrist-to-wrist) will be larger in the larger sizes, despite the actual sleeves being shorter. The larger sizes have longer sleeve caps and wider shoulders, so there will be a good fit in all sizes.

The measurement sketch/schematic drawing provides information regarding the full length of the garment. If it’s a jumper or a jacket the length is measured from the highest point on the shoulder (usually closest to the neckline), and straight down to the bottom of the garment. It is NOT measured from the tip of shoulder. Similarly, the length of yoke is measured from the highest point on the shoulder and down to where yoke is split into body and sleeves.

See DROPS lesson: How to read a schematic drawing

Diagrams are often repeated on the round or in height. 1 repeat is the diagram the way it appears in the pattern. If it says to work 5 repeats of A.1 in the round, then you work A.1 a total of 5 times after/next to each other in the round. If it says to work 2 repeats of A.1 vertically/in height you work the entire diagram once, then begin again at the start and work the entire diagram one more time.

Chain stitches are slightly narrower than other stitches and to avoid working the cast-on edge too tight, we simply chain more stitches to begin with. The stitch count will be adjusted on the following row to fit the pattern and measurement sketch.

The rib edge is more elastic and will contract slightly compared to, for example, stocking stitch. By increasing before the rib edge, you avoid a visible difference in width between the rib edge and the rest of the body.

It’s very easy to cast off too tightly, and by making yarn overs while casting off (and simultaneously casting these off) you avoid a too tight cast off edge.

See DROPS video: How to bind off with yarn overs (yo)

To achieve an even increase (or decrease) you can increase on, for example: every 3rd and 4th row alternately, like so: work 2 rows and increase on the 3rd row, work 3 rows and increase on the 4th. Repeat this until the increase is complete.

See DROPS lesson: Increase or decrease 1 st on every 3rd and 4th row alternately

Should you prefer to work in the round instead of back and forth, you may of course adjust the pattern. You’ll need to add steeks mid-front (usually 5 stitches), and follow the instructions. When you would normally turn and work from the wrong side, simply work across the steek and continue in the round. At the end you’ll cut the piece open, pick up stitches to work bands, and cover the cut edges.

See DROPS video: How to knit steeks and cut open

Should you prefer to work back and forth instead of in the round, you may of course adjust the pattern so you work the pieces separately and then assemble them at the end. Divide the stitches for the body in 2, add 1 edge stitch in each side (for sewing) and work the front and back pieces separately.

See DROPS lesson: Can I adapt a pattern for circular needles into straight needles?

Pattern repeats can vary slightly in the different sizes, in order to get the correct proportions. If you’re not working the exact same size as the garment in the photo, yours might deviate slightly. This has been carefully developed and adjusted so that the complete impression of the garment is the same in all sizes.

Make sure to follow instructions and diagrams for your size!

If you have found a pattern you like which is available in women’s size it’s not very difficult to convert it to men’s size. The biggest difference will be the length of sleeves and body. Start working on the women size that you think would fit across the chest. The additional length will be worked right before you cast off for the armhole/sleeve cap. If the pattern is worked top-down you can add the length right after the armhole or before the first decrease on sleeve.

Regarding additional yarn amount, this will depend on how much length you add, but it is better with a skein too many than too few.

All yarns will have excess fibres (from production) that might come off as lint or shedding. Brushed yarns (ie hairier yarns) have more of these loose, excess fibres, causing more shedding.

Shedding also depends on what is worn under or over the garment, and whether this pulls at the yarn fibres. It’s therefore not possible to guarantee that there will be no shedding

Below are some tips on how to get the best result when working with hairier yarns:

1. When the garment is finished (before you wash it) shake it vigorously so the looser hairs come off. NOTE: do NOT use a lint roller, brush or any method that pulls at the yarn.

2. Place the garment in a plastic bag and put it in your freezer - the temperature will cause the fibres to become less attached to each other, and excess fibres will come off easier.

3. Leave in the freezer for a few hours before taking it out and shaking it again.

4. Wash the garment according to the instructions on the yarn label.

Pilling is a natural process that happens to even the most exclusive of fibers. It's a natural sign of wear and tear that is hard to avoid, and that is most visible in high friction areas of your garment like a sweater's arms and cuffs.

You can make your garment look as new by removing the pilling, using a fabric comb or a pill/lint remover.

Still can't find the answer you need? Then scroll down and leave your question so one of our experts can try to help you. This will be done normally within 5 to 10 working days.
In the meantime, you can read the questions and answers that others have left to this pattern or join the DROPS Workshop on Facebook to get help from fellow knitters/crocheters!

You might also like...

s24-38 Amelie Smiles

Frances, Canada

Post a comment to pattern DROPS Children 24-38

We would love to hear what you have to say about this pattern!

If you want to leave a question, please make sure you select the correct category in the form below, to speed up the answering process. Required fields are marked *.

Comments / Questions (94)

country flag Joan Meade wrote:

HI, having trouble with size 7/8. 16st inc3x alt row,then 2x every 4th.5x16=80. add the 69 st set-up is 149sts.I should have 165sts. please help. Such a cute sweater.

16.11.2013 - 22:29

DROPS Design answered:

Dear Mrs Meade, you should inc a total of 4 times every other row + 2 times every 4th row, ie a total of 6 x 16 sts = 96 + 69 set up = 165 sts. Happy crocheting!

18.11.2013 - 10:48

country flag Christin Kroon wrote:

Nu har jag virkat oket på koftan och ska börja på bak- och framstycket. Men jag märker att mönstret är något förskjutet jämfört med mönstret på oket. Stolpgruppen ligger inte rakt under den förra.Ska det vara så? Beror det på att jag ökade på varv 7 på mönstret på oket?

23.07.2013 - 20:17

DROPS Design answered:

Ja men det skall vara så. När du ökar vill m bli något förskjutet!

10.10.2013 - 08:32

country flag Maria Benedicte Andersen wrote:

Som flere av deres andre oppskrifter, så syns jeg denne også er vanskelig å følge. Skulle ønske oppskriftene kunne vært litt mer steg for steg (rad for rad). Jeg heklet denne i muskat soft. Fikk den til tilslutt da, men ermene kunne ikke være så lange som oppskriften sier (ble ikke noe A.1 på slutten, og ermene er mer enn lange nok uten).

08.07.2013 - 19:43

country flag Britt Larsen wrote:

Hei. Hekler str 3/4 år har heklet etter oppskriften med 14 merker og 6 økninger hver 2. råd. Har da 147 m og skal øke 0 ganger hver 4. rad. På 7. rad i mønster Å.2 skal det økes 16m jevnt fordelt. Da skal jeg ha 177m men har bare 163 masker. Det er da 14 m for lite. 147 + 16= 163m Er det en økning hver 4. rad som mangler i oppskriften?

24.06.2013 - 13:06

DROPS Design answered:

Hej Britt. Der staar i mönstret at det økes ved merkene som tidligere på 4.rad i diag. Derefter i 7e rad i diag økes det 16 m jevnt fordelt = 177 m.

04.07.2013 - 12:38