
Popular categories
Looking for a yarn?


|
|
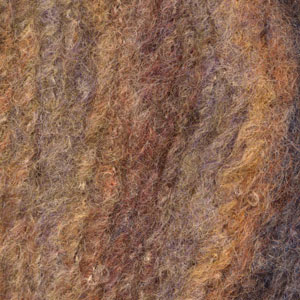
DROPS 75-10 |
|
|
|
|
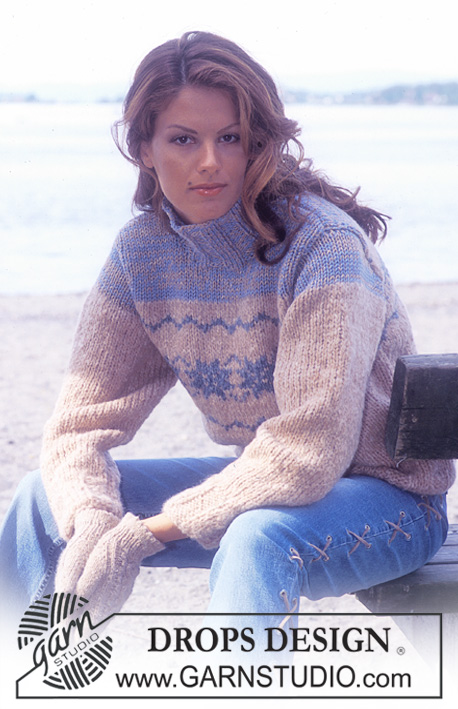
DROPS Long coat
DROPS 75-10 |
|
|
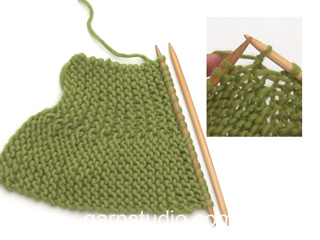
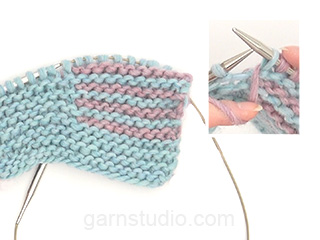
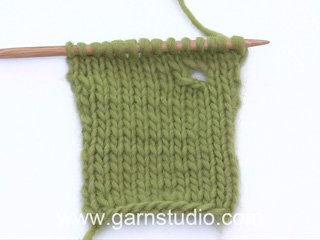
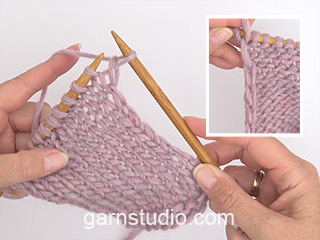
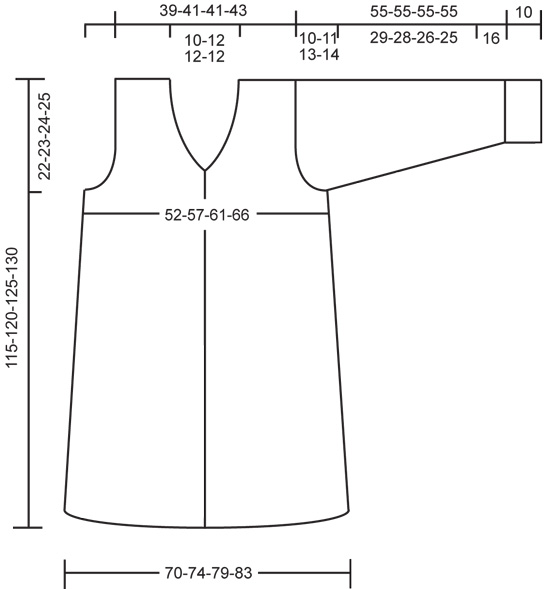
Gauge: 9 sts x 14 rows = 10 x 10 cm in stockinette st. Garter st, when knitting flat: Knit all sts, all rows. Measuring-tip: The measurements on the diagram show the garment as when held up or worn. Knitting tip (for neck shaping): All decs are made from right side. Dec as follows: After garter st edge sts: slip 1 as if to K, K 1, psso. Before garter st edge sts: K 2 tog. Back: Cast on 63-67-71-75 sts. Knit 10 rows garter st, then knit stockinette st keeping 3 sts in garter st at each side (for edge of side split). When the piece measures 28 cm, cast on 1 new st at each side (for seam allowance) = 65-69-73-77 sts. Then knit 4 rows stockinette st keeping the 4 sts at each side in garter st (this is the end of the split). Then knit stockinette st over all sts. At the same time when the piece measures 35 cm dec 1 st at each side every 7-7.5-8-8.5 cm a total of 8 times = 49-53-57-61 sts. When the piece measures 93-97-101-105 cm bind off for armhole at each side every other row: 3 sts 1 time, 2 sts 0-1-2-3 times and 1 st 4-3-3-2 times = 35-37-37-39 sts. When the piece measures 113-118-123-128 cm bind off the center 7-9-9-9 sts for the neck. On the next row dec 1 st at each neck edge = 13-13-13-14 sts remain on each shoulder. Bind off when the piece measures 115-120-125-130 cm. Left front: Cast on 35-37-39-41 sts. Knit garter st for 5 cm – slip the first st at the beginning of row at the center front edge in order to have a firm edge. Then knit stockinette st keeping 3 sts in garter st at the side edge and 5 sts in garter st at the center front edge. When the piece measures 28 cm cast on 1 new st at the side edge (for seam allowance) = 36-38-40-42 sts and knit 4 rows with 4 sts in garter st at side edge (this is the end of the split). Then knit stockinette st over all sts except the 5 button band sts. When the piece measures 35 cm dec 1 st at the side every 7-7.5-8-8.5 cm a total of 8 times = 28-30-32-34 sts. Read the entire next section before knitting: Collar: When the piece measures 90-94-98-102 cm cast on 15 new sts at the center front edge for collar. Continue to slip the first st of row at center front edge, and knit the following 19 sts in garter st with stockinette st over remaining sts. Neck shaping: When the piece measures 92-96-100-104 cm dec for the neck shaping. Dec 1 st inside the 20 collar sts in garter st – see knitting tips – every other row 4-5-5-5 times and every 4 rows 4 times. Armhole: At the same time when the piece measures 93-97-101-105 cm bind off for armhole at the side as on back. After all armhole and neck shaping is complete 28-28-28-29 sts remain on needles (13-13-13-14 shoulder sts + 15 collar sts). When the piece measures 115-120-125-130 cm bind off the 13-13-13-14 shoulder sts. Collar: Continue with garter st over 15 sts as follows: * 2 rows garter st over all sts, 2 rows garter st over only the outer 10 sts (center front edge) *, repeat from * - * until the collar measures approx. 5-6-6-6 cm to center back of the neck. Put sts on a st holder. Right front: Cast on and knit the same as the left, reversing all shaping. Make buttonholes along button band. 1 buttonhole = bind off the center button band st and cast on 1 new st over the bound off st on the next row. Make buttonholes when the piece measures: Size S/M: 31, 41, 51, 61, 71, 81 and 91 cm. Size M/L: 35, 45, 55, 65, 75, 85 and 95 cm. Size L/XL: 39, 49, 59, 69, 79, 89 and 99 cm. size XXL: 43, 53, 63 ,73, 83, 93 and 103 cm. Sleeve: Cast on 29-30-31-32 sts. Knit garter st for 26 cm (10 cm will be the cuff). Change to stockinette st. After the garter st inc 1 st at each side every 6.5-6.5-4.5-4.5 cm a total of 5-5-6-6 times = 39-40-43-44 sts. When sleeve measures 55-54-52-51 cm bind off for sleeve cap at each side every other row: 3 sts 1 time, 2 sts 2-2-2-1 times, 1 st 2-3-3-6 times, then bind off 2 sts at each side until sleeve measures 65 cm. Bind off the remaining sts. Assembly: Sew shoulder seams. Sew the collar at center back and sew the collar to back neck with seam on right side of coat. Sew in sleeves, sew sleeve and side seams using edge sts as a seam allowance, leaving side split open. Sew on buttons. |
|
|
|
|
Have you made this or any other of our designs? Tag your pictures in social media with #dropsdesign so we can see them! Do you need help with this pattern?You'll find tutorial videos, a Comments/Questions area and more by visiting the pattern on garnstudio.com. © 1982-2024 DROPS Design A/S. We reserve all rights. This document, including all its sub-sections, has copyrights. Read more about what you can do with our patterns at the bottom of each pattern on our site. |

With over 40 years in knitting and crochet design, DROPS Design offers one of the most extensive collections of free patterns on the internet - translated to 17 languages. As of today we count 304 catalogues and 11422 patterns - 11422 of which are translated into English (UK/cm).
We work hard to bring you the best knitting and crochet have to offer, inspiration and advice as well as great quality yarns at incredible prices! Would you like to use our patterns for other than personal use? You can read what you are allowed to do in the Copyright text at the bottom of all our patterns. Happy crafting!
Comments / Questions (13)
Hi, Sorry, my question was regarding: Decreasing 1 stitch in the 20 collar sts in garter stitch.... Thank you! Anne
23.04.2024 - 13:49DROPS Design answered:
Dear Mrs Mongeon, it looks like a typo, you will decrease for neck inside 20 sts in garter stitch, this means for the left front piece, decrease at the end of a row from RS, before the 20 sts in garter stitch, and for right front piece, increase at the beg of a row from RS after the first 20 sts in garter stitch. Happy knitting!
23.04.2024 - 13:51Hi, I am at the neck shaping, not sure I understand, when it says to decrease 1 st inside the 20 collar sts in garter stitch….. Thank you for your patience! Anne
23.04.2024 - 02:07DROPS Design answered:
Hi Anne, You do not increase for the neck across the collar + band stitches. This means you work the collar + band stitches first, then increase 1 stitch by slipping the first stitch after these stitches, knitting 1 and passing the slipped stitch over the knitted stitch. Work the rest of the row as before. Happy knitting!
23.04.2024 - 06:38Hi, what do you mean by knitting stockinette st over all sts except the 5 button band sts. ( left front….) Thank you! Anne
18.04.2024 - 02:02DROPS Design answered:
Hi Anne, This means that you now work stockinette across the whole row, apart from the band which is continued in garter stitch. The garter stitches in the side are now worked in stockinette as the split is finished. Hope this helps and happy knitting!
18.04.2024 - 06:54Als ik dit vest met de DROPS Eskimo wil breien in maat M/L, hoeveel bollen moet ik dan bestellen? Alvast bedankt, hartelijke groet, Maaike
01.10.2020 - 18:17DROPS Design answered:
Dag Maaike,
De garenvervanger geeft aan dat je dan 1040 gram Eskimo nodig hebt. Dit komt neer op 21 bollen.
21.10.2020 - 12:18How do I finish the collar as I have two sets of stitches on holders but no further instructions?
26.05.2020 - 19:25DROPS Design answered:
Dear Mrs McGreal , see under "Assembly" = you sew the sts of right and left collar together then sew the collar along neckline on back piece. Happy knitting!
27.05.2020 - 08:46Por favore traduz em português ,tanks
17.06.2019 - 14:12DROPS Design answered:
Bonjour Silvana. Tu as la traduction ici: https://www.garnstudio.com/pattern.php?id=587&cid=28
29.06.2019 - 00:24Er i gang med denne lækre sag, men er kørt fast i dette afsnit: Krave: . Fortsæt med retstrik over de 15 m således: * 2 p retstrik over alle m, 2 p retstrik over kun de yderste 10 m (mot midt foran) *, gentag fra *-* til kraven måler ... Når der står at man på 2 pinde retstrik over kun de yderste 10 m (mot midt foran skal strikke de første 10 masker ret - hvad skal man så gøre med de sidste 5 masker? På forhånd tak for hjælpen. Majbrit Nielsen
09.01.2015 - 09:27DROPS Design answered:
Hej Majbrit. Det er forkortede pinde, saa naar du strikker over de yderste 10 m, saa hviler de sidste 5. Derefter strikker du to pinde over alle 15 m. Paa den maade bliver kanten paa den ene side bredere end den anden. Se ogsaa her:
09.01.2015 - 16:07Hallo ihr Lieben Möchte mir gern zu diesem Mantel einen langen Rock stricken. Allerdings mit einer Garnalternative -> Drops Andes. Ist diese Wolle dafür geeignet? Müsste ich evtl. kleinere Nadeln nehmen, um das Ganze etwas fester und nicht so "durchsichtig" zu stricken? Wie viel Wolle würde ich dafür ca. brauchen, wenn die Weite des Rockes ca. die der Jacke hat? Oder wird ein langer Rock evtl. mit dieser Wolle zu schwer? Bin sehr gespannt und erwarte Ihre Antwort mit Ungeduld. GlG Carmen
25.10.2014 - 23:27DROPS Design answered:
Liebe Carmen, bedauerlicherweise leider können wir Ihnen an dieser Stelle keine Anleitung zum Umarbeiten in einen Rock bieten. Vielleicht fragen Sie in Ihrem Drops-Wollgeschäft nach, ob man Ihnen dort zu Ihrer Frage weiterhelfen kann.
12.11.2014 - 00:01Rosie wrote:
I am knitting the left front of this lovely long coat but am stuck. I don't understand this: In the neck shaping paragaph: "Dec 1 st inside the 20 collar sts in garter st - see knitting tips - every other row..." Where do I decrease the 1 st each time? What does "inside the 20 collar sts" mean? I have looked in the knitting tips but can't find which one I should be looking at. Thanks for your help.
13.10.2014 - 21:49DROPS Design answered:
It means you knit 20 collar sts, then dec 1 st. All decs are made from right side rows.
13.10.2014 - 23:09Bonjour je pense qu il y a une erreur au niveau du nombre de pelotes pour la réalisation de ce manteau pouvez vous m indiquer le nombre exacte pour la taille s merci
17.08.2014 - 14:19