DROPS Bomull-Lin uni colour 53% Cotton, 47% Linen |
3.10 € /50g |
Order |
Clicking the ORDER button will redirect you to Igla i kukica website
The yarn cost is calculated from the pattern’s smallest size and the yarn’s cheapest product type. Looking for an even better price? You might find it on the DROPS Deals!
-------------------------------------------------------
Alternative Yarn – See how to change yarns here
Yarn Groups A to F – Use the same pattern and change the yarn here
Yarn usage using an alternative yarn – Use our yarn converter here
-------------------------------------------------------
DROPS Bomull-Lin uni colour 53% Cotton, 47% Linen 3.10 € /50g Order |
Clicking the ORDER button will redirect you to Igla i kukica website
The yarn cost is calculated from the pattern’s smallest size and the yarn’s cheapest product type. Looking for an even better price? You might find it on the DROPS Deals!
Each of our patterns has specific tutorial videos to help you.
These step-by-step tutorials might also help you:
Why is the knitting/crochet tension so important?
Knitting tension is what determines the final measurements of your work, and is usually measured per 10 x 10 cm. It is provided like so: number of stitches in width x number of rows in height - eg: 19 stitches x 26 rows = 10 x 10 cm.
The knitting tension is very individual; some people knit/crochet loosely while others work tightly. You adjust the knitting tension with the needle size, which is why the suggested needle size is only meant as a guide! You need to adjust this (up or down) to ensure that YOUR knitting tension matches the knitting tension provided in the pattern. If you work with a different knitting tension than provided you will have a different yarn consumption, and your work will have different measurements than what the pattern suggests.
The knitting tension also determines which yarns can replace each other. As long as you achieve the same knitting tension you can replace one yarn with another.
See DROPS lesson: How to measure your tension/gauge
See DROPS video: How to make a gauge tension swatch
How do I know how many balls of yarn I need?
The required amount of yarn is provided in grams, eg: 450 g. To calculate how many balls you’ll need you first need to know how many grams are in 1 ball (25g, 50g or 100g). This information is available if you click on the individual yarn quality on our pages. Divide the amount required with the amount of each ball. For example, if each ball is 50g (the most common amount), the calculation will be as follows: 450 / 50 = 9 balls.
Can I use a different yarn than what the pattern suggests?
The important thing when changing from one yarn to another is that the knitting/crochet tension remains the same. This is so that the measurements of the finished piece will be the same as on the sketch provided. It is easier to achieve the same knitting tension using yarns from the same yarn group. It is also possible to work with multiple strands of a thinner yarn to achieve the knitting tension of a thicker one. Please try our yarn converter. We recommend you to always work a test swatch.
Please NOTE: when changing yarn the garment might have a different look and feel to the garment in the photo, due to individual properties and qualities of each yarn.
See DROPS lesson: Can I use a different yarn than the one mentioned in the pattern?
What are the yarn groups?
All our yarns are categorised into yarn groups (from A to F) according to thickness and knitting tension – group A contains the thinnest yarns and group F the thickest. This makes it easier for you to find alternative yarns to our patterns, should you wish to switch yarn. All yarns within the same group have a similar knitting tension and can easily replace each other. However, different yarn qualities have different structures and properties which will give the finished work a unique look and feel.
How do I use the yarn calculator?
At the top of all our patterns you’ll find a link to our yarn calculator, which is a helpful tool should you wish to use a different yarn than suggested. By filling in the yarn quality you wish to replace, the amount (in your size) and number of strands, the calculator will present good alternative yarns with the same knitting tension. Additionally it will tell you how much you’ll require in the new qualities and whether you’ll need to work with multiple strands. Most skeins are 50g (some are 25g or 100g).
If the pattern is worked with multiple colours, every colour will have to be calculated separately. Similarly, if the pattern is worked with several strands of different yarns (for example 1 strand Alpaca and 1 strand Kid-Silk) you will have to find alternatives for each, individually.
Why do you show discontinued yarns in the patterns?
Since different yarns have different qualities and textures we have chosen to keep the original yarn in our patterns. However, you can easily find options among our available qualities by using our yarn calculator, or simply pick a yarn from the same yarn group.
It is possible that some retailers still have discontinued yarns in stock, or that someone has a few skeins at home that they would like to find patterns for.
The yarn calculator will provide both alternative yarn as well as required amount in the new quality.
What size should I knit?
If you think it's hard to decide what size to make, it can be a good idea to measure a garment you own already and like the size of. Then you can pick the size by comparing those measures with the ones available in the pattern's size chart.
You'll find the size chart at the bottom of the pattern.
See DROPS lesson: How to read size chart
Why do I get the wrong knitting tension with the suggested needle size?
The needle size provided in the pattern serves only as a guide, the important thing is to follow the knitting tension. And since knitting tension is very individual, you will have to adjust the needle size to ensure that YOUR tension is the same as in the pattern – maybe you’ll have to adjust 1, or even 2 needle sizes, up or down to achieve the correct tension. For this, we recommend that you work test swatches.
Should you work with a different knitting tension than the one provided, the measurements of the finished garment might deviate from the measurement sketch.
See DROPS lesson: How to measure your tension/gauge
See DROPS video: How to make a tension/gauge swatch
Why is the pattern worked top-down?
Working a garment top-down provides more flexibility and room for personal adjustment. For example it is easier to try the garment on while working, as well as making adjustments to length of yoke and shoulder caps.
The instructions are carefully explaining every step, in the correct order. Diagrams are adjusted to the knitting direction and are worked as usual.
How do I work according to a knitting diagram?
The diagram depicts all rows/rounds, and every stitch seen from the right side. It is read from bottom to top, from right to left. 1 square = 1 stitch.
When working back and forth, every other row is worked from the right side and every other row is worked from the wrong side. When working from the wrong side, the diagram will have to be worked reversed: from left to right, knit stitches are purled, purl stitches are knit etc.
When working in the round every round is worked from the right side and the diagram are worked from right to left on all rounds.
See DROPS lesson: How to read knitting diagrams
How do I work according to a crochet diagram?
The diagram depicts all rows/rounds, and every stitch seen from the right side. It is worked from bottom to top, from right to left.
When working back and forth every other row is worked from the right side: from right to left and every other row is worked from the wrong side: from left to right.
When working in the round, every row in the diagram are worked from the right side, from right to left.
When working a circular diagram you start in the middle and work your way outwards, counter clockwise, row by row.
The rows usually start with a given number of chain stitches (equivalent to the height of the following stitch), this will either be depicted in the diagram or explained in the pattern.
See DROPS lesson: How to read crochet diagrams
How do I work several diagrams simultaneously on the same row/round?
Instructions for working several diagrams after each other on the same row/round, will often be written like so: “work A.1, A.2, A.3 a total of 0-0-2-3-4 times". This means you work A.1 once, then A.2 is worked once, and A.3 is repeated (in width) the number of times provided for your size – in this case like so: S = 0 times, M = 0 times, L=2 times, XL= 3 times and XXL = 4 times.
The diagrams are worked as usual: begin with the first row in A.1, then work the first row in A.2 etc.
See DROPS lesson: How to read knitting diagrams
See DROPS lesson: How to read crochet diagrams
Why are the sleeves shorter in larger sizes?
The total width of the garment (from wrist-to-wrist) will be larger in the larger sizes, despite the actual sleeves being shorter. The larger sizes have longer sleeve caps and wider shoulders, so there will be a good fit in all sizes.
Where on the garment is the length measured?
The measurement sketch/schematic drawing provides information regarding the full length of the garment. If it’s a jumper or a jacket the length is measured from the highest point on the shoulder closest to the neckline, and straight down to the bottom of the garment. It is NOT measured from the tip of shoulder. Similarly, the length of yoke is measured from the highest point on the shoulder and down to where yoke is split into body and sleeves.
On a jacket measures are never taken along bands, unless specifically stated. Always measure inside band stitches when measuring the length.
See DROPS lesson: How to read a schematic drawing
What is a repeat?
Diagrams are often repeated on the round or in height. 1 repeat is the diagram the way it appears in the pattern. If it says to work 5 repeats of A.1 in the round, then you work A.1 a total of 5 times after/next to each other in the round. If it says to work 2 repeats of A.1 vertically/in height you work the entire diagram once, then begin again at the start and work the entire diagram one more time.
Why does the piece start with more chain stitches than it’s worked with?
Chain stitches are slightly narrower than other stitches and to avoid working the cast-on edge too tight, we simply chain more stitches to begin with. The stitch count will be adjusted on the following row to fit the pattern and measurement sketch.
Why increase before the rib edge when the piece is worked top-down?
The rib edge is more elastic and will contract slightly compared to, for example, stocking stitch. By increasing before the rib edge, you avoid a visible difference in width between the rib edge and the rest of the body.
Why increase in the cast-off edge?
It’s very easy to cast off too tightly, and by making yarn overs while casting off (and simultaneously casting these off) you avoid a too tight cast off edge.
See DROPS video: How to bind off with yarn overs (yo)
How do I increase/decrease on every 3rd and 4th row/round alternately?
To achieve an even increase (or decrease) you can increase on, for example: every 3rd and 4th row alternately, like so: work 2 rows and increase on the 3rd row, work 3 rows and increase on the 4th. Repeat this until the increase is complete.
See DROPS lesson: Increase or decrease 1 st on every 3rd and 4th row alternately
How can I work a jacket in the round instead of back and forth?
Should you prefer to work in the round instead of back and forth, you may of course adjust the pattern. You’ll need to add steeks mid-front (usually 5 stitches), and follow the instructions. When you would normally turn and work from the wrong side, simply work across the steek and continue in the round. At the end you’ll cut the piece open, pick up stitches to work bands, and cover the cut edges.
See DROPS video: How to knit steeks and cut open
Can I work a jumper back and forth instead of in the round?
Should you prefer to work back and forth instead of in the round, you may of course adjust the pattern so you work the pieces separately and then assemble them at the end. Divide the stitches for the body in 2, add 1 edge stitch in each side (for sewing) and work the front and back pieces separately.
See DROPS lesson: Can I adapt a pattern for circular needles into straight needles?
Why is the pattern slightly different than what I see in the photo?
Pattern repeats can vary slightly in the different sizes, in order to get the correct proportions. If you’re not working the exact same size as the garment in the photo, yours might deviate slightly. This has been carefully developed and adjusted so that the complete impression of the garment is the same in all sizes.
Make sure to follow instructions and diagrams for your size!
How do I make a women’s size garment into a men’s size one?
If you have found a pattern you like which is available in women’s size it’s not very difficult to convert it to men’s size. The biggest difference will be the length of sleeves and body. Start working on the women size that you think would fit across the chest. The additional length will be worked right before you cast off for the armhole/sleeve cap. If the pattern is worked top-down you can add the length right after the armhole or before the first decrease on sleeve.
Regarding additional yarn amount, this will depend on how much length you add, but it is better with a skein too many than too few.
How do I prevent a hairy garment from shedding?
All yarns will have excess fibres (from production) that might come off as lint or shedding. Brushed yarns (ie hairier yarns) have more of these loose, excess fibres, causing more shedding.
Shedding also depends on what is worn under or over the garment, and whether this pulls at the yarn fibres. It’s therefore not possible to guarantee that there will be no shedding
Below are some tips on how to get the best result when working with hairier yarns:
1. When the garment is finished (before you wash it) shake it vigorously so the looser hairs come off. NOTE: do NOT use a lint roller, brush or any method that pulls at the yarn.
2. Place the garment in a plastic bag and put it in your freezer - the temperature will cause the fibres to become less attached to each other, and excess fibres will come off easier.
3. Leave in the freezer for a few hours before taking it out and shaking it again.
4. Wash the garment according to the instructions on the yarn label.
Why does my garment pill?
Pilling is a natural process that happens to even the most exclusive of fibers. It's a natural sign of wear and tear that is hard to avoid, and that is most visible in high friction areas of your garment like a sweater's arms and cuffs.
You can make your garment look as new by removing the pilling, using a fabric comb or a pill/lint remover.
Vendela |
|
|
|
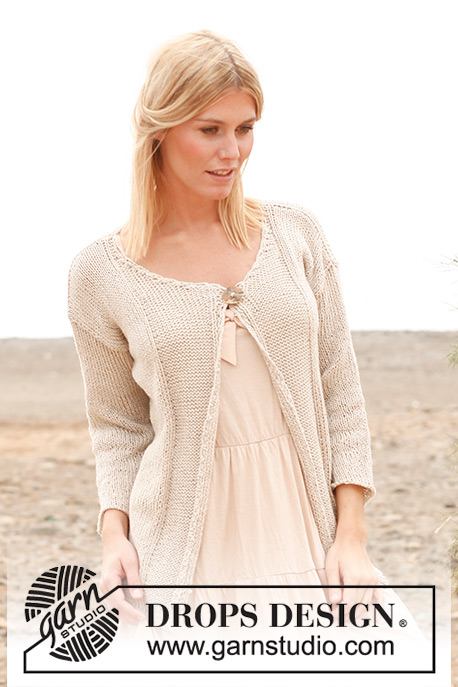
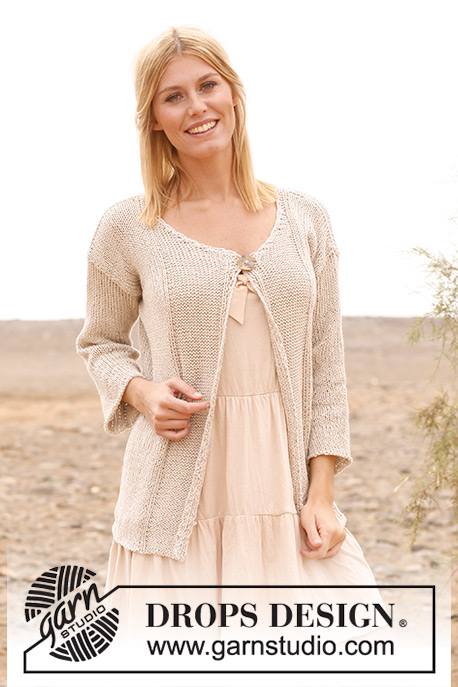
Knitted DROPS jacket in ”Bomull-Lin”. Size: S - XXXL.
DROPS 139-30 |
|
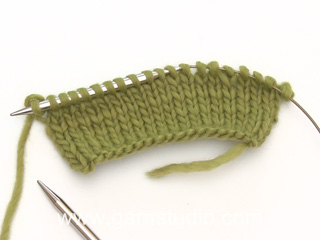
GARTER ST (back and forth on needle): K all rows. INCREASE TIP: Inc 1 st by making 1 YO, on next row work YO twisted (i.e. work in the back loop of st instead front) to avoid holes. CAST OFF TIP: When casting off for neck on front piece, cast off with 2 threads Bomull-Lin (to avoid a tight cast off edge), then work the rest of row with 1 thread Bomull-Lin. -------------------------------------------------------- BODY: Worked back and forth on circular needle. Loosely cast on 158-174-186-206-222-238 sts on circular needle size 6 mm with Bomull-Lin. Work 1st row (= from RS) as follows: 1 edge st in garter st - Read explanation above, P 1, K 1, 15-16-17-18-19-20 sts in reversed stocking st, * K 1, P 1, 42-48-52-60-66-72 sts in stocking sts, P 1, K 1 *, 30-32-34-36-38-40 sts in reversed stocking st, repeat from *-* 1 time, 15-16-17-18-19-20 sts in reversed stocking st, finish with K 1, P 1, and 1 edge st in garter st. Continue like this with K over K and P over P (+ 1 edge st in garter st in each side). REMEMBER THE KNITTING TENSION! When piece measures 45-46-47-48-49-50 cm, insert 2 markers; 41-45-48-53-57-61 sts in from each side (= 76-84-90-100-108-116 sts between markers on back piece). On next row cast off 2-3-4-5-6-7 sts for armholes on each side of both markers (= 4-6-8-10-12-14 cast off sts in each side). Now divide the piece and finish each part separately. BACK PIECE: = 72-78-82-90-96-102 sts. Work as before until piece measures 58-60-62-64-66-68 cm. Then cast off the middle 22-24-24-26-26-28 sts for neck and finish each shoulder separately. Continue to cast off 1 st on next row towards the neck = 24-26-28-31-34-36 sts remain on the shoulder. Cast off when piece measures 60-62-64-66-68-70 cm. RIGHT FRONT PIECE: = 39-42-44-48-51-54 sts. Continue to work until piece measures 48-50-51-53-54-56 cm. Then cast off for neck at the beg of every row from RS as follows: With 2 threads Bomull-Lin - Read CAST OFF TIP above, cast off 6 sts 1 time, 2 sts 2-3-2-3-2-3 times, 1 st 5-4-6-5-7-6 times = 24-26-28-31-34-36 sts remain on shoulder. Cast off when piece measures 60-62-64-66-68-70 cm. LEFT FRONT PIECE: Work as right front piece but reversed. SLEEVE: Worked back and forth on needle. Loosely cast on 44-46-48-50-52-54 sts and work in stocking st with 1 edge st in garter st in each side. When piece measures 6-6-6-5-5-5 cm, inc 1 st inside 1 edge st in each side - Read INCREASE TIP above. Repeat inc every 15-10-10-7-7-5 cm a total of 2-3-3-4-4-5 times = 48-52-54-58-60-64 sts. When piece measures 36-36-35-34-34-33 cm (shorter measurements in the larger sizes because of broader shoulder width), cast off all sts. ASSEMBLY: Sew shoulder seams in front loop of outermost st. Sew sleeves tog inside 1 edge st and sew in sleeves. CROCHET EDGE: Work on hook size 6 mm along the edges mid front and around the neck as follows: Beg at the bottom corner on right front piece, work 1 dc, * 4 ch, skip approx. 2 cm, 1 dc *, repeat from *-*, finish with 4 ch and 1 dc at the bottom corner on left front piece. NOTE: Make sure that the crochet edge is not too tight. Sew on a button on left front piece, use a ch-loop on right front piece as button hole. |
|
Have you made this or any other of our designs? Tag your pictures in social media with #dropsdesign so we can see them! Do you need help with this pattern?You'll find tutorial videos, a Comments/Questions area and more by visiting the pattern on garnstudio.com. © 1982-2024 DROPS Design A/S. We reserve all rights. This document, including all its sub-sections, has copyrights. Read more about what you can do with our patterns at the bottom of each pattern on our site. |
With over 40 years in knitting and crochet design, DROPS Design offers one of the most extensive collections of free patterns on the internet - translated to 17 languages. As of today we count 304 catalogues and 11422 patterns - 11422 of which are translated into English (UK/cm).
We work hard to bring you the best knitting and crochet have to offer, inspiration and advice as well as great quality yarns at incredible prices! Would you like to use our patterns for other than personal use? You can read what you are allowed to do in the Copyright text at the bottom of all our patterns. Happy crafting!
Comments / Questions (24)
Pat McPherson wrote:
Please explain...this cardigan is being made XL so for body you cast on 206 stitches but the pattern adds to 228 stitches (18/60/36/60/36/18) what and I doing wrong?
19.09.2022 - 23:38DROPS Design answered:
Dear Mrs McPherson, work as follows: 1 edge st, P 1, K 1, 18 sts in reversed stocking st, * K 1, P 1, 60 sts in stocking sts, P 1, K 1 *, 36 sts in reversed stocking st, * K 1, P 1, 60 sts in stocking sts, P 1, K 1 *, 18 sts in reversed stocking st, K 1, P 1, 1 edge st = 1+1+1+18+1+1+60+1+1+36+1+1+60+1+1+18+1+1+1= 206 sts. Happy knitting!
20.09.2022 - 10:04Astrid wrote:
Hoeveel gram heb ik nodig als ik dit vest vanaf de taille wil breien?
06.03.2022 - 20:02DROPS Design answered:
Dag Astrid,
Dat zou ik zo niet uit mijn hoofd weten, waarschijnlijk heb je 2 of 3 bollen minder nodig, maar dat hangt ook van de maat af. Je kunt je verkooppunt vragen binnen welke termijn je eventueel overgebleven bollen je in kunt leveren.
07.03.2022 - 13:08Ingegerd Lindgren wrote:
Förstår inte .påbilden ser det ut att vara olika partier i rät eller slät stickning.i beskr endast rätstickning???
31.08.2019 - 18:11DROPS Design answered:
Hei Ingegerd. Nei, i beskrivelsen står det, se store bokstaver: Fram- och bakst: Arb stickas fram och tillbaka på rundst. Lägg löst upp 158-174-186-206-222-238 m på rundst 6 med Bomull Lin. Varv 1 (= rätsidan) stickas så här: 1 rätst kantm - Läs förkl ovan, 1 am, 1 rm, 15-16-17-18-19-20 m SLÂTST MED AVIGSIDAN UT, ………. Mvh Drops design
02.09.2019 - 13:19Elly De Hooge wrote:
Ik snap het afkanten voorpanden niet. De dubbeledraad wel maar bij de getallen die worden genoemd 1 keer 6 steken 2-3 2-3 2-3 keer 2 st, 5-4 6-5 7-6 keer 1 st. Kunt u mij uitleg geven?
25.03.2018 - 11:00DROPS Design answered:
Hallo Elly, Welke maat brei je? Als je bijv. maat S breit, dan neem je het eerste getal van de reeks getallen die er staat. De eerste keer kant je 6 steken af. De volgende keer kant je 2 steken af en dat doe je 2 keer, dan kant en dan kant je nog 5 keer 1 steek af, dus op telkens 1 steek aan de kant van de hals afkanten en dat doe je 5 keer. Het aantal keren hangt dus af van je maat.
26.03.2018 - 10:08Elly De Hooge wrote:
Ik snap het afkanten voorpanden niet. De dubbeledraad wel maar bij de getallen die worden genoemd 1 keer 6 steken 2-3 2-3 2-3 keer 2 st, 5-4 6-5 7-6 keer 1 st. Kunt u mij uitleg geven?
25.03.2018 - 10:58Sarah wrote:
Help! How do I bind off with 2 threads? I cant find a video tutorial anywhere and I have never done this before ...
22.08.2017 - 20:49DROPS Design answered:
Hello Sara. You just work sts with yarn held double and bind off as you usually do. Happy knitting!
22.08.2017 - 22:27Irene Christens wrote:
Hej Jeg forstår ikke hvordan ærmerne skal syes i? Der er jo de 10 masker som man lukker af til ærmegab som gør at der er et ekstra stykke der skal syes. Skal jeg strække ærmet så det passer til kanten hele vejen rundt. bliver det ikke pænt. Mit ærme måler ved aflukningskanten 38 cm. Vh Irene
10.07.2017 - 07:21DROPS Design answered:
Hej Irene, det er ikke meningen at der skal være en ærmekuppel i denne trøje. Men for at få ærmet til at passe skal du lukke meget løst af. Hvis du synes det bliver pænere med en mindre ærmekuppel, så kan du på de sidste 4 pinde lukke 2 m (LØST) af 2 gange i hver side. God fornøjelse!
12.07.2017 - 12:24Réjane wrote:
Bonjour, peut-on tricoter ce modèle avec des aiguilles droites ? merci
27.05.2016 - 11:29DROPS Design answered:
Bonjour Réjane, tout à fait, ce modèle se tricote en allers et retours sur aiguille circulaire pour avoir suffisamment de place pour y loger toutes les mailles - vous pouvez donc le tricoter sur aiguilles droites - voir également ici. Bon tricot!
27.05.2016 - 12:13Barbara wrote:
Ist die 1. Reihe die Hinreihe oder die Rückreihe (Vorder- oder Rückseite)? Ist das wichtig, um einen unteren Rand zu bekommen, der sich nicht einrollt? Was kann ich tun, dass sich die untere Kante nicht roll?
27.04.2015 - 22:14DROPS Design answered:
Die 1. R ist die Hin-R. Das hat aber keinen Einfluss auf das Einrollen. Dies können Sie ausgleichen, wenn Sie die Jacke anschließend unter feuchten Tüchern liegend trocknen lassen oder anfeuchten und mit Stecknadeln auf einer geeigneten Unterlage befestigt trocknen lassen.
28.04.2015 - 23:29Yvonne wrote:
Waar vind ik de informatie om te bepalen welke maat ik moet gebruiken?
07.04.2015 - 13:45DROPS Design answered:
Hoi Yvonne. Onderaan het patroon staan alle maten in cm per maat. Je kan deze gebruiken om je maat te kiezen.
07.04.2015 - 15:53