
Popular categories
Looking for a yarn?


|
|||||||||||||||||||
Blue Summer |
|||||||||||||||||||
|
|
|||||||||||||||||||
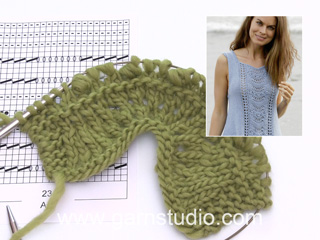
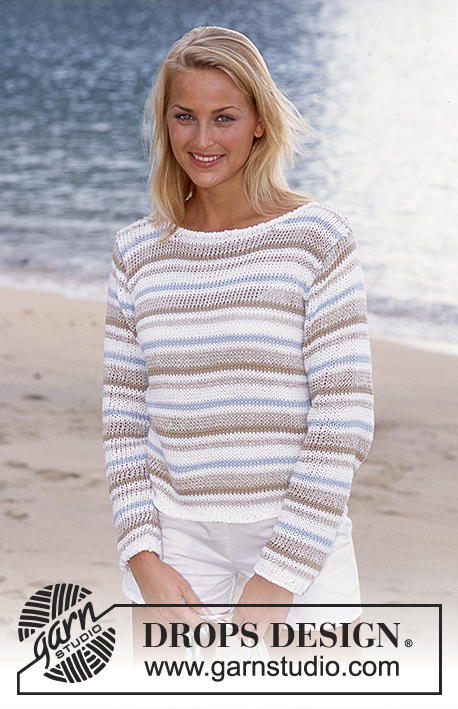
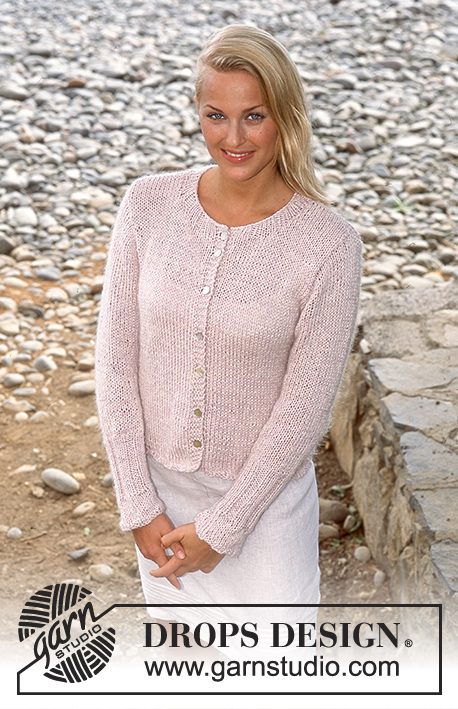
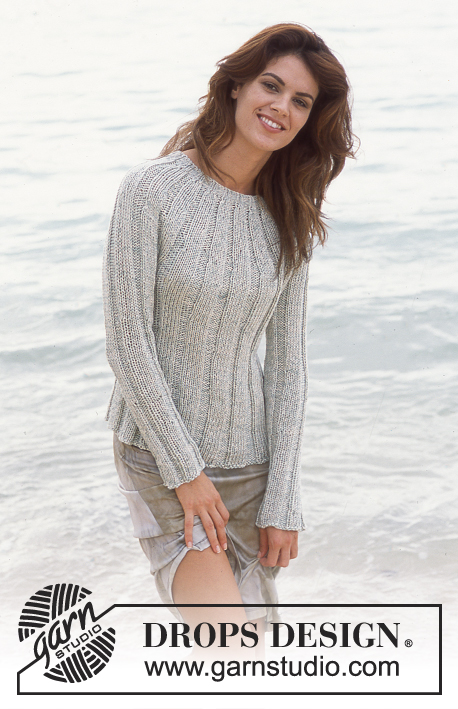
DROPS Pullover in Safran with short or long sleeves
DROPS 77-19 |
|||||||||||||||||||
|
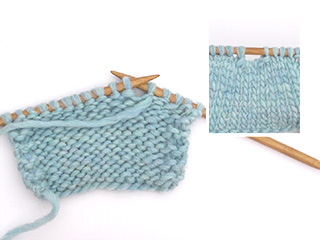
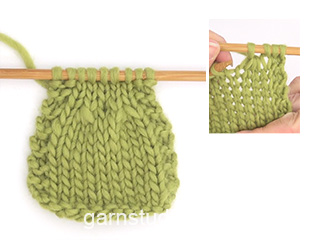
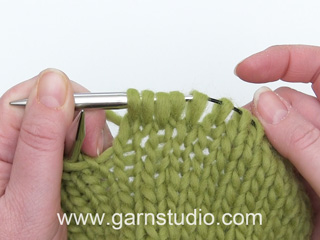
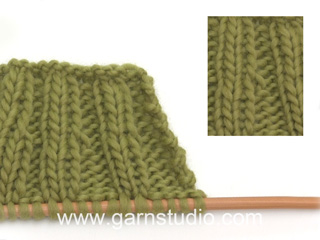
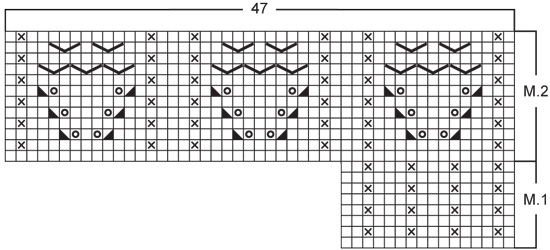
Gauge: 23 sts x 30 rows = 10 x 10 cm [4" x 4"] on larger needles in stockinette st. Rib: * K 1, P 1 *, repeat from * - *. Pattern: See chart. The pattern is seen from the right side. Garter st, when knitting flat: Knit all sts, all rows. Knitting tips (for neckband): All decs are made from right side. Dec inside 5 edge sts knit as follows from edge (seen from the right side): K 1 (edge st knit in garter st), K 1, P 1, K 1, P 1. Dec 1 st as follows:After 5 edge sts: Slip 1 st as if to knit, K 1, psso. Before 5 edge sts: K 2 tog. Body: Cast on 176-192-208-224-256 sts on smaller circular needles; join and place a marker at the join. Knit 5 rows rib. Change to larger circular needles and Pattern 1 - see that the seed st columns in the pattern are directly over the purl sts in the rib. Put a marker at each side (in the center st of a K 3 rib) – there will be 87-95-103-111-127 sts between markers. When the piece measures 12 cm [4¾"] inc 1 st at each side of sts with markers every 5 cm [2"] a total of 4 times - knit the increased sts into the pattern as you go along = 192-208-224-240-272 sts. Read the entire next section before continuing: Pattern: When the piece measures 31-32-34-36-37 cm [12¼"-12½"-13⅜"-14¼"-14½"] knit Pattern 2 over the center 47 sts on the front (knit the remaining sts as before). After Pattern 2 knit Pattern 1 over all sts again. Armhole: When the piece measures 33-34-35-36-37 cm [13"-13⅜"-13¾"-14¼"-14½"] bind off 7-9-9-11-11 sts at each side for armhole (that is, the st with the marker and 3-4-4-5-5 sts at each side st with marker). Knit each piece separately. Front: = 89-95-103-109-125 sts. Continue the pattern and bind off for armhole at each side every other row: 3 sts 0-0-0-1-2 times, 2 sts 1-2-2-2-4 times and 1 st 2-3-3-3-4 times = 81-81-89-89-89 sts. When the piece measures 40-41-42-44-45 cm [15¾"-16⅛"-16½"-17¼"-17¾"] knit 5 rows rib over the center 29-29-37-37-37 sts - start with P 1 (knit the remaining sts in pattern as before). Then bind off the center 19-19-27-27-27 sts for the neck - bind off in pattern. Keep the 5 sts at each neck edge in rib, with the outermost st in garter st, to finished dimensions. Dec 1 st at each neck edge: every other row 4 times and then every 4 rows 4 times - see knitting tips = 23 sts remain on each shoulder. Bind off when the piece measures 52-54-56-58-60 cm [20½"-21¼"-22"-22¾"-23⅝"]. Back: = 89-95-103-109-125 sts. Bind off for armhole as on front = 81-81-89-89-89 sts. When the piece measures 49-51-53-55-57 cm knit 5 rows rib over the center 45-45-53-53-53 sts - start with P 1 (knit the remaining sts in pattern as before). Then bind off the center 35-35-43-43-43 sts for the neck - bind off in rib = 23 sts remain on shoulder. Knit the 5 sts at neck edge as on front and bind off when the piece measures 52-54-56-58-60 cm [20½"-21¼"-22"-22¾"-23⅝"]. Short sleeve: Cast on 60-64-68-72-80 sts on smaller double-pointed needles; join and place a marker at the join. Knit 5 rows rib. Change to larger double-pointed needles and knit Pattern 1 to finished measurements. When the piece measures 5 cm [2"] inc 1 st each side of marker a total of 8-8-10-10-8 times: Sizes S, M and XXL: alternately every 3rd and 4th row. Sizes L and XL: alternately every other and every 3rd row = 76-80-88-92-96 sts - knit the increased sts in the pattern as you go along. When the piece measures 15 cm [6"] bind off 3 sts each side of marker. Then bind off for sleeve cap every other row: 3 sts 1 time, 2 sts 3-3-4-4-4 times and 1 st 3-3-2-5-7 times, then bind off 2 sts at each side until the piece measures 22-23-23-25-26 cm [8¾"-9"-9"-9¾"-10¼"], then bind off 3 sts at each side 1 time. Bind off the remaining sts, the piece measures approx. 23-24-24-26-27 cm [9"-9½"-9½"-10¼"-10⅝"]. Long sleeve: Cast on 48-52-52-56-56 sts on smaller double-pointed needles; join and place a marker at the join. Knit 5 rows rib. Change to larger double-pointed needles and knit Pattern 1 to finished measurements. When the piece measures 10 cm [4"] inc 1 st each side of marker every 8-8-6-6-5 rows a total of 14-14-18-18-20 times = 76-80-88-92-96 sts - knit the increased sts in the pattern as you go along. When the piece measures 48-47-47-46-46 cm [19"-18½"-18½"-18"-18"] bind off 3 sts each side of marker. Then bind off for sleeve cap every other row: 3 sts 1 time, 2 sts 3-3-4-4-4 times and 1 st 3-3-2-5-7 times, then bind off 2 sts at each side until the piece measures 55-55-55-56-57 cm [21⅝"-21⅝"-21⅝"-22"-22½"], then bind off 3 sts at each side 1 time. Bind off the remaining sts, the piece measures approx. 56-56-56-57-58 cm [22"-22"-22"-22½"-22¾"]. Assembly: Sew shoulder seams. Sew in sleeves. |
|||||||||||||||||||
Diagram explanations |
|||||||||||||||||||
|
|||||||||||||||||||
|
|||||||||||||||||||

|
|||||||||||||||||||
|
Have you made this or any other of our designs? Tag your pictures in social media with #dropsdesign so we can see them! Do you need help with this pattern?You'll find tutorial videos, a Comments/Questions area and more by visiting the pattern on garnstudio.com. © 1982-2024 DROPS Design A/S. We reserve all rights. This document, including all its sub-sections, has copyrights. Read more about what you can do with our patterns at the bottom of each pattern on our site. |
|||||||||||||||||||


With over 40 years in knitting and crochet design, DROPS Design offers one of the most extensive collections of free patterns on the internet - translated to 17 languages. As of today we count 304 catalogs and 11422 patterns - 11417 of which are translated into English (US/in).
We work hard to bring you the best knitting and crochet have to offer, inspiration and advice as well as great quality yarns at incredible prices! Would you like to use our patterns for other than personal use? You can read what you are allowed to do in the Copyright text at the bottom of all our patterns. Happy crafting!
Comments / Questions (62)
Je monte 192 mailles, alors comment se fait-il qu\\\'il y a 95 mailles entre les marqueurs et non 96. J\\\'ai mis un marqueur dans un 3 m. end et 95 mailles plus loin j\\\'en ai mis un autre. J\\\'ai un coté avec 95 m. et un autre avec 97 m. Il y a surement quelque chose qui m\\\'échappe.
19.06.2018 - 21:08DROPS Design answered:
Bonjour Mme Daoust, les marqueurs doivent être dans une maille, pas entre les mailles: dans la maille au milieu des 3 m end soit 1 m avec un marqueur, 95 m, 1 m avec un marqueur et 95 m = 192 m. Bon tricot!
20.06.2018 - 08:02Ich verstehe folgendes nicht:\r\nDie Perlmustergestrickten-M sollten das Muster von der li-M nach oben folgen. 1 Markierungsfaden auf jeder Seite anbringen (= in der Mitte von 3 re-M), zwischen den Markierungsfäden sind 87-95-103-111-127 M. Was bedeutet: das Muster von der li-M nach oben folgen?\Und wenn ich 224 M aufnehme, und dann die Markierungsfäden anlege, müssten das doch 112 Maschen zwischen den Markierungsfäden ergeben und nicht 111 ?\Danke für Ihre Hilfe Annette
08.04.2018 - 06:13DROPS Design answered:
Liebe Frau Poggel, die Masche in M.1 die Sie (1 M re, 1 M li in der Höhe) stricken sollen über die linken Maschen vom Rippenmuster gestrickt sein. Dh Bündchen haben Sie so gestrickt: (1 M re, 1 M li), M1 wird so gestrkt: (1 M re, 1 M li (= über die li M vom Bündchen), 3 M re, 1 M li (= über die li M vom Bündchen) usw. Die Markierungen sind jeweils in einer M: 1 Markierung, 103 M, 1 Markierung, 103 M = 208 M, nach den Zunahmen haben Sie: 1 Markierung, 111 M, 1 Markierung, 111 M = 224 M. Viel Spaß beim stricken!
09.04.2018 - 10:11Per una taglia S sono abbastanza i ferri circolari da 60 cm, o sono meglio da 80? Grazie
29.03.2018 - 09:29DROPS Design answered:
Buongiorno Elisa, contando che si parte da una circonferenza di 76 cm, meglio partire con il cavo da 60 cm, altrimenti sugli 80 sarebbero tirati. Nel caso può cambiare il cavo in corso d'opera se dovesse servire. Buon lavoro!
29.03.2018 - 09:37Bonjour, J'aimerais tricoter ce pull en version manches longues (taille XXL) en cadeau et avec le fil Baby Alpaca Silk ou Baby Merino, Pourriez-vous, m'aider, SVP, lequel de ces 2 fils serait mieux et quelles quantité je dois acheter? Merci beaucoup.
05.06.2017 - 16:24DROPS Design answered:
Bonjour, les deux laines sont tres belles, pour la taille XXL il vous faut 8 pelotes dans les deux cas. L'effet avec la laine Baby Alpaca Silk est plus brillant. Quant a Baby Merino, elle est tres douce, elastique, avec les mailles bien definies. On peut la laver en machine, elle convient ainsi à un usage quotidien, ce qui est particulierement important en ete. Partagez vos resultats sur notre facebook. Bon travail!
05.06.2017 - 18:44Ærmekuppel Spørgsmålet er til ærmekuplen. Der står "videre lukkes der 2 m til arbejdet måler 22-23-23-25-26 cm". Betyder det, at der lukkes 2 m af på hver pind, indtil arbejdet måler det antal cm, der passer til størrelsen?
11.05.2017 - 09:29DROPS Design answered:
Hej Lene, ja det stemmer - i starten af hver pind. God fornøjelse! :)
11.05.2017 - 11:38Kan I, der har lavet denne opskrift ikke prøve at svare igen, så det kan forstås??? Ellers må jeg trevle det hele op - øv! Mon ikke der er andre end mig, der bliver forvirrede. Det er mønster 2 på drops 77-19 " strik de 3 m sammen således fra retsiden uden at lade dem falde af venstre p: 3vr sm, 3r sm, 3vr sm, slip m af venstre p." - og efter sammenstrikningen er der stadig lige mange masker på tegningen
06.05.2017 - 00:19DROPS Design answered:
Hej Lene, jo men da du strikker de samme 3 masker sammen 3 gange i træk (uden at strikke noget andet imellem), så har du nu 3 nye masker på din højre pind. Forstår du hvad jeg mener?
08.05.2017 - 15:23Hei. Strikker topp, kort erme. Men hva menes med videre felles det til emi opp? Skal d felles på hver side av pinnene, eller midt på pinnen, eller kun på den ene siden?
12.07.2015 - 16:15DROPS Design answered:
Hej Lisbeth helen, Ja du feller til ermtopp i hver side af arbejdet. God fornøjelse!
30.07.2015 - 14:45Strikker jumper og er kommet til mønsteret,men forstår ikke det øverste. Det står:"Strikk de 3 m slik fra retten uten å la dem falle av venstre p.:3vr sm,3r sm,3vr sm.Slipp m av venstre pinne.Vil ha ordentelig forklaring på dette,Det skal vel bli 11 m igjen , Skal det være vrange masker eller vridde masker.?
11.08.2014 - 14:45DROPS Design answered:
Hei Wenche. Du strikker de 3 masker vr sammen, r sammen og vrang sammen (ikke vrid) uden du tager dem af pinden. Dvs, du strikker de 3 m 3 gange sammen fór du tager dem af venstre pind.
11.08.2014 - 16:04Mon ikke der er andre end mig, der bliver forvirrede. Det er mønster 2 på drops 77-19 " strik de 3 m sammen således fra retsiden uden at lade dem falde af venstre p: 3vr sm, 3r sm, 3vr sm, slip m af venstre p." - og efter sammenstrikningen er der stadig lige mange masker på tegningen
10.06.2014 - 13:34DROPS Design answered:
Hej Gerda. Ja, det er sandt. Men du stikker pinden ind i de 3 masker og strikker först vrang, saa ret, saa vrang sammen. De 3 gange slipper du ikke de 3 m fra venstre pind, saa du faar faktisk 3 nye masker paa höjre pind, naar du slipper den af venstre. Svaert at forklare, men jeg haaber du forstaar :-)
11.06.2014 - 19:28The pattern refers to "Pattern 1" and "Pattern 2. There are references to garter and seed stitches but no clear explanation of Pattern 1. Pattern 2 is clearly shown at the end. I love the look of the sweater! Please help!
12.02.2014 - 00:33DROPS Design answered:
Pattern 1 is the section in the chart below pattern 2.
12.02.2014 - 01:26