
Popular categories
Looking for a yarn?


|
|||||||||||||||||||
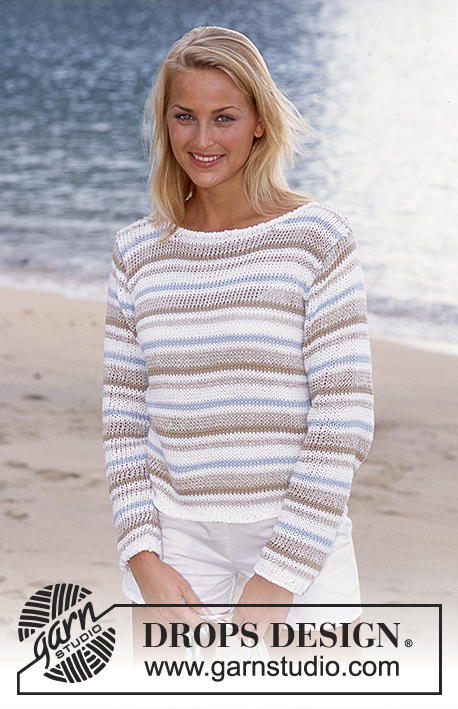
Blue Summer |
|||||||||||||||||||
|
|
|||||||||||||||||||
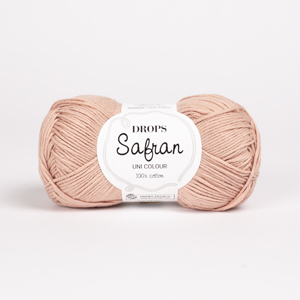
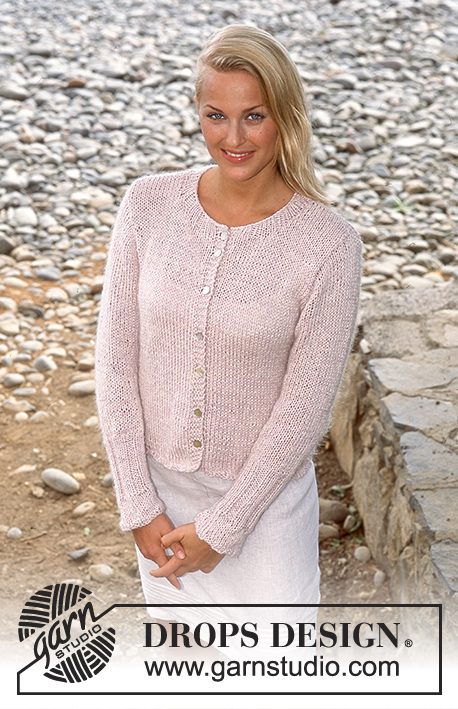
DROPS Pullover in Safran with short or long sleeves
DROPS 77-19 |
|||||||||||||||||||
|
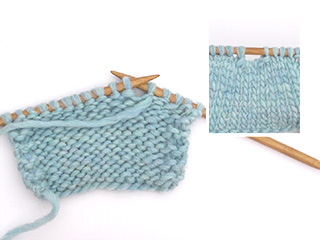
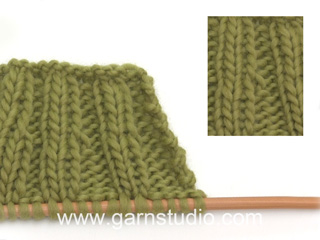
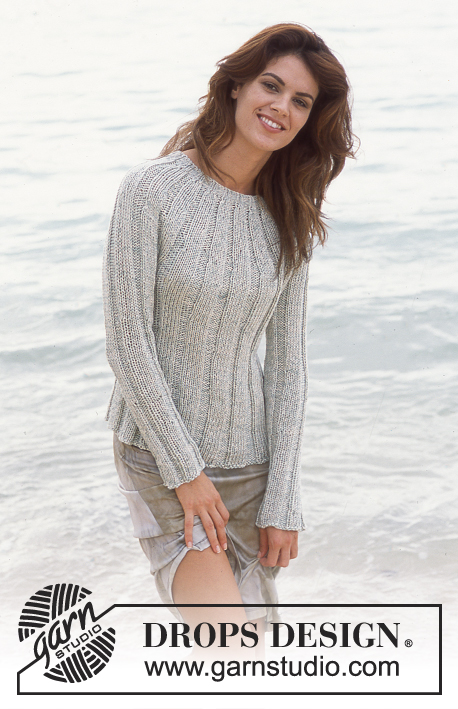
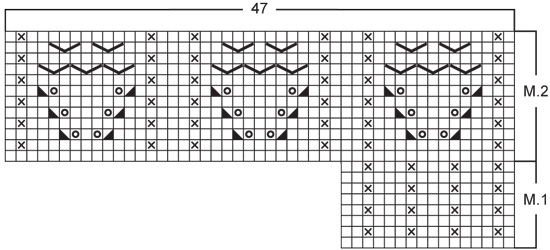
Tension: 23 sts x 30 rows = 10 x 10 cm on larger needles in stockinette st. Rib: * K 1, P 1 *, repeat from * - *. Pattern: See chart. The pattern is seen from the right side. Garter st, when knitting flat: Knit all sts, all rows. Knitting tips (for neckband): All decs are made from right side. Dec inside 5 edge sts knit as follows from edge (seen from the right side): K 1 (edge st knit in garter st), K 1, P 1, K 1, P 1. Dec 1 st as follows: After 5 edge sts: Slip 1 st as if to knit, K 1, psso. Before 5 edge sts: K 2 tog. Body: Cast on 176-192-208-224-256 sts on smaller circular needles; join and place a marker at the join. Knit 5 rows rib. Change to larger circular needles and Pattern 1 - see that the seed st columns in the pattern are directly over the purl sts in the rib. Put a marker at each side (in the center st of a K 3 rib) – there will be 87-95-103-111-127 sts between markers. When the piece measures 12 cm inc 1 st at each side of sts with markers every 5 cm a total of 4 times - knit the increased sts into the pattern as you go along = 192-208-224-240-272 sts. Read the entire next section before continuing: Pattern: When the piece measures 31-32-34-36-37 cm knit Pattern 2 over the center 47 sts on the front (knit the remaining sts as before). After Pattern 2 knit Pattern 1 over all sts again. Armhole: When the piece measures 33-34-35-36-37 cm cast off 7-9-9-11-11 sts at each side for armhole (that is, the st with the marker and 3-4-4-5-5 sts at each side st with marker). Knit each piece separately. Front: = 89-95-103-109-125 sts. Continue the pattern and cast off for armhole at each side every other row: 3 sts 0-0-0-1-2 times, 2 sts 1-2-2-2-4 times and 1 st 2-3-3-3-4 times = 81-81-89-89-89 sts. When the piece measures 40-41-42-44-45 cm knit 5 rows rib over the center 29-29-37-37-37 sts - start with P 1 (knit the remaining sts in pattern as before). Then cast off the center 19-19-27-27-27 sts for the neck - cast off in pattern. Keep the 5 sts at each neck edge in rib, with the outermost st in garter st, to finished dimensions. Dec 1 st at each neck edge: every other row 4 times and then every 4 rows 4 times - see knitting tips = 23 sts remain on each shoulder. Cast off when the piece measures 52-54-56-58-60 cm. Back: = 89-95-103-109-125 sts. Cast off for armhole as on front = 81-81-89-89-89 sts. When the piece measures 49-51-53-55-57 cm knit 5 rows rib over the center 45-45-53-53-53 sts - start with P 1 (knit the remaining sts in pattern as before). Then cast off the center 35-35-43-43-43 sts for the neck - cast off in rib = 23 sts remain on shoulder. Knit the 5 sts at neck edge as on front and cast off when the piece measures 52-54-56-58-60 cm. Short sleeve: Cast on 60-64-68-72-80 sts on smaller double-pointed needles; join and place a marker at the join. Knit 5 rows rib. Change to larger double-pointed needles and knit Pattern 1 to finished measurements. When the piece measures 5 cm inc 1 st each side of marker a total of 8-8-10-10-8 times: Sizes S, M and XXL: alternately every 3rd and 4th row. Sizes L and XL: alternately every other and every 3rd row = 76-80-88-92-96 sts - knit the increased sts in the pattern as you go along. When the piece measures 15 cm cast off 3 sts each side of marker. Then cast off for sleeve cap every other row: 3 sts 1 time, 2 sts 3-3-4-4-4 times and 1 st 3-3-2-5-7 times, then cast off 2 sts at each side until the piece measures 22-23-23-25-26 cm, then cast off 3 sts at each side 1 time. Cast off the remaining sts, the piece measures approx. 23-24-24-26-27 cm. Long sleeve: Cast on 48-52-52-56-56 sts on smaller double-pointed needles; join and place a marker at the join. Knit 5 rows rib. Change to larger double-pointed needles and knit Pattern 1 to finished measurements. When the piece measures 10 cm inc 1 st each side of marker every 8-8-6-6-5 rows a total of 14-14-18-18-20 times = 76-80-88-92-96 sts - knit the increased sts in the pattern as you go along. When the piece measures 48-47-47-46-46 cm cast off 3 sts each side of marker. Then cast off for sleeve cap every other row: 3 sts 1 time, 2 sts 3-3-4-4-4 times and 1 st 3-3-2-5-7 times, then cast off 2 sts at each side until the piece measures 55-55-55-56-57 cm, then cast off 3 sts at each side 1 time. Cast off the remaining sts, the piece measures approx. 56-56-56-57-58 cm. Assembly: Sew shoulder seams. Sew in sleeves. |
|||||||||||||||||||
Diagram explanations |
|||||||||||||||||||
|
|||||||||||||||||||
|
|||||||||||||||||||

|
|||||||||||||||||||
|
Have you made this or any other of our designs? Tag your pictures in social media with #dropsdesign so we can see them! Do you need help with this pattern?You'll find tutorial videos, a Comments/Questions area and more by visiting the pattern on garnstudio.com. © 1982-2024 DROPS Design A/S. We reserve all rights. This document, including all its sub-sections, has copyrights. Read more about what you can do with our patterns at the bottom of each pattern on our site. |
|||||||||||||||||||


With over 40 years in knitting and crochet design, DROPS Design offers one of the most extensive collections of free patterns on the internet - translated to 17 languages. As of today we count 304 catalogues and 11422 patterns - 11422 of which are translated into English (UK/cm).
We work hard to bring you the best knitting and crochet have to offer, inspiration and advice as well as great quality yarns at incredible prices! Would you like to use our patterns for other than personal use? You can read what you are allowed to do in the Copyright text at the bottom of all our patterns. Happy crafting!
Comments / Questions (62)
Hur maskar man av för ärmkullen
09.05.2024 - 10:52I do not understand the top two pattern lines of M2. Does the line of 3 V's mean I reduce 9 sts to 3? And what then happens on the next line with 2 V's? Help please.
05.05.2024 - 10:50DROPS Design answered:
Dear Rosemary, one V is knitted over 3 stitch, where you K3TOG, P3TOG and K3TOG the SAME 3 stitches for EACH V sign, only letting of teh stitches from the needle after the third time. In the next RS row, you only doing this twice (instead of three times). Happy Crafting!
05.05.2024 - 15:34Jeg kan simpelthen ikke få mit hoved omkring beskrivelsen i mønstret: "Når arb måler 12 cm tages der 1 m ud på hver side af m med mærketråden på hver 5. cm totalt 4 gange - de udtagede m strikkes ind i mønsteret løbende = 192-208-224-240-272 m."? Lige meget hvordan jeg tager masker ud, kan jeg ikke få maskerne til at følge mønstret, så det fortsætter med 3 ret, 1 vrang, 3 ret...??
27.04.2024 - 16:26DROPS Design answered:
Hei Charlotte. Når du øker masker i siden vil ikke mønstret stemme 100% med 3 rett-1 vrang-3 rett. Du må tilpasse de nye maskene inntil du har nok masker til at de passer inn i mønstret. Så noen ganger vil du ha 3 rett-1 vrang - 4 rett osv. (de nye maskene strikkes fortløpende inn i mønstret). mvh DROPS Design
29.04.2024 - 10:19Denne model strikkes på rundpind, ikke? Hvordan fremkommer der så en vrangside? symbols = ret fra retsiden, vrang fra vrangen symbols = vrang fra retsiden, ret fra vrangen
22.03.2024 - 10:11DROPS Design answered:
Hej Susanne, når du kommer op til bærestykket, bliver du nødt til at strikke frem og tilbage på pinden :)
03.04.2024 - 12:18Wie ist bei den Zunahmen "die neuen M werden fortlaufend ins Muster eingestrickt" zu verstehen? Werden die zugenommenen Maschen immer nur rechts gestrickt (nach allen Zunahmen dann jeweils 5 re Maschen li und 5 M re von der markierten Masche) oder wird irgendwann das Muster aufgegriffen? Falls ja, wann und wie?
26.02.2024 - 08:33DROPS Design answered:
Liebe Christina, das Muster beim Vorder- sowie beim Rückenteil wird sich beidseitig erweitern, dh an beiden Seiten passt das Muster nicht mehr aber immer noch beim Vorder und Rückenteil. Viel Spaß beim Stricken!
26.02.2024 - 10:06Bonjour, Pour les augmentations des côtés, on continue en point fantaisie quand on a suffisamment de mailles. Après avoir augmenté 2 fois, on tricote la maille avec le marqueur en point mousse. Mais après avoir augmenté à nouveau 2 fois, on se retrouve avec 5 mailles endroit de chaque côté de la maille avec le marqueur. Est-ce qu'on garde ce point irrégulier sur les côtés jusqu'à la fin? Merci!
27.10.2023 - 15:45DROPS Design answered:
Bonjour Jessica, la maille avec le marqueur doit continuer à être tricotée comme avant tout le temps, incorporez les augmentations dans le point fantaisie (sans le point ajouré). Le motif ne tombera pas juste sur les côtés, c'est normal.. Bon tricot!
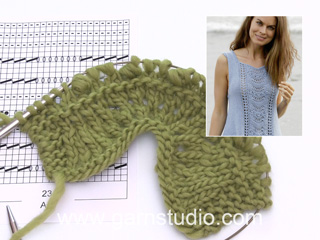
28.10.2023 - 08:46Jeg kan ikke forstå mønster M2 efter linje 8. Diagramforklaring til symbolet: strik de 3 m sammen fra retsiden …….. slutresultatet er: 9 m bliver til 3 Næste pind - altså pind 9 - her er der angivet, at de 9 m stadig er intakte. Venligst forklar, hvorledes den del af mønstret skal strikkes På forhånd tak for hjælpen. Hilsen fra Bente
08.05.2023 - 16:40DROPS Design answered:
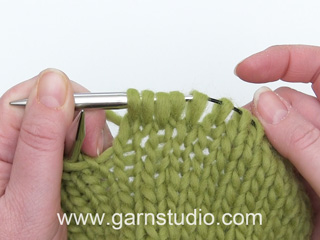
Hej Bente, på pind 9 strikkes hvert symbol med 3 masker således - se videoen her: Knude over 3 masker Det er altså de samme 3 masker du strikker sammen 3 gange, da får du 3 masker på højre pind før du slipper de 3 m af venstre pind :)
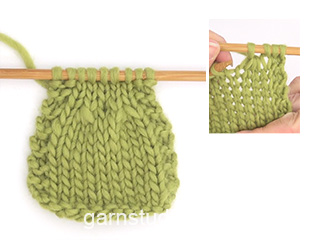
09.05.2023 - 10:23I do not understand the chart knit 3 St's from right side without slipping off left needle p3tog, k3tog p3tog, slip St's off left needle please could you explain
12.11.2022 - 18:12DROPS Design answered:
Dear Denise, work 3 sts as follows: purl 3 sts together, but don't slip them off the left needle. In the right needle, you will have 1 extra stitch, but you keep the 3 stitches in the left needle. Knit 3 together in the same stitch where you purled 3 together before. So, you have one more stitch in the right needle and you still have the 3 stitches in the left needle. Purl 3 together once more and now slip the stitches off the left needle: you have now worked the 3 stitches and formed something similar to a bobble. Happy knitting!
14.11.2022 - 00:46Ich bin dabei die Schulter des langen Ärmels zu stricken. Nach den Schulterabnahmen heißt es in der Anleitung "Weiter 2 M abketten bis die Arbeit .......... cm misst, danach 3 M 1 Mal auf jeder Seite abketten" Heißt das jetzt 2 M auf jeder Seite, oder jede zweite Reihe insgesamt 2 Maschen? Danke im Voraus
20.01.2022 - 03:36DROPS Design answered:
Liebe Frau Wybiralla, ja 2 Maschen sollen Sie auf beiden Seiten (am Anfang jeder Reihe, dh Hin- sowie Rückreihen) bis die Arbeit 55-56 oder 57 cm misst. Beachten Sie nur, daß Sie genausoviele Maschen beidseitig abgekettet haben. Viel Spaß beim stricken!
20.01.2022 - 09:20When casting off for the sleeve cap while knitting in the round, must i then start knitting back and forth to shape it?
26.06.2021 - 09:27DROPS Design answered:
Dear Helen, yes, unfortuntely there is no way around it.Sleeve caps are knitted back and forth (because of the shaping). Happy Stitching!
26.06.2021 - 15:48