
Popular categories
Looking for a yarn?


|
|
Wild Flower |
|
 |
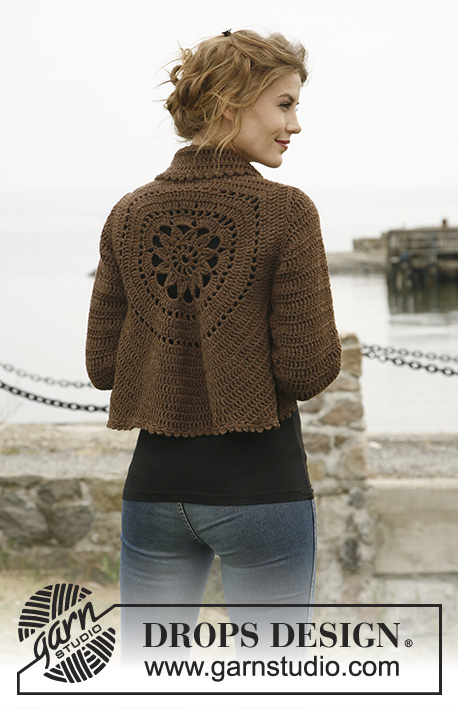 |
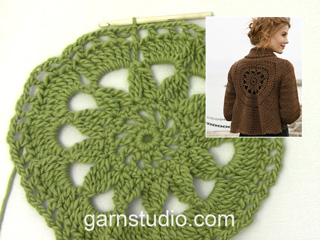
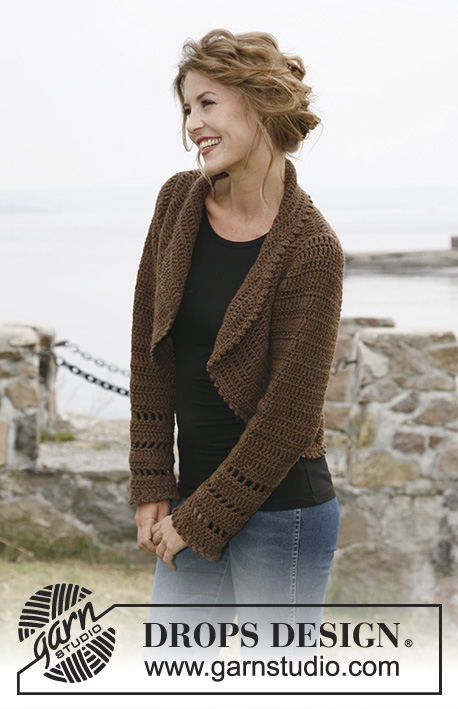
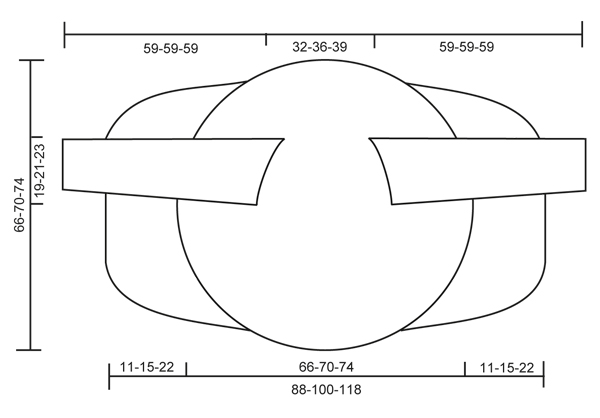
Crochet DROPS jacket worked in a circle in ”Nepal”. Size: S to XXXL
DROPS 132-2 |
|
|
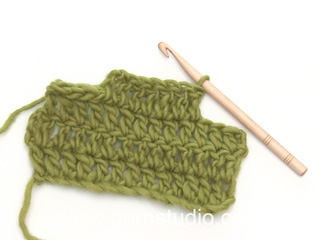
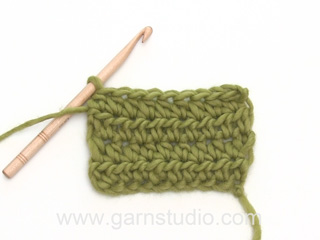
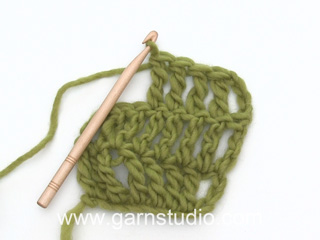
CROCHET TIP: Replace first tr on every round/row with ch 4. DECREASE TIP 1 (applies to the body): Dec as follows: Work tr until 3 tr remain, * in the first of these work 1 dc, in the next 1 hdc and in the last 1 sc, turn with ch 1, skip sc, work 1 sl st in hdc and 1 sl st in dc, then 1 sc in first tr, 1 hdc in next tr and 1 dc in next tr, work tr until 3 tr remain at end of row *, repeat from *-* until a total of 6-8-12 rows have been worked. DECREASE TIP 2 (applies to sleeve cap): Dec at beg of row by working sl st over the no of tr to be dec. Dec at end of row by working until same no of sts to be dec remains, turn piece. -------------------------------------------------------- -------------------------------------------------------- BODY: Worked in the round in a circle from mid back. Ch 8 on hook size 5 mm / H/8 with Nepal and form a ring with 1 sl st in first ch. ROUND 1: Work 12 sc in ch-ring, finish with 1 sl st in first sc. ROUND 2: ch 5 (= 1 dc + 2 ch), * 1 dc in next sc, ch 2 *, repeat from *-* the entire round and finish with 1 sl st in 3rd ch from beg of round = 12 dc with 2 ch between each. ROUND 3: 1 ch, continue to crochet as follows in every ch-space the entire round: 1 sc + ch 1 + 1 sc + ch 1, finish round with 1 sl st in first ch = 24 sc with 1 ch between each. ROUND 4: 1 sl st in first sc, 1 sl st in first ch, ch 5, 1 dtr in same ch, * ch 7, then work 4 dtr tog as follows: Work 2 dtr in same ch as last dtr but wait with last YO and pull through on both dtr, skip 1 sc + 1 ch + 1 sc, work 1 dtr in next ch but wait with last YO and pull through, then work last dtr in same ch and pull last YO through all 5 sts on hook *, repeat from *-* a total of 11 times, ch 7, work 2 dtr tog in same ch (but wait with last YO and pull through on both), work 1 sl st in 5th ch from beg of round and pull thread through all 3 sts on hook. ROUND 5: 1 sl st in first ch-space, ch 4 (= 1 tr), 7 tr in same ch-space, then work 8 tr in every ch-space, finish with 1 sl st in 4th ch from beg of round = a total of 96 tr. ROUND 6: ch 5 (= 1 dc + 2 ch), * skip 1 tr, 1 dc in next tr, ch 2 *, repeat from *-* the entire round and finish with 1 sl st in 3rd ch from beg of round = 48 ch-spaces. ROUND 7 – READ CROCHET TIP: Work 1 tr in every dc and work 1 and 2 tr alternately in every ch-space the entire round = 120 tr. ROUND 8: Work 1 tr in every tr but work 2 tr in every 10th tr = 132 tr. ROUND 9: ch 5 (= 1 dc + 2 ch), * skip 1 tr, 1 dc in next tr, ch 2 *, repeat from *-* the entire round and finish with 1 sl st in 3rd ch from beg of round = 66 ch-spaces. ROUND 10: Work 1 tr in every dc and work 1 and 2 tr alternately in every ch-space the entire round = 165 tr. ROUND 11: Work 1 tr in every tr but work 2 tr in every 15th tr = 176 tr. ROUND 12: Work 1 tr in every tr but work 2 tr in every 16th tr = 187 tr. Piece measures approx. 20 cm / 8" from center and outwards. SIZE S/M: ROUND 13: ch 1, then work 1 sc in each of the first 45 tr (= up towards neck), ch 30 loosely, skip the next 27 tr (= armhole), then work 1 sc in each of the next 88 tr (= down towards back), ch 30 loosely, skip the next 27 tr (= armhole) and fasten with 1 sl st in first sc on round. ROUND 14: Work 1 tr in every sc - but inc 2 tr evenly over the first 45 sc (= 47 tr), then work 30 tr in ch-row over armhole, work 1 tr in every sc – but inc 3 tr evenly over the bottom 88 sc (= 91 tr), and work 30 tr in ch-row over armhole = 198 tr. ROUND 15 to 19: Continue with tr – while at the same time inc 6 tr evenly on every round. After 19th round there are 228 tr on the round and piece measures approx. 33 cm / 13" from center and outwards. Continue working only over 79 tr in each side – i.e. do not work over 35 tr at top by neck or 35 tr at bottom of back. Continue with explanation under FRONT PIECE. SIZE L/XL: ROUND 13: Work 1 tr in every tr but work 2 tr in every 17th tr = 198 tr. ROUND 14: ch 1, then work 1 sc in each of the first 50 tr (= up towards neck), ch 32 loosely, skip the next 29 tr (= armhole), then work 1 sc in each of the next 90 tr (= down towards back), ch 32 loosely, skip the next 29 tr (= armhole) and fasten with 1 sl st in first sc on round. ROUND 15: Work 1 tr in every sc - but inc 3 tr evenly over the first 50 sc (= 53 tr), then work 32 tr in ch-row over armhole, work 1 tr in every sc – but inc 3 tr evenly over the bottom 90 sc (= 93 tr), and work 32 tr in ch-row over armhole = 210 tr. ROUND 16 to 20: Continue with tr – while at the same time inc 6 tr evenly on every round. After 20th round there are 240 tr on the round and piece measures approx. 35 cm / 13¾" from center and outwards. Continue working only over 81 tr in each side – i.e. do not work over 39 tr at top by neck or 39 tr at bottom of back. Continue with explanation under FRONT PIECE. SIZE XXL and XXXL: ROUND 13: Work 1 tr in every tr but work 2 tr in every 17th tr = 198 tr. ROUND 14: Work 1 tr in every tr but work 2 tr in every 18th tr = 209 tr. ROUND 15: ch 1, then work 1 sc in each of the first 54 tr (= up towards neck), ch 36 loosely, skip the next 32 tr (= armhole), then work 1 sc in each of the next 91 tr (= down towards back), ch 36 loosely, skip the next 32 tr (= armhole) and fasten with 1 sl st in first sc on round. ROUND 16: Work 1 tr in every sc - but inc 2 tr evenly over the first 54 sc (= 56 tr), then work 36 tr in ch-row over armhole, work 1 tr in every sc – but inc 3 tr evenly over the bottom 91 sc (= 94 tr), and work 36 tr in ch-row over armhole = 222 tr. ROUND 17 to 22: Continue with tr – while at the same time inc 6 tr evenly on every round. After 22nd round there are 258 tr on the round and piece measures approx. 37 cm / 14½" from center and outwards. Continue working only over 89 tr in each side – i.e. do not work over 40 tr at top by neck or 40 tr at bottom of back. Continue with explanation under FRONT PIECE. LEFT FRONT PIECE - ALL SIZES: = 79-81-89 tr. Insert a marker after 23-24-27 sts in from each side (= 33-33-35 sts between markers). Then work tr back and forth over these sts while at the same time inc 1 st at every marker on every row (i.e. inc 2 sts on row, inc alternately before and after marker) and dec 3 sts at beg and end of every row in each side – SEE DECREASE TIP 1 until a total of 6-8-12 rows back and forth have been worked. RIGHT FRONT PIECE: Work same way as on left piece over 79-81-89 tr in right side. SLEEVE (worked back and forth): Ch 46-48-53 loosely (includes 4 ch to turn with) on hook size 5 mm / H/8 with Nepal. ROW 1: 1 tr in 5th ch from hook, 1 tr in each of the next 2-4-2 ch, * skip ch 1, 1 tr in each of the next 6 ch *, repeat from *-* until 4 ch remain, skip 1 ch and work 1 tr in each of the last 3 ch = 37-39-43 tr. ROW 2: 1 tr in every tr – READ CROCHET TIP! ROW 3: ch 6 (= 1 tr + 2 ch), skip 1 tr, 1 tr in next tr, * ch 2, skip 1 tr, 1 tr in next tr *, repeat from *-* the entire row = 18-19-21 ch-spaces. ROW 4: Work 1 tr in every tr and 1 tr in every ch-space = 37-39-43 tr. Repeat row 2-4 a total of 3 times. Piece measures approx. 18 cm / 7". Then work tr on all rows until finished measurements, while at the same time inc as follows: SIZE S/M: * Inc 1 tr in one side by working 2 tr in next to last tr. On next row inc 1 tr in the other side the same way. Inc 1 more time the same way in each side, then work 1 row without inc *, repeat from *-* a total of 3 times = 12 inc = 49 tr. SIZE L/XL + XXL/XXXL: * Inc 1 tr in one side by working 2 tr in next to last tr. On next row inc 1 tr in the other side the same way *, repeat from *-* a total of 8 times = 16 inc = 55-59 tr. ALL SIZES: Continue to work until piece measures 49 cm / 19¼" in all sizes. Now dec on every row in each side for sleeve cap – SEE DECREASE TIP 2: 3 tr 1 time, 2 tr 3 times and 3 tr 1 time = 25-31-35 tr remain at the top. Fasten off. ASSEMBLY: Sew sleeve seams tog edge to edge to avoid a chunky seam. Work 1 round around the entire body and at bottom of sleeves as follows: * ch 5, 1 dc in first ch, skip 1 st, fasten with 1 sc in next st *, repeat from *-* the entire round and finish with 1 sl st in first ch. Sew in the sleeves. If desired, close the jacket with a pin or sew on a button on to left front piece (try the jacket on to see where button should be) and button it in crochet edge. |
|
|
|
|
Have you made this or any other of our designs? Tag your pictures in social media with #dropsdesign so we can see them! Do you need help with this pattern?You'll find tutorial videos, a Comments/Questions area and more by visiting the pattern on garnstudio.com. © 1982-2024 DROPS Design A/S. We reserve all rights. This document, including all its sub-sections, has copyrights. Read more about what you can do with our patterns at the bottom of each pattern on our site. |
|


With over 40 years in knitting and crochet design, DROPS Design offers one of the most extensive collections of free patterns on the internet - translated to 17 languages. As of today we count 304 catalogs and 11422 patterns - 11417 of which are translated into English (US/in).
We work hard to bring you the best knitting and crochet have to offer, inspiration and advice as well as great quality yarns at incredible prices! Would you like to use our patterns for other than personal use? You can read what you are allowed to do in the Copyright text at the bottom of all our patterns. Happy crafting!
Comments / Questions (433)
Wat een mooi patroon. Ik heb alleen echt geen idee hoe ik de mouwen vast moet zetten. Hoe naai ik het deel met de minderen erin? Ik hoop dat u mij kunt helpen.
19.08.2017 - 10:22DROPS Design answered:
Hoi Gaby, Je kunt de mouw in de panden naaien met kleine steekjes met de hand, waarbij de mouwkop op de schouder komt. Bij de minderingen is het telkens even kijken waar je de steken naait, zodat het er mooi uit komt te zien. Je kan bijvoorbeeld de steek gebruiken die in deze video te zien is
20.08.2017 - 21:35Currently making the Wild Flower DROPS / 132 / 2 but have become confused when creating the sides. The pattern states I've to increase at the markers but then says I should follow the decrease tip at the end of each row. How can I do both? I have asked a few fellow crocheters & we're all stumped! Please help!
29.07.2017 - 19:16DROPS Design answered:
Dear Mrs Smith, you will dec at the beg and end of each row as explained under DECREASE TIP 1, and at the same time, inc 2 sts on each row at each marker as explained under LEFT FRONT PIECE - each side of front will then be rounded with dec and inc at markers will give the correct shape. Happy crocheting!
31.07.2017 - 10:01Just finished one sleeve, sewed it on the jacket but it is about 5 inches too long. I can cuff the sleeve, but is there a way to cut the bottom (the pretty part-I hate to do it) of the sleeve? I crochet this will wool yarn and used size s/m. Obviously my arms don't fall into that realm !! help please
27.05.2017 - 23:24DROPS Design answered:
Dear Carol, your DROPS store may have any tip for you to help in this case, remember you can contact them even per mail or telephone. Happy crocheting!
29.05.2017 - 09:26After row 19 do we fasten off and the begin with new yarn to begin the left front piece? It seems like this is what to do but this is the first pattern I have ever done that doesn't explicitly say.
24.05.2017 - 22:17DROPS Design answered:
Dear Carol, you may have to cut the yarn to work front piece over the given sts, make sure to have the correct number of sts unworked on top and on bottom. Happy crocheting!
26.05.2017 - 10:09Hello, I am working on pattern 132-2 and am beginning the left front side which for me would be 81 stitches. I understand the increases and decreases - no problem. What I don't understand is the very first row of these 81 stitches. Do we begin the first row with a decrease? Or do we begin with a triple crochet and begin the decrease at the end of the first row of 81 stitches? Thank you for your time.
05.05.2017 - 15:27DROPS Design answered:
Dear Beth, you will work as explained under DECREASE TIP 1, ie work first row (with inc) until 3 sts remain and dec at the end of row, then turn and dec at the beg of row, work until 3 sts remain. Happy crocheting!
05.05.2017 - 16:43I'm a little confused with how to sew the sleeves, since they get smaller at the top. How far up do you sew the seam? Just to the decreases, or all the way up? How exactly do you attach them to the body of the sweater? The entire pattern has been an exercise in frustration to try to follow, but I eventually figured out the crochet stuff--it's just the assembly that has me confused.
01.04.2017 - 12:55DROPS Design answered:
Dear Mrs Tharp, sleeves are sewn on body as usual, ie the 3 sts dec on each side on 1st dec row will be sewn at the botom of armholes, with the top of sleeve cap towards the top. Then just sew each st along armhole. Your DROPS store will have any further tips & advices for you to sew these pieces tog, even per mail or telephone. Happy crocheting!
03.04.2017 - 09:16Melody Walls wrote:
So. I am at the sides. I understand the Dec at the beg/end of each row. . But..... do I skip the 3 slp stitches at the beginning and end of previous row? Or do I work my Dec over them? You have been very helpful. Thank You!
23.02.2017 - 02:15DROPS Design answered:
Dear Mrs Walls, when dec on front piece, work until 3 dtr remain on row, then dec and turn, you will not have then any dtr at the beg of row anymore - see DECREASE TIP 1. Happy crocheting!
23.02.2017 - 10:09Melody W wrote:
I am confused! So, size S/M..Round 15-19. Do I work the tr and inc 6 up until round 19 OR do I work back and forth (omitting working the top and bottom) for rounds 15-19? If I do Not work the top and bottom for round 15-19, how do I work the sides at the same time? Thank You
21.02.2017 - 23:35DROPS Design answered:
Dear Melody, rounds 15 to 19 are worked in the round as before (= around the whole circle, ie over all sts in the round), crochet in the round inc 6 sts evenly on each round, so that you will get 228 sts at the end of round 19. When round 19 is done, you will now crochet front pieces separately back and forth leaving sts on the top + at the bottom unworked. Happy crocheting!
22.02.2017 - 10:08Almeria Nielsen wrote:
Row 20 Am really sorry. Do you mind to show me the video of how to do it, pls? I'm still stuck thanks
13.02.2017 - 21:30DROPS Design answered:
Dear Mrs Nielsen, fold the circle double in the height so that both armholes are facing each other, then count the middle 35 sts at the top and the middle 35 sts at the bottom (sts left unworked), you should have 79 sts on each side for front pieces. For any further assistance you are welcome to contact your DROPS store. Happy crocheting!
14.02.2017 - 09:22Almeria Nielsen wrote:
Can you help to explain like to a beginner how to start round 20 for size S? Where to start counting 23-33-23? Where to start tr on left and right side? I seriously think that sometimes the pattern is not easy to understand - sorry. thanks rgds,
12.02.2017 - 23:33DROPS Design answered:
Dear Mrs Nielsen, from row 20 in size S you will work only on each front piece, fold piece double and count the top 35 sts and the bottom 35 sts, insert markers to have 79 sts between markers for both front pieces, then crochet these 79 sts on one front piece as explained, then crochet the 79 sts on the other front piece. Happy crocheting!
13.02.2017 - 12:08