
Popular categories
Looking for a yarn?


|
|
Wild Flower |
|
 |
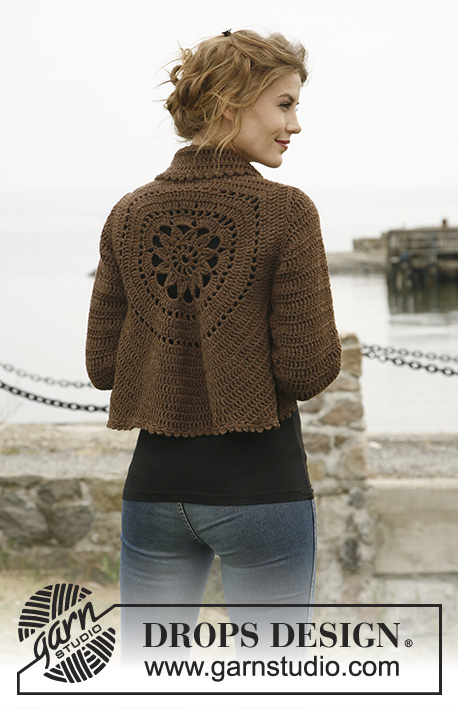 |
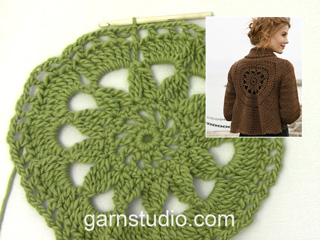
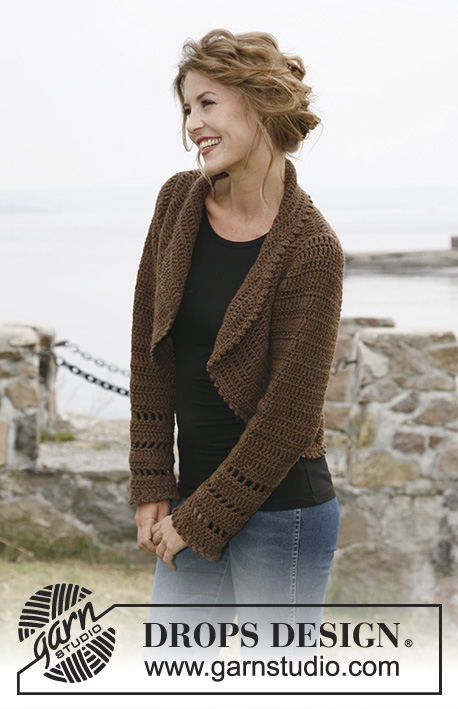
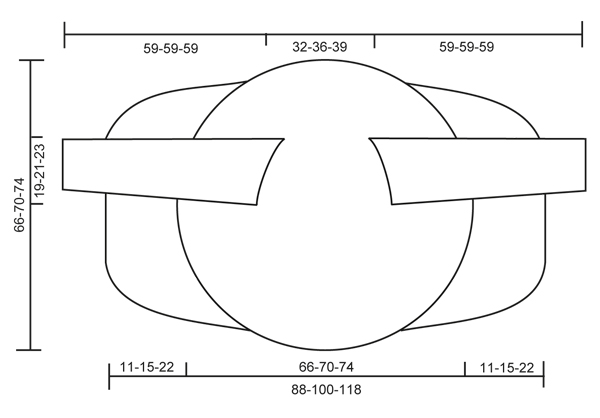
Crochet DROPS jacket worked in a circle in ”Nepal”. Size: S to XXXL
DROPS 132-2 |
|
|
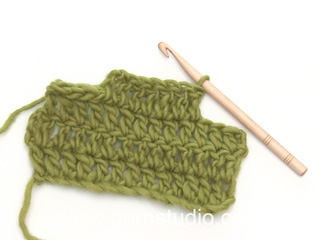
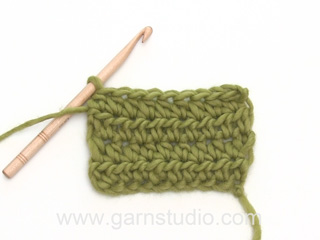
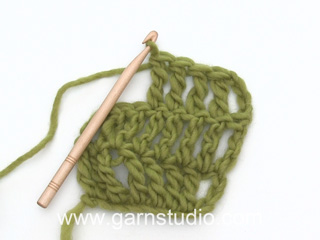
CROCHET TIP: Replace first tr on every round/row with ch 4. DECREASE TIP 1 (applies to the body): Dec as follows: Work tr until 3 tr remain, * in the first of these work 1 dc, in the next 1 hdc and in the last 1 sc, turn with ch 1, skip sc, work 1 sl st in hdc and 1 sl st in dc, then 1 sc in first tr, 1 hdc in next tr and 1 dc in next tr, work tr until 3 tr remain at end of row *, repeat from *-* until a total of 6-8-12 rows have been worked. DECREASE TIP 2 (applies to sleeve cap): Dec at beg of row by working sl st over the no of tr to be dec. Dec at end of row by working until same no of sts to be dec remains, turn piece. -------------------------------------------------------- -------------------------------------------------------- BODY: Worked in the round in a circle from mid back. Ch 8 on hook size 5 mm / H/8 with Nepal and form a ring with 1 sl st in first ch. ROUND 1: Work 12 sc in ch-ring, finish with 1 sl st in first sc. ROUND 2: ch 5 (= 1 dc + 2 ch), * 1 dc in next sc, ch 2 *, repeat from *-* the entire round and finish with 1 sl st in 3rd ch from beg of round = 12 dc with 2 ch between each. ROUND 3: 1 ch, continue to crochet as follows in every ch-space the entire round: 1 sc + ch 1 + 1 sc + ch 1, finish round with 1 sl st in first ch = 24 sc with 1 ch between each. ROUND 4: 1 sl st in first sc, 1 sl st in first ch, ch 5, 1 dtr in same ch, * ch 7, then work 4 dtr tog as follows: Work 2 dtr in same ch as last dtr but wait with last YO and pull through on both dtr, skip 1 sc + 1 ch + 1 sc, work 1 dtr in next ch but wait with last YO and pull through, then work last dtr in same ch and pull last YO through all 5 sts on hook *, repeat from *-* a total of 11 times, ch 7, work 2 dtr tog in same ch (but wait with last YO and pull through on both), work 1 sl st in 5th ch from beg of round and pull thread through all 3 sts on hook. ROUND 5: 1 sl st in first ch-space, ch 4 (= 1 tr), 7 tr in same ch-space, then work 8 tr in every ch-space, finish with 1 sl st in 4th ch from beg of round = a total of 96 tr. ROUND 6: ch 5 (= 1 dc + 2 ch), * skip 1 tr, 1 dc in next tr, ch 2 *, repeat from *-* the entire round and finish with 1 sl st in 3rd ch from beg of round = 48 ch-spaces. ROUND 7 – READ CROCHET TIP: Work 1 tr in every dc and work 1 and 2 tr alternately in every ch-space the entire round = 120 tr. ROUND 8: Work 1 tr in every tr but work 2 tr in every 10th tr = 132 tr. ROUND 9: ch 5 (= 1 dc + 2 ch), * skip 1 tr, 1 dc in next tr, ch 2 *, repeat from *-* the entire round and finish with 1 sl st in 3rd ch from beg of round = 66 ch-spaces. ROUND 10: Work 1 tr in every dc and work 1 and 2 tr alternately in every ch-space the entire round = 165 tr. ROUND 11: Work 1 tr in every tr but work 2 tr in every 15th tr = 176 tr. ROUND 12: Work 1 tr in every tr but work 2 tr in every 16th tr = 187 tr. Piece measures approx. 20 cm / 8" from center and outwards. SIZE S/M: ROUND 13: ch 1, then work 1 sc in each of the first 45 tr (= up towards neck), ch 30 loosely, skip the next 27 tr (= armhole), then work 1 sc in each of the next 88 tr (= down towards back), ch 30 loosely, skip the next 27 tr (= armhole) and fasten with 1 sl st in first sc on round. ROUND 14: Work 1 tr in every sc - but inc 2 tr evenly over the first 45 sc (= 47 tr), then work 30 tr in ch-row over armhole, work 1 tr in every sc – but inc 3 tr evenly over the bottom 88 sc (= 91 tr), and work 30 tr in ch-row over armhole = 198 tr. ROUND 15 to 19: Continue with tr – while at the same time inc 6 tr evenly on every round. After 19th round there are 228 tr on the round and piece measures approx. 33 cm / 13" from center and outwards. Continue working only over 79 tr in each side – i.e. do not work over 35 tr at top by neck or 35 tr at bottom of back. Continue with explanation under FRONT PIECE. SIZE L/XL: ROUND 13: Work 1 tr in every tr but work 2 tr in every 17th tr = 198 tr. ROUND 14: ch 1, then work 1 sc in each of the first 50 tr (= up towards neck), ch 32 loosely, skip the next 29 tr (= armhole), then work 1 sc in each of the next 90 tr (= down towards back), ch 32 loosely, skip the next 29 tr (= armhole) and fasten with 1 sl st in first sc on round. ROUND 15: Work 1 tr in every sc - but inc 3 tr evenly over the first 50 sc (= 53 tr), then work 32 tr in ch-row over armhole, work 1 tr in every sc – but inc 3 tr evenly over the bottom 90 sc (= 93 tr), and work 32 tr in ch-row over armhole = 210 tr. ROUND 16 to 20: Continue with tr – while at the same time inc 6 tr evenly on every round. After 20th round there are 240 tr on the round and piece measures approx. 35 cm / 13¾" from center and outwards. Continue working only over 81 tr in each side – i.e. do not work over 39 tr at top by neck or 39 tr at bottom of back. Continue with explanation under FRONT PIECE. SIZE XXL and XXXL: ROUND 13: Work 1 tr in every tr but work 2 tr in every 17th tr = 198 tr. ROUND 14: Work 1 tr in every tr but work 2 tr in every 18th tr = 209 tr. ROUND 15: ch 1, then work 1 sc in each of the first 54 tr (= up towards neck), ch 36 loosely, skip the next 32 tr (= armhole), then work 1 sc in each of the next 91 tr (= down towards back), ch 36 loosely, skip the next 32 tr (= armhole) and fasten with 1 sl st in first sc on round. ROUND 16: Work 1 tr in every sc - but inc 2 tr evenly over the first 54 sc (= 56 tr), then work 36 tr in ch-row over armhole, work 1 tr in every sc – but inc 3 tr evenly over the bottom 91 sc (= 94 tr), and work 36 tr in ch-row over armhole = 222 tr. ROUND 17 to 22: Continue with tr – while at the same time inc 6 tr evenly on every round. After 22nd round there are 258 tr on the round and piece measures approx. 37 cm / 14½" from center and outwards. Continue working only over 89 tr in each side – i.e. do not work over 40 tr at top by neck or 40 tr at bottom of back. Continue with explanation under FRONT PIECE. LEFT FRONT PIECE - ALL SIZES: = 79-81-89 tr. Insert a marker after 23-24-27 sts in from each side (= 33-33-35 sts between markers). Then work tr back and forth over these sts while at the same time inc 1 st at every marker on every row (i.e. inc 2 sts on row, inc alternately before and after marker) and dec 3 sts at beg and end of every row in each side – SEE DECREASE TIP 1 until a total of 6-8-12 rows back and forth have been worked. RIGHT FRONT PIECE: Work same way as on left piece over 79-81-89 tr in right side. SLEEVE (worked back and forth): Ch 46-48-53 loosely (includes 4 ch to turn with) on hook size 5 mm / H/8 with Nepal. ROW 1: 1 tr in 5th ch from hook, 1 tr in each of the next 2-4-2 ch, * skip ch 1, 1 tr in each of the next 6 ch *, repeat from *-* until 4 ch remain, skip 1 ch and work 1 tr in each of the last 3 ch = 37-39-43 tr. ROW 2: 1 tr in every tr – READ CROCHET TIP! ROW 3: ch 6 (= 1 tr + 2 ch), skip 1 tr, 1 tr in next tr, * ch 2, skip 1 tr, 1 tr in next tr *, repeat from *-* the entire row = 18-19-21 ch-spaces. ROW 4: Work 1 tr in every tr and 1 tr in every ch-space = 37-39-43 tr. Repeat row 2-4 a total of 3 times. Piece measures approx. 18 cm / 7". Then work tr on all rows until finished measurements, while at the same time inc as follows: SIZE S/M: * Inc 1 tr in one side by working 2 tr in next to last tr. On next row inc 1 tr in the other side the same way. Inc 1 more time the same way in each side, then work 1 row without inc *, repeat from *-* a total of 3 times = 12 inc = 49 tr. SIZE L/XL + XXL/XXXL: * Inc 1 tr in one side by working 2 tr in next to last tr. On next row inc 1 tr in the other side the same way *, repeat from *-* a total of 8 times = 16 inc = 55-59 tr. ALL SIZES: Continue to work until piece measures 49 cm / 19¼" in all sizes. Now dec on every row in each side for sleeve cap – SEE DECREASE TIP 2: 3 tr 1 time, 2 tr 3 times and 3 tr 1 time = 25-31-35 tr remain at the top. Fasten off. ASSEMBLY: Sew sleeve seams tog edge to edge to avoid a chunky seam. Work 1 round around the entire body and at bottom of sleeves as follows: * ch 5, 1 dc in first ch, skip 1 st, fasten with 1 sc in next st *, repeat from *-* the entire round and finish with 1 sl st in first ch. Sew in the sleeves. If desired, close the jacket with a pin or sew on a button on to left front piece (try the jacket on to see where button should be) and button it in crochet edge. |
|
|
|
|
Have you made this or any other of our designs? Tag your pictures in social media with #dropsdesign so we can see them! Do you need help with this pattern?You'll find tutorial videos, a Comments/Questions area and more by visiting the pattern on garnstudio.com. © 1982-2024 DROPS Design A/S. We reserve all rights. This document, including all its sub-sections, has copyrights. Read more about what you can do with our patterns at the bottom of each pattern on our site. |
|


With over 40 years in knitting and crochet design, DROPS Design offers one of the most extensive collections of free patterns on the internet - translated to 17 languages. As of today we count 304 catalogs and 11422 patterns - 11417 of which are translated into English (US/in).
We work hard to bring you the best knitting and crochet have to offer, inspiration and advice as well as great quality yarns at incredible prices! Would you like to use our patterns for other than personal use? You can read what you are allowed to do in the Copyright text at the bottom of all our patterns. Happy crafting!
Comments / Questions (433)
What's 1thread, 2 threads, 3 threads
22.04.2018 - 00:41DROPS Design answered:
Dear Susan, this pattern has been worked with 1 thread Nepal (= yarn group C) but you can work it with 2 threads yarn group A hold together as just one. Read more about alternatives here. Happy crocheting!
23.04.2018 - 09:24I absolutely love this Wild flower pattern but I'm self taught and was wondering if you had a tutorial showing me. I do better when I can see what you are doing. I hope to hear from you soon. Thank you in advance, Tammy 😁
05.04.2018 - 18:22DROPS Design answered:
Dear Tammy, you can find links to the related videos for each pattern on the left side of the page, below the picture of the model. I hope this helps. Happy Crocheting!
05.04.2018 - 23:30JANETH ELENA MARTINEZ MARTINEZ wrote:
Sugiero que realicen video tutorial, para comenzar los delanteros ya que es confuso. He desbaratado, queda desagradable y no he podido estrenar el saco. Agradezco la colaboración. JANETH
25.03.2018 - 04:17If I were to not crochet the sleeves would that look okay? I’m wanting to just make a vest and love how the back looks :)
25.03.2018 - 03:55DROPS Design answered:
Dear Amanda, yes, that can work. We have a couple of vests in similar - circle body- style, that are nice without sleeves. However I would crochet a narrow edge around the armhole, just to stabilize it (probably a *dc, 3 chain stitch* would do well, or apicot edge if you want to go fancy). Happy Crocheting!
29.03.2018 - 02:20Hallo zusammen Ich hänge schon eine gefühlte Ewigkeit am linken vorderteil. Die Jacke soll s/m werden. Wenn ich nach 19 Runden fertig bin , schneide och den Faden dann ab? Ich komm absolut nicht klar mit dem zählen und errechnen der Seiten. Bitte helft mir.
07.01.2018 - 00:35DROPS Design answered:
Liebe Frau Brand, wenn der Kreis fertig ist, schneiden Sie den Faden ab. Jetzt die Markierer für beide Vorderteil einsetzen. Falten Sie Kreis so daß beide Armlöcher gegenüber sind, dann eine Markierung in der Mitte oben am Hals + unten am Rand einsetzen, dann die 35 Maschen zählen (= die Masche mit der Markierung + 17 Maschen auf beiden Seiten der Markierung). Dann Vorderteil über die 79 Maschen zwischen den Markierungen (oben am Hals und unten am Rand) häkeln. Viel Spaß beim häkeln!
08.01.2018 - 09:21Estoy haciendo la chaqueta wild flower y estoy con los delanteros,ya tengo puesto los marcadores.Estoy haciendo la talla S,que se empieza a trabajar en los puntos que están entre los marcadores?( en mi caso son 33)o en lo 79? Estoy muy perdida no sé cómo seguir.
01.01.2018 - 23:45DROPS Design answered:
Hola Ana. Los delanteros los trabajamos sobre los 79 puntos a cada lado para la talla S. Los marcapuntos son necesarios para marcar donde se trabajan los aumentos para darle forma a los delanteros.
09.01.2018 - 15:48I love this pattern! If I used Lima (yarn group B) instead of Nepal (yarn group c), what would be the difference of the finished jacket? Would I need to change the hook size? I would be concerned about the finished product not fitting correctly, but I like the idea of a lighter weight jacket that isn't as bulky. Any thoughts? Thanks.
07.11.2017 - 17:58DROPS Design answered:
Dear Wendy, the Lima and the Nepal yarns are similar as far as the composition, however they are different weights, they are in different yarn groups. Nepal is thicker. It is not impossible to make the sweater, but you should make a gauge swatch and recalculate the stitchcount. I hope this helps. Happy crafting!
07.11.2017 - 19:52Hi, I needed more elaboration on the 2:3 ratio on the decrease for the sleeves for size s/m ie, do I decrease 3tr on each side twice first n then 2tr on each side thrice to reach my goal of 25tr for the last row? Thank you
02.11.2017 - 01:46DROPS Design answered:
Dear Tasfia, you dec 3 tr at the beg and end of next row (= 3 tr dec on each side), then dec 2 tr at the beg and end of the next 3 rows (= 2 tr dec on each side a total of 3 times) then dec 3 tr at the beg and end of next row (= 3 tr dec on each side). Dec as shown in the video below. Happy crocheting!
02.11.2017 - 09:30Hallo, ich habe die Jacke in Größe L/XL gehäkelt und sie gefällt mir sehr gut. Stellenweise fand ich die Anleitung etwas umständlich, z. B. bei den Ärmeln. Dort hat sich m. E. auch ein Fehler eingeschlichen. Wenn ich die ersten beiden Zunahmen wiederhole und dann das Ganze 8 Mal wiederhole, komme ich auf 32 Zunahmen anstelle von 16. Leichter verständlich wäre: in den folgenden 16 Reihen jeweils 1 Masche zunehmen, indem man 2 D-Stb in das letzte Stäbchen häkelt.
01.11.2017 - 07:22Hi, can you please explain tip 2 for decrease for size s/m? Thank you
31.10.2017 - 02:29DROPS Design answered:
Dear Tasfia, this video shows how to dec with slip sts - ie as under decrease-tip 2. Happy crocheting!
31.10.2017 - 09:39