DROPS Kid-Silk uni colour 75% Mohair, 25% Silk |
5.55 € /25g |
Order |
Clicking the ORDER button will redirect you to Igla i kukica website
The yarn cost is calculated from the pattern’s smallest size and the yarn’s cheapest product type. Looking for an even better price? You might find it on the DROPS Deals!
-------------------------------------------------------
Alternative Yarn – See how to change yarns here
Yarn Groups A to F – Use the same pattern and change the yarn here
Yarn usage using an alternative yarn – Use our yarn converter here
-------------------------------------------------------
DROPS Kid-Silk uni colour 75% Mohair, 25% Silk 5.55 € /25g Order |
Clicking the ORDER button will redirect you to Igla i kukica website
The yarn cost is calculated from the pattern’s smallest size and the yarn’s cheapest product type. Looking for an even better price? You might find it on the DROPS Deals!
Each of our patterns has specific tutorial videos to help you.
These step-by-step tutorials might also help you:
Why is the knitting/crochet tension so important?
Knitting tension is what determines the final measurements of your work, and is usually measured per 10 x 10 cm. It is provided like so: number of stitches in width x number of rows in height - eg: 19 stitches x 26 rows = 10 x 10 cm.
The knitting tension is very individual; some people knit/crochet loosely while others work tightly. You adjust the knitting tension with the needle size, which is why the suggested needle size is only meant as a guide! You need to adjust this (up or down) to ensure that YOUR knitting tension matches the knitting tension provided in the pattern. If you work with a different knitting tension than provided you will have a different yarn consumption, and your work will have different measurements than what the pattern suggests.
The knitting tension also determines which yarns can replace each other. As long as you achieve the same knitting tension you can replace one yarn with another.
See DROPS lesson: How to measure your tension/gauge
See DROPS video: How to make a gauge tension swatch
How do I know how many balls of yarn I need?
The required amount of yarn is provided in grams, eg: 450 g. To calculate how many balls you’ll need you first need to know how many grams are in 1 ball (25g, 50g or 100g). This information is available if you click on the individual yarn quality on our pages. Divide the amount required with the amount of each ball. For example, if each ball is 50g (the most common amount), the calculation will be as follows: 450 / 50 = 9 balls.
Can I use a different yarn than what the pattern suggests?
The important thing when changing from one yarn to another is that the knitting/crochet tension remains the same. This is so that the measurements of the finished piece will be the same as on the sketch provided. It is easier to achieve the same knitting tension using yarns from the same yarn group. It is also possible to work with multiple strands of a thinner yarn to achieve the knitting tension of a thicker one. Please try our yarn converter. We recommend you to always work a test swatch.
Please NOTE: when changing yarn the garment might have a different look and feel to the garment in the photo, due to individual properties and qualities of each yarn.
See DROPS lesson: Can I use a different yarn than the one mentioned in the pattern?
What are the yarn groups?
All our yarns are categorised into yarn groups (from A to F) according to thickness and knitting tension – group A contains the thinnest yarns and group F the thickest. This makes it easier for you to find alternative yarns to our patterns, should you wish to switch yarn. All yarns within the same group have a similar knitting tension and can easily replace each other. However, different yarn qualities have different structures and properties which will give the finished work a unique look and feel.
How do I use the yarn calculator?
At the top of all our patterns you’ll find a link to our yarn calculator, which is a helpful tool should you wish to use a different yarn than suggested. By filling in the yarn quality you wish to replace, the amount (in your size) and number of strands, the calculator will present good alternative yarns with the same knitting tension. Additionally it will tell you how much you’ll require in the new qualities and whether you’ll need to work with multiple strands. Most skeins are 50g (some are 25g or 100g).
If the pattern is worked with multiple colours, every colour will have to be calculated separately. Similarly, if the pattern is worked with several strands of different yarns (for example 1 strand Alpaca and 1 strand Kid-Silk) you will have to find alternatives for each, individually.
Why do you show discontinued yarns in the patterns?
Since different yarns have different qualities and textures we have chosen to keep the original yarn in our patterns. However, you can easily find options among our available qualities by using our yarn calculator, or simply pick a yarn from the same yarn group.
It is possible that some retailers still have discontinued yarns in stock, or that someone has a few skeins at home that they would like to find patterns for.
The yarn calculator will provide both alternative yarn as well as required amount in the new quality.
What size should I knit?
If you think it's hard to decide what size to make, it can be a good idea to measure a garment you own already and like the size of. Then you can pick the size by comparing those measures with the ones available in the pattern's size chart.
You'll find the size chart at the bottom of the pattern.
See DROPS lesson: How to read size chart
Why do I get the wrong knitting tension with the suggested needle size?
The needle size provided in the pattern serves only as a guide, the important thing is to follow the knitting tension. And since knitting tension is very individual, you will have to adjust the needle size to ensure that YOUR tension is the same as in the pattern – maybe you’ll have to adjust 1, or even 2 needle sizes, up or down to achieve the correct tension. For this, we recommend that you work test swatches.
Should you work with a different knitting tension than the one provided, the measurements of the finished garment might deviate from the measurement sketch.
See DROPS lesson: How to measure your tension/gauge
See DROPS video: How to make a tension/gauge swatch
Why is the pattern worked top-down?
Working a garment top-down provides more flexibility and room for personal adjustment. For example it is easier to try the garment on while working, as well as making adjustments to length of yoke and shoulder caps.
The instructions are carefully explaining every step, in the correct order. Diagrams are adjusted to the knitting direction and are worked as usual.
How do I work according to a knitting diagram?
The diagram depicts all rows/rounds, and every stitch seen from the right side. It is read from bottom to top, from right to left. 1 square = 1 stitch.
When working back and forth, every other row is worked from the right side and every other row is worked from the wrong side. When working from the wrong side, the diagram will have to be worked reversed: from left to right, knit stitches are purled, purl stitches are knit etc.
When working in the round every round is worked from the right side and the diagram are worked from right to left on all rounds.
See DROPS lesson: How to read knitting diagrams
How do I work according to a crochet diagram?
The diagram depicts all rows/rounds, and every stitch seen from the right side. It is worked from bottom to top, from right to left.
When working back and forth every other row is worked from the right side: from right to left and every other row is worked from the wrong side: from left to right.
When working in the round, every row in the diagram are worked from the right side, from right to left.
When working a circular diagram you start in the middle and work your way outwards, counter clockwise, row by row.
The rows usually start with a given number of chain stitches (equivalent to the height of the following stitch), this will either be depicted in the diagram or explained in the pattern.
See DROPS lesson: How to read crochet diagrams
How do I work several diagrams simultaneously on the same row/round?
Instructions for working several diagrams after each other on the same row/round, will often be written like so: “work A.1, A.2, A.3 a total of 0-0-2-3-4 times". This means you work A.1 once, then A.2 is worked once, and A.3 is repeated (in width) the number of times provided for your size – in this case like so: S = 0 times, M = 0 times, L=2 times, XL= 3 times and XXL = 4 times.
The diagrams are worked as usual: begin with the first row in A.1, then work the first row in A.2 etc.
See DROPS lesson: How to read knitting diagrams
See DROPS lesson: How to read crochet diagrams
Why are the sleeves shorter in larger sizes?
The total width of the garment (from wrist-to-wrist) will be larger in the larger sizes, despite the actual sleeves being shorter. The larger sizes have longer sleeve caps and wider shoulders, so there will be a good fit in all sizes.
Where on the garment is the length measured?
The measurement sketch/schematic drawing provides information regarding the full length of the garment. If it’s a jumper or a jacket the length is measured from the highest point on the shoulder closest to the neckline, and straight down to the bottom of the garment. It is NOT measured from the tip of shoulder. Similarly, the length of yoke is measured from the highest point on the shoulder and down to where yoke is split into body and sleeves.
On a jacket measures are never taken along bands, unless specifically stated. Always measure inside band stitches when measuring the length.
See DROPS lesson: How to read a schematic drawing
What is a repeat?
Diagrams are often repeated on the round or in height. 1 repeat is the diagram the way it appears in the pattern. If it says to work 5 repeats of A.1 in the round, then you work A.1 a total of 5 times after/next to each other in the round. If it says to work 2 repeats of A.1 vertically/in height you work the entire diagram once, then begin again at the start and work the entire diagram one more time.
Why does the piece start with more chain stitches than it’s worked with?
Chain stitches are slightly narrower than other stitches and to avoid working the cast-on edge too tight, we simply chain more stitches to begin with. The stitch count will be adjusted on the following row to fit the pattern and measurement sketch.
Why increase before the rib edge when the piece is worked top-down?
The rib edge is more elastic and will contract slightly compared to, for example, stocking stitch. By increasing before the rib edge, you avoid a visible difference in width between the rib edge and the rest of the body.
Why increase in the cast-off edge?
It’s very easy to cast off too tightly, and by making yarn overs while casting off (and simultaneously casting these off) you avoid a too tight cast off edge.
See DROPS video: How to bind off with yarn overs (yo)
How do I increase/decrease on every 3rd and 4th row/round alternately?
To achieve an even increase (or decrease) you can increase on, for example: every 3rd and 4th row alternately, like so: work 2 rows and increase on the 3rd row, work 3 rows and increase on the 4th. Repeat this until the increase is complete.
See DROPS lesson: Increase or decrease 1 st on every 3rd and 4th row alternately
How can I work a jacket in the round instead of back and forth?
Should you prefer to work in the round instead of back and forth, you may of course adjust the pattern. You’ll need to add steeks mid-front (usually 5 stitches), and follow the instructions. When you would normally turn and work from the wrong side, simply work across the steek and continue in the round. At the end you’ll cut the piece open, pick up stitches to work bands, and cover the cut edges.
See DROPS video: How to knit steeks and cut open
Can I work a jumper back and forth instead of in the round?
Should you prefer to work back and forth instead of in the round, you may of course adjust the pattern so you work the pieces separately and then assemble them at the end. Divide the stitches for the body in 2, add 1 edge stitch in each side (for sewing) and work the front and back pieces separately.
See DROPS lesson: Can I adapt a pattern for circular needles into straight needles?
Why is the pattern slightly different than what I see in the photo?
Pattern repeats can vary slightly in the different sizes, in order to get the correct proportions. If you’re not working the exact same size as the garment in the photo, yours might deviate slightly. This has been carefully developed and adjusted so that the complete impression of the garment is the same in all sizes.
Make sure to follow instructions and diagrams for your size!
How do I make a women’s size garment into a men’s size one?
If you have found a pattern you like which is available in women’s size it’s not very difficult to convert it to men’s size. The biggest difference will be the length of sleeves and body. Start working on the women size that you think would fit across the chest. The additional length will be worked right before you cast off for the armhole/sleeve cap. If the pattern is worked top-down you can add the length right after the armhole or before the first decrease on sleeve.
Regarding additional yarn amount, this will depend on how much length you add, but it is better with a skein too many than too few.
How do I prevent a hairy garment from shedding?
All yarns will have excess fibres (from production) that might come off as lint or shedding. Brushed yarns (ie hairier yarns) have more of these loose, excess fibres, causing more shedding.
Shedding also depends on what is worn under or over the garment, and whether this pulls at the yarn fibres. It’s therefore not possible to guarantee that there will be no shedding
Below are some tips on how to get the best result when working with hairier yarns:
1. When the garment is finished (before you wash it) shake it vigorously so the looser hairs come off. NOTE: do NOT use a lint roller, brush or any method that pulls at the yarn.
2. Place the garment in a plastic bag and put it in your freezer - the temperature will cause the fibres to become less attached to each other, and excess fibres will come off easier.
3. Leave in the freezer for a few hours before taking it out and shaking it again.
4. Wash the garment according to the instructions on the yarn label.
Why does my garment pill?
Pilling is a natural process that happens to even the most exclusive of fibers. It's a natural sign of wear and tear that is hard to avoid, and that is most visible in high friction areas of your garment like a sweater's arms and cuffs.
You can make your garment look as new by removing the pilling, using a fabric comb or a pill/lint remover.
Soft Focus |
|
|
|
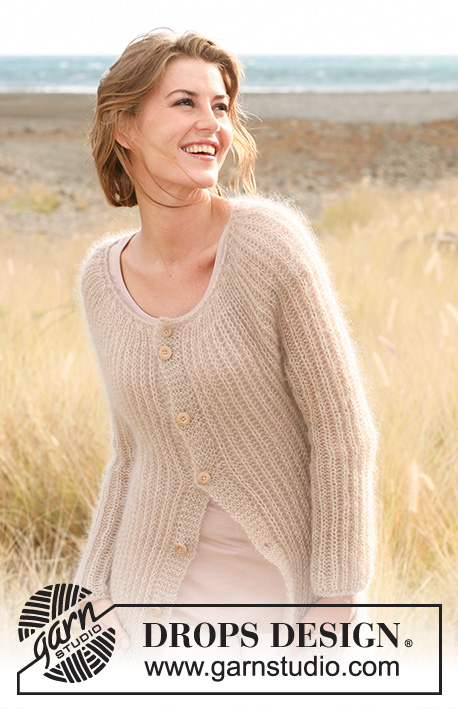
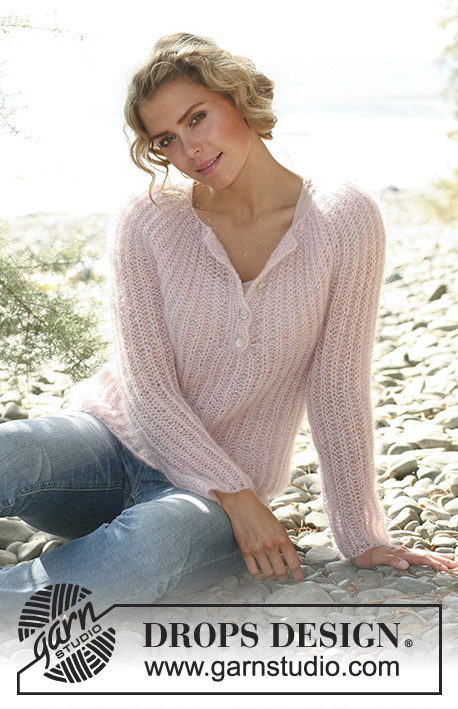
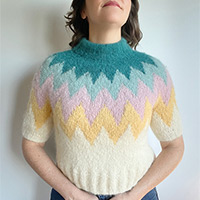
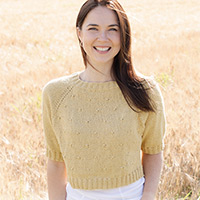
Knitted DROPS jacket in English rib in 2 threads "Kid-Silk". Size: XS - XXXL.
DROPS 127-4 |
|
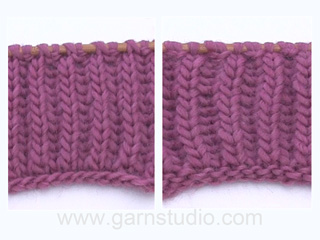
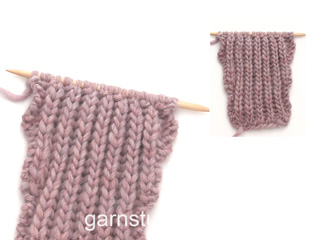
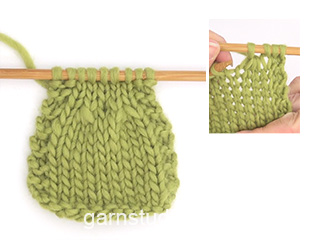
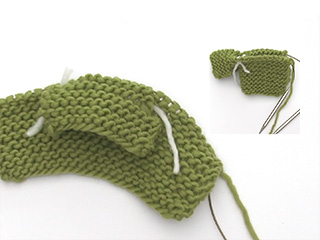
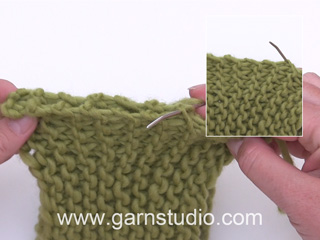
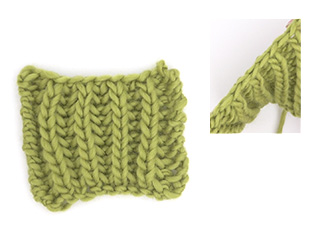
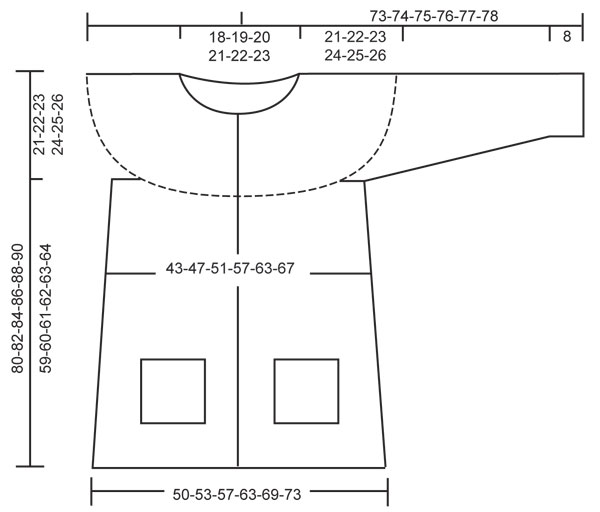
GARTER ST (back and forth on needle): K all rows. ENGLISH RIB ST: When counting the sts, the YOs are not counted as sts. DECREASE TIP IN ENGLISH RIB (applies to sides of body): Dec from RS on 3rd row in English rib: Work in English rib until 2 sts remain before the English rib st with marker (Read ENGLISH RIB ST above), slip these 2 sts as if to K tog, K the next 3 sts tog and then pass the 2 slipped sts over = 4 sts dec. Continue in English rib back and forth as before. INCREASE TIP (applies to sleeve): Inc 1 st at beg of row after 1 edge st and inc 1 st before edge st at end of row. Inc 1 st by making 1 YO, on next row work YO twisted (i.e. work in the back loop of st instead front). NOTE: Work the inc sts in English rib, i.e. after first inc, P the inc sts, next time K the inc sts etc. BODY IN ENGLISH RIB (back and forth on needle): ROW 1 (= RS): 6 band sts in garter st, * K 1, 1 YO, slip 1 st as if to P *, repeat from *-* until 7 sts remain and finish with K 1 and 6 band sts in garter st. ROW 2 (= WS): 6 band sts in garter st, * 1 YO, slip 1 st as if to P, K tog YO and slipped st *, repeat from *-* until 7 sts remain, finish with 1 YO, slip 1 st as if to P and 6 band sts in garter st. ROW 3 (= RS): 6 band sts in garter st, * K tog YO and slipped st, 1 YO, slip 1 st as if to P *, repeat from *-* until 8 sts remain, K tog YO and slipped st, finish with 6 band sts in garter st. Repeat 2nd and 3rd row upwards. SLEEVE IN ENGLISH RIB (back and forth on needle): ROW 1 (= RS): 1 edge st, * K 1, 1 YO, slip 1 st as if to P *, repeat from *-* until 1 st remains, finish with 1 edge st. ROW 2 (= WS/RS): 1 edge st, * K tog YO and slipped st, 1 YO, slip 1 st as if to P *, repeat from *-* until 1 st remains, finish with 1 edge st. Repeat 2nd row upwards. SHORT ROWS ALONG FRONT BAND: To make the sts in garter st on front band and on body in English rib the same length, work short rows in each side of piece as follows: Work as follows every 7th and 8th row: Work until 6 band sts remain, turn piece and work back until 6 band sts remain, turn piece (tighten the thread a little when turning to avoid holes). Continue with short rows every 7th and 8th row up to neck, then work back and forth over all sts again. BUTTON HOLES: Cast off for 8-8-8-8-9-9 button holes on right front band. 1 BUTTON HOLE = K tog third and fourth st from edge and make 1 YO. Cast off for button holes when piece measures approx.: SIZE XS: 19, 29, 39, 49, 59, 69, 79 cm and one button hole in the edge of neck. SIZE S: 21, 31, 41, 51, 61, 71, 81 cm and one button hole in the edge of neck. SIZE M: 23, 33, 43, 53, 63, 73, 83 cm and one button hole in the edge of neck. SIZE L/XL: 25, 35, 45, 55, 65, 75, 85 cm and one button hole in the edge of neck. SIZE XXL: 24, 33, 42, 51, 60, 69, 78, 87 cm and one button hole in the edge of neck. SIZE XXXL: 26, 35, 44, 53, 62, 71, 80, 89 cm and one button hole in the edge of neck. I.e. approx. 1 cm remains until finished measurements after last button hole. -------------------------------------------------------- JACKET: Worked back and forth from mid front on circular needle size 6 mm with 2 threads Kid-Silk. Loosely cast on 194-206-218-239-257-275 sts. Work first row as follows from WS: 6 band sts in GARTER ST - see explanation above -, * P 2 tog, K 1 *, repeat from *-* until 8 sts remain, finish with P 2 tog and 6 band sts in garter st = 133-141-149-163-175-187 sts. Insert 2 markers in the piece; in the 37th-39th-41st-45th-47th-51st st in from each side (insert marker in a K st - seen from RS). Then work BODY IN ENGLISH RIB and SHORT ROWS as well as BUTTON HOLES ON RIGHT FRONT BAND -see explanation above! REMEMBER THE KNITTING TENSION! When piece measures 11-12-12-12-12-12 cm, dec at the marker in each side - See DECREASE TIP IN ENGLISH RIB! Repeat dec every 11-12-12-12-12-12 cm a total of 4 times = 101-109-117-131-143-155 sts (incl band sts). When piece measures approx. 61-62-63-64-65-66 cm, work next row as follows from WS: Work 25-27-29-32-35-37 sts in garter st and English rib as before (= front piece), cast off 7-7-7-8-8-10 sts for armhole (YOs are not counted as 1 st), work 37-41-45-51-57-61 sts in English rib as before (= back piece), cast off 7-7-7-8-8-10 sts for armhole and work the remaining 25-27-29-32-35-37 sts in English rib and garter st as before (= front piece). Put piece aside and knit the sleeves. SLEEVE: Worked back and forth on needle. Cast on 41-44-44-47-47-50 sts (incl 1 edge st in each side) on circular needle size 6 mm with 2 threads Kid-Silk. Work first row as follows from WS: 1 edge st, * P 2 tog, K 1 *, repeat from *-* until 1 st remains, finish with 1 edge st = 28-30-30-32-32-34 sts. Then work SLEEVE IN ENGLISH RIB - see explanation above (1st row = RS). When piece measures 8 cm, inc 1 st in each side - READ INCREASE TIP! Repeat inc every 15-15-10-10-9-9 cm a total of 2-2-3-3-4-4 times = 32-34-36-38-40-42 sts. When piece measures 42-42-41-41-40-40 cm - adjust so that next row is worked from WS - cast off for armhole as follows: Cast off 2 sts at beg of row, work until 4 sts remain and cast off these sts = 26-28-30-32-34-36 sts - cut the thread. Work another sleeve but work last row on this sleeve as follows: When piece measures 42-42-41-41-40-40 cm - adjust so that next row is worked from WS - cast off for armhole as follows: Cast off 4 sts at beg of row, work until 2 sts remain and cast off these sts. YOKE: Slip sleeves on to same circular needle as body where armholes were cast off = 139-151-163-179-195-207 sts. Then work BODY IN ENGLISH RIB (1st row = RS = 3rd row on body in English rib) - NOTE: Make sure that the pattern is correct in every transition between body and sleeves. AT THE SAME TIME work SHORT ROWS - see explanation above. When yoke measures 19-20-21-22-23-24 cm from where body and sleeves were slipped on to same needle, work in rib (= K 1/P 1) over sts in English rib but work the 6 band sts in each side in garter st as before. When yoke measures approx. 21-22-23-24-25-26 cm, work next row as follows from RS (while at the same time casting off for the last button hole on right front piece): 6 band sts in garter st, * K 2 twisted tog, P 2 tog *, repeat from *-* until 7 sts remain and finish with K 2 tog and 5 band sts in garter st = 75-81-87-95-103-109 sts. P 1 row from WS (K the 6 band sts) - while AT THE SAME TIME dec 9-11-15-19-25-27 sts evenly on row - do not dec over band sts = 66-70-72-76-78-82 sts. Cast off with K from RS with 4 threads Kid-Silk. Jacket measures approx. 80-82-84-86-88-90 cm up to shoulder. POCKET: Cast on 22 sts (incl 1 edge st in garter st in each side) on circular needle size 6 mm with 2 threads Kid-Silk. Work first row as follows from WS: 1 edge st in garter st, * P 2 tog, K 1 *, repeat from *-* until 3 sts remain, finish with P 2 tog and 1 edge st in garter st = 15 sts. Then work as BODY IN ENGLISH RIB - see explanation above but work 1 edge st in garter st instead of 6 band sts in garter st in each side. When pocket measures approx. 16 cm, work 1 row in rib K 1/P 1 over sts in English rib, work edge sts in garter st as before. Cast off with K over K and P over P with 4 threads Kid-Silk. Knit another pocket. ASSEMBLY: Sew the sleeve seams inside 1 edge st. Sew the opening under the sleeves. Sew on buttons (use the smallest button at the top in the neck edge). Place 1 pocket on each front piece, approx. 8-11 cm from mid front and 20-25 cm from the bottom edge. Sew on pockets inside 1 edge st with stitches so that the sts in English rib fits. |
|
Have you made this or any other of our designs? Tag your pictures in social media with #dropsdesign so we can see them! Do you need help with this pattern?You'll find tutorial videos, a Comments/Questions area and more by visiting the pattern on garnstudio.com. © 1982-2024 DROPS Design A/S. We reserve all rights. This document, including all its sub-sections, has copyrights. Read more about what you can do with our patterns at the bottom of each pattern on our site. |
With over 40 years in knitting and crochet design, DROPS Design offers one of the most extensive collections of free patterns on the internet - translated to 17 languages. As of today we count 304 catalogues and 11422 patterns - 11422 of which are translated into English (UK/cm).
We work hard to bring you the best knitting and crochet have to offer, inspiration and advice as well as great quality yarns at incredible prices! Would you like to use our patterns for other than personal use? You can read what you are allowed to do in the Copyright text at the bottom of all our patterns. Happy crafting!
Comments / Questions (57)
Annika wrote:
Mulig jeg er litt dum her - men når jeg strikker blir knappestolpen kortere/strammere enn patentstrikken på resten av bolen, så jeg har strikket forkortede pinner over selve knappestolpen. Men når jeg nå leser oppskriften igjen tolker jeg det som at man skal strikke ekstra pinner over resten av bolen..? Kanskje det bare er jeg som strikker stramt i riller og løst i patent - men hva er fasit her?
30.09.2022 - 00:45DROPS Design answered:
Hei Annika. Ja, man strikker forkortede pinner over bolen, ikke stolpene. Noen strikker løsere i patent, så sjekk strikkefastheten din og se om den stemmer. mvh DROPS Design
10.10.2022 - 08:27Dorota Chrulska wrote:
Robię ten sweter rozmiar L na drutach 5,5. Kid silk 2 nitki. Na 30 cm przestałam bo wychodzi ogromny. Szerokość robótki 158 cm.! Robię na mniejszych drutach i nie rozumiem. Robię dość ciasno, bo to nie mój pierwszy sweter ściegiem angielskim który jest luźny z natury. Muszę spróć. Coś nie tak z tym opisem.
30.01.2022 - 18:51DROPS Design answered:
Witaj Doroto, mam podobny problem ze ściegiem angielskim, robię go luźniej niż dżersej. Radzę wziąć mniejsze druty i wykonać próbkę. Dopiero jak twoja próbka będzie zgodna ze wzorem, wymiary swetra po ukończeniu będą takie jak we wzorze. Pozdrawiamy!
31.01.2022 - 09:24Nancy wrote:
Hallo. Ich würde die Strickjacke gerne in einem Wellenmuster stricken. Gibt es ein Muster das ich dazu verwenden kann hier auf der Webseite?
01.12.2021 - 22:08DROPS Design answered:
Liebe Nancy, hier finden Sie alle unsere Anleitungen für Jacken mit Wellenmuster. Viel Spaß beim stricken!
02.12.2021 - 09:03Susanne wrote:
Hejsa! Jeg har desværre brug for hjælp til at forstå opskriften på ærmerne. 1. pind afsluttes med retmaske før kantmaske, men på 1. pind i helpatent (=2. pind) startes også med ret efter kantmaske. Så bliver det ret over vrang? Og så forstår jeg ikke hvordan patenten kan komme til at passe på bærestykket, når der lukkes et ulige antal af til ærme, men ærmerne ender med at have et lige antal masker? På forhånd tak for hjælpen;)
31.07.2020 - 08:56DROPS Design answered:
Hej Susanne, du lukker af i hver side af ærmet, så det bliver et lige antal masker du lukker af. God fornøjelse!
06.08.2020 - 08:37Monika wrote:
Wenn ich die Jacke mit falschem Patent stricken möchte, wie rechne ich die Angaben um ? geht das überhaupt? Meine Maschenprobe sin 13M auf 10 cm im falschem Patent.
16.08.2018 - 18:14DROPS Design answered:
Liebe Monika, leider können wir nicht jede Anleitung nach jeder individuellen Anfrage anpassen, gerne wird Ihnen Ihr DROPS Laden weiterhelfen (auch telefonisch oder per E-mail). Viel Spaß beim stricken!
17.08.2018 - 09:49Mia Juul wrote:
Kan det passe at ærmerne skal være kortere på str XXL end på en str S?
11.03.2018 - 15:23DROPS Design answered:
Hej Mia, ja det stemmer i og med at bærestykket er bredere i de større størrelser. God fornøjelse!
13.03.2018 - 16:23Katja wrote:
Und wie viel Gramm Alpaca muß ich bei Größe L nehmen. vielen Dank
23.11.2015 - 19:29DROPS Design answered:
Für Größe L benötigen Sie 2400 m Garn (300 g Kid-Silk = 12 x 25 g, 25 g = 200 m), d.h. umgerechnet auf Alpaca benötigen Sie 15 Knäuel Alpaca-Garn (2400 m durch 167 m (= 50 g Alpaca) = 14,37).
24.11.2015 - 22:55Katja wrote:
Hallo! Wenn ich diese Jacke in Alpaca stricken möchte, muß ich dann auch mit zwei Fäden stricken?
23.11.2015 - 18:59DROPS Design answered:
Ja, Sie stricken dann ebenfalls doppelfädig. Beide Garne gehören in Garngruppe A und sind somit untereinander austauschbar, was bedeutet, dass sie sich auch ähnlich verhalten - somit wird auch mit Alpaca zweifädig gestrickt.
24.11.2015 - 22:52Celik wrote:
Hallo, kann ich dieses Modell auch mit brushed Alpaca Silk stricken? Wieviel Gramm brauche ich dann für die Größe M und welche Nadelstärke? Besten Dank für die Antwort im Voraus!
14.05.2015 - 13:04DROPS Design answered:
An sich ist Brushed Alpaca Silk nicht als Garnalternative vorgesehen, da es eine andere Stärke/Maschenprobe hat als Kid Silk. Wenn Sie Brushed Alpaca Silk 1-fädig nehmen, wird die Jacke dünner, wenn Sie es doppelfädig nehmen (wie hier Kid-Silk), wird die Jacke dicker. Wichtig ist, dass die Maschenprobe erreicht wird. Falls Sie schon im Besitz von Brushed Alpaca Silk sind, würde ich einfach ein Probestück anfertigen und testen, ob Sie die Maschenprobe erreichen und wie Ihnen das Ergebnis gefällt. Ansonsten würde ich raten, wie in der Anleitung Kid-Silk zu verwenden - die Wolle ist auch schön flauschig. Jacken, die Sie in Brushed Alpaca Silk stricken können, sind z.B. 158-24 und 157-19.
15.05.2015 - 12:24Sabine wrote:
Ich glaube, ich habe einen Fehler gefunden: in der Anleitung unter "Tipp zum Abnehmen im Patentmuster" muss es heißen: ...diese 2 M. re. ABHEBEN, die nächsten 3 M. re. zusammenstricken und danach die 2 abgehobenen Maschen überziehen (das Wort abheben fehlt)
20.01.2015 - 14:37DROPS Design answered:
Danke für den Hinweis, das wird gleich korrigiert!
21.01.2015 - 22:06