
Popular categories
Looking for a yarn?


|
|||||||||||||||||||||||||
Martina's Hug |
|||||||||||||||||||||||||
|
|
|||||||||||||||||||||||||
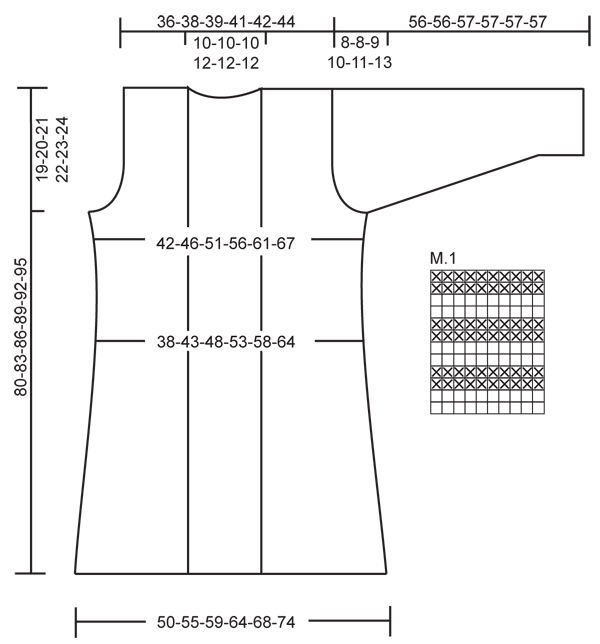
Knitted long DROPS jacket with cables and shawl collar in ”Nepal”. Size S - XXXL.
DROPS 123-39 |
|||||||||||||||||||||||||
|
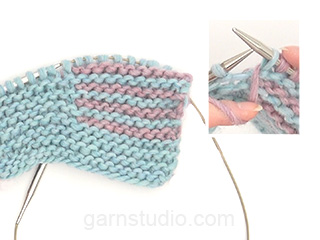
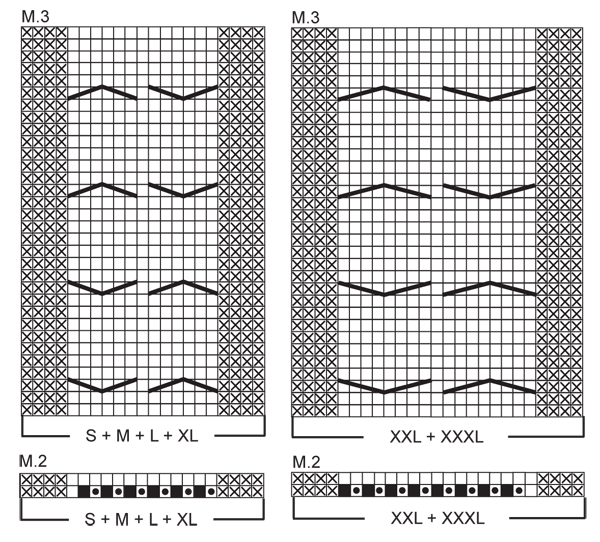
MEASUREMENT TIP: Because of the weight of the yarn make all measurements while the garment is hanging, otherwise it will be too long when worn. GARTER ST (back and forth on circular needle): K all rows. KNITTING TIP-1 (applies to front band): To make the edge neater work the 2 first sts on front band with 2 strands (use a separate small ball of yarn). It is important to either K or P first st according to pattern, i.e. do not slip first st as if to K/P. KNITTING TIP-2 (applies to front band): To make sure front band isn’t too tight, work shortened rows on front band with regular intervals as follows: * Beg mid front and work 2 rows as before on all sts on needle, turn piece, work 1 row on the 18-18-18-20-20-20 front band sts only, turn piece, slip 1 st as if to K/P, tighten thread and work return row *, repeat from *-* after approx every 10 rows. PATTERN: See diagrams M.1 to M.3. Diagrams show the pattern from RS. Row 1 in diagram = RS. INCREASING TIP (applies to shawl collar): Inc 1 st by making 1 YO inside the 2 front band sts towards front edge. On next row K YO into back of loop, to avoid a hole. BUTTONHOLES: Make buttonholes on right front band. 1 BUTTONHOLE = K tog 3rd and 4th st from mid front and make 1 YO. Make buttonholes when piece measures: SIZE S: 27, 34, 41, 48 cm / 10⅝",13⅜",16⅛",19". SIZE M: 29, 36, 43, 50 cm / 11⅜",14¼",17",19¾". SIZE L: 29, 37, 45, 53 cm / 11⅜",14½",17¾",21". SIZE XL: 31, 39, 47, 55 cm / 12¼",15¼",18½",21⅝". SIZE XXL: 34, 42, 50, 58 cm / 13⅜",16½",19¾",22¾". SIZE XXXL: 33, 42, 51, 60 cm / 13",16½",20",23⅝". -------------------------------------------------------- JACKET: All parts worked back and forth on circular needle. BACK PIECE: Cast on 87-95-103-110-118-128 sts (includes 1 edge st each side) on circular needle size 4.5 mm / US 7 with Nepal. Work 4 rows GARTER ST - see above! Change to circular needle size 5 mm / US 8 and work stockinette st back and forth on needle with 1 edge st each side. REMEMBER THE GAUGE! When piece measures 4-4-5-6-6-6 cm / 1½"-1½"-2"-2⅜"-2⅜"-2⅜" - See MEASUREMENT TIP -dec 1 st each side and repeat the dec each side on every 4-4-4-4.5-4.5-4.5 cm / 1½"-1½"-1½"-1¾"-1¾"-1¾" a total of 10-10-10-9-9-9 times = 67-75-83-92-100-110 sts. When piece measures 45-46-47-48-49-50 cm / 17¾"-18"-18½"-19"-19¼"-19¾" inc 1 st each side. Repeat the inc each side on every 5-5-6-6-6-6 cm / 2"-2"-2⅜"-2⅜"-2⅜"-2⅜" a total of 3 times = 73-81-89-98-106-116 sts. When piece measures 61-63-65-67-69-71 cm / 24"-24¾"-25½"-26⅜"-27⅛"-28" bind off for armhole at beg of row each side as follows: 3 sts 1-1-1-1-2-3 times, 2 sts 1-1-2-3-3-4 times and 1 st 1-3-4-5-5-4 times = 61-65-67-70-72-74 sts. When piece measures 78-81-84-87-90-93 cm / 30¾"-32"-33"-34¼"-35½"-36⅝" bind off the middle 15-15-15-18-18-18 sts for neck and complete each shoulder separately. Bind off 1 st on neckline on next row = 22-24-25-25-26-27 sts left on shoulder. Bind off when piece measures 80-83-86-89-92-95 cm / 31½"-32¾"-33⅞"-35"-36¼"-37⅜". RIGHT FRONT PIECE: Cast on 53-57-61-65-69-74 sts (includes 1 edge st at the side and 18-18-18-20-20-20 front band sts towards front edge) on circular needle size 4.5 mm / US 7 with Nepal. Work 4 rows garter st and change to circular needle size 5 mm / US 8. See KNITTING TIP 1 + 2 AND REMEMBER MEASUREMENT TIP! Work next row as follows from RS: M.1 on the first 18-18-18-20-20-20 sts (= front band), M.2 (= 15 sts in SIZE S + M + L + XL and 17 sts in SIZE XXL + XXXL), stockinette st on the next 19-23-27-29-31-36 sts and 1 edge st. After 1 vertical repeat of M.2 there are 59-63-67-71-77-82 sts on needle. Now continue in M.3 instead of M.2 (Row 1 = RS, see diagram for your size) – work remaining sts as before. When piece measures 4-4-5-6-6-6 cm / 1½"-1½"-2"-2⅜"-2⅜"-2⅜" dec at the side as described for back piece = 49-53-57-62-68-73 sts. REMEMBER BUTTONHOLES ON FRONT BAND - see above. When piece measures 45-46-47-48-49-50 cm / 17¾"-18"-18½"-19"-19¼"-19¾" inc at the side as described for back piece. AT THE SAME TIME when piece measures 48-49-50-51-52-53 cm / 19"-19¼"-19¾"-20"-20½"-21" inc 1 st for shawl collar – See INCREASING TIP. Repeat the inc on every 3-3.5-3.5-4-4-4.5 cm / 1⅛"-1¼"-1¼"-1½"-1½"-1¾" a total of 8 times. AT THE SAME TIME when piece measures 61-63-65-67-69-71 cm / 24"-24¾"-25½"-26⅜"-27⅛"-28" bind off for armhole at the side as described for back piece (bind off at the beg of every row from the side). After all inc and dec are complete there are 54-56-57-59-62-63 sts on needle. Continue until 1 row remains before piece measures 80-83-86-89-92-95 cm / 31½"-32¾"-33⅞"-35"-36¼"-37⅜" – adjust so that next row is from RS. Now dec evenly on the middle 13-13-13-13-17-17 sts in cable as follows: 6 sts in SIZE S + M + L + XL and 8 sts in SIZE XXL + XXXL – NOTE: Dec by K2 tog. On next row bind off 22-24-25-25-26-27 sts for shoulder = 26-26-26-28-28-28 sts left on needle for shawl collar, work remaining sts on row. Continue in M.1 back and forth on these sts AT THE SAME TIME work shortened rows as follows - adjust so that next row is a K row from RS and either row 2, 6 or 10 in M.1 (adjust to this by working an extra row here if necessary): * K1 row from RS on all sts, turn and K return row from WS on all sts, turn and P the first 14 sts, turn, slip first st as if to K, tighten thread and K return row, turn and P 1 row on all sts, turn and P 1 row from WS on all sts *, repeat from *-* until collar measures approx 7-7-7-8-8-8 cm / 2¾"-2¾"-2¾"-3⅛"- 3⅛"- 3⅛" towards the neck, slip sts on a stitch holder. LEFT FRONT PIECE: Cast on and work like right front piece, but mirrored. NOTE: Do not make buttonholes on left front band. When working shortened rows on collar adjust so the collar is identical on both sides and mid back for sewing tog SLEEVE: Cast on 42-44-44-46-46-48 sts (includes 1 edge st each side) on circular needle size 4.5 mm / US 7 with Nepal. Work 4 rows garter st. Change to circular needle size 5 mm / US 8 and work M.1 back and forth on needle. When piece measures 8 cm / 3⅛" continue in stockinette st. When piece measures 9-9-11-9-12-10 cm / 3½"-3½"-4⅜"-3½"-4¾"-4" inc 1 st each side. Repeat the inc on every 5-4-3-3-2-2 cm / 2"-1½"-1⅛"-1⅛"-¾"-¾" a total of 8-10-12-13-16-16 times = 58-64-68-72-78-80 sts. When piece measures 48-48-48-47-46-44 cm / 19"-19"-19"-18½"-18"-17¼" - NOTE: Less for the larger sizes because of longer sleeve cap and wider shoulder – bind off for sleeve cap at the beg of every row each side as follows: 3 sts 1 time, 2 sts 3 times and 1 st 1-1-2-3-4-5 times, then 2 sts each side until piece measures 55-55-56-56-56-56 cm / 21⅝"-21⅝"-22"-22"-22"-22". Now bind off 3 sts at the beg of the next 2 rows and bind off remaining sts, piece measures approx 56-56-57-57-57-57 cm / 22"-22"-22½"-22½"-22½"-22½". ASSEMBLY: Sew shoulder seams. Graft collar tog mid back and sew collar to neckline on back piece. Set in sleeves. Sew sleeve and side seams inside 1 edge st. Sew buttons on left front piece. |
|||||||||||||||||||||||||
Diagram explanations |
|||||||||||||||||||||||||
|
|||||||||||||||||||||||||
|
|||||||||||||||||||||||||
|
|||||||||||||||||||||||||
|
Have you made this or any other of our designs? Tag your pictures in social media with #dropsdesign so we can see them! Do you need help with this pattern?You'll find tutorial videos, a Comments/Questions area and more by visiting the pattern on garnstudio.com. © 1982-2024 DROPS Design A/S. We reserve all rights. This document, including all its sub-sections, has copyrights. Read more about what you can do with our patterns at the bottom of each pattern on our site. |
|||||||||||||||||||||||||


With over 40 years in knitting and crochet design, DROPS Design offers one of the most extensive collections of free patterns on the internet - translated to 17 languages. As of today we count 304 catalogs and 11422 patterns - 11417 of which are translated into English (US/in).
We work hard to bring you the best knitting and crochet have to offer, inspiration and advice as well as great quality yarns at incredible prices! Would you like to use our patterns for other than personal use? You can read what you are allowed to do in the Copyright text at the bottom of all our patterns. Happy crafting!
Comments / Questions (44)
Andreeea wrote:
Hi! Can you help me with a video for the increasing tip for the shawl collar please. Thank's! The othet two video's that you posted were very helpful, thank you!
26.02.2016 - 21:06DROPS Design answered:
Dear Andreeea, you inc for the shawl collar as explained under "Increase- tip (applies to shawl collar": ie work the first 2 sts at beg of row (from RS= right front piece), make a YO, work row as stated until 2 sts remain on row (from RS = left front piece) and make a YO, K2. On next row K YO into back of loop to avoid hole. Happy knitting!
27.02.2016 - 15:52Andreea wrote:
Hi, can you help me with the front pieace becouse I am lost.. I dont understand how to work the edge neater with the small ball of yarn. Maby you can help me with a video for this as well as for the shortend rows. Thank you.
20.02.2016 - 12:21DROPS Design answered:
Dear Andreea, the video below shows how to work the 2 outermost sts with 2 strands of yarn held together, the other video shows how to work short rows -see more videos under tab "Videos". Happy knitting!
20.02.2016 - 12:50Pour tricoter le diagramme M2 vous dites pas de maille ne pas tricoter cette maille alors que doit on en faire la lâcher parce que si je ne la tricote pas en la passant directement sur l'autre aiguille j'ai une maille de trop ?
29.06.2015 - 15:02DROPS Design answered:
Bonjour Mme Davesne, sautez la case noire, il n'y a pas encore de mailles sur ce rang, celle avec le point noir = tricotez 2 fois cette maille = 1 augmentation, ainsi, au rang suivant, vous avez 6-8 m en plus (cf taille). Bon tricot!
29.06.2015 - 15:30Vi ringrazio molto della spiegazione e della rapidità con cui mi avete risposto!!
05.04.2014 - 21:45Buonasera! Vorrei fare questa giacca ma rimango perplessa sull'utilizzo dei ferri circolari, in quanto non mi sembra sia una lavorazione in tondo! Mi sfugge di certo qualcosa! Potete cortesemente togliermi il dubbio? E potrei eventualmente usare comunque i ferri normali? Vi ringrazio anticipatamente e Vi saluto cordialmente
05.04.2014 - 16:47DROPS Design answered:
Buonasera Donatella, la maggior parte dei modelli DROPS è lavorata su ferri circolari, anche a causa del numero elevato di maglie. In questo caso il modello è aperto per cui non è lavorato in tondo e può lavorare con i ferri dritti, se preferisce. Buon lavoro!!
05.04.2014 - 20:34Buonasera! vorrei fare questa giacca,ma resto perplessa leggendo che occorrono i ferri circolari visto che non è una lavorazione in tondo. Ne deduco che mi sfugge qualcosa! Potete chiarire il mio dubbio? vorrei sapere se potrei comunque usare i ferri normali. Vi ringrazio anticipatamente e Vi saluto cordialmente
05.04.2014 - 16:43DROPS Design answered:
Buonasera Donatella, la maggior parte dei modelli DROPS è lavorata su ferri circolari, anche a causa del numero elevato di maglie. In questo caso il modello è aperto per cui non è lavorato in tondo e può lavorare con i ferri dritti, se preferisce. Buon lavoro!!
05.04.2014 - 20:34Dank je wel voor de reactie. Ik bedoel eigenlijk dat ik over de eerste 14 steken drie ribbels boven elkaar heb i.p.v twee zoals bij M1. Ik hoop dat ik wat duidelijker geweest ben.
05.02.2014 - 18:51DROPS Design answered:
Hoi Ria. Excuus voor de vertraging in mijn antwoord, ik moest even overleggen met een collega. Het patroon is correct, je moet niet de verkorte toeren meetellen in het telpatroon. Je hebt dus 2 nld av op de goede kant, die niet deelmaken van het motief
05.03.2014 - 16:23Is de beschrijving van de sjaalkraag goed? Ik krijg namelijk een aantal naalden linkse steken op de voorkant. Wie kan mij verder helpen? alvast bedankt.
04.02.2014 - 16:49DROPS Design answered:
Hoi Ria. Het patroon is correct. Ik begrijp niet de term "linkse steken op de voorkant". Wat bedoel je precies?
05.02.2014 - 16:55Sandra Stead wrote:
Thank you for the video, but that wasn't my question. On the front band, where the tip is to knit extra rows, do you knit the 18 stitches, go back to the end and start again? Do you mean knit the side of the cardigan or just the front band? The instructions are not very clear on this point.
26.03.2013 - 11:55DROPS Design answered:
Dear Mrs Stead, you will have to work 2 rows on the 18 sts of the front border (= more rows on these sts for the front border than for all other sts). Happy knitting!
29.03.2013 - 14:59I am finding diagram M.2 confusing.It says purl 4sts then work 2sts inthis st. Does that mean inc in purl in this st or work 2sts purl? Then it says no st (do not work this st). So for first size does this mean you inc in next 6 sts?
08.03.2013 - 12:55DROPS Design answered:
Dear Mrs Stead, 1st row in M.2 is worked from RS, ie white square = K from RS, you will then K front and back of the indicated sts to inc 2 in 1 a total of 6 times in each diagram = 6 sts inc.
Increase – KFB (knit front back) from Garnstudio Drops design on Vimeo.
Happy knitting! 08.03.2013 - 13:37