
Popular categories
Looking for a yarn?


|
|||||||||||||||||||||||||
Martina's Hug |
|||||||||||||||||||||||||
|
|
|||||||||||||||||||||||||
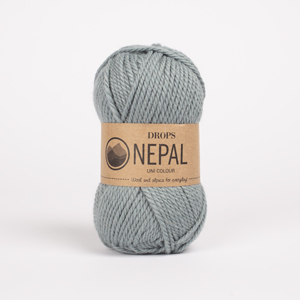
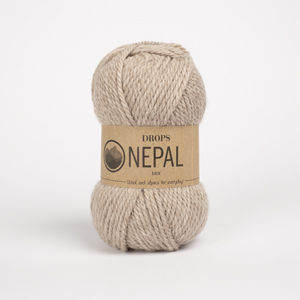
Knitted long DROPS jacket with cables and shawl collar in ”Nepal”. Size S - XXXL.
DROPS 123-39 |
|||||||||||||||||||||||||
|
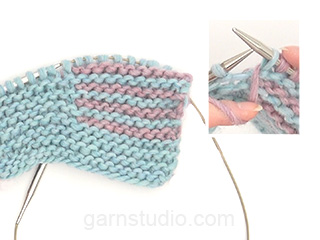
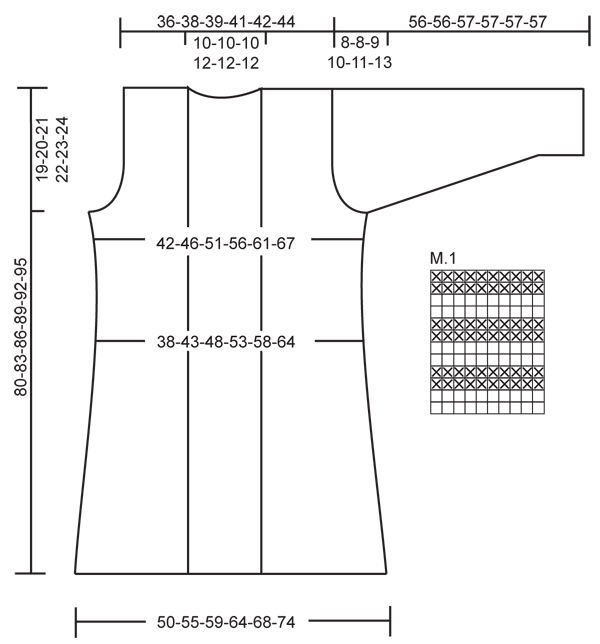
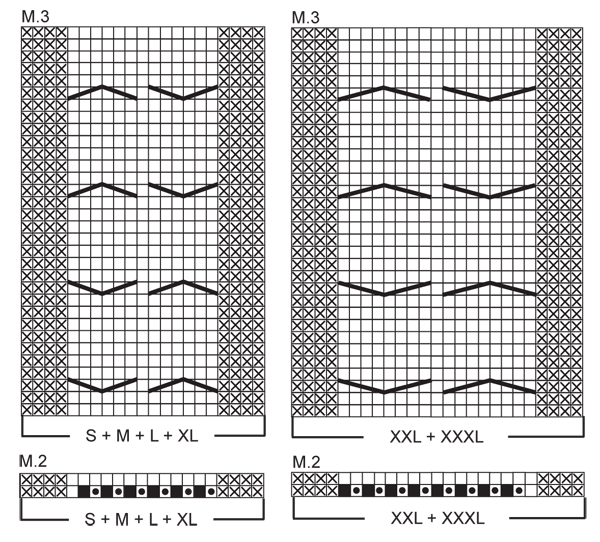
MEASUREMENT TIP: Because of the weight of the yarn make all measurements while the garment is hanging, otherwise it will be too long when worn. GARTER ST (back and forth on circular needle): K all rows. KNITTING TIP-1 (applies to front band): To make the edge neater work the 2 first sts on front band with 2 strands (use a separate small ball of yarn). It is important to either K or P first st according to pattern, i.e. do not slip first st as if to K/P. KNITTING TIP-2 (applies to front band): To make sure front band isn’t too tight, work shortened rows on front band with regular intervals as follows: * Beg mid front and work 2 rows as before on all sts on needle, turn piece, work 1 row on the 18-18-18-20-20-20 front band sts only, turn piece, slip 1 st as if to K/P, tighten thread and work return row *, repeat from *-* after approx every 10 rows. PATTERN: See diagrams M.1 to M.3. Diagrams show the pattern from RS. Row 1 in diagram = RS. INCREASING TIP (applies to shawl collar): Inc 1 st by making 1 YO inside the 2 front band sts towards front edge. On next row K YO into back of loop, to avoid a hole. BUTTONHOLES: Make buttonholes on right front band. 1 BUTTONHOLE = K tog 3rd and 4th st from mid front and make 1 YO. Make buttonholes when piece measures: SIZE S: 27, 34, 41, 48 cm / 10⅝",13⅜",16⅛",19". SIZE M: 29, 36, 43, 50 cm / 11⅜",14¼",17",19¾". SIZE L: 29, 37, 45, 53 cm / 11⅜",14½",17¾",21". SIZE XL: 31, 39, 47, 55 cm / 12¼",15¼",18½",21⅝". SIZE XXL: 34, 42, 50, 58 cm / 13⅜",16½",19¾",22¾". SIZE XXXL: 33, 42, 51, 60 cm / 13",16½",20",23⅝". -------------------------------------------------------- JACKET: All parts worked back and forth on circular needle. BACK PIECE: Cast on 87-95-103-110-118-128 sts (includes 1 edge st each side) on circular needle size 4.5 mm / US 7 with Nepal. Work 4 rows GARTER ST - see above! Change to circular needle size 5 mm / US 8 and work stockinette st back and forth on needle with 1 edge st each side. REMEMBER THE GAUGE! When piece measures 4-4-5-6-6-6 cm / 1½"-1½"-2"-2⅜"-2⅜"-2⅜" - See MEASUREMENT TIP -dec 1 st each side and repeat the dec each side on every 4-4-4-4.5-4.5-4.5 cm / 1½"-1½"-1½"-1¾"-1¾"-1¾" a total of 10-10-10-9-9-9 times = 67-75-83-92-100-110 sts. When piece measures 45-46-47-48-49-50 cm / 17¾"-18"-18½"-19"-19¼"-19¾" inc 1 st each side. Repeat the inc each side on every 5-5-6-6-6-6 cm / 2"-2"-2⅜"-2⅜"-2⅜"-2⅜" a total of 3 times = 73-81-89-98-106-116 sts. When piece measures 61-63-65-67-69-71 cm / 24"-24¾"-25½"-26⅜"-27⅛"-28" bind off for armhole at beg of row each side as follows: 3 sts 1-1-1-1-2-3 times, 2 sts 1-1-2-3-3-4 times and 1 st 1-3-4-5-5-4 times = 61-65-67-70-72-74 sts. When piece measures 78-81-84-87-90-93 cm / 30¾"-32"-33"-34¼"-35½"-36⅝" bind off the middle 15-15-15-18-18-18 sts for neck and complete each shoulder separately. Bind off 1 st on neckline on next row = 22-24-25-25-26-27 sts left on shoulder. Bind off when piece measures 80-83-86-89-92-95 cm / 31½"-32¾"-33⅞"-35"-36¼"-37⅜". RIGHT FRONT PIECE: Cast on 53-57-61-65-69-74 sts (includes 1 edge st at the side and 18-18-18-20-20-20 front band sts towards front edge) on circular needle size 4.5 mm / US 7 with Nepal. Work 4 rows garter st and change to circular needle size 5 mm / US 8. See KNITTING TIP 1 + 2 AND REMEMBER MEASUREMENT TIP! Work next row as follows from RS: M.1 on the first 18-18-18-20-20-20 sts (= front band), M.2 (= 15 sts in SIZE S + M + L + XL and 17 sts in SIZE XXL + XXXL), stockinette st on the next 19-23-27-29-31-36 sts and 1 edge st. After 1 vertical repeat of M.2 there are 59-63-67-71-77-82 sts on needle. Now continue in M.3 instead of M.2 (Row 1 = RS, see diagram for your size) – work remaining sts as before. When piece measures 4-4-5-6-6-6 cm / 1½"-1½"-2"-2⅜"-2⅜"-2⅜" dec at the side as described for back piece = 49-53-57-62-68-73 sts. REMEMBER BUTTONHOLES ON FRONT BAND - see above. When piece measures 45-46-47-48-49-50 cm / 17¾"-18"-18½"-19"-19¼"-19¾" inc at the side as described for back piece. AT THE SAME TIME when piece measures 48-49-50-51-52-53 cm / 19"-19¼"-19¾"-20"-20½"-21" inc 1 st for shawl collar – See INCREASING TIP. Repeat the inc on every 3-3.5-3.5-4-4-4.5 cm / 1⅛"-1¼"-1¼"-1½"-1½"-1¾" a total of 8 times. AT THE SAME TIME when piece measures 61-63-65-67-69-71 cm / 24"-24¾"-25½"-26⅜"-27⅛"-28" bind off for armhole at the side as described for back piece (bind off at the beg of every row from the side). After all inc and dec are complete there are 54-56-57-59-62-63 sts on needle. Continue until 1 row remains before piece measures 80-83-86-89-92-95 cm / 31½"-32¾"-33⅞"-35"-36¼"-37⅜" – adjust so that next row is from RS. Now dec evenly on the middle 13-13-13-13-17-17 sts in cable as follows: 6 sts in SIZE S + M + L + XL and 8 sts in SIZE XXL + XXXL – NOTE: Dec by K2 tog. On next row bind off 22-24-25-25-26-27 sts for shoulder = 26-26-26-28-28-28 sts left on needle for shawl collar, work remaining sts on row. Continue in M.1 back and forth on these sts AT THE SAME TIME work shortened rows as follows - adjust so that next row is a K row from RS and either row 2, 6 or 10 in M.1 (adjust to this by working an extra row here if necessary): * K1 row from RS on all sts, turn and K return row from WS on all sts, turn and P the first 14 sts, turn, slip first st as if to K, tighten thread and K return row, turn and P 1 row on all sts, turn and P 1 row from WS on all sts *, repeat from *-* until collar measures approx 7-7-7-8-8-8 cm / 2¾"-2¾"-2¾"-3⅛"- 3⅛"- 3⅛" towards the neck, slip sts on a stitch holder. LEFT FRONT PIECE: Cast on and work like right front piece, but mirrored. NOTE: Do not make buttonholes on left front band. When working shortened rows on collar adjust so the collar is identical on both sides and mid back for sewing tog SLEEVE: Cast on 42-44-44-46-46-48 sts (includes 1 edge st each side) on circular needle size 4.5 mm / US 7 with Nepal. Work 4 rows garter st. Change to circular needle size 5 mm / US 8 and work M.1 back and forth on needle. When piece measures 8 cm / 3⅛" continue in stockinette st. When piece measures 9-9-11-9-12-10 cm / 3½"-3½"-4⅜"-3½"-4¾"-4" inc 1 st each side. Repeat the inc on every 5-4-3-3-2-2 cm / 2"-1½"-1⅛"-1⅛"-¾"-¾" a total of 8-10-12-13-16-16 times = 58-64-68-72-78-80 sts. When piece measures 48-48-48-47-46-44 cm / 19"-19"-19"-18½"-18"-17¼" - NOTE: Less for the larger sizes because of longer sleeve cap and wider shoulder – bind off for sleeve cap at the beg of every row each side as follows: 3 sts 1 time, 2 sts 3 times and 1 st 1-1-2-3-4-5 times, then 2 sts each side until piece measures 55-55-56-56-56-56 cm / 21⅝"-21⅝"-22"-22"-22"-22". Now bind off 3 sts at the beg of the next 2 rows and bind off remaining sts, piece measures approx 56-56-57-57-57-57 cm / 22"-22"-22½"-22½"-22½"-22½". ASSEMBLY: Sew shoulder seams. Graft collar tog mid back and sew collar to neckline on back piece. Set in sleeves. Sew sleeve and side seams inside 1 edge st. Sew buttons on left front piece. |
|||||||||||||||||||||||||
Diagram explanations |
|||||||||||||||||||||||||
|
|||||||||||||||||||||||||
|
|||||||||||||||||||||||||
|
|||||||||||||||||||||||||
|
Have you made this or any other of our designs? Tag your pictures in social media with #dropsdesign so we can see them! Do you need help with this pattern?You'll find tutorial videos, a Comments/Questions area and more by visiting the pattern on garnstudio.com. © 1982-2024 DROPS Design A/S. We reserve all rights. This document, including all its sub-sections, has copyrights. Read more about what you can do with our patterns at the bottom of each pattern on our site. |
|||||||||||||||||||||||||


With over 40 years in knitting and crochet design, DROPS Design offers one of the most extensive collections of free patterns on the internet - translated to 17 languages. As of today we count 304 catalogs and 11422 patterns - 11417 of which are translated into English (US/in).
We work hard to bring you the best knitting and crochet have to offer, inspiration and advice as well as great quality yarns at incredible prices! Would you like to use our patterns for other than personal use? You can read what you are allowed to do in the Copyright text at the bottom of all our patterns. Happy crafting!
Comments / Questions (44)
Hola! Qué significa M1, M2 y M3? muchas gracias.
19.07.2019 - 23:09DROPS Design answered:
Hola Lady Grace. M.1, M.2 y M.3 son los diagramas de los dibujos que se utilizan en esta prenda. Puedes ver los gráficos y las abreviaturas bajo el patrón
25.07.2019 - 20:01Bonjour, je cherche un tutoriel pour assembler le col châle avec le dos de la veste. J'ai cherché sur le site mais sans succès. Merci d'avance ! 🙂
03.11.2018 - 16:32DROPS Design answered:
Bonjour Alice, cette vidéo montre comment assembler un col châle simple, ce sera la même technique pour ce modèle, la seule différence est que vous avez des rangs raccourcis sur le col. Bon assemblage!
05.11.2018 - 09:11Flätan kommer inte se ut som på modellen, fel mönster!
05.04.2018 - 18:23Wat wordt er bedoeld met :minder nu gelijkmatig over de middelste steken in de kabel;Gebeurt deze mindering in 1 naald? Ik hoop dat door deze verduidelijking mijn probleem opgelost wordt.Groetjes
22.03.2018 - 14:17DROPS Design answered:
Hallo M-Louise Cleuren, Ja, dat klopt, het minderen gebeurt in 1 naald. In het patroon staat precies beschreven hoe je mindert over de betreffende steken in de kabel. In maat s minder je bijvoorbeel 6 steken. Dat betekent dat je 6 keer 2 steken samen moet breien verdeeld over die 13 steken. (Komt er op neer dat je ze zowat allemaal samen moet breien :) )
26.03.2018 - 10:42Ik heb problemen met het breien van de voorbies.Het voorste telt 75 steken met bies(19 steken) inbegrepen. Voor de schouder moet ik 40 steken over hebben op het einde en voor de bies 27 steken) 19 +8steken bijgemaakt) Hoe kan ik de overblijvende steken die teveel zijn wegwerken.Maar mijn breipatroon laat een mindering langs de voorbies niet toe. Kunt u mij helpen. Dank
21.03.2018 - 22:05DROPS Design answered:
Hallo Maria Louise, Waarschijnlijk is dit opgelost met de minderingen over de kabel in je volgende vraag.
26.03.2018 - 10:50Do you have a picture of the back of the sweater?
28.05.2017 - 20:32DROPS Design answered:
Dear Judy, back piece is worked in stocking st without cable, that's the reason why there are no picture from back piece. Happy knitting!
29.05.2017 - 10:21Bonjour, pour le devant droit, à partir de quel rang doit on commencer les rangs raccourcis? merci
20.01.2017 - 11:28DROPS Design answered:
Bonjour Asma, on tricote les rangs raccourcis tous les 10 rangs environ, cf ASTUCE TRICOT-2. Bon tricot!
20.01.2017 - 16:25Thank you! I got it. This is my first shawl collar, so I practiced with scrap yarn until I could make sense of it. I was making it too difficult! Now on to the sleeves! I am enjoying this so much!
14.10.2016 - 03:19Do you have a photo or diagram of the top back shawl collar section? I keep getting a single purl row on the WS in the pattern somehow before I get to the short rows, and I am certain I am not following the pattern correctly: adjust so that next row is a K row from RS and either row 2, 6 or 10 in M.1 (adjust to this by working an extra row here if necessary): * K1 row from RS on all sts, turn and K return row from WS on all sts, turn and P the first 14 st, . . . Thank you!
13.10.2016 - 15:50DROPS Design answered:
Dear Amy D., work as explained, ie you will continue as in M.1 with 2 short rows (P14 seen from RS). Happy knitting!
13.10.2016 - 16:20Leigh Knowles wrote:
Hi! I do not understand what is meant, if anything, by the first instruction regarding cast on xx sts includes 1 edge st each side. What is meant by the 1 edge st each side? Is that st to be knit any differently??? I understand the 2 edge sts when doing the front band section but am not sure why the 1 edge st is mentioned for the back unless it is meant to be knit differently. Please clarify!! Thanks so much
31.05.2016 - 13:59DROPS Design answered:
Dear Mrs Knowles, the edge sts are included in the no of sts to cast on, they don't have to be extra cast on. They are not worked in pattern for seam allowance. Happy knitting!
31.05.2016 - 15:07