
Popular categories
Looking for a yarn?


|
|||||||||||||
Cookie Crush Jacket |
|||||||||||||
|
|
|||||||||||||
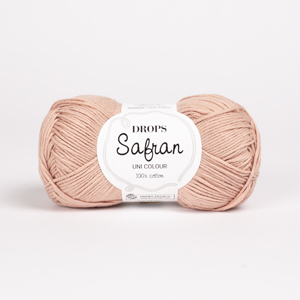
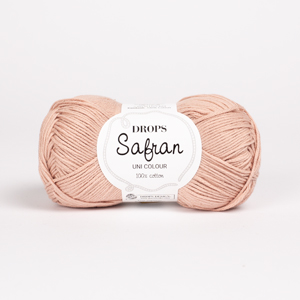
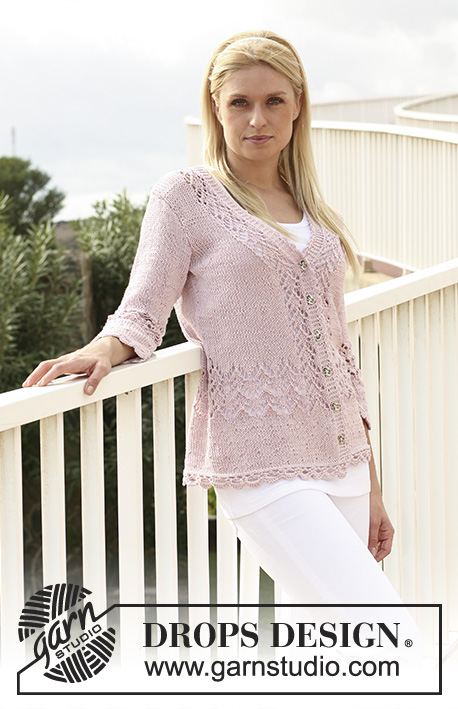
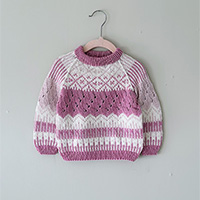
DROPS jacket in ”Safran” with lace pattern and crochet borders. Size XS - XXL.
DROPS 111-2 |
|||||||||||||
|
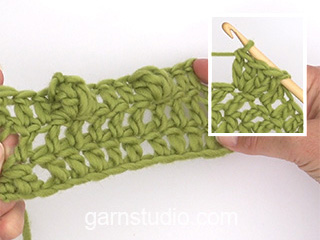
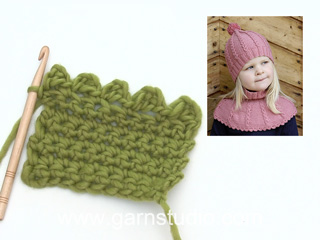
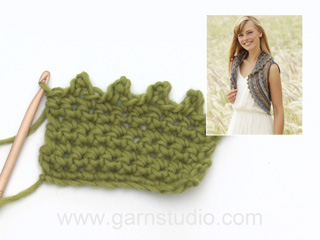
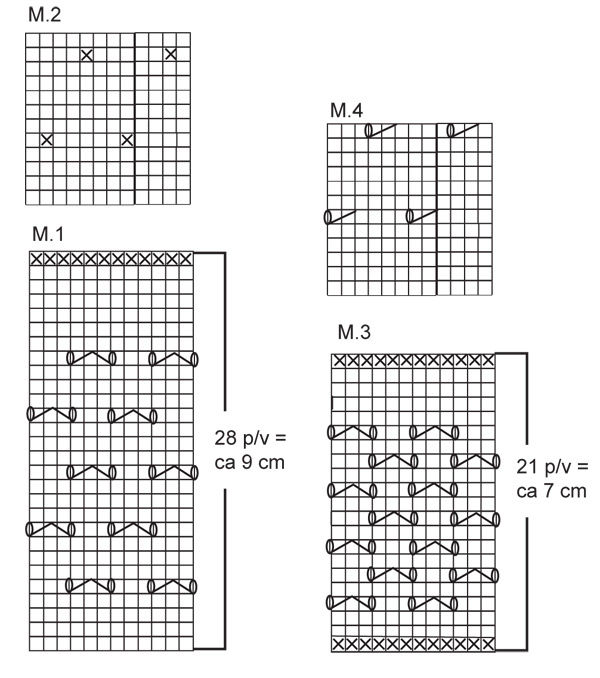
GARTER ST (back and forth on needle): K all rows. PATTERN: See diagram M.1 to M.4 – the diagrams show the pattern from the RS. BUTTONHOLES: Make buttonholes on right front band. 1 buttonhole = K tog 3rd and 4th st from mid front and make 1 YO. Make buttonholes when piece measures: SIZE XS: 5, 10, 15, 20, 25 and 30 cm. SIZE S: 5, 10, 16, 21, 26 and 31 cm. SIZE M: 5, 10, 16, 21, 27 and 32 cm. SIZE L: 5, 11, 16, 22, 27 and 33 cm. SIZE XL: 5, 11, 17, 23, 28 and 34 cm. SIZE XXL: 5, 11, 17, 23, 29 and 35 cm. DECREASING TIP: Make all dec from RS inside 6 garter sts. Dec as follows after 6 garter sts: slip 1 st as if to K, K1, psso Dec as follows before 6 garter sts: K2 tog. --------------------------------------------------------------------- BODY PIECE: Worked back and forth on circular needle from mid front. Cast on 194-206-218-242-266-290 sts (includes 6 front band sts each side towards mid front) on circular needle size 3.5 mm with beige. K 1 row from WS and continue as follows from RS: 6 garter sts (front band), 1 stocking st, M.1 across the row until 7 sts remain, 1 stocking st, 6 garter sts (front band). Work 1 vertical repeat of M.1 like this, REMEMBER to make BUTTONHOLE when piece measures 5 cm – see above. After M.1 change to pink, K 1 row from RS, AT THE SAME TIME dec 24 sts evenly = 170-182-194-218-242-266 sts. Continue as follows: 6 garter sts, 1 stocking st, M.2 across the row until 7 sts remain, 1 stocking st, 6 garter sts – AT THE SAME TIME insert a marker 45-48-51-57-63-69 sts in from each side (to mark the sides = 80-86-92-104-116-128 sts on back piece). When piece measures 14-15-16-17-18-19 cm inc 1 st on each side of both markers and repeat the inc on every 3-3-2-2-2-2 cm a total of 6-6-9-9-9-9 times = 194-206-230-254-278-302 sts. NOW READ ALL OF THE FOLLOWING SECTION BEFORE CONTINUING! NECKLINE: When piece measures 31-32-33-34-35-36 cm work 2 rows garter st on the 6 front band sts at one side only, work 1 row on all sts and then work 2 rows garter st on 6 front band sts only on the other side (to make neckline neater). Continue on all sts, AT THE SAME TIME on next row from RS dec 1 st each side towards mid front – SEE DECREASING TIP – on every other row a total of 8-8-8-8-9-9 times and then on every 4th row a total of 9-9-10-10-10-10 times. ARMHOLE: AT THE SAME TIME when piece measures 35-36-37-38-39-40 cm cast off 6-6-8-8-10-10 sts each side for armhole (= 3-3-4-4-5-5 sts on each side of marker) and now complete each piece separately. RIGHT FRONT PIECE: Continue dec for neck, AT THE SAME TIME cast off for armhole at the beg of every row from the side: 3 sts 0-0-0-1-2-3 times, 2 sts 0-1-2-3-3-3 times and 1 st 3-3-4-4-4-5 times. When all dec are complete there are 28-29-30-31-32-34 sts left on shoulder. Cast off when piece measures 53-55-57-59-61-63 cm. LEFT FRONT PIECE: Like right front piece, but mirrored. BACK PIECE: = 86-92-102-114-124-136 sts. Cast off for armhole each side as described for front piece = 80-82-86-88-92-96 sts. When piece measures 50-52-54-56-58-60 cm work 4 rows garter st on the middle 32-32-34-34-36-36 sts (work remaining sts as before) and then cast off the middle 20-20-22-22-24-24 sts for neck. Complete each shoulder separately with 6 garter sts towards neckline. Dec to shape the neckline on every other row – SEE DECREASING TIP: 1 st 2 times = 28-29-30-31-32-34 sts left on shoulder. Cast off when piece measures 53-55-57-59-61-63 cm. SLEEVE: Worked in the round on double pointed needles. Cast on 60-60-60-72-72-72 sts on double pointed needles size 3.5 mm with beige. Work 1 vertical repeat of M.3, change to pink and continue in M.4, AT THE SAME TIME dec 6-0-0-6-0-0 sts evenly on first row = 54-60-60-66-72-72 sts. Insert a marker at beg of round (= mid under arm). When piece measures 9 cm inc 1 st on each side of marker on every 7-7-5-5-5-4 round a total of 10-9-11-11-11-13 times = 74-78-82-88-94-98 sts – work inc sts in stocking st until they fit into M.4. When piece measures 32-31-30-29-28-27 cm (less for the larger sizes because of longer sleeve cap and wider shoulder) cast off 6-6-8-8-10-10 sts mid under arm and complete piece back and forth on needle. Cast off to shape the sleeve cap each side at the beg of every row: 3 sts 1 time, 2 sts 3 times and 1 st 4-5-7-8-10-11 times, then 2 sts each side until piece measures 39 cm, now cast off 3 sts each side 1 time and cast off remaining sts on next row. Piece measures approx 40 cm. ASSEMBLY: Sew shoulder seams. LACE BORDER, BODY PIECE – worked back and forth along cast on row, with light brown and crochet hook size 3.5 mm. ROW 1: 1 dc in each st, but work 2 dc in 1 st 2 times, evenly distributed = 196-208-220-244-268-292 dc. ROW 2: 1 ch, 1 dc in each of the first 7 dc, * 3 ch, skip 2 dc, 1 dc in each of the next 10 dc *, repeat from *-* until 9 dc remain, 3 ch, skip 2 dc, 1 dc in each of the last 7 dc, turn piece. ROW 3: 1 ch, 1 dc in each of the first 5 dc, 1 ch, skip 2 dc * crochet as follows in ch-loop: 1 tr, 1 ch, 1 tr, 1 ch, 1 tr 1 ch, 1 tr, 1 ch, then skip 2 dc, 1 dc in each of the next 2 dc, 3 ch, skip 2 dc, 1 dc in each of the next 2 dc, 1 ch, skip 2 dc *, repeat from *-* until 1 ch-loop and 7 dc remain, crochet as follows in ch-loop: 1 tr, 1 ch, 1 tr, 1 ch, 1 tr, 1 ch, 1 tr, 1 ch, now skip 2 dc, and crochet 1 dc in each of the last 5 dc, turn piece. ROW 4: 1 ch, 1 dc in each of the first 3 dc, skip 2 dc, ** 2 ch, 1 bobble in ch-loop (1 bobble = crochet 3 tr tog. i.e. wait with the last pull through in each tr until all 3 tr have been crochet, yarn over hook, pull thread through all 4 sts on hook),* 1 ch, 1 bobble in next ch-loop * repeat from *-* a total of 4 times (= 5 bobbles in total), 2 ch, 1 dc in 3-ch-loop **, repeat from **-** until 2 dc, 5 ch with tr between each and 5 dc remain, 2 ch, skip 2 dc, in each ch-loop crochet: 1 bobble + 1 ch, now work 1 ch, skip 2 dc, 1 dc in each of the last 3 dc, turn piece. ROW 5: 1 ch, 1 dc in each of the first 2 dc, skip 1 dc, 2 dc in ch-loop, * [1 picot (= 3 ch, 1 dc in first ch), 1 dc in next ch-loop] , repeat from [ - ] a total of 5 times, 1 dc in the same ch-loop, 2 dc in next ch-loop *, repeat from *-*, but the last time skip 1 dc and work 1 dc in each of the last 2 dc instead of 2 dc in next ch-loop. Cut and fasten thread. LACE BORDER, SLEEVE – worked in the round in cast on row with light brown and crochet hook size 3.5 mm. ROUND 1: 1 dc in each st = 60-60-60-72-72-72 dc. ROUND 2: 1 ch, 1 dc in each of the first 5 dc, * 3 ch, skip 2 dc, 1 dc in each of the next 10 dc *, repeat from *-* until 7 dc remain, 3 ch, skip 2 dc, 1 dc in each of the last 5 dc. ROUND 3: 2 ch, skip 1 dc, 1 dc in each of the next 2 dc, 1 ch, skip 2 dc, * crochet as follows in ch-loop: 1 tr, 1 ch, 1 tr, 1 ch, 1 tr, 1 ch, 1 tr, 1 ch, then skip 2 dc, 1 dc in each of the next 2 dc, 3 ch, skip 2 dc, 1 dc in each of the next 2 dc, 1 ch, skip 2 dc *, repeat from *-* until 1 ch-loop and 5 dc remain, crochet as follows in ch-loop: 1 tr, 1 ch, 1 tr, 1 ch, 1 tr, 1 ch, 1 tr, 1 ch, then skip 2 dc, 1 dc in each of the next 2 dc, skip last dc and finish with 1 ch and 1 sl st in first ch from beg of round. ROUND 4: 3 ch, skip 1 ch and 2 dc, * 1 bobble in next ch (1 bobble = crochet 3 tr tog. i.e. wait with the last pull through in each tr until all 3 tr have been crochet, yarn over hook, pull thread through all 4 sts on hook), [1 ch, 1 bobble in next ch] repeat from [ - ] a total of 4 times (= 5 bobbles in total), 2 ch, 1 dc in 3-ch-loop, 2 ch *, repeat from *-* until 5 ch with tr between each + 2 dc and 1 ch remain, work 1 bobble + 1 ch in each of the first 5 ch, after the last ch work 1 more 1 ch, then skip 2 dc, and finish with 1 sl st in first ch on round. ROUND 5: 1 ch, * 2 dc in ch-loop, [1 picot (= 3 ch, 1 dc in first ch), 1 dc in next ch-loop] , repeat from [ - ] a total of 5 times, 1 dc in the same ch-loop *, repeat from *-*, and finish with 1 sl st in first dc from beg of round. Cut and fasten the thread. PICOT BORDER: Crochet with light brown and crochet hook size 3.5 mm in first P row/round on body piece and sleeves. Hold garment with cast on row facing away from you and crochet the picot border in the lower loop of P sts as follows: 1 dc in first st, * 1 picot (= 3 ch, 1 dc in first ch), skip 2 sts, 1 dc in next st *, repeat from *-*. Also crochet a picot border in the top P row in M.1 on body piece and in M.3 on sleeves. Hold garment with the cast on row facing away and crochet in the lower loop of P sts. Crochet a similar picot border in the outermost st loop along front bands and neckline. FURTHER ASSEMBLY: Set in sleeves and sew on buttons. |
|||||||||||||
Diagram explanations |
|||||||||||||
|
|||||||||||||

|
|||||||||||||
|
|||||||||||||
|
Have you made this or any other of our designs? Tag your pictures in social media with #dropsdesign so we can see them! Do you need help with this pattern?You'll find tutorial videos, a Comments/Questions area and more by visiting the pattern on garnstudio.com. © 1982-2024 DROPS Design A/S. We reserve all rights. This document, including all its sub-sections, has copyrights. Read more about what you can do with our patterns at the bottom of each pattern on our site. |
|||||||||||||


With over 40 years in knitting and crochet design, DROPS Design offers one of the most extensive collections of free patterns on the internet - translated to 17 languages. As of today we count 304 catalogues and 11422 patterns - 11422 of which are translated into English (UK/cm).
We work hard to bring you the best knitting and crochet have to offer, inspiration and advice as well as great quality yarns at incredible prices! Would you like to use our patterns for other than personal use? You can read what you are allowed to do in the Copyright text at the bottom of all our patterns. Happy crafting!
Comments / Questions (86)
Where are the increases done? On the side markers or at the beginning after the garter sts?
27.02.2020 - 11:22DROPS Design answered:
Dear Mrs Lacour, the increases on body are worked when piece measures 14 - 19 cm (see size) on each side of each marker (= 4 sts inc on each inc row). Happy knitting!
27.02.2020 - 14:58Ik snap toer 5 van de te haken rand niet. Een telschema zou handig zijn. Kan dat toegevoegd worden?
23.08.2019 - 17:24DROPS Design answered:
Dag Corine,
Helaas is er geen telpatroon van de gehaakte rand. Je haakt eerst 1 losse en dan herhaal je steeds wat tussen de twee sterretjes staat. Je haakt eigenlijk steeds een vaste in de lus, dan haak je een picootje en dan weer en vaste in de volgende lus, enzovoort. Je eindigt de toer met een halve vaste in de eerste vaste van het begin van de toer.
31.08.2019 - 14:39Where I can see Crochet abbreviations meaning, please. For example, what is ch or dc, etcetera.
02.08.2019 - 11:05DROPS Design answered:
Hello Ludmila. This page could be useful. Happy crafting!
02.08.2019 - 16:39Bij het breien van het lijf, staat in het patroon "Brei zo 1 vertikale herhaling van M.1". Betekent dit dat je 2x M.1 (boven elkaar) breit?
22.06.2018 - 13:31DROPS Design answered:
Dag Rina, Nee je breit M.1 1 keer in totaal in de hoogte, niet 2 keer.
25.06.2018 - 10:51Noch eine Frage zur Häkelkante. Bei der Picotkante heißt es: 3 Lm, 1fM in die erste Lm. Welche Luftmasche ist hier gemeint? Wenn man dann 2 Maschen überspringt und eine feste Masche häkelt, zieht sich die Kante zusammen. Ist das beabsichtigt?
26.06.2015 - 19:51DROPS Design answered:
Es ist die 1. der 3 Lm gemeint, die Sie soeben gehäkelt haben, also 3 Lm und dann 1 fM in die erste dieser 3 Lm. Damit ergibt sich eine kleine spitzenartige Form. Das Prinzip des Picots finden Sie auch in zwei Videos erklärt, schauen Sie mal im Kopf neben dem Foto unter "Videos". Die Kante sollte sich eigentlich nicht zusammenziehen.
28.06.2015 - 19:23Eine Frage zur gehäkelten Spitze am Ärmel. Dort heißt es in der 4.Runde, man soll 1 Noppe in die nächste Luftmasche häkeln. Kann es sein, dass der Lm-Bogen gemeint ist? Es sollen insgesamt 5 Noppen in eine Luftmaschenkette gehäkelt werden, das sieht irgendwie komisch aus.
09.06.2015 - 10:37DROPS Design answered:
Aus der 3. Rd haben Sie Lm-Bögen, die aus nur 1 Lm bestehen, in diese häkeln Sie 1 Noppe. Wenn Sie in 5 Lm je 1 Noppe gehäkelt haben, sind Sie an der Stelle mit dem Lm-Bogen aus 3 Lm angekommen, in den häkeln Sie dann wie beschrieben fM.
09.06.2015 - 21:57Skal der strikkes forkortede pinde over forkanten ? Kan ikke se noget om det i opskriften
31.07.2014 - 20:23DROPS Design answered:
Hej Ina. Nej, det skal der ikke.
04.08.2014 - 15:52Bei den Ärmel- und Halsabnahmen am re. Vorderteil heißt es: Nach allen Abnahmen sind noch 28-29-30-31-32-34 M. auf der Nadel. Ich stricke die 3. Größe und statt 30 müßten es doch 36M. sein. Wurden die 6 Krausrippe Maschen vergessen? Grüßchen Sabine
12.05.2013 - 15:27DROPS Design answered:
Liebe Sabine, es sollte alles stimmen, ich habe alles nochmals durchgerechnet: Sie haben in der 3. Grösse 51 M + 9 M aufgenommen = 60 M. Für den Ausschnitt insgesamt -18 M = 42 M. Für das Armloch – 4, dann für die Kugel nochmals auf mehrere R verteilt – 8 = 30 Maschen. An welcher Stelle die Maschen jeweils abgenommen werden steht in der Anleitung, ich habe jetzt nochmals kontrolliert, dass die Gesamtzahl stimmt.
13.05.2013 - 07:19Har köpt garn och skall sticka mod2 nr111 Man skall börja med mönster 1 på fram o bakst, men på ärmen skall man börja med mönster3 Skall det inte vara samma på nederkanterna?
28.06.2012 - 20:07Hallo, ich stricke diese schöne Jacke und stutze gerade:erst heißt es beim Vorder- und Rückenteil: ....je einen Markierungsfaden einziehen(=....104...M. für das Rückenteil). Weiter unten heißt es beim Rückenteil=...114..M. Wo kommen den die 10 Maschen her? Zugenommen wurden doch nur Maschen ausserhalb der Rückenteilmarkierung. Viele Grüße Daniela
27.02.2012 - 22:25DROPS Design answered:
Nein, es wird auf beiden Seiten der Markierungen aufgenommen (auf beiden Seiten der Markierungsfäden je 1 M. aufnehmen). 104 M. + 18 (9x2) = 122 - 8 (für das Armloch) = 114 Maschen.
28.02.2012 - 09:45