
Popular categories
Looking for a yarn?


|
||||||||||||||||
Summer Shadows |
||||||||||||||||
|
|
||||||||||||||||
DROPS Top and Cardigan in Muskat
DROPS 81-5 |
||||||||||||||||
|
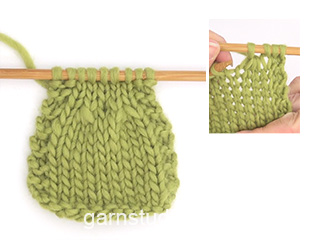
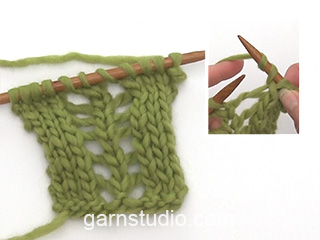
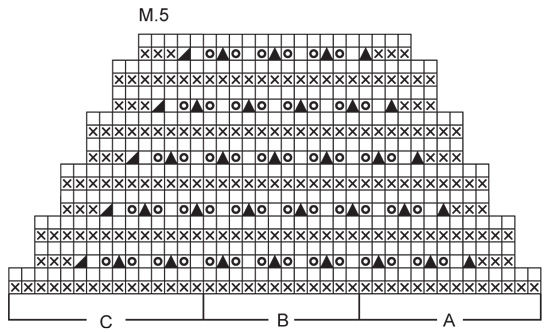
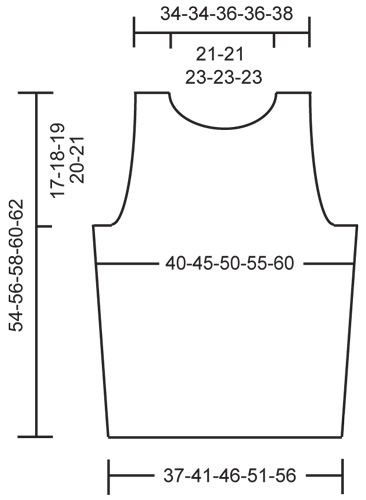
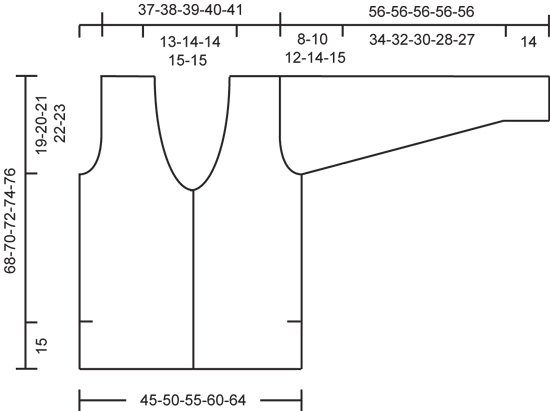
TOP: Gauge: Stockinette st: 21 sts x 28 rows = 10 x 10 cm. Pattern: 17 sts = 10 cm in width Pattern: See charts for Patterns 4 and 5. The pattern is seen from the right side. Knitting tips (for the first 2 decs at armhole edge): All decs are made from right side. Dec 1 st inside of 3 edge sts in garter st as follows: After 3 ede sts: Slip 1 st as if to knit, K 1, psso. Before 3 edge sts: K 2 tog. Front: Cast on 79-89-99-109-119 sts and knit 4 rows garter st. Establish pattern on the next row as follows (right side row): K 1 (edge st knit in garter st), 7-6-11-10-15 sts stockinette st, * Pattern 4 (= 3 sts), 17-21-21-25-25 sts stockinette st *, repeat from * - * a total of 3 times, finish with Pattern 4 (= 3 sts), 7-6-11-10-15 sts stockinette st and K 1 (edge st knit in garter st). Continue in pattern as established. When the piece measures 10 cm inc 1 st at each side every 7 cm a total of 4 times = 87-97-107-117-127 sts – knit the increased sts in stockinette st. Read the entire section before knitting: Armhole: When the piece measures 36-37-38-39-40 cm knit 4 rows with garter st over the 6-7-8-9-10 sts at each side (knit the remaining sts the same as before), then bind off 3-4-5-6-7 sts at each side for armhole. Keep 3 sts in garter st at each side and dec 1 st at each side every other row 2 times – see knitting tips = 77-85-93-101-109 sts. K 1 row back (wrong side row), decreasing 8 sts evenly distributed on the row = 69-77-85-93-101 sts. Knit the next row as follows from right side: Pattern 5A (= 14 sts), Pattern 5B over 40-48-56-64-72 sts, Pattern 5C (= 15 sts) – this is 2 rows of purl over all sts, including the 3 sts at each side previously knit in garter st. From now on, P these 3 sts every row. Dec at each side as seen in Pattern 5 a total of 3-5-6-8-9 times. The chart shows a maximum of 5 decs – for Size S, stop decreasing after 3 decs, for Sizes L + XL + XXL, continue to decrease as before, even though it is not shown on the chart. Continue the pattern, now keeping the 3 edge sts in garter st at each armhole – sts that are not in pattern, knit in stockinette st. Neck: When the piece measures 46-47-48-49-50 cm put the center 19-19-23-23-23 sts on a st holder for the neck. Continue with pattern, and dec at each neck edge in the manner that you decreased for armholes (= Pattern 5) 4 times. After all armhole and neck shaping is complete 11-11-11-11-13 sts remain on each shoulder (= 3 sts in garter st + 8-8-8-8-10 sts pattern). Continue the pattern and bind off when the piece measures 54-56-58-60-62 cm. Back: Cast on and knit the same as the front. Bind off for armhole as on front = 57-57-61-61-65 sts. When the piece measures 51-53-55-57-59 cm bind off the center 31-31-35-35-35 sts for the neck. Then bind off 2 sts 1 time for the neck as on front = 11-11-11-11-13 sts remain on each shoulder. Bind off when the piece measures 54-56-58-60-62 cm. Assembly: Sew right shoulder. Neckband: Pick up approx. 105-125 sts (incl. sts on st holders) around the neck. Knit 3 rows garter st, bind off. Sew left shoulder and up along neckband. Sew side seams using edge sts as seam allowance. CARDIGAN IN MUSKAT: Sizes: S - M - L - XL - XXL Finished measurements: Bust: 90-100-110-120-128 cm [35-⅜" - 39-⅜" - 43.25" - 47.25" - 50-⅜"] Materials: DROPS MUSKAT from Garnstudio 600-650-700-750-850 gr nr 24, grey. DROPS 4 mm [US 6] needles, or size needed to obtain correct gauge. 5 DROPS Silver buttons nr 533 Gauge: Stockinette st: 21 sts x 28 rows = 10 x 10 cm. Pattern: 17 sts = 10 cm in width Pattern: See charts for Patterns 1, 2 and 3. The pattern is seen from the right side. Knitting tips (for neck shaping): All decs are made on right side rows. Dec inside of 5 edge sts in garter st by P 2 tog. Back: Cast on 95-105-115-125-135 sts and knit 6 rows garter st. Establish pattern on the next row as follows: K 3 (edge sts in garter st for side split edge), 7-12-11-16-15 sts stockinette st, * Pattern 1 (= 3 sts), 21-21-25-25-29 sts stockinette st *, repeat from * - * a total of 3 times, finish with Pattern 1 (= 3 sts), 7-12-11-16-15 sts stockinette st and K 3 sts (edge sts in garter st for side split edge). Continue in pattern as established. When the piece measures 15 cm end side split and cast on 1 new st at each side = 97-107-117-127-137 sts. Knit 4 rows in pattern keeping 4 sts in garter st at each side, then knit stockinette st over all sts. When the piece measures 38 cm knit Pattern 2 one time, then knit reverse stockinette st to finished measurements. When the piece measures 49-50-51-52-53 cm bind off for armhole at each side every other row: 4 sts 1 time, 3 sts 0-1-1-2-2 times, 2 sts 1-2-3-4-5 times and 1 st 4-3-5-4-5 times = 77-79-81-83-87 sts. When the piece measures 65-67-69-71-73 cm knit 4 rows with garter st over the center 33-35-35-37-37 sts (knit the remaining sts the same as before). Then bind off the center 23-25-25-27-27 sts for the neck edge (bind off a little tightly). Then dec 1 st at each neck edge every other row 2 times – see knitting tips = 25-25-26-26-28 sts remain on each shoulder. Bind off when the piece measures 68-70-72-74-76 cm. Left front: Cast on 53-58-63-68-73 sts and knit 6 rows garter st. Establish pattern on the next row as follows (from right side): K 3 (edge sts in garter st for side split), 7-12-11-16-15 sts stockinette st, Pattern 1 (= 3 sts), 21-21-25-25-29 sts stockinette st, Pattern 1 (= 3 sts), 11-11-13-13-15 sts stockinette st and K 5 (buttonband sts in garter st). When the piece measures 15 cm end side split and cast on 1 new st at the side = 54-59-64-69-74 sts. Knit 4 rows in pattern keeping 4 sts in garter st at the side, then knit stockinette st over all sts. When the piece measures 38 cm knit Pattern 2 over all sts (keep buttonband sts in garter st). Then knit reverse stockinette st and buttonbands in garter st to finished measurements. Read entire section before knitting: Neckband: When the piece measures 45-46-47-48-49 cm dec 1 st for the neck – see knitting tips: every other row 10 times and then every 4 rows 9-10-10-11-11 times. Armhole: When the piece measures 49-50-51-52-53 cm bind off for armhole at the side as on back. After all armhole and neck shaping is complete 25-25-26-26-28 sts remain on shoulder. Bind off when the piece measures 68-70-72-74-76 cm. Right front: Cast on and knit the same as the left, reversing all shaping. Make buttonholes along buttonband. 1 buttonhole = K tog the 2nd and 3rd sts from center front edge and yo. Make buttonholes when the piece measures: Size S: 11, 19, 27, 35 and 43 cm. Size M: 12, 20, 28, 36 and 44 cm. Size L: 13, 21, 29, 37 and 45 cm. Size XL: 14, 22, 30, 38 and 46 cm. Size XXL: 15, 23, 31, 39 and 47 cm. Sleeve: Loosely cast on 43-43-47-47-47 sts. Knit 6 rows garter st, then establish pattern on the next row as follows: K 1 (edge st knit in garter st), Pattern 3A (= 6 sts), Pattern 3B over 32-32-36-36-36 sts, Pattern 3C (= 3 sts) and K 1 (edge st knit in garter st). When the piece measures 14 cm inc 1 st at each side every 4.5-3-3-2-2 cm a total of 8-10-10-12-13 times = 59-63-67-71-73 sts – knit the increased sts in stockinette st until there are enough increased sts to knit in the pattern. When sleeve measures 48-46-44-42-41 cm bind off for sleeve cap at each side every other row: 3 sts 1 time and 2 sts 2 times, then dec 1 st at each side until the piece measures 54 cm, then bind off 2 sts 1 time and then bind off 3 sts 1 time at each side. The piece measures approx. 56 cm, bind off the remaining sts. Assembly: Sew shoulder seams. Sew in sleeves. Sew sleeve and side seams using edge sts as a seam allowance, leaving side split open at each side. Sew on buttons. |
||||||||||||||||
Diagram explanations |
||||||||||||||||
|
||||||||||||||||

|
||||||||||||||||
|
||||||||||||||||
|
||||||||||||||||
|
||||||||||||||||
|
Have you made this or any other of our designs? Tag your pictures in social media with #dropsdesign so we can see them! Do you need help with this pattern?You'll find tutorial videos, a Comments/Questions area and more by visiting the pattern on garnstudio.com. © 1982-2024 DROPS Design A/S. We reserve all rights. This document, including all its sub-sections, has copyrights. Read more about what you can do with our patterns at the bottom of each pattern on our site. |
||||||||||||||||


With over 40 years in knitting and crochet design, DROPS Design offers one of the most extensive collections of free patterns on the internet - translated to 17 languages. As of today we count 304 catalogs and 11422 patterns - 11417 of which are translated into English (US/in).
We work hard to bring you the best knitting and crochet have to offer, inspiration and advice as well as great quality yarns at incredible prices! Would you like to use our patterns for other than personal use? You can read what you are allowed to do in the Copyright text at the bottom of all our patterns. Happy crafting!
Comments / Questions (41)
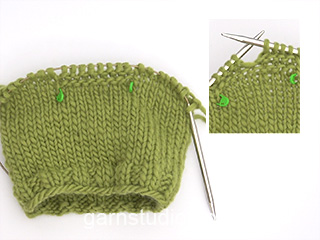
Hi , a bit confused, I am starting the M5 chart , do I decrease each end with skpo and K2 tog as before as well as K3 tog as stated in the diagram or is the K3 tog in the chart the decrease as it is only on the chart when decreasing is needed , thanks Zoe
30.10.2023 - 23:15DROPS Design answered:
Dear Zoe, in M.5A you will start by decreasing with Slip 1, K2 tog, peso and you will end M.5 with M.5C and K3 tog just as shown in diagram. Happy knitting!
31.10.2023 - 15:53Buongiorno ,Che rimanessero 11 maglie ci ero arrivata ! Ma continuando con il motivo fino a 56 cm di lunghezza inevitabilmente si riducono , per questo le ho chiesto aiuto , altrimenti provero' a chiedere a qualche professionista . La ringrazio per la disponibilità
07.05.2023 - 15:11Buongiorno , Sono riuscita a risolvere il problema delle maglie al modellamento scalfo e collo , il problema è che continuando il motivo fino ai 56 cm , rimangono pochissime maglie sul ferro al termine della spalla tipo 7 , è corretto ? Ringrazio e mi scuso !
06.05.2023 - 11:31DROPS Design answered:
Buonasera Veronica, per la taglia M, alla fine delle diminuzioni, rimangono 11 maglie. Buon lavoro!
06.05.2023 - 22:22Buonasera, ho bisogno di aiuto per le spiegazioni del collo. Dopo aver messo le 19 m centrali in sospeso per la taglia M , non riesco a far tornare le 11 m alla fine del modellamento. Potrei avere uno schema più preciso ? devo continuare con il motivo 5 per 4 volte o devo solo fare una diminuzione finale 4 volte? Ho fatto vari tentativi senza risultato ! Mi scuso Veronica
02.05.2023 - 16:33DROPS Design answered:
Buonasera Veronica, deve diminuire le maglie per il collo con il motivo 5 per 4 volte. Buon lavoro!
06.05.2023 - 22:24Vorrei chiedere se il modello può essere lavorato avanti e indietro usando i ferri circolari . Cambia qualcosa se non uso i ferri dritti ? Ringrazio Veronica
10.03.2023 - 04:45DROPS Design answered:
Buonasera Veronica, può tranquillamente lavorare in piano con i ferri circolari. Buon lavoro!
10.03.2023 - 21:48Bonjour Je suis entrain de réaliser le gilet du modèle 81-5 en muscat j'ai un problème pour les manches pour l'emanchure celle- ci fait 20 cm sur le dos et le devant et la tete de manche ne fait sur votre explication ne fait que 10 cm votre explication de 46 cm diminution pour la tete de manche à 56 cm rabattre les mailles donc fin de la manche ce n'est pas possible Merci de me répondre svp
28.02.2022 - 14:32DROPS Design answered:
Bonjour Mme Ferrand, les 20 cm d'emmanchures correspondent à la hauteur de l'emmanchure; vous allez rabattre pour l'arrondi de la manche sur les 10 derniers cm, mais vous allez coudre les mailles - donc en largeur et non 20 cm en hauteur, il est normal que le haut de la manche ne soit pas aussi haut que la hauteur de l'emmanchure. Vérifiez bien la hauteur. Placez le milieu du haut de la manche au niveau de la couture d'épaules et cousez les 3 mailles rabattues de chaque côté de la manche aux 3 mailles rabattues pour les emmanchures (on en a 4 - 1 m lis pour la couture du côté= 3 m). Épinglez si besoin avant de coudre, tout doit bien rentrer. Bonne continuation!
28.02.2022 - 16:28Hej igen. Godt Nytår. Jeg strikker toppen i str. XL. Forstykket og har 93 m på p. Er nået til anden p i M5. Hvordan begynder jeg næste p. ?
02.01.2022 - 14:18DROPS Design answered:
Hej Lillian, du starter i nederste højre hjørne af diagrammet, første pind strikkes vrang fra retsiden, anden pind strikkes vrang fra vrangen, 3 pind strikkes således fra retsiden (du starter i højre side af diagrammet); 3vr, tag 1 maske løst af pinden som om den skulle strikkes ret, 2 ret sammen, løft den løse maske over, 1ret, 2 omslag, tag 1 maske løst ......, 2 omslag, fortsæt fra 1 ret pinden ud (husk at det enes omslag slippes ned og det andet strikkes vrang på næste pind :)
05.01.2022 - 09:03Jeg har strikket jakken og er begyndt på toppen. Er nu nået til ærmegab og M5. Resten af afsnittet forstår jeg ikke. Kan I ikke hjælpe mig videre.? PS Jeg har var virkelig så glad for jeres gamle hjemmeside, som har givet mig mod på at strikke, men nu efter den nye, ja der har I tabt mig. Den er nu ikke til at finde rundt i og er uoverskuelig, snøft, snøft.
17.12.2021 - 21:45DROPS Design answered:
Hej Lillian, hvad er det du ikke forstår, så skal vi prøve at forklare. Skriv hvor mange masker du har, hvilken størrelse og hvilket diagram du ikke forstår. Den nye hjemmeside er lettere at navigere rundt på, men det tager altid lidt tid at lære sig en ny uanset hvor let det er :)
21.12.2021 - 09:04In der Anleitung steht, dass für das Teil die Farbe DROPS Muskat von Garnstudio, Fb. Nr. 24, grau benötigt wird. Tatsächlich ist Fb. Nr. 24 jedoch die Farbe Taupe. Um welche Farbe handelt es sich bei dem Teil oben also? Es sieht aus wie silbergrau?
22.06.2021 - 17:49DROPS Design answered:
Liebe Frau Faust, dieses Modell wurde schon vor vielen Jahren designt, es kann sein, daß diese Farbe inzwischen verändert wurde, am besten suchen Sie sich Ihre Lieblingsfarbe aus der aktuellen Farbkarte - Ihr DROPS Laden hilft Ihnen auch gerne damit, eine Farbe zu wählen - auch telefonisch oder per E-Mail. Viel Spaß beim stricken!
23.06.2021 - 07:47In het telpatroon M5 C bij het halve driehoekje 3 samenbreien, wat doe ik op de teruggaande naald? Ik mis dan toch steken?
26.01.2021 - 17:55DROPS Design answered:
Dag Hanny,
Die steken zijn er inderdaad nog niet afgehaald in het telpatroon op de volgende naald, maar pas 3 naalden later. Je kunt dat gewoon negeren en doen alsof ze er al af zijn. Op de eerstvolgende naald met minderingen en omslagen is namelijk wel weer het juiste aantal steken aangegeven.
29.01.2021 - 13:26