
Popular categories
Looking for a yarn?


|
|||||||
DROPS 94-8 |
|||||||
|
|
|||||||
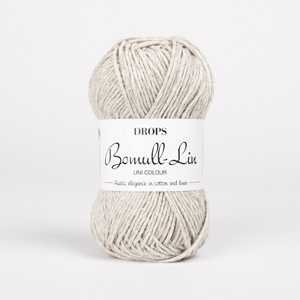
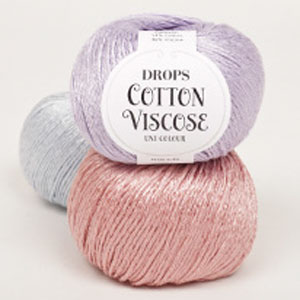
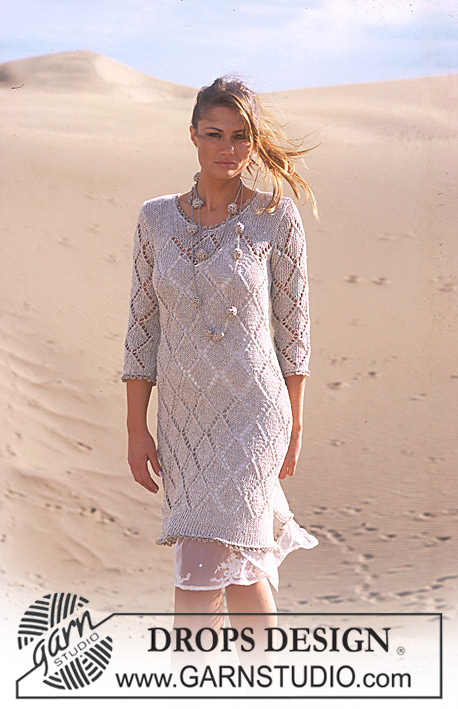
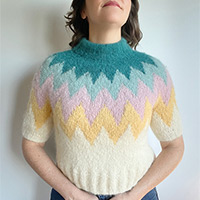
DROPS Jacket in Bomull-Lin with crochet borders in Cotton Viscose
DROPS 94-8 |
|||||||
|
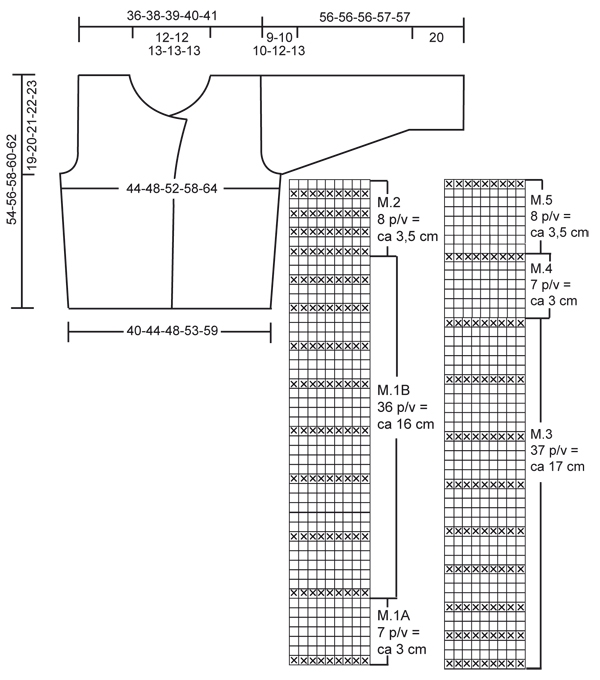
Knitting tension: 17 sts x 22 rows on needle size 5.5mm in stocking stitch = 10 x 10 cm Pattern: See diagrams M.1 to M.5. The diagrams are seen from the right side. Increasing tips (applies to front band): Increase within 1 edge st from the right side as follows: make a yo and knit yo into back of st on next row. Buttonholes: Make buttonholes on right front piece as follows: K tog 2nd and 3rd st from edge and make a yo. Knit yo on next row. Make buttonholes when piece measures: Size S: 15, 21, 27, 33 and 39 cm Size M: 16, 22, 28, 34 and 40 cm Size L: 17, 23, 29, 35 and 41 cm Size XL: 18, 24, 30, 36 and 42 cm Size XXL: 20, 26, 32, 38 and 44 cm Back piece: Cast on 70-77-84-92-102 sts (inclusive of 1edge st each side) on needle size 5.5 with Bomull-Lin and knit 2 rows garter st. Read all of the following section before continuing: Pattern: Knit M.1A, then 1 repeat of M.1B and then M.2 until piece measures 27-28-29-30-31 cm. Now knit 1 repeat of M.3, 1 repeat of M.4 and then M.5 until finished measurements. Increases at side: At the same time when piece measures 9 cm inc 1 st each side on every 9-9-9-8-8 cm a total of 3-3-3-4-4 times = 76-83-90-100-110 sts. Armhole: At the same time when piece measures 35-36-37-38-39 cm cast off for armhole each side on every other row as follows: 3 sts 1 time, 2 sts 1-2-3-4-5 times and 1 st 2-2-3-5-7 times = 62-65-66-68-70 sts. Neck: At the same when piece measures 52-54-56-58-60 cm cast off the middle 18-19-20-20-20 sts for neck. Dec1 st at neckline on next row = 21-22-22-23-24 sts left on each shoulder. Cast off when piece measures 54-56-58-60-62 cm. Right Front: Cast on 39-43-46-50-55 sts (inclusive of 1edge st at side and 4 edge sts towards mid front) on needle size 5.5 with Bomull-Lin. Knit 2 rows garter st. Read all of the following section before continuing: Pattern: Knit M.1A – NB! Knit the 4 sts towards mid front in garter st up until the neckline. After M.1A knit M.1B, M.2, M.3, M.4 and M.5 as described for back piece. Remember buttonholes! Increases at side: At the same time when piece measures 9 cm inc at side as described for back piece. Slanting front band: At the same tine when piece measures 16-17-18-19-21 cm inc towards mid front – see increasing tips – 1 st on every 2 cm a total of 12 times. Knit all new sts in garter st so that after the last inc there are 16 sts in garter st in front band. Decreases for armhole: When piece measures 35-36-37-38-39 cm dec for armhole as described for back piece. Neckline: When piece measures 40-41-42-43-45 cm cast off for neckline towards mid front on every other row as follows: 3 sts 6 times, 2 sts 3 times and 1 st 1-2-2-2-2 times. Then on every 4th row: 1 st 1 time = 21-22-22-23-24 sts left on shoulder. Cast off when piece measures 54-56-58-60-62 cm. Left front piece: As right front piece, but mirrored (don’t make buttonholes!). Sleeve: Cast on 46-50-51-54-54 sts (inclusive of 1 seam st each side) on needle size 5.5 with Bomull-Lin. Knit 2 rows garter st. Read all of the following section before continuing: Pattern: Knit M.1A a total of 5-4-4-3-3 times, piece now measures approx 16-13-13-10-10 cm. After M.1A knit M.1B and then M.2 until piece measures approx 39-38-38-37-36 cm. Now knit M.3 and repeat the last 6 rows of M.3 until finished measurements. Decreases: At the same time when piece measures 10 cm dec 2-4-3-4-4 sts evenly on row. Repeat the dec when piece measures 20 cm = 42-42-45-46-46 sts remaining. Increases: At the same time when piece measures 23-23-23-24-25 cm inc 1 st each side on every 3-2-2-1.5-1 cm a total of 8-10-11-13-17 times = 58-62-67-72-80 sts Sleeve cap: When piece measures 47-46-46-45-44 cm cast off for sleeve cap each side on every other row as follows: 3 sts 1 time, 2 sts 2-3-3-3-4 times, 1 st 4-4-4-5-5 times, and then 2 sts each side until piece measures 55-55-55-56-56 cm, now dec 3 sts each side and cast off remaining sts on next row, piece measures approx 56-56-56-57-57 cm. Assembly: Sew shoulder seams. Set in sleeves and sew sleeve and side seams within 1 seam st. Sew on buttons. Neck: Pick up approx 80 to 110 sts round the neck using needle size 5.5 and Bomull-Lin and knit 2 rows garter st. Cast off loosely from the wrong side in garter st. Crochet border: Crochet round all edges, including bottom edge and sleeves using crochet hook size 4 and Cotton Viscose as follows: 1 dc in first st, *2 ch, skip 2 sts (approx 1 cm), 1 dc in next st*, repeat from *-*. |
|||||||
Diagram explanations |
|||||||
|
|||||||
|
|||||||
|
Have you made this or any other of our designs? Tag your pictures in social media with #dropsdesign so we can see them! Do you need help with this pattern?You'll find tutorial videos, a Comments/Questions area and more by visiting the pattern on garnstudio.com. © 1982-2024 DROPS Design A/S. We reserve all rights. This document, including all its sub-sections, has copyrights. Read more about what you can do with our patterns at the bottom of each pattern on our site. |
|||||||


With over 40 years in knitting and crochet design, DROPS Design offers one of the most extensive collections of free patterns on the internet - translated to 17 languages. As of today we count 304 catalogues and 11422 patterns - 11422 of which are translated into English (UK/cm).
We work hard to bring you the best knitting and crochet have to offer, inspiration and advice as well as great quality yarns at incredible prices! Would you like to use our patterns for other than personal use? You can read what you are allowed to do in the Copyright text at the bottom of all our patterns. Happy crafting!
Comments / Questions (21)
Hallo. Ich verstehe leider nicht den Absatz mit dem Abnehmen für die Ärmelausschnitte! Wie ich es auch anstelle, komme nicht auf meine 66 Endmaschen! Wie genau sollen diese Abna Abnahmen funktionieren??? Auch ist es verwirrend mir "Ndl " Angabe.
11.06.2022 - 12:49DROPS Design answered:
Liebe Isabella, es sind 90 Maschen, dann ketten Sie so am anfang jeder Reihe (Hin- sowie Rückreihe): 3 M x 1, dann 2 M x 3 und 1 M x 3 (= 3+6+3 = 12 Maschen auf beiden Seiten = 24 Maschen insgesamt), so sind 90-24=66 Maschen übrig. Viel Spaß beim stricken!
13.06.2022 - 08:46What does p/v in this pattern mean?
28.09.2019 - 11:27DROPS Design answered:
Dear Mrs Grant, this refers to the number of rows (p/v = rows in Norwegian/Swedish), so that M.1A = 7 rows and approx. 3 cm. Happy knitting!
30.09.2019 - 10:34Merci pour vos explications. j'ai tres bien compris. A bientot J
14.03.2014 - 17:16Bonsoir, j'ai un probleme avec le diagramme de ce modele, M.1A 7 p/v= ca 3cm j'ai 70 points pour la taille s le diagramme indique un travaille sur 9 mailles!! je ne comprend pas. Pouvez vs m'aider?? merci.Marie
13.03.2014 - 21:52DROPS Design answered:
Bonjour Marie, M1A se répète sur les 70 m. L'indication 7 p/v = ca 3 cm indique que 7 rangs de M1A mesurent environ 3 cm. Bon tricot!
14.03.2014 - 10:22Bonjour,je viens de finir le devant droit du gilet .pour le devant gauche il faut faire comme le devant droit mais a l envers se qui signifie que mon gilet va se croiser a l interieur du aux augmentations. se ne sait pas si s est juste merci de m aider
07.04.2013 - 12:04DROPS Design answered:
Bonjour Madame Vinassac, tricoter en sens inverse signifie faire à droite ce qui a été fait à gauche au 1er devant et vice versa. Au devant droit, les rangs sur l'endroit commençaient par les mailles de bordure devant, au devant gauche, les rangs sur l'endroit se terminent par les mailles de bordure devant. Bon tricot!
08.04.2013 - 09:36Hej! Har stickat klart alla delar i denna kofta men ärmhålen är på tok för stora för ärmarna när jag ska sy i dem. Är det någon som har erfarenhet av detta? Mvh Karin
22.03.2012 - 10:45DROPS Design answered:
Hej, Det kan vara stickfastheten när du har maskat av som inte stämmer. Ta med dig ditt arbetet till din garnbutik så får du hjälp.
28.03.2012 - 11:47Lene wrote:
Flot klassisk model
11.01.2006 - 16:59läcker och en modell som passar alla tillfällen
30.12.2005 - 09:47ærmerne alt for lange...lidt kedelig...
25.12.2005 - 17:46Mailinglisten wrote:
Vacker och enkel modell.
14.12.2005 - 15:21