Clicking the ORDER button will redirect you to Mallia Kouvaria - pleko.gr. website
The yarn cost is calculated from the pattern’s smallest size and the yarn’s cheapest product type. Looking for an even better price? You might find it on the DROPS Deals!
-------------------------------------------------------
Alternative Yarn – See how to change yarns here
Yarn Groups A to F – Use the same pattern and change the yarn here
Yarn usage using an alternative yarn – Use our yarn converter here
-------------------------------------------------------
Clicking the ORDER button will redirect you to Mallia Kouvaria - pleko.gr. website
The yarn cost is calculated from the pattern’s smallest size and the yarn’s cheapest product type. Looking for an even better price? You might find it on the DROPS Deals!
= wine red, K | |
= wine red, P | |
= off white, K |
Each of our patterns has specific tutorial videos to help you.
These step-by-step tutorials might also help you:
Why is the knitting/crochet tension so important?
Knitting tension is what determines the final measurements of your work, and is usually measured per 10 x 10 cm. It is provided like so: number of stitches in width x number of rows in height - eg: 19 stitches x 26 rows = 10 x 10 cm.
The knitting tension is very individual; some people knit/crochet loosely while others work tightly. You adjust the knitting tension with the needle size, which is why the suggested needle size is only meant as a guide! You need to adjust this (up or down) to ensure that YOUR knitting tension matches the knitting tension provided in the pattern. If you work with a different knitting tension than provided you will have a different yarn consumption, and your work will have different measurements than what the pattern suggests.
The knitting tension also determines which yarns can replace each other. As long as you achieve the same knitting tension you can replace one yarn with another.
See DROPS lesson: How to measure your tension/gauge
See DROPS video: How to make a gauge tension swatch
How do I know how many balls of yarn I need?
The required amount of yarn is provided in grams, eg: 450 g. To calculate how many balls you’ll need you first need to know how many grams are in 1 ball (25g, 50g or 100g). This information is available if you click on the individual yarn quality on our pages. Divide the amount required with the amount of each ball. For example, if each ball is 50g (the most common amount), the calculation will be as follows: 450 / 50 = 9 balls.
Can I use a different yarn than what the pattern suggests?
The important thing when changing from one yarn to another is that the knitting/crochet tension remains the same. This is so that the measurements of the finished piece will be the same as on the sketch provided. It is easier to achieve the same knitting tension using yarns from the same yarn group. It is also possible to work with multiple strands of a thinner yarn to achieve the knitting tension of a thicker one. Please try our yarn converter. We recommend you to always work a test swatch.
Please NOTE: when changing yarn the garment might have a different look and feel to the garment in the photo, due to individual properties and qualities of each yarn.
See DROPS lesson: Can I use a different yarn than the one mentioned in the pattern?
What are the yarn groups?
All our yarns are categorised into yarn groups (from A to F) according to thickness and knitting tension – group A contains the thinnest yarns and group F the thickest. This makes it easier for you to find alternative yarns to our patterns, should you wish to switch yarn. All yarns within the same group have a similar knitting tension and can easily replace each other. However, different yarn qualities have different structures and properties which will give the finished work a unique look and feel.
How do I use the yarn calculator?
At the top of all our patterns you’ll find a link to our yarn calculator, which is a helpful tool should you wish to use a different yarn than suggested. By filling in the yarn quality you wish to replace, the amount (in your size) and number of strands, the calculator will present good alternative yarns with the same knitting tension. Additionally it will tell you how much you’ll require in the new qualities and whether you’ll need to work with multiple strands. Most skeins are 50g (some are 25g or 100g).
If the pattern is worked with multiple colours, every colour will have to be calculated separately. Similarly, if the pattern is worked with several strands of different yarns (for example 1 strand Alpaca and 1 strand Kid-Silk) you will have to find alternatives for each, individually.
Why do you show discontinued yarns in the patterns?
Since different yarns have different qualities and textures we have chosen to keep the original yarn in our patterns. However, you can easily find options among our available qualities by using our yarn calculator, or simply pick a yarn from the same yarn group.
It is possible that some retailers still have discontinued yarns in stock, or that someone has a few skeins at home that they would like to find patterns for.
The yarn calculator will provide both alternative yarn as well as required amount in the new quality.
What size should I knit?
If you think it's hard to decide what size to make, it can be a good idea to measure a garment you own already and like the size of. Then you can pick the size by comparing those measures with the ones available in the pattern's size chart.
You'll find the size chart at the bottom of the pattern.
See DROPS lesson: How to read size chart
Why do I get the wrong knitting tension with the suggested needle size?
The needle size provided in the pattern serves only as a guide, the important thing is to follow the knitting tension. And since knitting tension is very individual, you will have to adjust the needle size to ensure that YOUR tension is the same as in the pattern – maybe you’ll have to adjust 1, or even 2 needle sizes, up or down to achieve the correct tension. For this, we recommend that you work test swatches.
Should you work with a different knitting tension than the one provided, the measurements of the finished garment might deviate from the measurement sketch.
See DROPS lesson: How to measure your tension/gauge
See DROPS video: How to make a tension/gauge swatch
Why is the pattern worked top-down?
Working a garment top-down provides more flexibility and room for personal adjustment. For example it is easier to try the garment on while working, as well as making adjustments to length of yoke and shoulder caps.
The instructions are carefully explaining every step, in the correct order. Diagrams are adjusted to the knitting direction and are worked as usual.
How do I work according to a knitting diagram?
The diagram depicts all rows/rounds, and every stitch seen from the right side. It is read from bottom to top, from right to left. 1 square = 1 stitch.
When working back and forth, every other row is worked from the right side and every other row is worked from the wrong side. When working from the wrong side, the diagram will have to be worked reversed: from left to right, knit stitches are purled, purl stitches are knit etc.
When working in the round every round is worked from the right side and the diagram are worked from right to left on all rounds.
See DROPS lesson: How to read knitting diagrams
How do I work according to a crochet diagram?
The diagram depicts all rows/rounds, and every stitch seen from the right side. It is worked from bottom to top, from right to left.
When working back and forth every other row is worked from the right side: from right to left and every other row is worked from the wrong side: from left to right.
When working in the round, every row in the diagram are worked from the right side, from right to left.
When working a circular diagram you start in the middle and work your way outwards, counter clockwise, row by row.
The rows usually start with a given number of chain stitches (equivalent to the height of the following stitch), this will either be depicted in the diagram or explained in the pattern.
See DROPS lesson: How to read crochet diagrams
How do I work several diagrams simultaneously on the same row/round?
Instructions for working several diagrams after each other on the same row/round, will often be written like so: “work A.1, A.2, A.3 a total of 0-0-2-3-4 times". This means you work A.1 once, then A.2 is worked once, and A.3 is repeated (in width) the number of times provided for your size – in this case like so: S = 0 times, M = 0 times, L=2 times, XL= 3 times and XXL = 4 times.
The diagrams are worked as usual: begin with the first row in A.1, then work the first row in A.2 etc.
See DROPS lesson: How to read knitting diagrams
See DROPS lesson: How to read crochet diagrams
Why are the sleeves shorter in larger sizes?
The total width of the garment (from wrist-to-wrist) will be larger in the larger sizes, despite the actual sleeves being shorter. The larger sizes have longer sleeve caps and wider shoulders, so there will be a good fit in all sizes.
Where on the garment is the length measured?
The measurement sketch/schematic drawing provides information regarding the full length of the garment. If it’s a jumper or a jacket the length is measured from the highest point on the shoulder closest to the neckline, and straight down to the bottom of the garment. It is NOT measured from the tip of shoulder. Similarly, the length of yoke is measured from the highest point on the shoulder and down to where yoke is split into body and sleeves.
On a jacket measures are never taken along bands, unless specifically stated. Always measure inside band stitches when measuring the length.
See DROPS lesson: How to read a schematic drawing
What is a repeat?
Diagrams are often repeated on the round or in height. 1 repeat is the diagram the way it appears in the pattern. If it says to work 5 repeats of A.1 in the round, then you work A.1 a total of 5 times after/next to each other in the round. If it says to work 2 repeats of A.1 vertically/in height you work the entire diagram once, then begin again at the start and work the entire diagram one more time.
Why does the piece start with more chain stitches than it’s worked with?
Chain stitches are slightly narrower than other stitches and to avoid working the cast-on edge too tight, we simply chain more stitches to begin with. The stitch count will be adjusted on the following row to fit the pattern and measurement sketch.
Why increase before the rib edge when the piece is worked top-down?
The rib edge is more elastic and will contract slightly compared to, for example, stocking stitch. By increasing before the rib edge, you avoid a visible difference in width between the rib edge and the rest of the body.
Why increase in the cast-off edge?
It’s very easy to cast off too tightly, and by making yarn overs while casting off (and simultaneously casting these off) you avoid a too tight cast off edge.
See DROPS video: How to bind off with yarn overs (yo)
How do I increase/decrease on every 3rd and 4th row/round alternately?
To achieve an even increase (or decrease) you can increase on, for example: every 3rd and 4th row alternately, like so: work 2 rows and increase on the 3rd row, work 3 rows and increase on the 4th. Repeat this until the increase is complete.
See DROPS lesson: Increase or decrease 1 st on every 3rd and 4th row alternately
How can I work a jacket in the round instead of back and forth?
Should you prefer to work in the round instead of back and forth, you may of course adjust the pattern. You’ll need to add steeks mid-front (usually 5 stitches), and follow the instructions. When you would normally turn and work from the wrong side, simply work across the steek and continue in the round. At the end you’ll cut the piece open, pick up stitches to work bands, and cover the cut edges.
See DROPS video: How to knit steeks and cut open
Can I work a jumper back and forth instead of in the round?
Should you prefer to work back and forth instead of in the round, you may of course adjust the pattern so you work the pieces separately and then assemble them at the end. Divide the stitches for the body in 2, add 1 edge stitch in each side (for sewing) and work the front and back pieces separately.
See DROPS lesson: Can I adapt a pattern for circular needles into straight needles?
Why is the pattern slightly different than what I see in the photo?
Pattern repeats can vary slightly in the different sizes, in order to get the correct proportions. If you’re not working the exact same size as the garment in the photo, yours might deviate slightly. This has been carefully developed and adjusted so that the complete impression of the garment is the same in all sizes.
Make sure to follow instructions and diagrams for your size!
How do I make a women’s size garment into a men’s size one?
If you have found a pattern you like which is available in women’s size it’s not very difficult to convert it to men’s size. The biggest difference will be the length of sleeves and body. Start working on the women size that you think would fit across the chest. The additional length will be worked right before you cast off for the armhole/sleeve cap. If the pattern is worked top-down you can add the length right after the armhole or before the first decrease on sleeve.
Regarding additional yarn amount, this will depend on how much length you add, but it is better with a skein too many than too few.
How do I prevent a hairy garment from shedding?
All yarns will have excess fibres (from production) that might come off as lint or shedding. Brushed yarns (ie hairier yarns) have more of these loose, excess fibres, causing more shedding.
Shedding also depends on what is worn under or over the garment, and whether this pulls at the yarn fibres. It’s therefore not possible to guarantee that there will be no shedding
Below are some tips on how to get the best result when working with hairier yarns:
1. When the garment is finished (before you wash it) shake it vigorously so the looser hairs come off. NOTE: do NOT use a lint roller, brush or any method that pulls at the yarn.
2. Place the garment in a plastic bag and put it in your freezer - the temperature will cause the fibres to become less attached to each other, and excess fibres will come off easier.
3. Leave in the freezer for a few hours before taking it out and shaking it again.
4. Wash the garment according to the instructions on the yarn label.
Why does my garment pill?
Pilling is a natural process that happens to even the most exclusive of fibers. It's a natural sign of wear and tear that is hard to avoid, and that is most visible in high friction areas of your garment like a sweater's arms and cuffs.
You can make your garment look as new by removing the pilling, using a fabric comb or a pill/lint remover.
DROPS 52-23 |
||||||||||
|
||||||||||
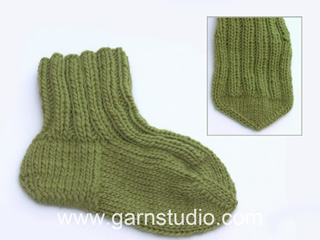
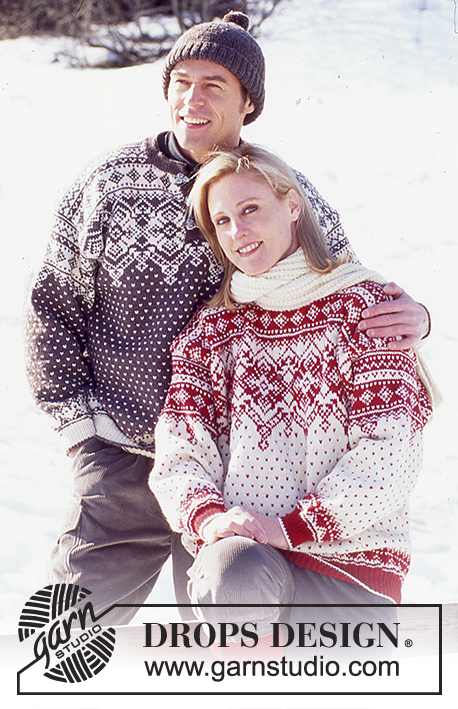
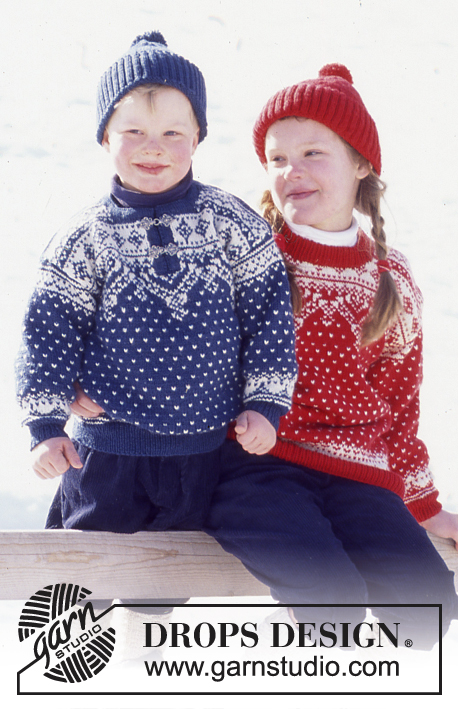
DROPS Cardigan, socks and scarf in Karisma Superwash
DROPS 52-23 |
||||||||||
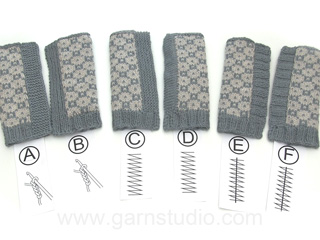
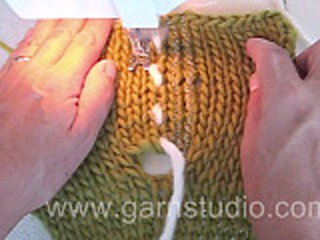
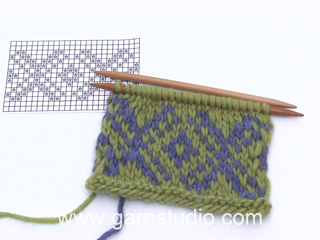
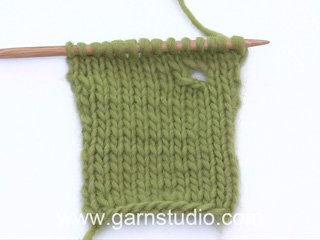
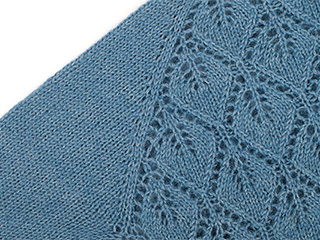
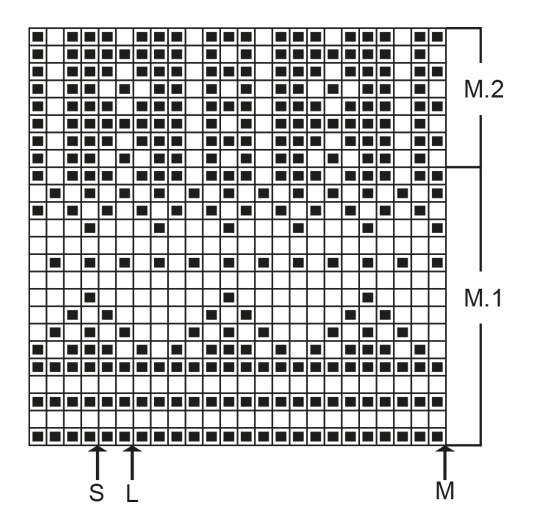
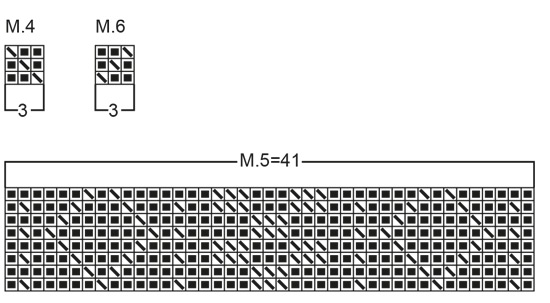
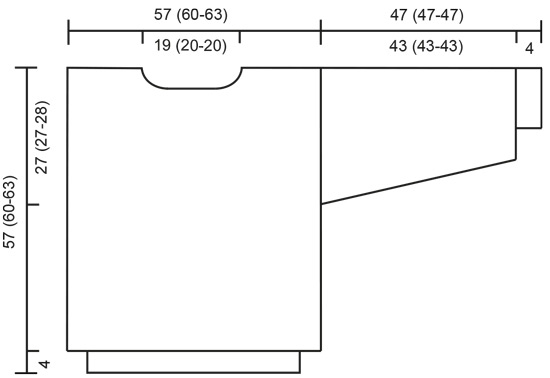
Gauge: 22 sts and 30 rows on larger needle in stockinette stitch = 10 x 10 cm Pattern: See chart (1 chart = 1 repeat). The pattern is shown from the right side and is knit entirely in stockinette stitch. The arrows indicate the starting points for different sizes. Border 1: Knit 4 cm stockinette stitch, purl 1 row (for the folding edge - measure the work from here), and then 4 cm stockinette stitch. Border 2: Knit 3 cm stockinette stitch, purl 1 row (for the folding edge - measure the work from here), and then 3 cm stockinette stitch. Body: Knit the cardigan in the round after the border and then cut steeks for armholes and at the center front. Cast on 251 (267-279) sts on smaller circular needles with wine red and knit Border 1 back and forth on needles keeping 1 edge stitch on either side at the center front in garter stitch throughout. Change to larger circular needles and inc 3 sts at the center front - these sts + edge sts (= 5 sts) are for the center front steek and are not knitted into the pattern = 249 (265-277) sts + 5 steek sts. Join and knit Pattern 1 once, then repeat Pattern 2 until the work measures 30 (33-35) cm , then inc 5 sts on either side (these sts are for the armhole steeks and are not knitted into the pattern). Front = 124 (132-138) sts + 5 steek sts, back = 125 (133-139) sts. Continue to repeat Pattern 2 until the work measures approximately 36 (39-42) cm - adjust for complete pattern, then knit Pattern 3. When the work measures 51 (54-57) cm, bind off the center front 24 (26-26) sts + 5 steek sts for the neck and knit the rest of the work back and forth on needles. Then bind off at each neck edge every other row: 3 sts 1 time, 2 sts 2 times, 1 st 1 time. At the same time, when the work measures 55 (58-61) cm, bind off the center back 37 (39-39) sts and then bind off 2 sts at each back neck edge on the next row. Bind off after Pattern 3 is complete, the work measures approximately 57 (60-63) cm. Sleeves: Cast on 52 (54-56) sts on smaller double pointed needles with wine red; join and place a marker at the join. Knit Border 1. Change to larger double pointed needles and knit Pattern 1, centering the pattern on the sleeve. After the border, inc 1 st each side of marker 34 (33-34) times alternately every 3rd and 4th row = 120 (120-124) sts. After Pattern 1 repeat Pattern 2 until the work measures approximately 42 cm - adjust for complete pattern. Then knit Pattern 1 upside down (knit from the top of the chart down) once. The work measures approximately 47 cm. Knit 2 cm reverse stockinette stitch for a seam allowance over the cut edge on the body, bind off. Assembly: Sew a marker thread in the center of the steek sts on either side and at the center front. Sew two machine seams around the marker thread, 1st seam = 1/2 stitch from the marker thread, 2nd seam = 1/2 stitch from first seam. Cut steeks for armholes and at the center front. Sew shoulder seams. Pick up approximately 112-130 sts along the left front on smaller needles with wine red and knit Border 2, bind off. Repeat along the right front, but after 1 cm make 7 buttonholes evenly distributed on the row (1 buttonhole = bind off 2 sts and cast on 2 new sts over the bound-off sts on the next row). Remember to make corresponding buttonholes on the folding edge. Fold the buttonband over against the wrong side and sew. Pick up approximately 110-120 sts around the neck on smaller circular needles with wine red and knit Border 2, bind off. Sew the sleeves to the body from the right side as follows: Sew alternately a stitch in the last row on the sleeve before the seam allowance and a stitch on the body after the machine seam. Turn the sweater inside out and sew the seam allowance from the sleeve over the cut edge on the body by hand. Fold all edges over against the wrong side and sew. Sew on the buttons. SOCKS: Sizes: European shoe sizes 38-41 (41-44) women’s US shoe sizes 7 - 9-1/2 (9-1/2 - 11) men’s US shoe sizes 6 - 8-1/2 (8-1/2 - 10) total length: 58 (65) cm foot length: 23 (26) cm Materials: DROPS KARISMA SUPERWASH from Garnstudio 300 (350) g col. 48, wine red DROPS 3 mm and 3.5 mm double pointed needles, or sizes needed to obtain correct gauge. Alternate yarns: see listing under sweater. Gauge: 22 sts and 30 rows on larger needle in stockinette stitch = 10 x 10 cm Pattern: See charts (1 chart = 1 repeat). The pattern is seen from the right side and is knit in textured stitches entirely in wine red. Rib: * knit 2, purl 2 *, repeat from * - *. Socks: Cast on 72 (80) sts on smaller double pointed needles with wine red; join and place a marker at the join (this is the center back). Knit 14 (16) cm rib. Change to larger double pointed needles and inc 0 (4) sts evenly distributed on the first row = 72 (84) sts. Knit 15 (21) sts of Pattern 4, Pattern 5, 15 (21) sts of Pattern 6, 1 st at the center back (keep this stitch in stockinette stitch throughout). When the work measures 30 (32) cm begin shaping the leg. Dec 1 st on each side of the marker at the center back (before the marker: knit 1, slip 1, pass the slipped st over (psso); and after the marker: K 2 tog) every 5th (4th) row 12 (16) times = 48 (52) sts. When the work measures 50 (56) cm, put the center 24 (26) sts in front on a stitch holder and knit the rest in stockinette stitch. Knit 5 (6) cm stockinette stitch (for the heel) over the 24 (26) center sts in the back, and then turn the heel: 1st row (right side): Knit until 8 (9) sts remain on the needle, slip 1, knit 1, psso. Turn the work. 2nd row (wrong side): Purl until 8 (9) sts remain on the needle, slip 1, purl 1, psso. Turn the work. 3rd row (right side): Knit until 7 (8) sts remain on the needle, slip 1, knit 1, psso. Turn the work. 4th row (wrong side): Purl until 7 (8) sts remain on the needle, slip 1, purl 1, psso. Turn the work. 5th row (right side): Knit until 6 (7) sts remain on the needle, slip 1, knit 1, psso. Turn the work. 6th row (wrong side): Purl until 6 (7) sts remain on the needle, slip 1, purl 1, psso. Turn the work. 7th row (right side): Knit until 5 (6) sts remain on the needle, slip 1, knit 1, psso 1. Turn the work. 8th row (wrong side): Purl until 5 (6) sts remain on the needle, slip 1, purl 1, psso. Turn the work. Continue in this manner, working 1 less stitch before decreasing every other row, until 12 (14) sts remain. Then pick up 12 (13) sts on either side of the heel and distribute all sts evenly on 4 needles = 60 (66) sts. Put a marker on either side of the uppermost 24 (26) sts. Dec 1 st before the marker before the 24 (26) sts and 1 st after the marker after the 24 (26) sts every other row 6 times in all = 48 (54) sts. Make the decreases as follows: Before the marker: K 2 tog. After the marker: slip 1, knit 1, psso. Knit until the foot measures approximately 19 (21.5) cm. Put a marker on either side of the foot and bind off for the toe on either side of the marker as follows: K 2 tog before the marker and K 2 tog after the marker, repeat 3 times every other row = 36 (42) sts, then 7 (9) times on every row = 8 (6) sts. Pull together remaining sts and fasten well. SCARF: Size: width = approximately 20 cm length = approximately 160 cm Materials: DROPS KARISMA SUPERWASH from Garnstudio 200 g col. 01, natural white DROPS 3.5 mm needles, or size needed to obtain correct gauge. Gauge: 25 sts in pattern = 10 c Row gauge is not important for this pattern. Rib: * knit 1, purl 1 *. Repeat from * - *. Pattern: Row 1: knit 1, purl 1, knit 1, * knit 3, purl 1 *, repeat from * - *, finish with: knit 1, purl 1, knit 1. Row 2: purl 1, knit 1, purl 1, * knit 2, purl 1, knit 1 *, repeat from * - *, finish with: purl 1, knit 1, purl 1. Repeat these 2 rows throughout. Scarf: Cast on 50 sts on and knit 2 rows rib. Then knit Pattern until the work measures approximately 160 cm. Finish with 2 rows rib, bind off. |
||||||||||
Diagram explanations |
||||||||||
|
||||||||||
Have you made this or any other of our designs? Tag your pictures in social media with #dropsdesign so we can see them! Do you need help with this pattern?You'll find tutorial videos, a Comments/Questions area and more by visiting the pattern on garnstudio.com. © 1982-2024 DROPS Design A/S. We reserve all rights. This document, including all its sub-sections, has copyrights. Read more about what you can do with our patterns at the bottom of each pattern on our site. |
With over 40 years in knitting and crochet design, DROPS Design offers one of the most extensive collections of free patterns on the internet - translated to 17 languages. As of today we count 304 catalogues and 11422 patterns - 11422 of which are translated into English (UK/cm).
We work hard to bring you the best knitting and crochet have to offer, inspiration and advice as well as great quality yarns at incredible prices! Would you like to use our patterns for other than personal use? You can read what you are allowed to do in the Copyright text at the bottom of all our patterns. Happy crafting!
Comments / Questions (8)
Lecas Sylvie wrote:
Bonjour,\r\nMerci pour votre réponse et sa rapidité.\r\nJ\'aime beaucoup vos modèles et les explications sont simples.\r\nMerci encore.
22.02.2023 - 10:45Lecas wrote:
Bonjour, Pour les mailles steek des emmanchures du modèle 52-23, faut-il ajouter 5 mailles ou se servir des mailles existantes ? Merci
21.02.2023 - 17:38DROPS Design answered:
Bonjour Mme Lecas, les mailles steek sont toujours montées en plus, autrement dit, vous allez monter 5 mailles de chaque côté de l'ouvrage pour les emmanchures (entre chacun des devants et le dos) - sauf si je comprends mal votre question. Bon tricot!
21.02.2023 - 18:20Marianne Derksen wrote:
Betreft rugpand en voorpand. Ik ben gekomen bij "meerder bij een hoogte van 30 cm 5 st. aan weerskanten voor de armsgaten" Maar aan weerskanten waarvan? waar komen deze meerderingen, dat is mij helaas niet duidelijk
14.12.2022 - 21:17Liesbeth Van Roekel wrote:
Kan ik dit patroon ook breien met de wol fabel
18.10.2019 - 12:10DROPS Design answered:
Dag Liesbeth,
Fabel valt in garencategorie A en is dus dunner dan Karisma (uit categorie B). Voor een vervangend garen kun je dus het beste een garen kiezen uit dezelfde categorie. Via deze link vindt je een overzicht van de categorieën.
23.10.2019 - 20:25Hanne Mølgaard wrote:
Jeg vil gerne have en forklaring på dette: Derefter lukkes der af mod halsen på hver 2. p: 3 m 1 gang, 2 m 2 gange, 1 m 1 gang. På forhånd tak.
04.05.2019 - 04:15DROPS Design answered:
Hej Hanne, Jo på første pind lukker du 3 masker af nærmest halsen, på 3. og 5. pind lukker du 2 masker af til hals og sidst på 7.pind lukker du 1 maske af. Det gør du i begge sider af forstykkerne mod halsen. God fornøjelse!
06.05.2019 - 09:08Laine Tuulikki wrote:
Hei! Kun aloin neulomaan villatakkia niin M1 meni ihan oikein mutta M2 eturenat eivät tule samanlaiset väliin laitoin 5oikeaa aukileikkaus silmät olen laskenut muutenkin silmät moneen kertaan tosin jos silmiä on 249 niin eihän se voi mennä tasan mallikerran kanssa kun mallikerta on 24 silmää . Mitähän teen väärin.
26.11.2017 - 20:53Katariina Koski wrote:
Why you don't have those M1 And M2 in the paper. Its very hard to understad what you mean
08.04.2017 - 18:57DROPS Design answered:
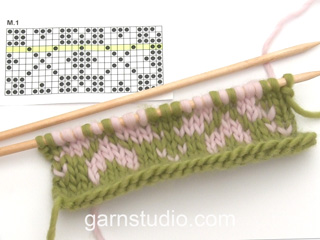
Dear Mrs Koski, you will find diagram M.1 and M.2 at the very bottom of the last diagram at the bottom of the page - see on the right side of diagram sections called M.1 and M.2. Happy knitting!
12.04.2017 - 13:07Estrid wrote:
Hvis du, som jeg, bedst kan lide at mønsteret på ærmerne er symetrik ved udtagningerne, så start med en maske mere eller mindre.
10.07.2013 - 15:14