-------------------------------------------------------
Alternative Yarn – See how to change yarns here
Yarn Groups A to F – Use the same pattern and change the yarn here
Yarn usage using an alternative yarn – Use our yarn converter here
-------------------------------------------------------
All measurements in charts are in cm.
= knit (as seen from the right side) | |
= purl (as seen from the right side) |
Each of our patterns has specific tutorial videos to help you.
These step-by-step tutorials might also help you:
Why is the knitting/crochet tension so important?
Knitting tension is what determines the final measurements of your work, and is usually measured per 10 x 10 cm. It is provided like so: number of stitches in width x number of rows in height - eg: 19 stitches x 26 rows = 10 x 10 cm.
The knitting tension is very individual; some people knit/crochet loosely while others work tightly. You adjust the knitting tension with the needle size, which is why the suggested needle size only serve as a guide! You need to adjust this (up or down) to ensure that YOUR knitting tension matches the knitting tension provided in the pattern. If you work with a different knitting tension than provided you will have a different yarn consumption, and your work will have different measurements than what the pattern suggests.
The knitting tension also determines which yarns can replace each other. As long as you achieve the same knitting tension you can replace one yarn with another.
See DROPS lesson: How to measure your tension/gauge
See DROPS video: How to make a gauge tension swatch
How do I know how many balls of yarn I need?
The required amount of yarn is provided in grams, eg: 450 g. To calculate how many balls you’ll need you first need to know how many grams are in 1 ball (25g, 50g or 100g). This information is available if you click on the individual yarn quality on our pages. Divide the amount required with the amount of each ball. For example, if each ball is 50g (the most common amount), the calculation will be as follows: 450 / 50 = 9 balls.
Can I use a different yarn than what the pattern suggests?
The important thing when changing from one yarn to another is that the knitting/crochet tension remains the same. This is so that the measurements of the finished piece will be the same as on the sketch provided. It is easier to achieve the same knitting tension using yarns from the same yarn group. It is also possible to work with multiple strands of a thinner yarn to achieve the knitting tension of a thicker one. Please try our yarn converter. We recommend you to always work a test swatch.
Please NOTE: when changing yarn the garment might have a different look and feel to the garment in the photo, due to individual properties and qualities of each yarn.
See DROPS lesson: Can I use a different yarn than the one mentioned in the pattern?
What are the yarn groups?
All our yarns are categorised into yarn groups (from A to F) according to thickness and knitting tension – group A contains the thinnest yarns and group F the thickest. This makes it easier for you to find alternative yarns to our patterns, should you wish to switch yarn. All yarns within the same group have a similar knitting tension and can easily replace each other. However, different yarn qualities have different structures and properties which will give the finished work a unique look and feel.
How do I use the yarn converter?
At the top of all our patterns you’ll find a link to our yarn converter, which is a helpful tool should you wish to use a different yarn than suggested. By filling in the yarn quality you wish to replace, the amount (in your size) and number of strands, the converter will present good alternative yarns with the same knitting tension. Additionally it will tell you how much you’ll require in the new qualities and whether you’ll need to work with multiple strands. Most skeins are 50g (some are 25g or 100g).
If the pattern is worked with multiple colours, every colour will have to be converted separately. Similarly, if the pattern is worked with several strands of different yarns (for example 1 strand Alpaca and 1 strand Kid-Silk) you will have to find alternatives for each, individually.
Why do you show discontinued yarns in the patterns?
Since different yarns have different qualities and textures we have chosen to keep the original yarn in our patterns. However, you can easily find options among our available qualities by using our yarn converter, or simply pick a yarn from the same yarn group.
It is possible that some retailers still have discontinued yarns in stock, or that someone has a few skeins at home that they would like to find patterns for.
The yarn converter will provide both alternative yarn as well as required amount in the new quality.
What size should I knit?
If you think it's hard to decide what size to make, it can be a good idea to measure a garment you own already and like the size of. Then you can pick the size by comparing those measures with the ones available in the pattern's size chart.
You'll find the size chart at the bottom of the pattern.
See DROPS lesson: How to read size chart
Why do I get the wrong knitting tension with the suggested needle size?
The needle size provided in the pattern serves only as a guide, the important thing is to follow the knitting tension. And since knitting tension is very individual, you will have to adjust the needle size to ensure that YOUR tension is the same as in the pattern – maybe you’ll have to adjust 1, or even 2 needle sizes, up or down to achieve the correct tension. For this, we recommend that you work test swatches.
Should you work with a different knitting tension than the one provided, the measurements of the finished garment might deviate from the measurement sketch.
See DROPS lesson: How to measure your tension/gauge
See DROPS video: How to make a gauge tension swatch
Why is the pattern worked top-down?
Working a garment top-down provides more flexibility and room for personal adjustment. For example it is easier to try the garment on while working, as well as making adjustments to length of yoke and shoulder caps.
The instructions are carefully explaining every step, in the correct order. Diagrams are adjusted to the knitting direction and are worked as usual.
How do I work according to a knitting diagram?
The diagram depicts all rows/rounds, and every stitch seen from the right side. It is read from bottom to top, from right to left. 1 square = 1 stitch.
When working back and forth, every other row is worked from the right side and every other row is worked from the wrong side. When working from the wrong side, the diagram will have to be worked reversed: from left to right, knit stitches are purled, purl stitches are knit etc.
When working in the round every round is worked from the right side and the diagram are worked from right to left on all rounds.
See DROPS lesson: How to read knitting diagrams
How do I work according to a crochet diagram?
The diagram depicts all rows/rounds, and every stitch seen from the right side. It is worked from bottom to top, from right to left.
When working back and forth every other row is worked from the right side: from right to left and every other row is worked from the wrong side: from left to right.
When working in the round, every row in the diagram are worked from the right side, from right to left.
When working a circular diagram you start in the middle and work your way outwards, counter clockwise, row by row.
The rows usually start with a given number of chain stitches (equivalent to the height of the following stitch), this will either be depicted in the diagram or explained in the pattern.
See DROPS lesson: How to read crochet diagrams
How do I work several diagrams simultaneously on the same row/round?
Instructions for working several diagrams after each other on the same row/round, will often be written like so: “work A.1, A.2, A.3 a total of 0-0-2-3-4 times". This means you work A.1 once, then A.2 is worked once, and A.3 is repeated (in width) the number of times provided for your size – in this case like so: S = 0 times, M = 0 times, L=2 times, XL= 3 times and XXL = 4 times.
The diagrams are worked as usual: begin with the first row in A.1, then work the first row in A.2 etc.
See DROPS lesson: How to read knitting diagrams
See DROPS lesson: How to read crochet diagrams
Why are the sleeves shorter in larger sizes?
The total width of the garment (from wrist-to-wrist) will be larger in the larger sizes, despite the actual sleeves being shorter. The larger sizes have longer sleeve caps and wider shoulders, so there will be a good fit in all sizes.
Where on the garment is the length measured?
The measurement sketch/schematic drawing provides information regarding the full length of the garment. If it’s a jumper or a jacket the length is measured from the highest point on the shoulder (usually closest to the neckline), and straight down to the bottom of the garment. It is NOT measured from the tip of shoulder. Similarly, the length of yoke is measured from the highest point on the shoulder and down to where yoke is split into body and sleeves.
See DROPS lesson: How to read a schematic drawing
What is a repeat?
Diagrams are often repeated on the round or in height. 1 repeat is the diagram the way it appears in the pattern. If it says to work 5 repeats of A.1 in the round, then you work A.1 a total of 5 times after/next to each other in the round. If it says to work 2 repeats of A.1 vertically/in height you work the entire diagram once, then begin again at the start and work the entire diagram one more time.
Why does the piece start with more chain stitches than it’s worked with?
Chain stitches are slightly narrower than other stitches and to avoid working the cast-on edge too tight, we simply chain more stitches to begin with. The stitch count will be adjusted on the following row to fit the pattern and measurement sketch.
Why increase before the rib edge when the piece is worked top-down?
The rib edge is more elastic and will contract slightly compared to, for example, stocking stitch. By increasing before the rib edge, you avoid a visible difference in width between the rib edge and the rest of the body.
Why increase in the cast-off edge?
It’s very easy to cast off too tightly, and by making yarn overs while casting off (and simultaneously casting these off) you avoid a too tight cast off edge.
See DROPS video: How to bind off with yarn overs (yo)
How do I increase/decrease on every 3rd and 4th row/round alternately?
To achieve an even increase (or decrease) you can increase on, for example: every 3rd and 4th row alternately, like so: work 2 rows and increase on the 3rd row, work 3 rows and increase on the 4th. Repeat this until the increase is complete.
See DROPS lesson: Increase or decrease 1 st on every 3rd and 4th row alternately
How can I work a jacket in the round instead of back and forth?
Should you prefer to work in the round instead of back and forth, you may of course adjust the pattern. You’ll need to add steeks mid-front (usually 5 stitches), and follow the instructions. When you would normally turn and work from the wrong side, simply work across the steek and continue in the round. At the end you’ll cut the piece open, pick up stitches to work bands, and cover the cut edges.
See DROPS video: How to knit steeks and cut open
Can I work a jumper back and forth instead of in the round?
Should you prefer to work back and forth instead of in the round, you may of course adjust the pattern so you work the pieces separately and then assemble them at the end. Divide the stitches for the body in 2, add 1 edge stitch in each side (for sewing) and work the front and back pieces separately.
See DROPS lesson: Can I adapt a pattern for circular needles into straight needles?
Why is the pattern slightly different than what I see in the photo?
Pattern repeats can vary slightly in the different sizes, in order to get the correct proportions. If you’re not working the exact same size as the garment in the photo, yours might deviate slightly. This has been carefully developed and adjusted so that the complete impression of the garment is the same in all sizes.
Make sure to follow instructions and diagrams for your size!
How do I make a women’s size garment into a men’s size one?
If you have found a pattern you like which is available in women’s size it’s not very difficult to convert it to men’s size. The biggest difference will be the length of sleeves and body. Start working on the women size that you think would fit across the chest. The additional length will be worked right before you cast off for the armhole/sleeve cap. If the pattern is worked top-down you can add the length right after the armhole or before the first decrease on sleeve.
Regarding additional yarn amount, this will depend on how much length you add, but it is better with a skein too many than too few.
How do I prevent a hairy garment from shedding?
All yarns will have excess fibres (from production) that might come off as lint or shedding. Brushed yarns (ie hairier yarns) have more of these loose, excess fibres, causing more shedding.
Shedding also depends on what is worn under or over the garment, and whether this pulls at the yarn fibres. It’s therefore not possible to guarantee that there will be no shedding
Below are some tips on how to get the best result when working with hairier yarns:
1. When the garment is finished (before you wash it) shake it vigorously so the looser hairs come off. NOTE: do NOT use a lint roller, brush or any method that pulls at the yarn.
2. Place the garment in a plastic bag and put it in your freezer - the temperature will cause the fibres to become less attached to each other, and excess fibres will come off easier.
3. Leave in the freezer for a few hours before taking it out and shaking it again.
4. Wash the garment according to the instructions on the yarn label.
Why does my garment pill?
Pilling is a natural process that happens to even the most exclusive of fibers. It's a natural sign of wear and tear that is hard to avoid, and that is most visible in high friction areas of your garment like a sweater's arms and cuffs.
You can make your garment look as new by removing the pilling, using a fabric comb or a pill/lint remover.
Villmark |
|||||||
|
|
||||||
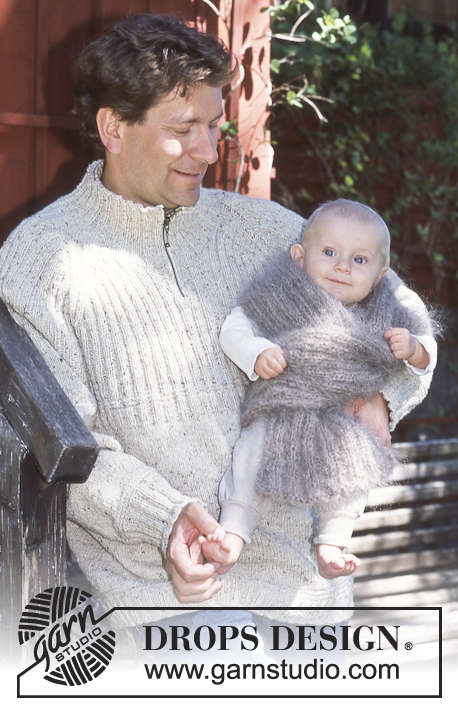
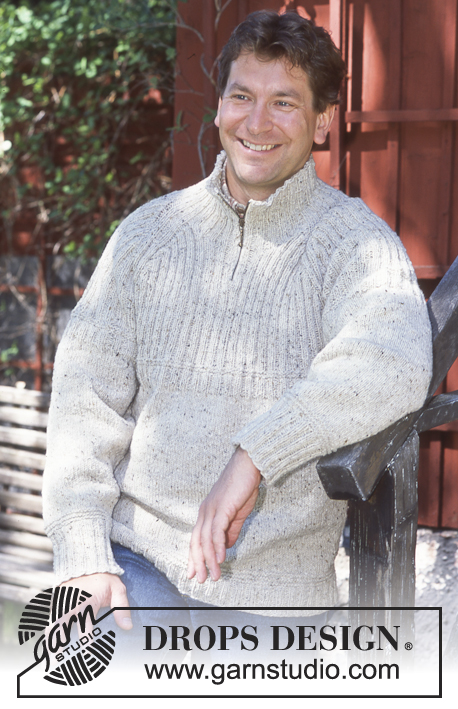
DROPS Pullover for men in Angora-Tweed (with or without zipper). Ribbed scarf in Vienna
DROPS 70-21 |
|||||||
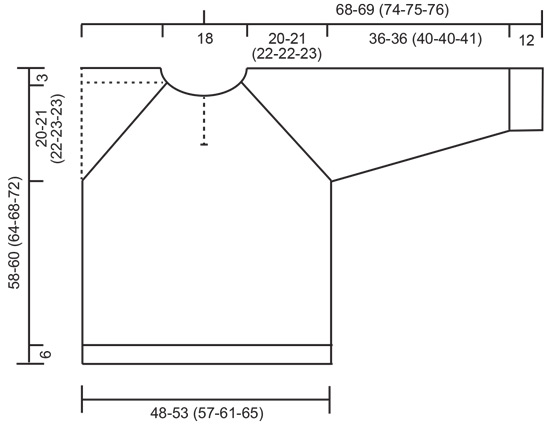
Gauge: 2 1 sts x 24 rows on larger needles in stockinette st = 10 x 10 cm [4" x 4"] Rib: * K 2, P 2 *, repeat from * - *. Pattern: See chart. The pattern is seen from the right side. Body: Cast on 184-200 (216-232-248) sts on smaller circular needles; join and place a marker at the join. P 1 row (seen from the right side) then knit Pattern 2. Change to larger circular needles and stockinette st. When the piece measures 28-30 (32-35-39) cm [11" - 11.75" (12-⅝" - 13.75" - 15.25")] knit Pattern 3. At the same time when the piece measures 35-36 (39-42-46) cm [13.75" - 14-⅛" (15.25" - 16.5" - 18-⅛")] place a marker at each side - in the middle of a K 2 rib. There are 92-100 (108-116-124) sts between markers on Body. On the next row bind off 12 sts at each side for armhole (bind off 6 sts each side of marker as follows: P 1, K 2, P 2, K 1, marker, K 1, P2, K 2, P 1). There are now 80-88 (96-104-112) sts each on front and back. Lay aside and knit sleeves. Sleeve: Cast on 52-52 (60-60-60) sts on smaller double-pointed needles; join and place a marker at the join. P 1 row (seen from the right side), then knit Pattern 1. After Pattern 1 change to larger double-pointed needles and stockinette st. Read the rest of the sleeve instructions before continuing. When the piece measures 14 cm [5.5"] inc 1 st at each side of marker (make all incs 1 st in from marker so that you have 2 sts between incs) 12-16 (12-16-16) times: Size S/M (women): alternately every 6th and 7th row Size M/L (women): every 5th row. Size M (men): alternately every 7th and 8th row. Sizes L + XL (men): alternately every 5th and 6th row = 76-84 (84-92-92) sts - knit the increased sts into pattern as you go along. At the same time when the piece measures 41-42 (45-45-46) cm [16-⅛" - 16.5" (17.75" - 17.75" - 18-⅛")] knit Pattern 3 - place pattern so that you have a K st on each side of marker. Keep these 2 sts in stockinette st thoughout and make incs at each side of these 2 sts. When the piece measures 48-49 (52-52-53) cm [18-⅞" - 19.25" (20.5" - 20.5" - 20-⅞")] bind off 6 sts each side of marker (you will bind off P 1, K 2, P 2, K1, marker, K 1, P 2, K 2, P 1) = 64-72 (72-80-80) sts remain on needles. Lay piece aside and knit another sleeve. Yoke: Put the sleeves in on the same circular needles as Body where sts were bound off for armhole = 288-320 (336- 368-384) sts. Put a marker in each transition between front, back and sleeve = 4 markers. Continue with Pattern 3 until it is complete and then repeat Pattern 4 to finished measurements at the same time as shaping raglan. Knit 4 rows before beginning raglan shaping. Raglan shaping: read this entire section before knitting. There are 8 decs per dec row and 8 sts between decs at each transition between front, back and sleeve (4 sts each side of each marker). These 8 sts = raglan sts which are knit as follows: P 1, K 2, P 2, K 2, P 1. Dec 1 st each side of the 8 raglan st every 4 rows 2 times, then every other row 14-12 (15-13-13) times, then every row 8-14 (11-17-17) times. A total of 192-224 (224-256-256) sts are decreased for raglan. Dec as follows from right side: P 2 tog Dec as follows from wrong side (after neck shaping): K 2 tog. Collar with zipper: When the piece measures 46-48 (52-56-60) cm [18-⅛" - 18-⅞" (20.5" - 22" - 23-⅝")] knit 2 rows with garter st over the front center 2 sts. On the next row bind off these 2 sts (for zipper opening). Keep the edge st at each side of center front opening in garter st, and continue in pattern over remaining sts. When the piece measures 52-54 (58-60-62) cm [20.5" - 21.25" (22-⅞" - 23-⅝" - 24-⅜")] bind off 4-4 (6-6-8) sts at each side (center front edge), then bind off at each neck edge every other row: 2 sts 2 times and 1 st 2 times. After all raglan and neck shaping is complete there are 74-74 (86-86-98) sts on needles and the piece measures approx. 58-60-(64-68-72) cm [22-⅞" - 23-⅝" (25.25" - 26.75" - 28.25")] to shoulder. Put sts around the neck on smaller double-pointed needles, pick up 14-14 (16-16-18) sts each side of neck to center front = 102-102 (118-118-134) sts. Knit rib back and forth, keeping 1 st at each front edge in garter st - match up ribs from Body. Bind off in pattern when the collar measures approx. 12 cm [4.75"]. Collar without zipper: When the piece measures 52-54 (58-60-62) cm [20.5" - 21.25" (22-⅞" - 23-⅝" - 24-⅜")] put 10-10 (14-14-18) sts at center front on a st holder for the neck. Then bind off at each side of sts on holder for neck every other row: 2 sts 2 times and 1 st 2 times. After all raglan and neck shaping is complete there are 74-74 (86-86-98) sts on needles and the piece measures approx. 58-60-(64-68-72) cm [22-⅞" - 23-⅝" (25.25" - 26.75" - 28.25")] to shoulder. Put sts around the neck on smaller double-pointed needles, pick up 30-30 (34-34-38) sts at center front (incl. sts from st holder) = 104-104 (120-120-136) sts; join and place a marker at the join. Knit rib over all sts - match up ribs from Body. Bind off in pattern when the collar measures approx. 12 cm [4.75"]. Assembly: Sew opening under the sleeve and sew in zipper. RIBBED SCARF IN VIENNA: Size: approx. 26 x 160 cm [10.25" x 63"] Materials: DROPS VIENNA from Garnstudio 150 g. col. no. 44, brown. DROPS 8 mm [US 11] needles, or size needed to obtain correct gauge. Gauge: 12 sts x 14 rows rib = 10 x 10 cm [4" x 4"]. Rib: * K 2, P 2 *, repeat from * - *. Garter st, when knitting flat: Knit all sts, all rows. Scarf: Cast on 32 sts with 2 strands Vienna. Change to 1 strand and knit as follows: K 1 (edge st knit in garter st thoughout), 30 sts rib, K 1 (edge st knit in garter st thoughout). When scarf measures 160 cm [63"] bind off all sts with double strands of yarn in rib. |
|||||||
Diagram explanations |
|||||||
|
|||||||
Have you made this or any other of our designs? Tag your pictures in social media with #dropsdesign so we can see them! Do you need help with this pattern?You'll find tutorial videos, a Comments/Questions area and more by visiting the pattern on garnstudio.com. © 1982-2024 DROPS Design A/S. We reserve all rights. This document, including all its sub-sections, has copyrights. Read more about what you can do with our patterns at the bottom of each pattern on our site. |
With over 40 years in knitting and crochet design, DROPS Design offers one of the most extensive collections of free patterns on the internet - translated to 17 languages. As of today we count 304 catalogs and 11422 patterns - 11417 of which are translated into English (US/in).
We work hard to bring you the best knitting and crochet have to offer, inspiration and advice as well as great quality yarns at incredible prices! Would you like to use our patterns for other than personal use? You can read what you are allowed to do in the Copyright text at the bottom of all our patterns. Happy crafting!
Comments / Questions (24)
Helen wrote:
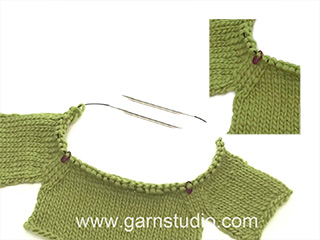
On the section about the yolk, you say to put a marker at the front and back and sleeve equalling f four markers. Did you mean front and back of sleeve that would make sense to me if this isn’t right please explain a little more. Thank you
11.10.2023 - 16:52DROPS Design answered:
Dear Helen, you should insert a marker to mark each piece: 1 marker before the stitches of the sleeves (after the stitches of back / front piece) and 1 marker after the end of the sleeves (before the stitches of front/back piece). Happy knitting!
12.10.2023 - 09:06Franzi Engels wrote:
Hallo, auch ich habe eine Frage zu den Abnahmen und hinterer Zunahmen am Reißverschluss. Auf dem Bild ist ja sehr schön zu erkennen, dass die Maschen direkt am Reißverschluss bis in den Hals übergehen und dort keine Maschen zu oder abgenommen werden. die "4-4 (6-6-8) M auf jeder Seite der Mitte vorne" werden also, zumindest den Bild nach, nicht am Reißverschluss abgenommen. Ich freue mich über eine zeitnahe Hilfe Franzi
15.09.2023 - 18:14DROPS Design answered:
Lieber Franzi, für den Hals mit Reissverschluss soll man die Arbeit nach 46-48 (52-56-60) cm in 2 teilen; dann strickt man bis die Arbeit 52-54 (58-60-62) cm und dann wird man für den Hals abketten: es wird 4-4 (6-6-8) Maschen 1 Mal + 2 Maschen 2 Mal und 1 Masche 2 Mal am Anfang jeder Reihe von Hals abgekettet - dh am Anfang jeder Hin-Reihe für das rechte Vorderteil und am Anfang jeder Rückreihe für das linke Vorderteil - diese Maschen gehören zum Halsausschnitt. Viel Spaß beim stricken!
18.09.2023 - 07:57Annette wrote:
Har en udfordringer med de sidste indtagninger, på drops 21-70 herre trøje. Laver hals med lynlås og skal indtage de sidste 30 masker (xl) men forstår ikke hvor indtagningerne laves, er det kun på forsiden mellem ravlan og lynlås? Og hvordan laver man 2 m 2 gange indtagning? Håber på hurtig respons 🙏🏻🙏🏻
21.02.2023 - 11:58DROPS Design answered:
Hej Annette, først lukker du de første 8 masker af til hals (i starten af pinden, strikker rundt til den anden side og lukker 8 masker af i starten af næste pind. Næste gang lukker du 2 masker af i starten af de 2 næste pinde, og så yderligere 2 masker af i starten af de næste 2 pinde osv :)
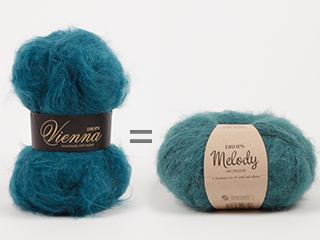
28.02.2023 - 15:31Christel wrote:
Hej, Hvilket garn kan man bruge i stedet for ull-tweed? Skriv evt. garngruppen eller navnet, linket ovenfor virker ikke. Mvh Christel
21.01.2023 - 10:13DROPS Design answered:
Hei Christel. Hvilken link virker ikke? Så skal vi få ordnet den. DROPS Ull-Tweed tilhørte garngruppe B og du kan bruke de kvalitetene vi har i samme garngruppe. Bruk vår Garnkalkulator for å regne ut garnmengden du trenger i den størrelsen du skal strikke (linken til Garnkalkulator finner du rett over "Trenger du hjelp?" og " Skriv ut" ikonene. Ellers ta en titt på Soft-Tweed, evnt Karisma, Lima, Puna eller Merino Extra Fine. Og husk strikkefastheten er kun veiledende. mvh DROPS Design
23.01.2023 - 11:16Sylvie wrote:
Bonjour, j’ai un problème avec les explications concernant le col avec zip: « À 52-54 (58-60-62) cm de hauteur totale, rabattre 4-4- (6-6-8) m de chaque côté (milieu devant-encolure) ». Où rabattre les (6) mailles? Si au bord de l’ouverture faite au milieu du devant, cela crée une « marche » qui ne permettra pas de poser le zip…Faut- il plutôt faire des diminutions sur les 2 demi- devants ? Pouvez- vous m’expliquer ce qu’est le « milieu devant- encolure »?
14.06.2022 - 13:18DROPS Design answered:
Bonjour Sylvie, ce sont les premières mailles que vous rabattez pour l'encolure soit les 6 premières mailles du rang sur l'endroit + les 6 premières mailles du rang suivant sur l'envers (= les 12 mailles du milieu devant) - vous relèverez ensuite des mailles le long de ces mailles pour tricoter le col. Le zip ira jusqu'ici + la hauteur du col (vous tricotez ensuite 12 cm de col). Bon tricot!
14.06.2022 - 17:00Lise Hebert wrote:
Bonjour Mme Hebert, les diminutions des raglans se font de chaque côté des 8 m des raglans (1 m env, 2 m end, 2 m env, 2 m end, 1 m env), autrement dit, sur l'endroit tricotez: 2 m ens à l'env, (les 8 m) 2 m ens à l'envers. Puis sur l'envers, diminuez 2 m ens à l'end, (les 8 m), 2 m ens à l'end. Bon tricot! PAR CONTRE SI JE TRICOTE EN CONTINU , DONC JE SUIS TOUJOURS SUR LE CÔTÉ ENDROIT ALORS JE FAIS ÇA COMMENT,,,
04.10.2021 - 04:42DROPS Design answered:
Bonjour Mme Hebert, vous allez d'abord diminuer pour le raglan tous les 4 tours, puis tous les 2 tours et vous terminez en diminuant tous les tours/rangs, quelque soit l'encolure choisie, vous devrez alors diminuer pour le raglan sur l'endroit aussi bien que sur l'envers. Bon tricot!
04.10.2021 - 08:56Lise Hebert wrote:
Meme si ce sont des cotes 2-2 Desfois je tricote ensemble une endroit et une envers ensemble Parce que je tricote en continue, donc toujours a l’endroit
01.10.2021 - 16:28DROPS Design answered:
Bonjour Mme Hebert, tricotez toujours ensemble à l'envers la maille précédent les 8 m et la maille après les 8 m du raglan, même si celle ci est une maille endroit, autrement dit, diminuez toujours avec 2 m ens à l'envers sur l'endroit, après l'encolure, vous diminuerez tous les rangs = sur l'envers aussi donc, en tricotant 2 m ens à l'endroit. Bon tricot!
04.10.2021 - 07:41Lise Hebert wrote:
Comment faire les diminutions, pour les manches raglan, cotes 2/2 A 4 mailles du bord pour ce chandail
01.10.2021 - 14:31DROPS Design answered:
Bonjour Mme Hebert, les diminutions des raglans se font de chaque côté des 8 m des raglans (1 m env, 2 m end, 2 m env, 2 m end, 1 m env), autrement dit, sur l'endroit tricotez: 2 m ens à l'env, (les 8 m) 2 m ens à l'envers. Puis sur l'envers, diminuez 2 m ens à l'end, (les 8 m), 2 m ens à l'end. Bon tricot!
01.10.2021 - 16:15Donna wrote:
To start off how many stitches do I cast on for a mans chest measurement of 45; inches
26.08.2021 - 13:42DROPS Design answered:
Dear Donna, measure a similar garment he has and likes the shape and compare these measurements with the chart (measurements in chart are in cm) - this is the best way to find the size. Read more here. Happy knitting!
26.08.2021 - 16:23Lise Hebert wrote:
Cela voudrait dire que je pourrais faire les manches du chandail Villmark avec une aiguille circulaire Est ce vrai
18.06.2021 - 13:46DROPS Design answered:
Bonjour Mme Hebert, tout à fait, vous pouvez les tricoter d'abord en magic loop puis continuer avec une circulaire de 40 cm lorsque vous aurez augmenté assez de mailles. Ou bien vous pouvez les tricoter en rangs - comme expliqué dans cette leçon. Bon tricot!
21.06.2021 - 07:20