
Popular categories
Looking for a yarn?


|
|||||||||||||
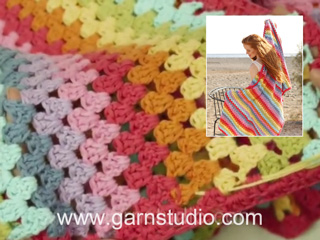
Moonstone Meadow |
|||||||||||||
 |
 |
||||||||||||
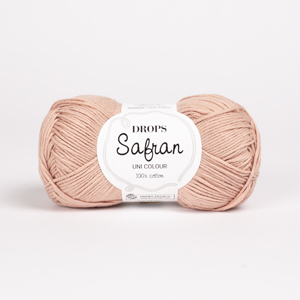
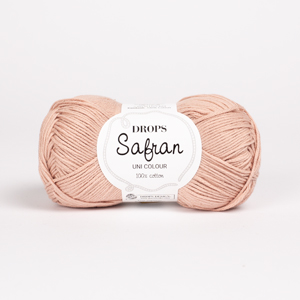
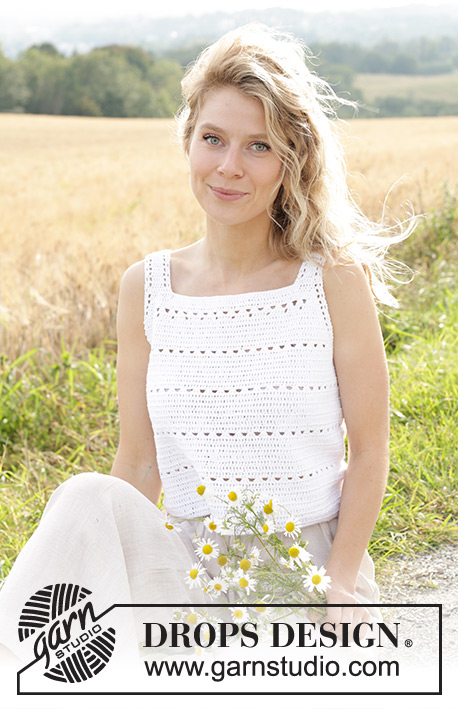
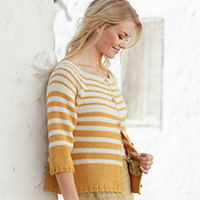
Crocheted top/singlet in DROPS Safran. Piece is crocheted top down with treble crochets and lace pattern. Size: S - XXXL
DROPS 248-22 |
|||||||||||||
|
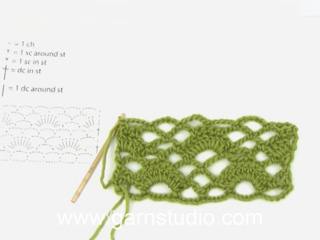
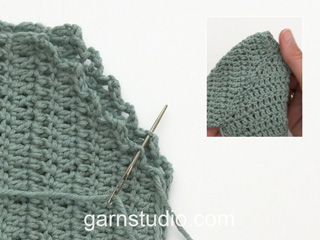
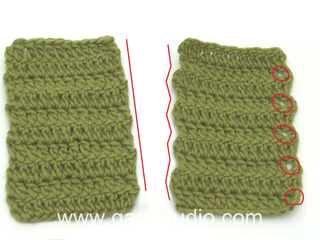
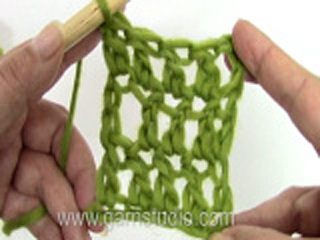
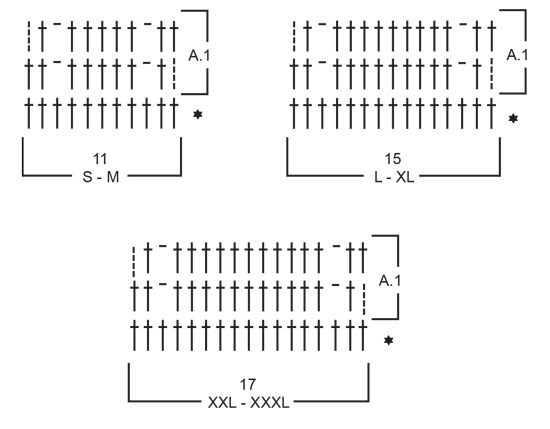
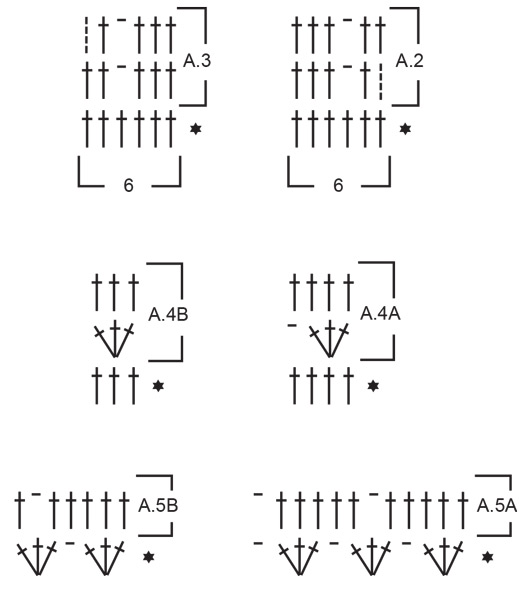
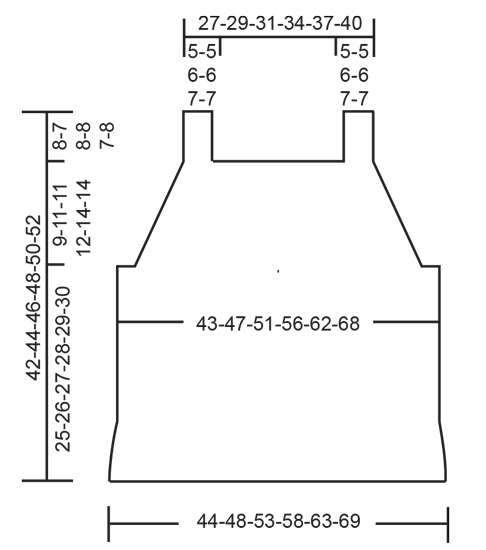
---------------------------------------------------------- EXPLANATION FOR THE PATTERN: ---------------------------------------------------------- CHAIN STITCH: If you work at the end of crochet hook the chain stitch will often be too tight. 1 chain stitch should be just as long as 1 treble crochet is wide. CROCHET INFORMATION: At the beginning of every row when working strap, front piece and back piece, work 4 chain stitches, these chain stitches replace first treble crochet on row. At the beginning of every round with treble crochets when working in the round, work 3 chain stitches, these chain stitches replace first treble crochet, and finish round with 1 slip stitch in 3rd chain stitch at beginning of round. NOTE! When working in the round, turn piece after every round to work alternately from right side and wrong side. This is done so that the texture is the same when working in the round. PATTERN: Diagrams show all rows in pattern seen from the right side. Remember to read the diagrams from left to right when working from the wrong side. See diagrams A.1 to A.5. Choose diagram for correct size (applies to A.1). INCREASE 1 TREBLE CROCHET: Increase 1 treble crochet by working 2 treble crochets in the 5th stitch in from the side. INCREASE 2 TREBLE CROCHETS: Increase 2 treble crochets by working 2 treble crochets in 5th and 6th stitch in from the side. ---------------------------------------------------------- START THE PIECE HERE: ---------------------------------------------------------- TOP - SHORT OVERVIEW OF THE PIECE: Work top down. First work 2 loose shoulder straps back and forth, then work new stitches between shoulder straps for front piece. Work front piece back and forth down to armholes while AT THE SAME TIME increasing for armholes in each side. Work back piece the same way. At the armholes put front piece and back piece together, and work body in the round until finished measurements. Then sew shoulder straps together. If 0 is given for the chosen size, it means that you skip the information until next information. LEFT STRAP AT THE FRONT (when garment is worn): Work 14-14-18-18-20-20 CHAIN STITCHES - read explanation above, on hook size 3 mm with DROPS Safran. Turn and work first row from wrong side: Work 1 treble crochet in 5th chain stitch from hook, work 1 treble crochet in every chain stitch the entire row = 11-11-15-15-17-17 treble crochets (= 10-10-14-14-16-16 treble crochets + 4 chain stitches). Read CROCHET INFORMATION and work PATTERN - read explanation above, i.e. work A.1 back and forth until strap measures 7-6-7-7-6-7 cm and last row is worked from wrong side. Cut the yarn and work right strap as explained below. RIGHT STRAP AT THE FRONT (when garment is worn): Work 14-14-18-18-20-20 chain stitches, on hook size 3 mm. Turn and work first row from wrong side: Work 1 treble crochet in 5th chain stitch from hook, work 1 treble crochet in every chain stitch the entire row = 11-11-15-15-17-17 treble crochets (= 10-10-14-14-16-16 treble crochets + 4 chain stitches). Remember CROCHET INFORMATION and work A.1 back and forth until strap measures 7-6-7-7-6-7 cm and last row is worked from wrong side. Now slip right and left strap together for front piece as explained below (do not cut the yarn). FRONT PIECE: ROW 1 (= right side): Work from right side as before over right strap, work 43-47-45-51-55-63 chain stitches, work from right side as before over left strap = 65-69-75-81-89-97 stitches, turn piece. ROW 2 (= wrong side): Work A.3 (begin on 2nd row in diagram) and INCREASE 1 TREBLE CROCHET – read explanation above, work 1 treble crochet in every stitch until 6 stitches remain on row, work A.2 (begin on 2nd row in diagram) and INCREASE 1 TREBLE CROCHET = 67-71-77-83-91-99 stitches, turn piece. ROW 3 (= right side): Work A.2 and increase 1 treble crochet, work 1 treble crochet in every treble crochet until 6 stitches remain on row, work A.3 and increase 1 treble crochet = 69-73-79-85-93-101 stitches, turn piece. ROW 4 (= wrong side): Work A.3 and increase 1 treble crochet, work 1 treble crochet in every treble crochet until 6 stitches remain, work A.2 and increase 1 treble crochet = 71-75-81-87-95-103 stitches, turn piece. ROW 5 (= right side): Work A.2 and increase 1 treble crochet, work 1 treble crochet in each of the 0-0-1-0-0-0 next stitches, work first row in A.4A 14-15-16-18-20-22 times in total, work first row in A.4B, work 1 treble crochet in each of the 0-0-1-0-0-0 next stitches, work A.3 and increase 1 treble crochet, turn piece = 73-77-83-89-97-105 stitches. ROW 6 (= wrong side): Work A.3 and increase 1 treble crochet, work 1 treble crochet in each of the next 3-5-2-5-3-1 stitches, work A.5B, work A.5A 4-4-5-5-6-7 times in total, work 1 treble crochet in each of the next 3-5-2-5-3-1 stitches, work A.2 and increase 1 treble crochet = 75-79-85-91-99-107 stitches. Then work back and forth with 1 treble crochet in every treble crochet and A.2/A.3 at the edge in each side. Continue to increase 1 stitch in each side on every row for armholes as before, 4-5-4-5-7-5 more times (i.e. increase 1 stitch in each side 9-10-9-10-12-10 times in total including increases explained above), then INCREASE 2 TREBLE CROCHET in each side – read explanation above, 1-2-3-4-4-6 times in total = 87-97-105-117-129-141 stitches. Then work the last 2 rows as follows: ROW 1 (= right side): Work A.2 and increase 2 treble crochets, work 1 treble crochet in the next 0-1-1-1-1-1 treble crochet, work A.4A 18-20-22-25-28-31 times in total, work A.4B, work 1 treble crochet in the next 0-1-1-1-1-1 treble crochet, work A.3 over the last 6 stitches and increase 2 treble crochets, turn piece = 91-101-109-121-133-145 stitches. ROW 2 (= wrong side): Work A.3 and increase 2 treble crochets, work 1 treble crochet in each of the 2-3-3-3-3-3 treble crochets, work A.4B, work A.4A 18-20-22-25-28-31 times in total, work 1 treble crochet in every treble crochet until 6 stitches remain, work A.2 over the last 6 stitches and increase 2 treble crochets = 95-105-113-125-137-149 stitches. Cut and fasten the yarn. Piece measures approx. 17-18-19-20-21-22 cm from chain stitch row on strap. Cut and fasten the yarn and work the back piece. BACK PIECE: Work the same way as front piece (front piece and back piece are identical). Now slip parts together and finish body in the round as explained below. BODY: ROUND 1: Begin by working 3-3-4-4-5-6 chain stitches, then work 1 treble crochet in each of the 95-105-113-125-137-149 stitches from back piece (work from right side), work 6-6-8-8-10-12 chain stitches for armhole, work 1 treble crochet in each of the 95-105-113-125-137-149 stitches from front piece, work 3-3-4-4-5-6 chain stitches for armhole, finish with 1 slip stitch in first chain stitch at beginning of round = 202-222-242-266-294-322 stitches. Beginning of round = in the side of body, turn piece. ROUND 2: Remember CROCHET INFORMATION and work 1 treble crochet in every stitch the entire round = 202-222-242-266-294-322 treble crochets, turn piece. Work 2nd ROUND until 6-6-6-8-8-8 rounds with treble crochets have been worked on body and increase at the same time 3 treble crochets evenly on first round = 205-225-245-269-297-325 treble crochets. Work next round as follows: Work 3 chain stitches (equals 1 treble crochet), work A.4A 51-56-61-67-74-81 times in total in the round on body, finish round with 1 slip stitch in 3rd chain stitch at beginning of round, turn piece. When A.4 has been worked vertically, work 6-6-6-8-8-8 rounds with treble crochets as before. Then work A.4A again over the next 2 rounds. Continue like this with alternately 6-6-6-8-8-8 round with treble crochets and 2 rounds with A.4A until A.4A has been worked 3 times in total vertically on body. When A.4A has been worked for the last time, continue in the round with treble crochets as before until finished measurements while AT THE SAME TIME on first round increasing 7 treble crochets evenly in all sizes = 212-232-252-276-304-332 stitches. Work until piece measures 42-44-46-48-50-52 cm from chain stitch row on shoulder strap (approx. 25-26-27-28-29-30 cm from where front piece and back piece were put together for body). Cut and fasten the yarn. ASSEMBLY: Sew the shoulder straps together. |
|||||||||||||
Diagram explanations |
|||||||||||||
|
|||||||||||||
|
|||||||||||||
|
|||||||||||||
|
|||||||||||||
|
Have you made this or any other of our designs? Tag your pictures in social media with #dropsdesign so we can see them! Do you need help with this pattern?You'll find tutorial videos, a Comments/Questions area and more by visiting the pattern on garnstudio.com. © 1982-2024 DROPS Design A/S. We reserve all rights. This document, including all its sub-sections, has copyrights. Read more about what you can do with our patterns at the bottom of each pattern on our site. |
|||||||||||||


With over 40 years in knitting and crochet design, DROPS Design offers one of the most extensive collections of free patterns on the internet - translated to 17 languages. As of today we count 304 catalogues and 11422 patterns - 11422 of which are translated into English (UK/cm).
We work hard to bring you the best knitting and crochet have to offer, inspiration and advice as well as great quality yarns at incredible prices! Would you like to use our patterns for other than personal use? You can read what you are allowed to do in the Copyright text at the bottom of all our patterns. Happy crafting!
Comments / Questions (8)
Bonjour, Je ne comprend pas comment se crochette le point fantaisie A4A ? Merci de votre retour
30.04.2024 - 19:01DROPS Design answered:
Bonjour Céphora, A.4A se crochète ainsi sur 4 mailles:*sautez 1 bride, 3 brides dans la bride suivante, 1 maille en l'air, sautez 2 brides*, répétez de *à*. Au 2ème rang, crochetez 1 bride dans chaque maille (=4 brides pour chaque A.4A). Bon crochet!
02.05.2024 - 07:42Oh, and one more question: the pattern says that when crocheting the Last 2 rossz of the front piece we should work with A.4 in both rows which would create nice "holes" on the top in these 2 rows, but on the picture there is only one row with holes at that part. Thanks, Csilla
19.04.2024 - 23:03DROPS Design answered:
Dear Csilla, you work 2 rows in A.4, but only the first row of A.4 has holes, as you can see in A.4a. Happy crochetting!
22.04.2024 - 00:38Hello Drops Team, Thank you for your answer below! Now my question concerns ROW6 of the front piece; is it normal that for me this row doesn't turns out to be simmetrical at all in size L??? I've double checked & counted it several times... Thank you for answer Csilla
19.04.2024 - 22:31DROPS Design answered:
Dear Csilla, A.5b is like 2/3 of A.5a so, as you repeat A.5a, A.5b may look like it's part of A.5a. In the end it may not seem strictly symmetrical, but it will give enough of an illusion that it is. Happy knitting!
22.04.2024 - 00:36Hello! When starting the front piece, at ROW1, you start with double crochets at the bottom of the right strap then come the chain stiches (e.g. 45 ch in size L) and then you join the left strap with double crochets again? Or, when working on the bottom of the straps you continue to make diagram A1? Thanks in advance!
18.04.2024 - 10:22DROPS Design answered:
Dear Csilla, you work the right strap as before = with A.1 then crochet 45 chains and work the left strap just as before = with A.1. Then work A.3 at the beg of row from WS/end of row from RS and A.2 at the end of row from WS/beg of row from RS increasing 1 st on each side as explained. Happy crocheting!
18.04.2024 - 12:40Très beau model Le point fantaisie fait un effet léger Et féminin.
19.01.2024 - 08:24Love this pattern and would like to name it spring fields.
18.01.2024 - 23:47Prachtige top
18.01.2024 - 18:14J'aime beaucoup ce top ...on dirait une couverture de marguerites en forme de top
18.01.2024 - 17:58