DROPS Muskat
DROPS Muskat
100% Cotton
from 1.85 £ /50g
Get the yarn to make this pattern from 12.95£.

The yarn cost is calculated from the pattern’s smallest size and the yarn’s cheapest product type. Looking for an even better price? You might find it on the DROPS Deals!

DROPS SS24

Spring Novel

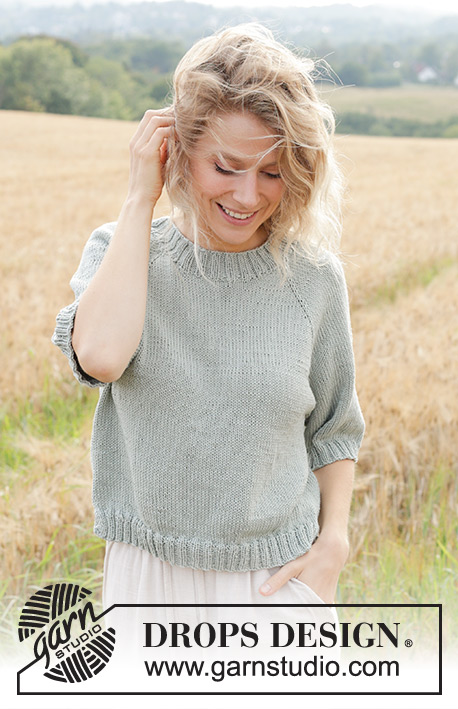
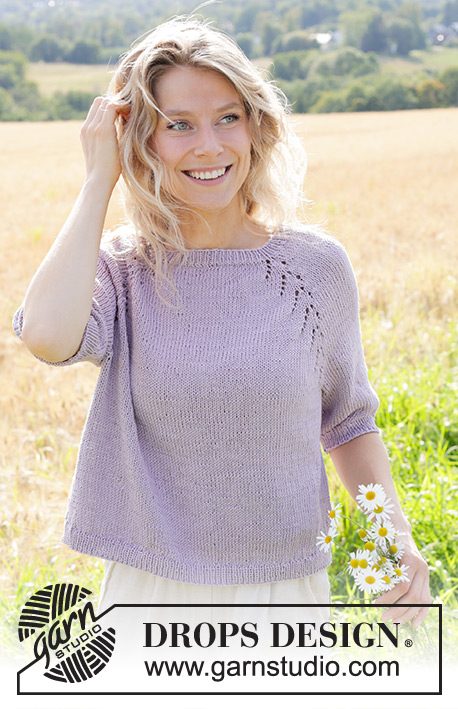
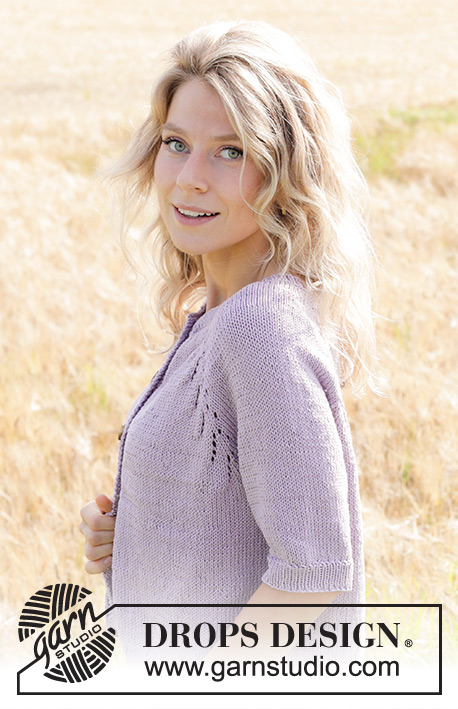
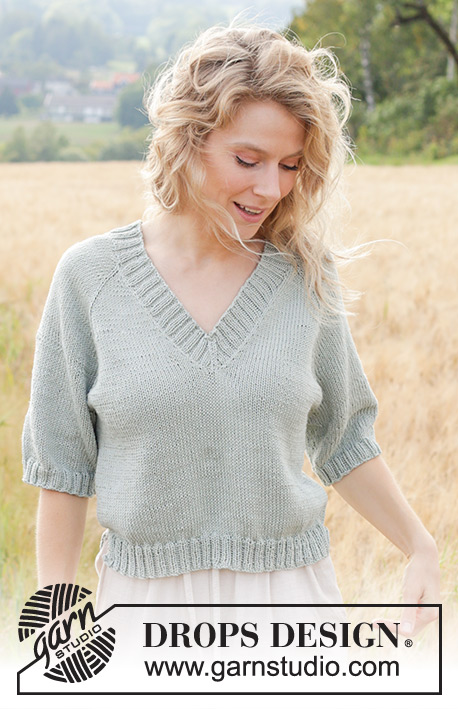
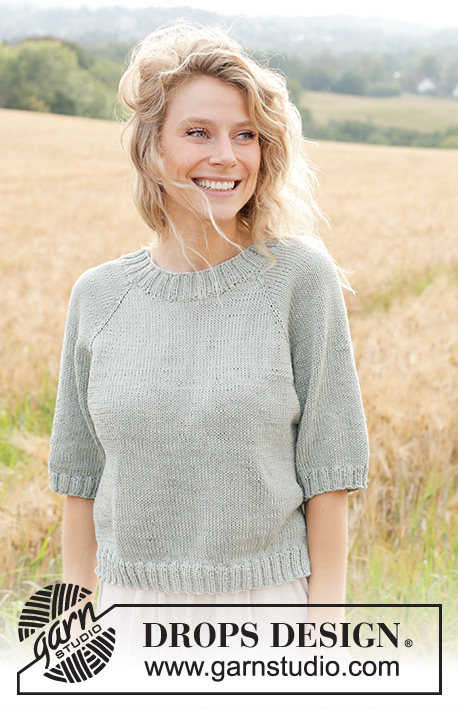
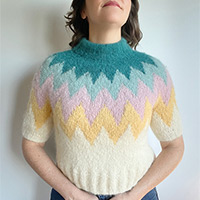
Knitted top/T-shirt in DROPS Muskat or DROPS Merino Extra Fine. The piece is worked top down with stocking stitch, raglan, short sleeves and split in sides. Sizes XS - XXL.

DROPS 249-34
DROPS Design: Pattern r-825
Yarn group B
-------------------------------------------------------

SIZES:
XS - S - M - L - XL - XXL

YARN:
DROPS MUSKAT from Garnstudio (belongs to yarn group B)
350-400-450-500-550-600 g colour 89, light sea green

Or use:
DROPS MERINO EXTRA FINE from Garnstudio (belongs to yarn group B)
350-400-450-500-550-600 g colour 15, light sea green

NEEDLES:
DROPS CIRCULAR NEEDLES SIZE 4 MM: Length 40 cm and 80 cm.
DROPS CIRCULAR NEEDLES SIZE 3 MM: Length 40 cm and 80 cm.
DROPS DOUBLE POINTED NEEDLES SIZE 4 MM.
DROPS DOUBLE POINTED NEEDLES SIZE 3 MM.
The technique MAGIC LOOP can be used – you then only need 80 cm circular needle in each size.

KNITTING TENSION:
21 stitches in width and 28 rows in height with stocking stitch = 10 x 10 cm.
NOTE: Needle size is only a guide. If you get too many stitches on 10 cm, change to a larger needle size. If you get too few stitches on 10 cm, change to a smaller needle size.

-------------------------------------------------------

Alternative Yarn – See how to change yarns here
Yarn Groups A to F – Use the same pattern and change the yarn here
Yarn usage using an alternative yarn – Use our yarn converter here

-------------------------------------------------------

DROPS Muskat
DROPS Muskat
100% Cotton
from 1.85 £ /50g
Get the yarn to make this pattern from 12.95£.

The yarn cost is calculated from the pattern’s smallest size and the yarn’s cheapest product type. Looking for an even better price? You might find it on the DROPS Deals!

Pattern instructions

NOTE: This pattern is written in British English. All measurements in charts are in cm. For conversion from cm to inches - click here. There are different terms for crocheting in British and American English. If this pattern includes crochet, click for "crochet terms" here. For this pattern in American English, please click here.
-------------------------------------------------------

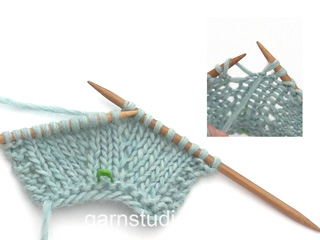
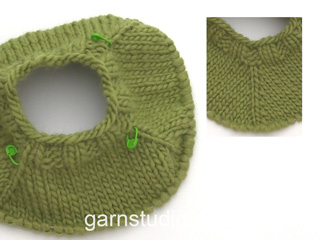
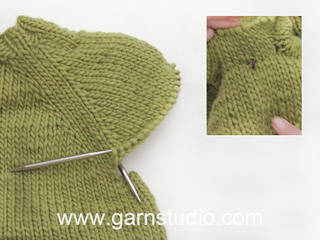
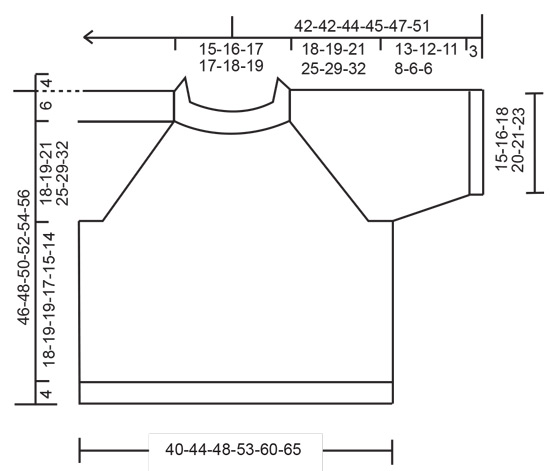
EXPLANATIONS FOR THE PATTERN:

-------------------------------------------------------

GARTER STITCH (worked back and forth):
Knit all rows.
1 ridge = knit 2 rows.

RAGLAN:
All increases are worked from the right side!
Increase 1 stitch by making 1 yarn over before/after all 4 raglan-stitches.
The raglan-stitches are worked in stocking stitch. On the next row/round work the yarn overs as follows (then work the new stitches in stocking stitch).

From wrong side:
BEFORE raglan-stitches:
Purl the back loop. No hole.
AFTER raglan-stitches:
Slip yarn-over onto right needle, then replace it onto the left needle the other way round (insert left needle through back when replacing it). Purl the front loop. No hole.

From right side:
BEFORE raglan-stitches:
Slip yarn over onto right needle, then replace it onto the left needle the other way round (insert left needle through back when replacing it). Knit the front loop. No hole.
AFTER raglan-stitches:
Knit the back loop. No hole.

DECREASE TIP (for sleeves):
Decrease 1 stitch on each side of the marker-thread as follows: Work until there are 3 stitches left before the marker-thread, knit 2 together, knit 2 (marker-thread sits between these 2 stitches), slip 1 stitch knit-wise, knit 1 and pass the slipped stitch over the knitted stitch (2 stitches decreased).

-------------------------------------------------------

START THE PIECE HERE:

-------------------------------------------------------

TOP - SHORT OVERVIEW OF THE PIECE:
The pattern uses both long and short needles; start with the length which fits the number of stitches and change when necessary.
The neckline is worked first, back and forth and top down, increasing stitches on each side. Then piece is joined and the yoke worked in the round with circular needle, from mid back. When finished, the yoke is divided for body and sleeves and the body continued in the round, while the sleeves wait. The body is divided for the split in each side and front and back pieces finished separately, back and forth. The sleeves are worked in the round top down. Stitches are knitted up around the neckline and the neck worked in the round.

NECKLINE:
Cast on 88-90-92-92-94-96 stitches with circular needle size 4 mm.
Insert 4 markers and 1 marker-thread as follows: Count 1 stitch, insert 1 marker in the next stitch, count 26 stitches (sleeve), insert 1 marker in the next stitch, count 15-16-17-17-18-19 stitches, insert 1 marker-thread (mid-back), count 15-16-17-17-18-19 stitches, insert 1 marker in the next stitch, count 26 stitches (sleeve), insert 1 marker in the next stitch = 1 stitch left after the last marker. The marker-stitches are now called raglan-stitches.
Work back and forth as follows:
ROW 1 (right side): Knit and increase for RAGLAN on each side of the 4 raglan-stitches – read description above (8 stitches increased), cast on 2 stitches at end of row = 98-100-102-102-104-106 stitches.
ROW 2 (wrong side): Purl (remember to work yarn overs as described under RAGLAN), cast on 2 stitches at end of row = 100-102-104-104-106-108 stitches.
ROW 3 (right side): Knit and increase for raglan on each side of the 4 raglan-stitches (8 stitches increased), cast on 2 stitches at end of row = 110-112-114-114-116-118 stitches.
ROW 4 (wrong side): Purl and cast on 2 stitches at end of row = 112-114-116-116-118-120 stitches.
ROW 5 (right side): Knit and increase for raglan on each side of the 4 raglan-stitches (8 stitches increased), cast on 3 stitches at end of row = 123-125-127-127-129-131 stitches.
ROW 6 (wrong side): Purl and cast on 3 stitches at end of row = 126-128-130-130-132-134 stitches.
ROW 7 (right side): Knit and increase for raglan on each side of the 4 raglan-stitches (8 stitches increased), cast on 14-16-18-18-20-22 stitches at end of row = 148-152-156-156-160-164 stitches. The neckline is finished and you have increased 4 times for raglan on each side of the 4 raglan-stitches.
Now join the neckline, beginning the round at the marker-thread mid-back. Cut the strand, do not turn. Push the stitches from the left needle onto the right needle as far as the marker-thread.

YOKE:
Work stocking stitch in the round from mid-back. REMEMBER THE KNITTING TENSION. Increase for raglan every 2nd round until you have increased a total of 13-14-19-20-18-18 times (including the 4 increases on the neckline) = 220-232-276-284-272-276 stitches. Continue increasing for raglan but every 2nd increase is only on the front and back pieces, i.e., increase on the front and back pieces every 2nd round and on the sleeves every 4th round (alternately 4 and 8 increased stitches). Increase like this 10-12-10-14-22-26 times on the body (5-6-5-7-11-13 times on the sleeves). A total of 23-26-29-34-40-44 times on the front and back pieces and 18-20-24-27-29-31 times on the sleeves = 280-304-336-368-404-432 stitches.

Continue working until the piece measures 18-19-21-25-29-32 cm, mid-back.
Now divide for the body and sleeves: Knit 39-43-47-52-59-64 (half back piece), place the next 62-66-74-80-84-88 stitches on 1 thread for the sleeve, cast on 6-6-6-8-8-8 stitches under the sleeve, knit 78-86-94-104-118-128 stitches (front piece), place the next 62-66-74-80-84-88 stitches on 1 thread for the sleeve, cast on 6-6-6-8-8-8 stitches under the sleeve, knit the last 39-43-47-52-59-64 stitches (half back piece) = 168-184-200-222-252-272 stitches on the body. The body and sleeves are finished separately. The piece is now measured from here!

BODY:
= 168-184-200-224-252-272 stitches. Insert 1 marker-thread in the middle of the 6-6-6-8-8-8 stitches under each sleeve and allow the threads to follow your work onwards; they are used when dividing for the split in each side. Work stocking stitch in the round until the body measures 18-19-19-17-15-14 cm from the division. Now divide at both marker-threads and finish each piece separately.

FRONT PIECE:
= 84-92-100-112-126-136 stitches. Change to circular needle size 3 mm. Knit 1 row from the right side and increase 14-14-14-18-20-22 stitches evenly spaced = 98-106-114-130-146-158 stitches. Work rib from the wrong side as follows: 2 GARTER STITCHES – read description above, * purl 2, knit 2 *, work from *-* until there are 4 stitches left, purl 2 and 2 garter stitches. Continue this rib back and forth for 4 cm, cast off. The piece measures approx. 46-48-50-52-54-56 cm from the shoulder down.

BACK PIECE:
Work in the same way as the front piece.

SLEEVES:
Place the 62-66-74-80-84-88 stitches from the thread on the one side of the piece on short circular needle/double pointed needles size 4 mm and knit up 1 stitch in each of the 6-6-6-8-8-8 stitches cast on under the sleeve = 68-72-80-88-92-96 stitches. Insert a marker-thread in the middle of the 6-6-6-8-8-8 new stitches under the sleeve.
Start at the marker-thread and work stocking stitch in the round.
When the sleeve measures 3 cm from the division, decrease 2 stitches under the sleeve – read DECREASE TIP. Decrease like this every 3-2-3-1½-0-0 cm a total of 2-2-2-2-1-0 times (no decreases in size XXL) = 64-68-76-84-90-96 stitches. Continue working until the sleeve measures 13-12-11-8-8-6 cm from the division. Knit 1 round and increase 4-4-4-0-2-0 stitches evenly spaced = 68-72-80-84-92-96 stitches. Change to double pointed needles size 3 mm. Work rib (knit 2, purl 2) for 3 cm. Cast off. The sleeve measures approx. 16-15-14-11-9-9 cm from the division.

NECK:
Start from the right side on one shoulder. Use short circular needle size 3 mm and knit up 104 to 116 stitches around the neckline. Work rib in the round (knit 2, purl 2) for 4 cm. Cast off.

Diagram

diagram measurements

Each of our patterns has specific tutorial videos to help you.

Do you have a question? See a list of frequently asked questions (FAQ)

Knitting tension is what determines the final measurements of your work, and is usually measured per 10 x 10 cm. It is provided like so: number of stitches in width x number of rows in height - eg: 19 stitches x 26 rows = 10 x 10 cm.

The knitting tension is very individual; some people knit/crochet loosely while others work tightly. You adjust the knitting tension with the needle size, which is why the suggested needle size is only meant as a guide! You need to adjust this (up or down) to ensure that YOUR knitting tension matches the knitting tension provided in the pattern. If you work with a different knitting tension than provided you will have a different yarn consumption, and your work will have different measurements than what the pattern suggests.

The knitting tension also determines which yarns can replace each other. As long as you achieve the same knitting tension you can replace one yarn with another.

See DROPS lesson: How to measure your tension/gauge

See DROPS video: How to make a gauge tension swatch

The required amount of yarn is provided in grams, eg: 450 g. To calculate how many balls you’ll need you first need to know how many grams are in 1 ball (25g, 50g or 100g). This information is available if you click on the individual yarn quality on our pages. Divide the amount required with the amount of each ball. For example, if each ball is 50g (the most common amount), the calculation will be as follows: 450 / 50 = 9 balls.

The important thing when changing from one yarn to another is that the knitting/crochet tension remains the same. This is so that the measurements of the finished piece will be the same as on the sketch provided. It is easier to achieve the same knitting tension using yarns from the same yarn group. It is also possible to work with multiple strands of a thinner yarn to achieve the knitting tension of a thicker one. Please try our yarn converter. We recommend you to always work a test swatch.

Please NOTE: when changing yarn the garment might have a different look and feel to the garment in the photo, due to individual properties and qualities of each yarn.

See DROPS lesson: Can I use a different yarn than the one mentioned in the pattern?

All our yarns are categorised into yarn groups (from A to F) according to thickness and knitting tension – group A contains the thinnest yarns and group F the thickest. This makes it easier for you to find alternative yarns to our patterns, should you wish to switch yarn. All yarns within the same group have a similar knitting tension and can easily replace each other. However, different yarn qualities have different structures and properties which will give the finished work a unique look and feel.

Click here for an overview of the yarns in each yarn group

At the top of all our patterns you’ll find a link to our yarn calculator, which is a helpful tool should you wish to use a different yarn than suggested. By filling in the yarn quality you wish to replace, the amount (in your size) and number of strands, the calculator will present good alternative yarns with the same knitting tension. Additionally it will tell you how much you’ll require in the new qualities and whether you’ll need to work with multiple strands. Most skeins are 50g (some are 25g or 100g).

If the pattern is worked with multiple colours, every colour will have to be calculated separately. Similarly, if the pattern is worked with several strands of different yarns (for example 1 strand Alpaca and 1 strand Kid-Silk) you will have to find alternatives for each, individually.

Click here to see our yarn calculator

Since different yarns have different qualities and textures we have chosen to keep the original yarn in our patterns. However, you can easily find options among our available qualities by using our yarn calculator, or simply pick a yarn from the same yarn group.

It is possible that some retailers still have discontinued yarns in stock, or that someone has a few skeins at home that they would like to find patterns for.

The yarn calculator will provide both alternative yarn as well as required amount in the new quality.

If you think it's hard to decide what size to make, it can be a good idea to measure a garment you own already and like the size of. Then you can pick the size by comparing those measures with the ones available in the pattern's size chart.

You'll find the size chart at the bottom of the pattern.

See DROPS lesson: How to read size chart

The needle size provided in the pattern serves only as a guide, the important thing is to follow the knitting tension. And since knitting tension is very individual, you will have to adjust the needle size to ensure that YOUR tension is the same as in the pattern – maybe you’ll have to adjust 1, or even 2 needle sizes, up or down to achieve the correct tension. For this, we recommend that you work test swatches.

Should you work with a different knitting tension than the one provided, the measurements of the finished garment might deviate from the measurement sketch.

See DROPS lesson: How to measure your tension/gauge

See DROPS video: How to make a tension/gauge swatch

Working a garment top-down provides more flexibility and room for personal adjustment. For example it is easier to try the garment on while working, as well as making adjustments to length of yoke and shoulder caps.

The instructions are carefully explaining every step, in the correct order. Diagrams are adjusted to the knitting direction and are worked as usual.

The diagram depicts all rows/rounds, and every stitch seen from the right side. It is read from bottom to top, from right to left. 1 square = 1 stitch.

When working back and forth, every other row is worked from the right side and every other row is worked from the wrong side. When working from the wrong side, the diagram will have to be worked reversed: from left to right, knit stitches are purled, purl stitches are knit etc.

When working in the round every round is worked from the right side and the diagram are worked from right to left on all rounds.

See DROPS lesson: How to read knitting diagrams

The diagram depicts all rows/rounds, and every stitch seen from the right side. It is worked from bottom to top, from right to left.

When working back and forth every other row is worked from the right side: from right to left and every other row is worked from the wrong side: from left to right.

When working in the round, every row in the diagram are worked from the right side, from right to left.

When working a circular diagram you start in the middle and work your way outwards, counter clockwise, row by row.

The rows usually start with a given number of chain stitches (equivalent to the height of the following stitch), this will either be depicted in the diagram or explained in the pattern.

See DROPS lesson: How to read crochet diagrams

Instructions for working several diagrams after each other on the same row/round, will often be written like so: “work A.1, A.2, A.3 a total of 0-0-2-3-4 times". This means you work A.1 once, then A.2 is worked once, and A.3 is repeated (in width) the number of times provided for your size – in this case like so: S = 0 times, M = 0 times, L=2 times, XL= 3 times and XXL = 4 times.

The diagrams are worked as usual: begin with the first row in A.1, then work the first row in A.2 etc.

See DROPS lesson: How to read knitting diagrams

See DROPS lesson: How to read crochet diagrams

The total width of the garment (from wrist-to-wrist) will be larger in the larger sizes, despite the actual sleeves being shorter. The larger sizes have longer sleeve caps and wider shoulders, so there will be a good fit in all sizes.

The measurement sketch/schematic drawing provides information regarding the full length of the garment. If it’s a jumper or a jacket the length is measured from the highest point on the shoulder closest to the neckline, and straight down to the bottom of the garment. It is NOT measured from the tip of shoulder. Similarly, the length of yoke is measured from the highest point on the shoulder and down to where yoke is split into body and sleeves.

On a jacket measures are never taken along bands, unless specifically stated. Always measure inside band stitches when measuring the length.

See DROPS lesson: How to read a schematic drawing

Diagrams are often repeated on the round or in height. 1 repeat is the diagram the way it appears in the pattern. If it says to work 5 repeats of A.1 in the round, then you work A.1 a total of 5 times after/next to each other in the round. If it says to work 2 repeats of A.1 vertically/in height you work the entire diagram once, then begin again at the start and work the entire diagram one more time.

Chain stitches are slightly narrower than other stitches and to avoid working the cast-on edge too tight, we simply chain more stitches to begin with. The stitch count will be adjusted on the following row to fit the pattern and measurement sketch.

The rib edge is more elastic and will contract slightly compared to, for example, stocking stitch. By increasing before the rib edge, you avoid a visible difference in width between the rib edge and the rest of the body.

It’s very easy to cast off too tightly, and by making yarn overs while casting off (and simultaneously casting these off) you avoid a too tight cast off edge.

See DROPS video: How to bind off with yarn overs (yo)

To achieve an even increase (or decrease) you can increase on, for example: every 3rd and 4th row alternately, like so: work 2 rows and increase on the 3rd row, work 3 rows and increase on the 4th. Repeat this until the increase is complete.

See DROPS lesson: Increase or decrease 1 st on every 3rd and 4th row alternately

Should you prefer to work in the round instead of back and forth, you may of course adjust the pattern. You’ll need to add steeks mid-front (usually 5 stitches), and follow the instructions. When you would normally turn and work from the wrong side, simply work across the steek and continue in the round. At the end you’ll cut the piece open, pick up stitches to work bands, and cover the cut edges.

See DROPS video: How to knit steeks and cut open

Should you prefer to work back and forth instead of in the round, you may of course adjust the pattern so you work the pieces separately and then assemble them at the end. Divide the stitches for the body in 2, add 1 edge stitch in each side (for sewing) and work the front and back pieces separately.

See DROPS lesson: Can I adapt a pattern for circular needles into straight needles?

Pattern repeats can vary slightly in the different sizes, in order to get the correct proportions. If you’re not working the exact same size as the garment in the photo, yours might deviate slightly. This has been carefully developed and adjusted so that the complete impression of the garment is the same in all sizes.

Make sure to follow instructions and diagrams for your size!

If you have found a pattern you like which is available in women’s size it’s not very difficult to convert it to men’s size. The biggest difference will be the length of sleeves and body. Start working on the women size that you think would fit across the chest. The additional length will be worked right before you cast off for the armhole/sleeve cap. If the pattern is worked top-down you can add the length right after the armhole or before the first decrease on sleeve.

Regarding additional yarn amount, this will depend on how much length you add, but it is better with a skein too many than too few.

All yarns will have excess fibres (from production) that might come off as lint or shedding. Brushed yarns (ie hairier yarns) have more of these loose, excess fibres, causing more shedding.

Shedding also depends on what is worn under or over the garment, and whether this pulls at the yarn fibres. It’s therefore not possible to guarantee that there will be no shedding

Below are some tips on how to get the best result when working with hairier yarns:

1. When the garment is finished (before you wash it) shake it vigorously so the looser hairs come off. NOTE: do NOT use a lint roller, brush or any method that pulls at the yarn.

2. Place the garment in a plastic bag and put it in your freezer - the temperature will cause the fibres to become less attached to each other, and excess fibres will come off easier.

3. Leave in the freezer for a few hours before taking it out and shaking it again.

4. Wash the garment according to the instructions on the yarn label.

Pilling is a natural process that happens to even the most exclusive of fibers. It's a natural sign of wear and tear that is hard to avoid, and that is most visible in high friction areas of your garment like a sweater's arms and cuffs.

You can make your garment look as new by removing the pilling, using a fabric comb or a pill/lint remover.

Still can't find the answer you need? Then scroll down and leave your question so one of our experts can try to help you. This will be done normally within 5 to 10 working days.
In the meantime, you can read the questions and answers that others have left to this pattern or join the DROPS Workshop on Facebook to get help from fellow knitters/crocheters!

You might also like...

Post a comment to pattern DROPS 249-34

We would love to hear what you have to say about this pattern!

If you want to leave a question, please make sure you select the correct category in the form below, to speed up the answering process. Required fields are marked *.

Comments / Questions (14)

country flag Anonym wrote:

Leider stehe ich als Anfängerin vor einem Problem: Der Beginn des Pullovers wird in Hin-u Rückreihen erklärt, die Videos zeigen die Raglan-Zunahmen und Abnahmen aber immer nur beim Stricken in Runden. Gibt es ein spezielles Video, das ich noch nicht entdeckt habe?

24.04.2024 - 16:54

DROPS Design answered:

Hallo! Am Anfang vom Pullover wird man in Hin- und Rückreihen stricken, gleichzeitig nimmt man für Raglan zu (siehe Video) und am Ende jeder Reihe wird man neue Maschen für den Halsausschnitt anschlagen (siehe Video), dann endlich wird man in Runden stricken und von der hintere Mitte stricken. Viel Spaß beim Stricken!

25.04.2024 - 07:41

country flag Karan wrote:

Hi, I’ve question about the no. Of increases in the yoke. The raglan stitches are 4(which is 8 stitch increased)and the no. Of increases are 19 times for the size I’m knitting. So at the end it says 276 stitches in total after the yoke but if I do 19*8=152 And my stitch count comes as 308 instead of 276. So where am I doing wrong. All the stitches counts in yoke pattern comes 32 stitches short. I need help with that.

22.04.2024 - 17:38

DROPS Design answered:

Dear Karen, the 19 increases are including the 4 increases made with the short rows, this means after the short rows and all new stitches for neck are done, you have 156 sts, you increase 8 sts 15 times more (for a total of 19 times), you get then 156 + 15x4= 276 sts. Happy knitting!

23.04.2024 - 07:52

country flag Carine ALMA wrote:

Bonjour, je viens de finir les alternances des augmentations dos/devant et manches pour l'empiècement et j'ai atteint 336 mailles (Taille M). Selon le patron je dois continuer à tricoter jusqu'à ce que l'ouvrage mesure 21 cm au milieu dos. J'en suis actuellement à 18cm, ce qui veut dire que je dois continuer de tricoter en rond sans augmentations encore 3 cm c'est bien cela? Mais du coup je n'aurais plus de raglan sur ces 3cm si je comprends bien? Merci d'avance pour votre aide?

22.04.2024 - 11:51

DROPS Design answered:

Bonjour Mme Alma, tout à fait, tricotez simplement en jersey endroit pendant 3 cm, mais notez bien que vous risquez d'avoir besoin de davantage de laine si votre tension en hauteur est plus serrée (les 58 rangs de l'empiècement (28 augmentations tous les 2 rangs/tours pour le raglan) doivent mesurer environ 21 cm). Bon tricot!

22.04.2024 - 13:07

country flag Roelien wrote:

Hoe krijg ik de halslijn erin als je van boven naar beneden breit. Voor-hals is toch lager dan achter?

31.03.2024 - 13:06

DROPS Design answered:

Dag Roelien,

Dit wordt gedaan door zogenaamde 'verkorte toeren' (dus waarbij je de naalden niet helemaal uitbreit tot het einde) en is helemaal uitgeschreven onder de paragraaf 'HALSLIJN'.

04.04.2024 - 20:28

country flag Tabea wrote:

Hallo, welche Nadelstärke wird denn für die Maschenprobe empfohlen? Bei mir passt es mit der Nadelstärke 3. Ist das dann die größere oder kleinere angebene Stärke in der Anleitung? Viele Grüße Tabea

25.03.2024 - 20:28

DROPS Design answered:

Liebe Tabea, die Maschenprobe 21 Maschen x 28 Reihen glatt rechts wir mitden grösseren Nadeln gestrickt, aber natürlich muss mann die Nadelstärke anpassen, solange daß die Maschenprobe stimmt. Hier lesen Sie mehr. Viel Spaß beim Stricken!

02.04.2024 - 10:14

country flag Marta wrote:

Można prosić o jaśniejsze objaśnienie fragmentu po zrobieniu dekoltu? „Teraz połączyć robótkę na okrągło, zaczynając okrążenie od nitki markera na środku tyłu. Odciąć nitkę, nie obracać robótki.” Nie kontynuować przerabiania po dodaniu oczek w rzędzie 7 tylko zostawiać to, a nową nitką zacząć przerabiać oczka od środka tyłu? I odciąć nitkę za tymi dodanymi oczkami w rzędzie 7? Dziękuję za pomoc!

15.03.2024 - 22:04

DROPS Design answered:

Witaj Marto, odcinasz nitkę, przekładasz oczka z lewego drutu na prawy (bez przerabiania), aż do nitki markera (środek tyłu, tu będą zaczynać się okrążenia podczas przerabiania na okrągło). Dołączasz nową nitkę i od teraz zaczynasz przerabiać KARCZEK jak w opisie poniżej. Powodzenia!

18.03.2024 - 09:03

country flag PASCALE JEANNE wrote:

Bonjour, Comment puis je adapter un patron donné pour des aiguilles taille 3-4 en taille 5-5,5? Merci pour votre aide

13.03.2024 - 18:15

DROPS Design answered:

Bonjour Pascale, vous devrez recalculer entièrement les explications sur la base de votre propre échantillon, essayez de consulter les différents modèles du même type dans la tension souhaitée, cela pourra vous aider. Bon tricot!

14.03.2024 - 08:03

country flag Leena Lamminpää Jokioinen wrote:

Heippa! aloitus pääntieltä ei voi olla oikein koska silmukkamerkit raglan lisäyksiin ei voi tulla eteen 2 merkkiä samaan kohtaan ?

12.03.2024 - 13:04

country flag Hanneke wrote:

Ziet er goed uit. Voor mij waarschijnlijk aan de korte kant

05.03.2024 - 07:02

country flag Hanne wrote:

Er det feil her: Sett 4 merker og 1 merketråd i arbeidet slik: Tell 1 maske, sett 1 merke i neste maske, tell 26 masker (erme), sett 1 merke i neste maske, tell 15-16-17-17-18-19 masker, sett 1 merketråd (midt bak), tell 15-16-17-17-18-19 masker, sett 1 merke i neste maske, tell 26 masker (erme), sett 1 merke i siste maske = 1 maske igjen etter siste merke. Maskene med merke i kalles nå raglanmasker.

04.03.2024 - 22:20

DROPS Design answered:

Hei Hanne, Du har 4 merker og 1 merketråd (midt bak). Hvert merke er satt i en maske, slik at du har 4 merke-masker. Hjelper det? God fornøyelse!

05.03.2024 - 08:10