
Popular categories
Looking for a yarn?


|
|||||||||||||
Daisy Fields |
|||||||||||||
 |
 |
||||||||||||
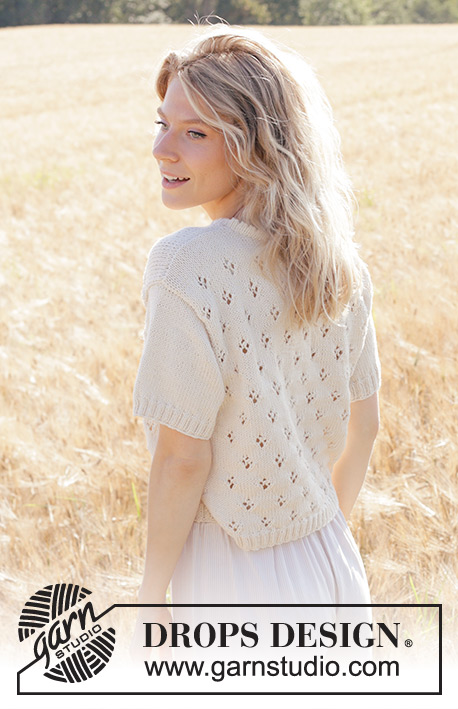
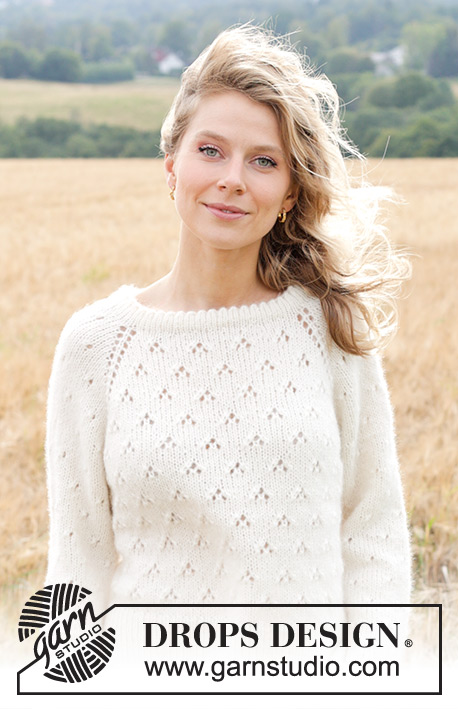
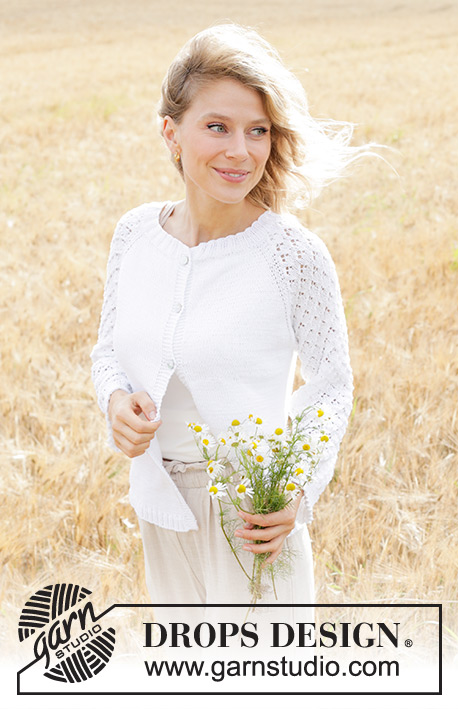
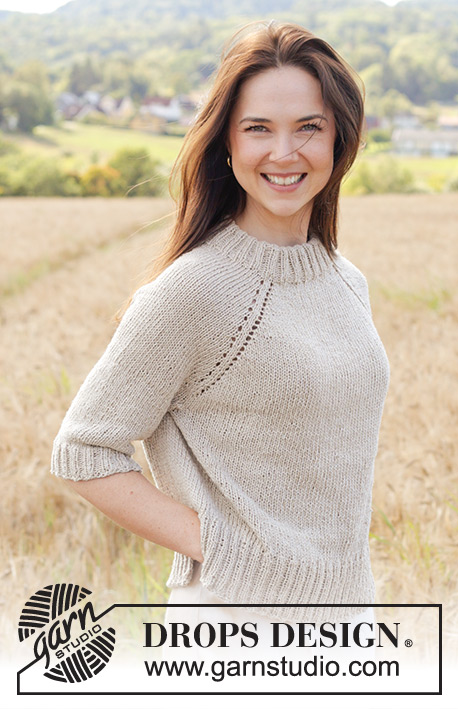
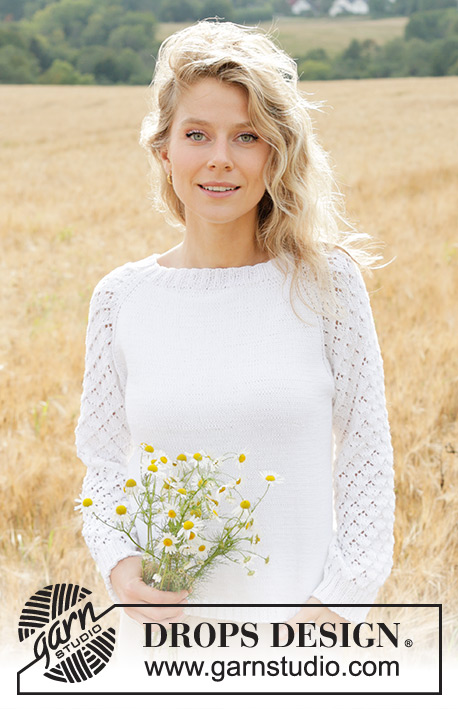
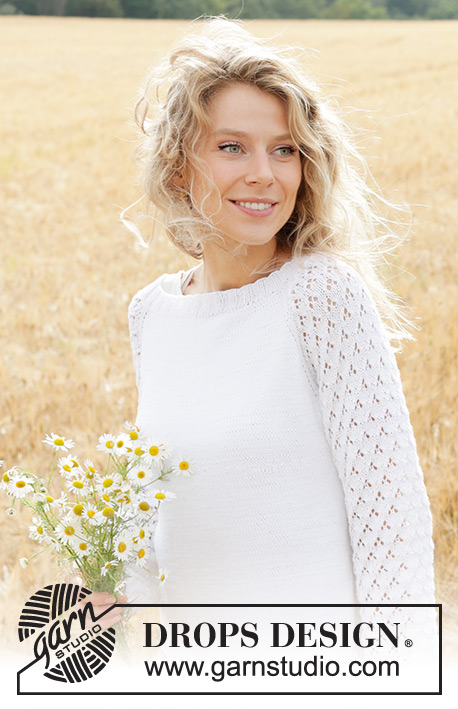
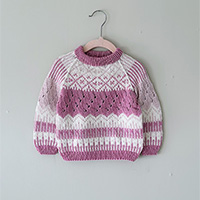
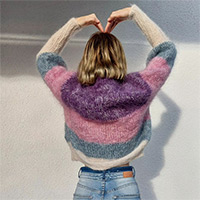
Knitted jumper in DROPS Safran or DROPS BabyMerino. The piece is worked top down with raglan and lace pattern on sleeves. Sizes S - XXXL.
DROPS 249-7 |
|||||||||||||
|
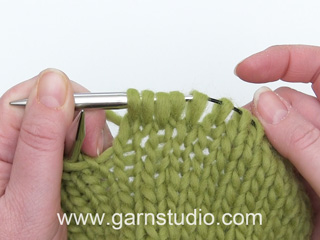
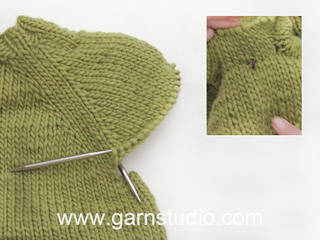
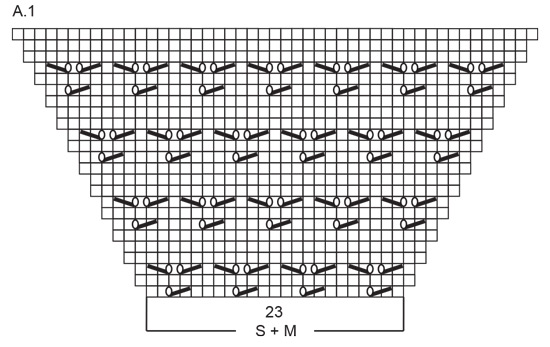
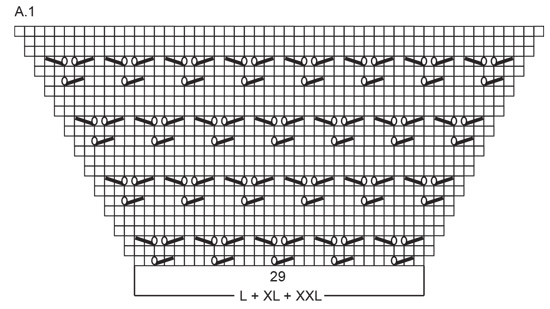
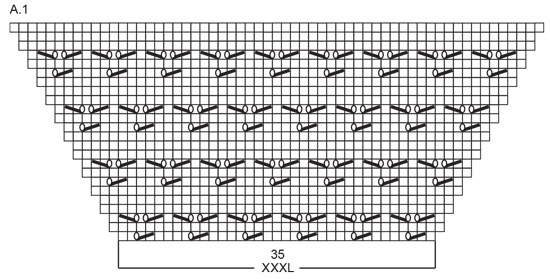
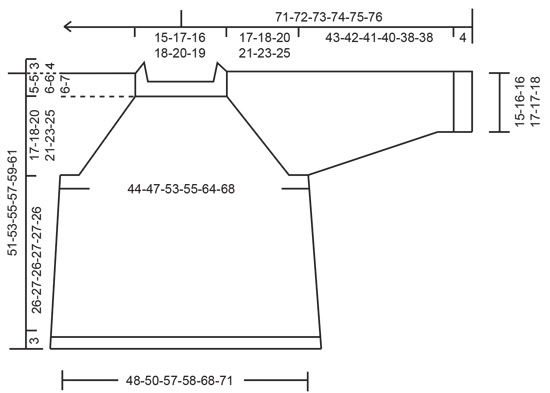
------------------------------------------------------- EXPLANATIONS FOR THE PATTERN: ------------------------------------------------------- PATTERN: See diagram A.1. Choose pattern for your size. As you increase for raglan on the sleeves, work the new stitches into the pattern as shown in A.1; i.e., work the stitches in stocking stitch until there is room for a complete pattern repeat. Stitches which do not fit into the pattern are worked in stocking stitch. INCREASE TIP-1 (evenly spaced): Increase 1 stitch by making 1 yarn over, which is knitted twisted on the next round to avoid a hole. INCREASE TIP-2 (sides of body): Increase 1 stitch on each side of marker-thread as follows: Work until there are 2 stitches left before the marker-thread, make 1 yarn over, knit 4 (marker thread sits in the middle of these 4 stitches) make 1 yarn over. On the next round knit the yarn overs twisted to avoid holes. Then work the new stitches in stocking stitch. RAGLAN: Increase for raglan before/after 2 knitted stitches (called raglan-stitches in text) in each transition between the body and sleeves (marker-thread sits between these 2 stitches). INCREASE 1 STITCH: Before marker-thread: Work until there is 1 stitch left before the marker-thread, pick up from the back the strand between 2 stitches, place it on the left needle and knit it (= 1 increased stitch). After marker-thread: Work to 1 stitch past the marker-thread, pick up from the front the strand between 2 stitches, place it on the left needle and knit it twisted (= 1 increased stitch). INCREASE 2 STITCHES: Before marker-thread: Work until there are 2 stitches left before the marker thread, pick up from the back the strand between 2 stitches, place it on the left needle and knit it. Knit 1, pick up from the back the strand between 2 stitches, place it on the left needle and knit it (= 2 increased stitches). After marker-thread: Work to 1 stitch past the marker-thread, pick up from the front the strand between 2 stitches and knit it twisted. Knit 1, pick up from the front the strand between 2 stitches and knit it twisted (= 2 increased stitches). DECREASE TIP (for sleeves): Decrease 1 stitch on each side of the marker-thread as follows: Work until there are 3 stitches left before the marker-thread, knit 2 together, knit 2 (marker-thread sits between these 2 stitches), slip 1 stitch knit-wise, knit 1 and pass the slipped stitch over the knitted stitch. ------------------------------------------------------- START THE PIECE HERE: ------------------------------------------------------- JUMPER – SHORT OVERVIEW OF THE PIECE. The pattern uses both long and short needles; start with the length which fits the number of stitches and change when necessary. The neck and yoke are worked in the round with circular needle, top down. When the yoke is finished, it is divided for the body and sleeves. The body is continued in the round, while the sleeves wait. The sleeves are worked in the round, top down. NECK: Cast on 120-128-136-144-152-160 stitches with circular needle size 2.5 mm and DROPS Safran or DROPS Baby Merino. Work rib as follows: Knit 1, rib (purl 2, knit 2) until there is 1 stitch left, knit 1. Work this rib for 3-3-3-4-4-4 cm. Insert 1 marker in the last round. The yoke is measured from here. YOKE: Insert 4 marker-threads, without working the stitches as follows: Insert 1 marker-thread at the beginning of the round (= right back shoulder), count 20-20-28-28-28-32 stitches (= sleeve), insert 1 marker-thread before the next stitch, count 40-44-40-44-48-48 stitches (= front piece) insert 1 marker-thread before the next stitch, count 20-20-28-28-28-32 stitches (= sleeve), insert 1 marker-thread before the next stitch, there are 40-44-40-44-48-48 stitches left (= back piece). The marker-threads are between 2 knitted stitches (raglan-stitches) which are always knitted. Change to circular needle size 3.5 mm. Read INCREASE TIP-1 in explanations above. Knit 1 raglan-stitch, work stocking stitch and increase 5-5-3-3-3-5 stitches evenly over the next 18-18-26-26-28-30 stitches, knit 2 raglan-stitches, work stocking stitch and increase 8-6-8-6-4-4 stitches evenly over the next 38-42-38-42-46-46 stitches, knit 2 raglan-stitches, work stocking stitch and increase 5-5-3-3-3-5 m stitches evenly over the next 18-18-26-26-26-30 stitches, knit 2 raglan-stitches, work stocking stitch and increase 8-6-8-6-4-4 stitches evenly over the next 38-42-38-42-46-46 stitches, knit 1 raglan-stitch. There are 146-150-158-162-166-178 stitches (48-50-48-50-52-52 stitches between the marker-threads on front/back pieces and 25-25-31-31-31-37 stitches on the sleeves). Knit 1 round. INFORMATION BEFORE CONTINUING: Continue with stocking stitch on the front/back pieces and PATTERN on the sleeves – read description above, AT THE SAME TIME increase for RAGLAN – read description above. The increases are different on the front/back pieces and on the sleeves. SIZES S and M: Knit 1 raglan-stitch, INCREASE 1 STITCH for raglan after the marker-thread – read description above, work A.1, (= sleeve), INCREASE 1 STITCH for raglan before and after the marker-thread, knit until there is 1 stitch left before the next marker-thread (= front piece), INCREASE 1 STITCH for raglan before and after the marker-thread, work A.1 (= sleeve), INCREASE 1 STITCH for raglan before and after the marker-thread, knit until there is 1 stitch left before the next marker-thread, INCREASE 1 STITCH before the marker-thread, knit 1 raglan-stitch (= back piece) = 154-158 stitches. Continue with stocking stitch and pattern, increasing 1 stitch for raglan on each side of the raglan-stitches every 2nd round. REMEMBER THE KNITTING TENSION! When you have increased 22-25 times for raglan the increases are finished on the sleeves. NOTE! When the diagram is finished in height, continue the pattern onwards. Stitches which do not fit a complete repeat on each side are worked in stocking stitch. Continue increasing on front/back pieces every 2nd round 2-1 more times, a total of 22-25 times on sleeves and 24-26 times on front/back pieces = 330-354 stitches. There are 96-102 stitches on the front/back pieces and 69-75 stitches on each sleeve. SIZES L, XL, XXL and XXXL: Knit 1 raglan-stitch, INCREASE 1 STITCH for raglan after the marker-thread – read description above, work A.1 (= sleeve), INCREASE 1 STITCH for raglan before and after the marker-thread, knit until there is 1 stitch left before the next marker-thread (= front piece), INCREASE 1 STITCH for raglan before and after the marker-thread, work A.1 (= sleeve), INCREASE 1 STITCH for raglan before and after the marker-thread, knit until there is 1 stitch left before the next marker-thread, INCREASE 1 STITCH before the marker-thread and knit 1 raglan-stitch (= back piece) = 166-170-174-186 stitches. REMEMBER THE KNITTING TENSION! Continue working while increasing differently on the front/back pieces and on the sleeves, read SLEEVE-INCREASES and BODY-INCREASES before continuing! SLEEVE-INCREASES: Continue increasing 1 stitch for raglan every 2nd round a total of 18-28-27-22 times (including the increases above), then increase 1 stitch every 4th round 6-2-4-7 times. You have increased for raglan a total of 24-30-31-29 times on the sleeves. NOTE! When the diagram is finished in height, continue the pattern onwards. Stitches which do not fit a complete repeat on each side are worked in stocking stitch. BODY-INCREASES: On the next round increase 2 stitches for raglan on the front/back pieces – read INCREASE 2 STITCHES in explanations above. Then INCREASE 1 STITCH for raglan every 2nd round but every 10th-12th-6th-6th round (i.e., every 5th-6th-3rd-3rd increase), INCREASE 2 STITCHES instead of 1 stitch. Work until you have increased a total of 29-30-34-36 times (6-5-11-12 times with 2 increased stitches instead of 1) = 394-422-470-486 stitches. There are 118-120-142-148 stitches on the front/back pieces and 79-91-93-95 stitches on each sleeve = 394-422-470-486 stitches. ALL SIZES: = 330-354-394-422-470-486 stitches. Continue working without further increases until the yoke measures 17-18-20-21-23-25 cm from the marker on the neck. DIVIDE FOR BODY AND SLEEVES: Knit 1 (this stitch belongs to the back piece), place the next 67-73-77-89-91-93 stitches on 1 thread for the sleeve, cast on 8-8-8-10-10-12 stitches (= in side under sleeve), work 98-104-120-122-144-150 stitches in stocking stitch (= front piece), place the next 67-73-77-89-91-93 stitches on 1 thread for the sleeve, cast on 8-8-8-10-10-12 stitches (= in side under sleeve), work the last 97-103-119-121-143-149 stitches in stocking stitch (= back piece). The body and sleeves are finished separately. The piece is now measured from here. BODY: = 212-224-256-264-308-324 stitches. Insert 1 marker-thread in the middle of the 8-8-8-10-10-12 stitches cast on under each sleeve; these are used when increasing in the sides. Work stocking stitch in the round for 5 cm. Now increase 1 stitch on each side of both marker-threads – read INCREASE TIP-2. Increase like this every 4½-5-4½-5-5-4½ cm a total of 4 times = 228-240-272-280-324-340 stitches. Work stocking stitch until the body measures 26-27-26-27-27-26 cm from the division. Change to circular needle size 2.5 mm. Work rib (knit 2, purl 2), AT THE SAME TIME increase 36-40-44-44-52-56 stitches evenly on the first round = 264-280-316-324-376-396 stitches. When the rib measures 3 cm, cast off with rib a little loosely. The jumper measures approx. 51-53-55-57-59-61 cm from the shoulder. SLEEVES: Place the 67-73-77-89-91-93 sleeve-stitches from the thread on one side of the piece on short circular needle/double pointed needles size 3.5 mm and knit up 1 stitch in each of the 8-8-8-10-10-12 stitches cast on under the sleeve = 75-81-85-99-101-105 stitches. Insert a marker-thread in the middle of the 8-8-8-10-10-12 stitches under the sleeve. Start at the marker-thread and work pattern in the round, making sure to continue the pattern from the yoke. The new stitches under the sleeve are worked in stocking stitch. When you decrease under the sleeve, adjust the pattern as you go. When the sleeve measures 2 cm, decrease 2 stitches under the sleeve – read DECREASE TIP. Decrease like this every 4th round a total of 3-5-5-7-7-8 times, then every 11-10-7-3-3-2½ cm 4-4-5-9-9-9 times = 61-63-65-67-69-71 stitches. Continue working until the sleeve measures 43-42-41-40-38-38 cm – adjust so you have worked at least 1 round without pattern. Change to double pointed needles size 2.5 mm. Work rib (knit 2, purl 2), AT THE SAME TIME increase 3-5-7-5-7-5 stitches evenly on the first round = 64-68-72-72-76-76 stitches. When the rib measures 4 cm, cast off. The sleeve measures approx. 47-46-45-44-42-42 cm. |
|||||||||||||
Diagram explanations |
|||||||||||||
|
|||||||||||||
|
|||||||||||||
|
|||||||||||||
|
|||||||||||||
|
|||||||||||||
|
Have you made this or any other of our designs? Tag your pictures in social media with #dropsdesign so we can see them! Do you need help with this pattern?You'll find tutorial videos, a Comments/Questions area and more by visiting the pattern on garnstudio.com. © 1982-2024 DROPS Design A/S. We reserve all rights. This document, including all its sub-sections, has copyrights. Read more about what you can do with our patterns at the bottom of each pattern on our site. |
|||||||||||||

With over 40 years in knitting and crochet design, DROPS Design offers one of the most extensive collections of free patterns on the internet - translated to 17 languages. As of today we count 304 catalogues and 11422 patterns - 11422 of which are translated into English (UK/cm).
We work hard to bring you the best knitting and crochet have to offer, inspiration and advice as well as great quality yarns at incredible prices! Would you like to use our patterns for other than personal use? You can read what you are allowed to do in the Copyright text at the bottom of all our patterns. Happy crafting!
Comments / Questions (30)
Bonjour, je relève une erreur dans les explications pour les manches pour les diminution. 5 diminution tous les 4 tours, puis 4 diminutions tous les 10 cm pour une manche qui mesure 42 cm. A mon avis erreur de frappe, 11 cm au lieu de 11 tours.Bien cordialement Mileva Neli
23.04.2024 - 21:17DROPS Design answered:
Bonjour Mme Mileva, en taille S on va bien diminuer d'abord 3 fois tous les 4 tours puis 4 fois tous les 11 cm, autrement dit on va avoir: 2 cm avant de diminuer + 3xtous les 4 tours = 2,5 cm + 4 x tous les 11 cm = 33 cm, puis 5,5 cm sans diminuer pour arriver aux 43 cm de longueur de manche avant les côtes. Bon tricot!
24.04.2024 - 08:31Hej, jag behöver ett förtydligande kring raglan-ökningarna. Om man följer beskrivningen exakt och ser tröjan framifrån så blir raglan-mönstret asymetriskt så att hålen är mot framstycket på ena sidan och vid ärmarna på andra sidan. När jag hade stickat ner till ärmhålen såg det jättekonstigt ut så jag var tvungen att repa upp hela tröjan. Det måste väl ändå vara så att raglan-ökningarna som ger hål ska göras på framstycket och bakstycket? Tacksam för förklaring
20.04.2024 - 15:31Hallo liebes Drops-Team, mit 166 M für Größe L stehe ich vor den Zunahmen. Werden in der 1. Runde jeweils 2 M nur am Vorder-/Rückenteil zugenommen und ab Runde 2 erfolgen die Zunahmen sowohl an den Ärmeln und am Vorder-/Rückenteil? Erfolgt die 2. Zunahme mit je 2 M dann in Runde 12? Danke und viele Grüße.
04.04.2024 - 21:54DROPS Design answered:
Liebe Vinka, bei der nächsten Runde nehmen Sie für den Raglan bei den Ärmeln (je 1 Masche beidseitig) + beim Rumpf (je 2 M beidseitig) zu; dann 2 Runde ohne Zunahmen, dann nehmen Sie bei der nächsten Runde bei den Ärmeln und beim Rumpf je 1 Masche zu, dann 1 Runde ohne Zunahmen. Bei den Ärmeln nehmen Sie so in jeder 2. Runde 18 Mal dann in jeder 4. Runde jeweils 1 M 6 Mal zu. Beim Rumpf nehmen Sie abwechslungsweise jeweils 1 M und 2 M (29 Mal insgesamt: 19 Mal 1 M + 10 M 2 M) zu. Viel Spaß beim Stricken!
05.04.2024 - 08:15Hallo, kann es sein, dass bei den Ärmeln ein Fehler in der Anleitung ist? Wenn man in Größe M erst nach 2 cm in jeder 4. Reihe 5x und danach alle 10 cm nochmal 4x abnehmen soll, habe ich 2 cm + 20 Reihen + 40 cm = 42 cm + 20 Reihen (ca 6 cm) = 48 cm gestrickt. Der Ärmel soll ab Teilung bis zum Bündchen aber nur 42 cm lang werden. Das passt doch nicht oder habe ich einen Denkfehler? Schon jetzt Danke für die Hilfe! Viele Grüße, Angela
29.03.2024 - 16:14DROPS Design answered:
Liebe Angela, es wird zuerst nach 2 cm 5 Mal in jeder 4. Reihe abgenommen = 16 Reihen = ca 5 cm + 2 = 7 cm insgesamt ab Verteilung + 4 Mal in jeder 10 cm = ca 30 cm = 37 cm insgesamt, noch bis 42 cm stricken. Viel Spaß beim Stricken!
02.04.2024 - 14:10Ich bin nun bei den Ärmeln , stimmt es dass bei den Ärmel das Muster nicht kontinuierlich um den Ärmel geht sondern ein Streifen glatt rechts bleibt. Oder muss ich das Muster mit den abnahmen weiterführen aber das wäre glaube ich gar nicht möglich. Ich kann nur leider auf den Fotos nicht erkennen wie die Innenseite der Ärmel aussieht. So wie ich es verstehe ist bis zur Ärmel Mitte ein Streifen glatt rechts und danach das Muster kontinuierlich?Ich wollte nur sicher gehen ob das so stimmt
13.03.2024 - 21:29DROPS Design answered:
Liebe Petra, ja das stimmt, das Muster wird nicht under den Ärmel passen, stricken Sie soviel Maschen im Muster wie zuvor als möglich, die übrigen Maschen am Anfang/Ende der Runde werden glatt rechts gestrickt, genauso wie bei den Abnahmen, wenn Sie nicht genügend Maschen haben, um das Lochmuster weiterzustricken, stricken Sie einfach diese Maschen glatt rechts. Viel Spaß beim Stricken!
14.03.2024 - 08:31Ich bin jetzt mit der raglan Zunahme fertig und habe insgesamt 330 Maschen wie in der Anleitung für Größe S. Meine Frage ist werden die raglan Maschen mitgezählt? Zum Beispiel ich habe 22 mal and den Ärmeln zu genommen zähle ich da zwei raglan Maschen dazu denn ansonsten hätte ich 67 Maschen und nicht 69. genauso auch an vorder und Rückseite. Also werden die raglan Maschen mitgezählt?
02.03.2024 - 12:53DROPS Design answered:
Liebe Petra, ja damit sind die RAglanmaschen gezählt, so 67 M für jede Ärmel + 1 Raglanmasche beidseitig sind 69 Maschen. Viel Spaß beim Stricken!
04.03.2024 - 07:52Jag har stickat till "ökning ärmar och framstycke/bakstycke". Jag förstår inte hur jag ska gå vidare. Det är sammanlagt fyra raglan men i beskrivningen står det ökning både för ärmar och fram-bakstycke där man ökar antigen en eller två maskor och på olika varv. Vilka raglan menas det? Finns det någon enkel förklaring hur man går vidare?
27.02.2024 - 23:38DROPS Design answered:
Hej Snjezana. Du har raglan på 4 ställen i arbetet och varje raglan består av ökning innan och efter markören. När det står Ökning ärmar så är det på de sidorna av markörerna vid raglan som är mot ärmarna och Ökning framstycke/bakstycke är på de sidorna av markörerna vid raglan som är mot fram och bakstycket. Mvh DROPS Design
28.02.2024 - 07:32Daisy flower wreath thank you for this lovely pattern♥️
20.02.2024 - 13:38Diamond Breeze
22.01.2024 - 10:25Fleurs des champs
21.01.2024 - 22:28