
Popular categories
Looking for a yarn?


|
|||||||
Coral Echoes |
|||||||
 |
 |
||||||
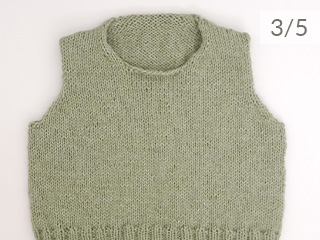
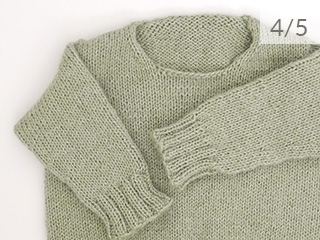
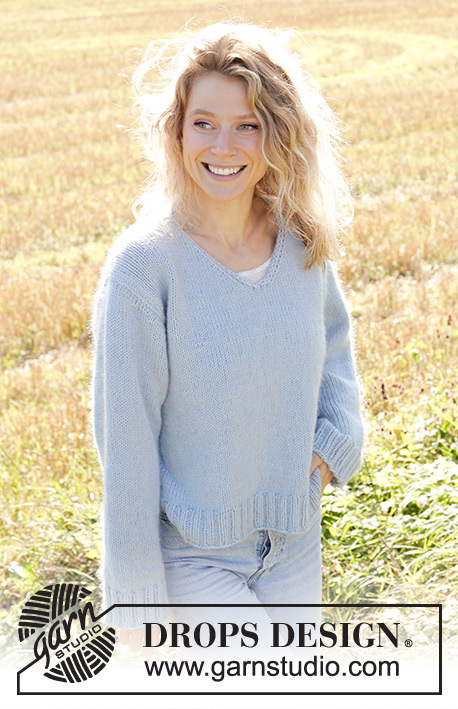
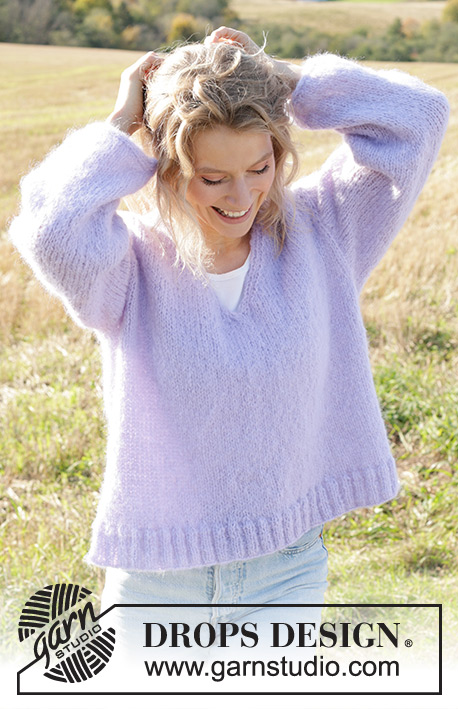
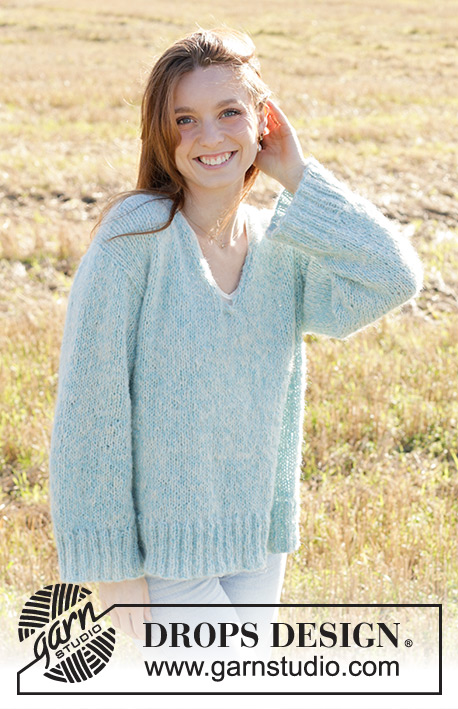
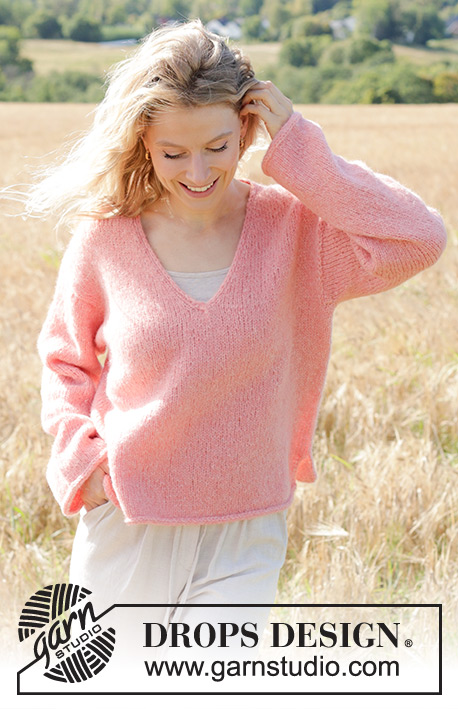
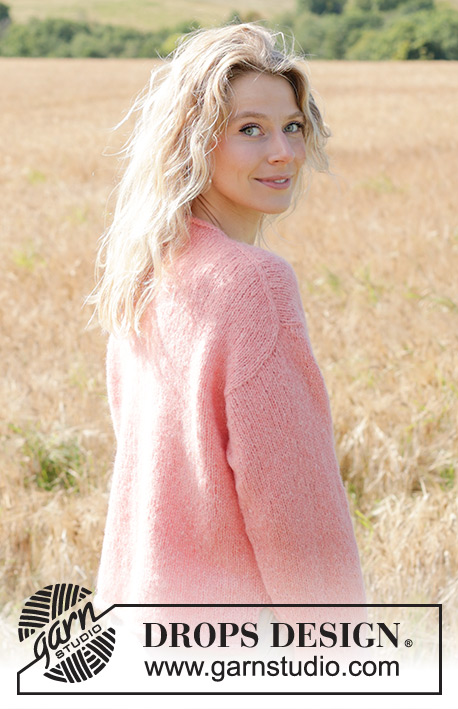
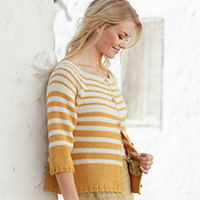
Knitted jumper in DROPS Air or DROPS Paris. Piece is knitted top down with European shoulder / diagonal shoulder, V-neck, I-cord and vents in the sides. Size: S - XXXL
DROPS 248-13 |
|||||||
|
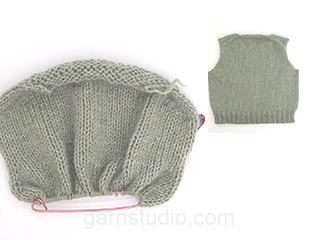
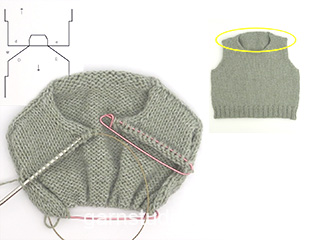
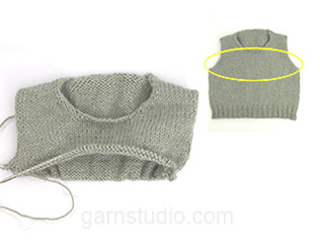
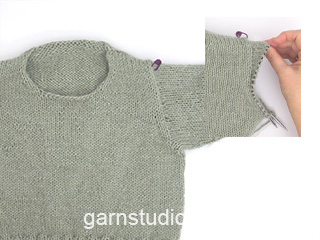
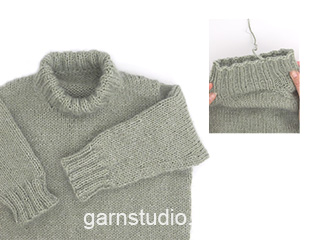
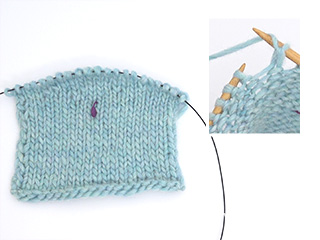
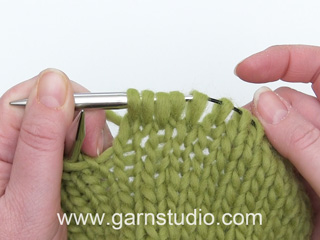
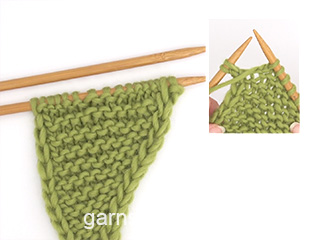
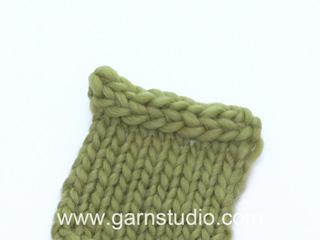
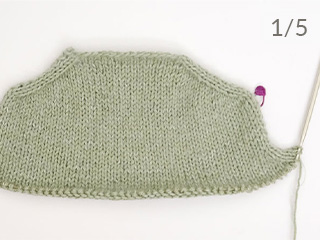
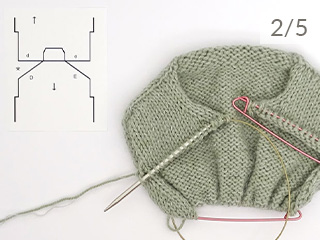
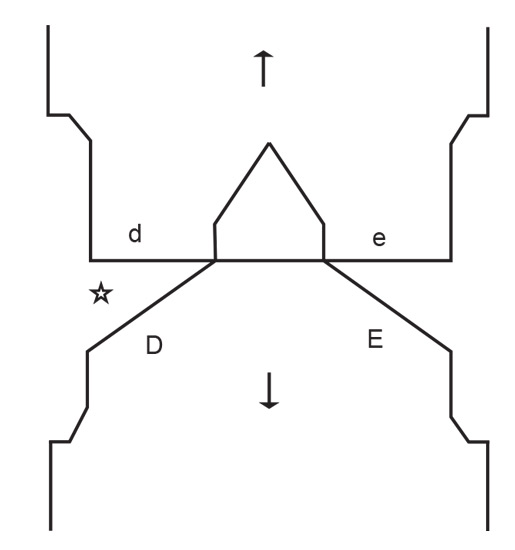
---------------------------------------------------------- EXPLANATION FOR THE PATTERN: ---------------------------------------------------------- INCREASE TIP-1 (from right side): Increase 1 stitch towards the left: Use left needle to pick up yarn between 2 stitches from row below, pick up yarn from the front and knit stitch in back loop of stitch. Increase 1 stitch towards the right: Use left needle to pick up yarn between 2 stitches from row below, pick up yarn from the back and knit stitch in front loop of stitch. INCREASE TIP-2 (from wrong side): Increase 1 stitch towards the left: Use left needle to pick up yarn between 2 stitches from row below, pick up yarn from the back and purl stitch in front loop of stitch. Increase 1 stitch towards the right: Use left needle to pick up yarn between 2 stitches from row below, pick up yarn from the front and purl stitch in back loop of stitch. EDGE STITCHES I-CORD RIGHT SHOULDER: RIGHT SIDE: Work until 3 stitches remain, purl 1, slip 1 stitch purlwise with strand in front of piece and knit 1. WRONG SIDE: Slip 1 stitch purlwise with strand in front of piece and knit 1, knit 1, work the rest of row. EDGE STITCHES I-CORD LEFT SHOULDER: RIGHT SIDE: Slip 1 stitch purlwise with strand in front of piece, knit 1, purl 1, work the rest of row. WRONG SIDE: Work until 3 stitches remain, knit 1, slip 1 stitch purlwise with strand in front of piece, knit 1. I-CORD (in each side, applies to vents at the bottom of body): FIRST 2 STITCHES: Work as follows on every row: Slip 1 stitch purlwise with strand in front of piece, knit 1. LAST 2 STITCHES: Work as follows on every row: Work until 2 stitches remain on needle, slip 1 stitch purlwise with strand in front of piece, knit 1. I-CORD CAST-OFF (bottom edge on body and neck edge at the back): ROW 1 (= right side): Knit 2 , knit the next 2 stitches twisted together. ROW 2 (= right side): Slip the 3 stitches from right needle back on left needle, knit 2 , knit the next 2 stitches twisted together. Repeat ROW 2 until 3 stitches remain on right needle. Slip the 3 stitches from right needle back on left needle. Cast off. Sew a little stitch that binds beginning/end of I-cord to the garment. I-CORD CAST-OFF (sleeve): At the end of round and after last stitch on round has been worked: Cast on 3 new stitches on right needle from right side. Slip the 3 new stitches from right needle to left needle so that working yarn is 3 stitches in on left needle (the working yarn tightens the piece when working to form a little tube). ROW 1 (= right side): Knit 2 , knit the next 2 stitches twisted together. ROW 2 (= right side): Slip the 3 stitches from right needle back on left needle, knit 2 , knit the next 2 stitches twisted together. Repeat ROW 2 until 3 stitches remain on right needle. Slip the 3 stitches from right needle back on left needle. Cast off. Sew a little stitch that binds beginning/end of I-cord together. DECREASE TIP (applies to mid under sleeves): Decrease 1 stitch on each side of marker thread as follows: Work until 3 stitches remain before marker thread and knit 2 together, knit 2 (marker thread is between these 2 stitches), slip 1 stitch knitwise, knit 1, pass slipped stitch over stitch worked. ---------------------------------------------------------- START THE PIECE HERE: ---------------------------------------------------------- JUMPER - SHORT OVERVIEW OF THE PIECE: In this pattern long and short needles have been used - begin with fitting length and switch as needed. First work piece back and forth on needle. Begin by casting on stitches in the back of neck. Then work back piece downwards while at the same time increasing in each side of piece until number of stitches for shoulder width is reached. Back piece has a slight diagonal shoulder. Then work down to armholes. Now put back piece aside and work the front piece. Front piece is first worked in 2 parts. Begin by picking up stitches along right shoulder, work while increasing towards the neck. Repeat on the left shoulder. Put right and left front piece together when increases for neck are done. Then work front piece down to armholes. Now slip front piece and back piece on to same needle and work body downwards in the round on circular needle before dividing the piece again for vents. Pick up stitches for sleeves around the armholes. First work back and forth with short rows to form a sleeve cap. Then work sleeves downwards in the round on needle. BACK PIECE: Cast on 26-28-28-32-34-34 stitches on circular needle size 5 mm. Purl 1 row from wrong side. Read INCREASE TIP-1 and work next row from right side as follows: Knit 3, increase towards the left, knit until 3 stitches remain, increase towards the right, knit 3. Read INCREASE TIP-2 and work next row from wrong side as follows: Purl 3, increase towards the left, purl until 3 stitches remain, increase towards the right, purl 3. Continue like this and increase the same way from both right side and wrong side 24-26-28-30-32-36 times in total. REMEMBER THE KNITTING TENSION! After last increase there are 74-80-84-92-98-106 stitches on needle. Insert 1 marker in the side. Now measure piece from here! Work stocking stitch back and forth until piece measures 12-13-13-14-13-14 cm, measured along the edge of armhole. Work next row as follows from right side: Knit 3, increase towards the left, work until 3 stitches remain, increase towards the right, knit 3 – remember INCREASE TIP-1. Increase like this on every row from right side 2-2-3-3-4-4 times in total = 78-84-90-98-106-114 stitches. Work until piece measures 14-15-16-17-17-18 cm, measured along armhole. Cut the yarn, slip stitches on a thread or stitch holder, and work front piece as explained below. RIGHT SHOULDER: Begin with right shoulder (when garment is worn). Pick up 24-26-28-30-32-36 stitches inside outermost stitch along right shoulder on back piece (i.e. pick up 1 stitch in every row from edge at the top of back piece, see E on chart). All length measurements are done from here! Purl 1 row from wrong side, work next row as follows from right side: Knit until 3 stitches remain, 3 EDGE STITCHES - read explanation above. Continue like this. When piece measures 6 cm, increase stitches towards the neck. Increase towards the right at the end of every row from right side, increase before 4 stitches - remember INCREASE TIP-1. Increase 1 stitch on every other row (every row from right side) 13-14-14-16-17-17 times in total = 37-40-42-46-49-53 stitches. When last row with increase is done, slip stitches on a thread or needle. Then work left shoulder as explained below. LEFT SHOULDER: Pick up 24-26-28-30-32-36 stitches inside outermost stitch along left shoulder on back piece (i.e. pick up 1 stitch in every row from edge at the top of back piece, see D on chart). All length measurements are done from here! Purl 1 row from wrong side, then work as follows from right side: 3 EDGE STITCHES - read explanation above, knit the remaining stitches. Continue like this. When piece measures 6 cm, increase stitches towards the neck. Increase towards the left at the beginning of every row from right side, increase after 4 stitches– remember INCREASE TIP-1. Increase 1 stitch on every other row (every row from right side) 13-14-14-16-17-17 times in total = 37-40-42-46-49-53 stitches. Work next row as follows from wrong side: Work stocking stitch over the 37-40-42-46-49-53 stitches from left shoulder, slip stitches from right shoulder on left needle and then work them in stocking stitch = 74-80-84-92-98-106 stitches. Work next row as follows - from right side: Knit 36-39-41-45-48-52, slip next stitch on a cable needle in front of piece, knit 1, knit stitch from cable needle, work the last 36-39-41-45-48-52 stitches on row. Continue in stocking stitch. Continue to work until piece measures 22-23-23-24-25-26 cm. Work next row as follows from right side: Knit 3, increase towards the left, work until 3 stitches remain, increase towards the right, knit 3 – remember INCREASE TIP-1. Increase like this on every row from right side 2-2-3-3-4-4 times in total = 78-84-90-98-106-114 stitches. Continue in stocking stitch until piece measures 24-25-26-27-29-30 cm, finish with a row from wrong side. Now put front piece and back piece together for body as explained below. BODY: Work stocking stitch over the 78-84-90-98-106-114 stitches from front piece, cast on 4-4-6-6-8-10 new stitches at the end of this row (in the side), work stocking stitch over the 78-84-90-98-106-114 stitches from back piece, cast on 4-4-6-6-8-10 new stitches at the end of row = 164-176-192-208-228-248 stitches. Insert 1 marker thread in each side, in the middle of the new stitches that were cast on under sleeve. Work stocking stitch until piece measures 50-52-54-56-58-60 cm, measured from the top point on shoulder on front piece. Now divide the piece at the marker threads in the side, slip the last 82-88-96-104-114-124 stitches on a thread and continue over stitches from front piece. FRONT PIECE: = 82-88-96-104-114-124 stitches. Work stocking stitch with 2 stitches I-CORD in each side - read explanation above. Cast off with I-CORD when piece measures 56-58-60-62-64-66 cm from top point on shoulder - read explanation above. BACK PIECE: Slip the 82-88-96-104-114-124 stitches from thread back on needle size 5 mm and work the same way as front piece. SLEEVES: Place piece flat and insert 1 marker at the top of armhole (NOTE! It is not where stitches were picked up for front piece but approx. 5-6 cm down on front piece = mid on top of shoulder). Use circular needle size 5 mm, begin in the middle of the new stitches cast on under sleeve, and pick up 68-74-80-82-90-94 stitches along armhole - adjust to pick up same number of stitches on each side of marker along armhole. Now work stocking stitch back and forth with short rows over sleeve cap, this is done to get a better shape on sleeve. Begin mid under sleeve. 1st row (right side): work 9-10-10-10-11-11 stitches past marker, turn 2nd row (wrong side): work 9-10-10-10-11-11 stitches past marker, turn. 3rd row (right side): 10-11-8-6-5-5 stitches past where the previous turn was, turn 4th row (wrong side): work 10-11-8-6-5-5 stitches past where the previous turn was, turn Repeat 3rd and 4th row until 29-32-34-34-36-36 stitches have been worked past marker mid on top of sleeve (3-3-4-5-6-6 turns have been done in each side). Work from right side until beginning of round (mid under sleeve). Insert 1 marker thread here, this is used when decreasing stitches under sleeve. Move marker thread upwards when working. Continue working in the round in stocking stitch over all stitches as explained under. When sleeve measures 5-5-6-7-7-7 cm from where stitches were picked up (all length measurements are done mid on top of sleeve), decrease 2 stitches mid under sleeve - read DECREASE TIP. Decrease every other round 2-2-3-3-4-4 times, then decrease every 4½-3½-2½-2½-2-1½ cm 6-8-9-9-11-12 times, e.g. a total of 8-10-12-12-15-16 times in total = 52-54-56-58-60-62 stitches. Work until sleeve measures 52-52-52-50-49-48 cm from where stitches were picked up for sleeve. Cast off with I-CORD - remember explanation above. BACK NECK EDGE: Use circular needle size 5 mm and cast on 2 stitches on needle, pick in addition up stitches along the neck edge at the back, begin at shoulder line from right side and pick up inside 1 stitch to the other shoulder line. Pick up approx. 24-26-26-30-32-32 stitches. Fasten off. Begin in the side where stitches were cast on and cast off with I-CORD - remember explanation above. |
|||||||
Diagram explanations |
|||||||
|
|||||||
|
|||||||

|
|||||||
|
Have you made this or any other of our designs? Tag your pictures in social media with #dropsdesign so we can see them! Do you need help with this pattern?You'll find tutorial videos, a Comments/Questions area and more by visiting the pattern on garnstudio.com. © 1982-2024 DROPS Design A/S. We reserve all rights. This document, including all its sub-sections, has copyrights. Read more about what you can do with our patterns at the bottom of each pattern on our site. |
|||||||


With over 40 years in knitting and crochet design, DROPS Design offers one of the most extensive collections of free patterns on the internet - translated to 17 languages. As of today we count 304 catalogues and 11422 patterns - 11422 of which are translated into English (UK/cm).
We work hard to bring you the best knitting and crochet have to offer, inspiration and advice as well as great quality yarns at incredible prices! Would you like to use our patterns for other than personal use? You can read what you are allowed to do in the Copyright text at the bottom of all our patterns. Happy crafting!
Comments / Questions (26)
Hej, När jag ska plocka upp maskor på axlarna, börjar jag från hals eller axel? Kantmaskorna som ska stickas, är de mot ärmen eller halsen?
16.04.2024 - 19:51DROPS Design answered:
Hej Viktoria, øverst i opskriften finder du flere videoer som viser hvordan man strikker den europæiske skulder :)
18.04.2024 - 11:47Hi, I’m having a little bit of trouble with the left shoulder edge stitches i-cord. On the pattern it’s said “Slip 1 stitch purlwise with strand in front of piece, knit 1, purl 1” , but when I knit with the strand in front, it automatically adds a stitch to the row, and the pattern is not symmetric with the right shoulder. Am I doing anything wrong? And also should both the shoulder be the same row number? Or as long as it’s 6cm it will be fine? Thank you!
26.03.2024 - 08:38DROPS Design answered:
Dear Roslyn, Slip 1 stitch purlwise with strand in front of piece = you slip 1 stitch purlwise to the other needle and leave the strand at the front (it's not a yarn over). Then knit 1 stitch and purl 1 stitch. It should form a small tube. You can see an example here: https://www.garnstudio.com/video.php?id=1780&lang=en. You should work the edge in both shoulders at the same point in the pattern, so that they match. That means they should have the same length at the same row. Happy knitting!
31.03.2024 - 23:07Hi, another question, having got to the end of the neck shaping, in size M, my piece is only 17cm long from the start of the front pieces (ie. from picking up for the right/left shoulder). This makes the whole neck very short. Have i misunderstood something ?? I have increased for the neck edge on every right side row . It looks much shorter than in your picture.
16.03.2024 - 19:11DROPS Design answered:
Dear Tessa, according to the gauge, the end of the neck edge should be at approx. 18.5cm. Take into account that the armhole shape starts at the 23cm mark, so there is only 5cm between the end of the neck and the armhole shaping and the neck edge can't be much longer. If you feel that the neck is too short check whether the gauge in rows is correct. Happy knitting!
17.03.2024 - 23:54Je réalise ce modèle en drops paris taille xl. Après avoir suivi les instructions jusqu'à la réunion du dos et du devant, je pense qu'il y a une erreur de mesure. Le dos est 10cm plus court que le devant. Pouvez vous me confirmer les mesures exactes ? Merci beaucoup Sylvie
12.03.2024 - 16:59DROPS Design answered:
Bonjour Sylvie, dans ce type de modèle, les épaules se trouvent en biais, vers le dos, autrement dit, le dos est plus court = 17 cm avant de mettre en attente que le devant = 27 cm avant de réunir le dos et le devant, soit (17+27)/2 = 22 cm de hauteur d''emmanchures. Retrouvez cette façon de tricoter dans l'onglet vidéos: dos et épaules des devants, avant et après la réunion des 2 parties. Bon tricot!
13.03.2024 - 08:41The back until armholes seems a lot shorter than the front, only 13 cm instead of 23, this should also be 23cm, or am I completely misunderstanding the pattern? Also then 25 until end of back piece before putting stitches on thread .
11.03.2024 - 21:20DROPS Design answered:
Dear `Tessa, you are right, in this kind of shape the armholes on back piece are shorter, and shoulders will lie diagonally towards back piece - see tab "videos" at the top of the pattern (next to "pattern") to find videos showing how to work the back piece, front pieces, etc.. for this kind of shape. Happy knitting!
12.03.2024 - 07:38Bonjour, Je suis arrivée à l'épaule droite et je comprends pas comment faire. Dois-je relever les 26 maille sur l'encolure du dos ou sur les mailles de l'épaule ? Ensuite tricoter à l'endroit (après un rang envers ?) jusqu'à ce qu'il reste 3 maille et terminer par 3 mailles lisères.
11.03.2024 - 15:33DROPS Design answered:
Bonjour Mme Bequet, dans cette vidéo, nous montrons où relever les mailles de chacun des 2 devants; et comment augmenter pour l'encolure V à 3 mailles du bord pour chacune des 2 épaules - retrouvez ensuite comment continuer le devant dans cette autre vidéo. Bon tricot!
11.03.2024 - 16:05Hello, Can this sweater be knitted with drops sky yarn? Thank You (:
04.03.2024 - 17:58DROPS Design answered:
Hi Rinat, Drops Sky belongs to yarn group B so cannot replace Drops Air from yarn group C unless you adjust your needle size/number of stitches and rows to get the correct knitting tension. Good luck and happy knitting!
05.03.2024 - 08:16Cos'è la tecnica del MAGIC LOOP? Non la trovo sul vs. sito.
25.02.2024 - 18:08DROPS Design answered:
Buonasera Susanna, a questo linktrova il video del magic loop. Buon lavoro!
25.02.2024 - 21:15Peach peony
21.01.2024 - 06:55Mayflower
20.01.2024 - 17:34