DROPS Merino Extra Fine
100% Wool
from 4.55 $ /50g
DROPS SS24

Hello Santa

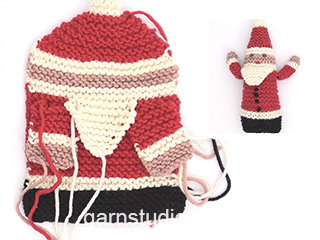
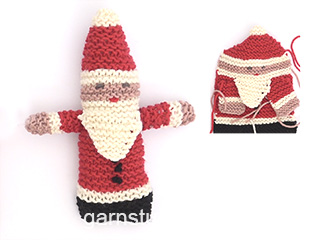
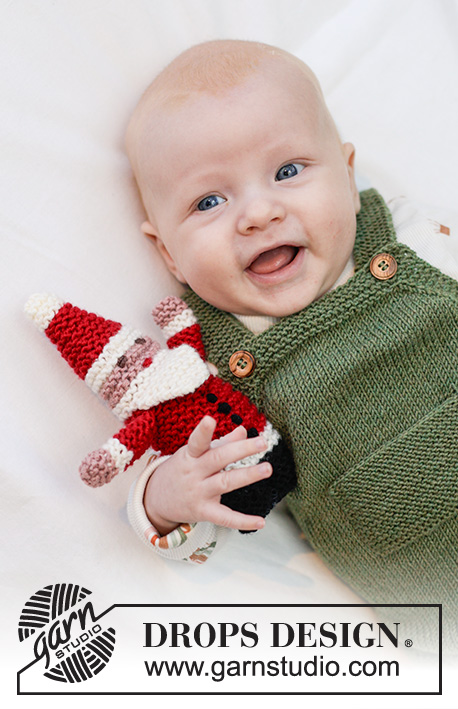
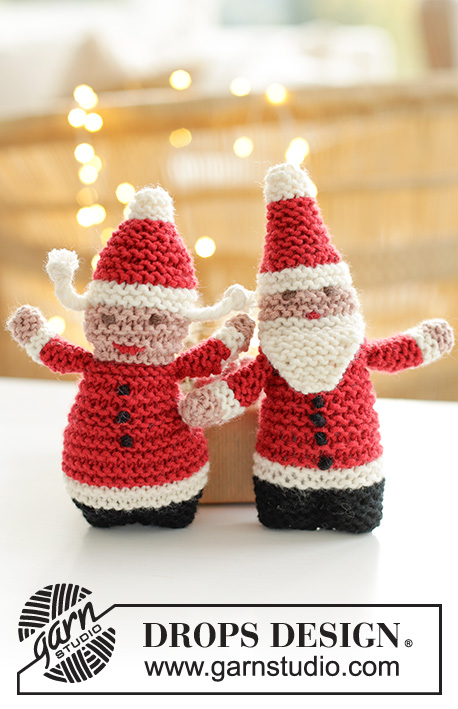
Knitted Santas for babies and children in DROPS Merino Extra Fine. The pieces are worked bottom up, with garter stitch and embroidered faces.

DROPS Baby 46-21
DROPS Design: Pattern me-085-by
Yarn group B
-----------------------------------------------------------

SIZE:
Height = approx. 13 cm = 5⅛"

YARN FOR 2 SANTAS:
DROPS MERINO EXTRA FINE from Garnstudio (belongs to yarn group B)
50 g color 01, off white
50 g color 02, black
50 g color 11, red
50 g color 46, desert rose
And use:
Left-over color 49, chocolate

ACCESSORIES:
Wadding.

1 Santa weighs approx. 25 g with wadding.

NEEDLES:
DROPS SINGLE POINTED NEEDLES SIZE 3.5 MM = US 4.

KNITTING GAUGE:
22 stitches in width and 45 rows in height with garter stitch = 10 x 10 cm = 4" x 4".
NOTE: Needle size is only a guide. If you get too many stitches on 10 cm = 4", change to a larger needle size. If you get too few stitches on 10 cm = 4", change to a smaller needle size.

-------------------------------------------------------

Alternative Yarn – See how to change yarns here
Yarn Groups A to F – Use the same pattern and change the yarn here
Yarn usage using an alternative yarn – Use our yarn converter here

-------------------------------------------------------

DROPS Merino Extra Fine
100% Wool
from 4.55 $ /50g

Pattern instructions

NOTE: This pattern is written in American English. All measurements in charts are in cm. For conversion from inches to cm - click here. There are different terms for crocheting in American and British English. If this pattern includes crochet, click for "crochet terms" here. For this pattern in British English, please click here.
-------------------------------------------------------

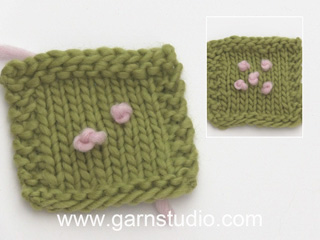
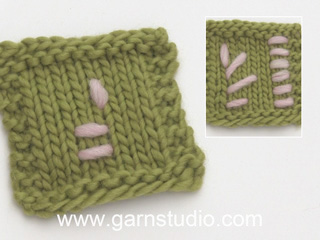
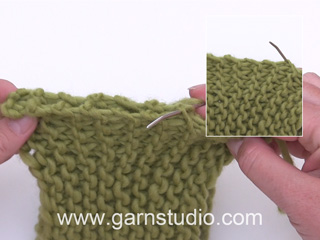
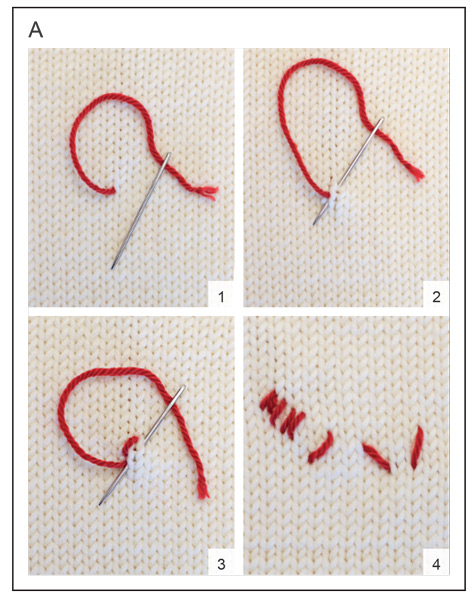
EXPLANATIONS FOR THE PATTERN:
-------------------------------------------------------

GARTER STITCH (worked back and forth):
Knit all rows.
1 ridge = knit 2 rows.

PATTERN:
See diagrams A and B. The diagrams show how to work the embroidered stitches.

-------------------------------------------------------

START THE PIECE HERE:

-------------------------------------------------------

SANTA – SHORT OVERVIEW OF THE PIECE:
The piece is worked back and forth, first the arms, then the body is worked from the legs to the top of the hat, working in the arms as you go. Mr Santa has a beard and Mrs Santa has plaits. The pieces are worked in garter stitch and sewn together to finish, with embroidered faces.

MR SANTA:

ARMS:
Cast on 8 stitches with needle size 3.5 MM = US 4 and color desert rose DROPS Merino Extra Fine. Work GARTER STITCH – read description above, as follows: 2 ridges with color desert rose, 2 ridges with color off white and 4 ridges with color red. REMEMBER THE KNITTING GAUGE!
Continue as follows with color red:
ROW 1 (right side): Knit
ROW 2: Bind off 2 stitches, knit until 2 stitches remain, bind off the next 2 stitches. Cut the yarn approx. 25 cm = 9¾" from piece (to sew the arm with), and pull the yarn into the last stitch. Slip the 4 remaining stitches on a thread or another needle.
Work 1 more arm in the same way.

LEGS AND BODY:
Cast on 24 stitches with needle size 3.5 MM = US 4 and color black. Work 4 ridges.
Change to color off white, work 2 ridges. Change to color red and work garter stitch until the piece measures 6½ cm = 2½" (approx. 9 ridges with color red – finish after a row from the wrong side).

Now work in the arms with color red from the right side as follows: Knit 4 stitches from the body, knit the next 4 stitches on the body together with the 4 stitches on one arm (knitting together 1 stitch from the body and 1 from the arm each time), knit 8 stitches from the body, knit the next 4 stitches on the body together with the 4 stitches on the other arm, knit the last 4 stitches from the body.
Turn and knit back from the wrong side. Lay the piece to one side and work the beard.

BEARD:
Cast on 4 stitches with needle size 3.5 MM = US 4 and color off white. Work back and forth as follows:
ROWS 1-2: Knit.
ROW 3: Knit 1, 1 yarn over, knit 2, 1 yarn over, knit 1 = 6 stitches.
ROWS 4-6: Knit (yarn overs knitted twisted to avoid holes).
ROW 7: Knit 1, 1 yarn over, knit 4, 1 yarn over, knit 1 = 8 stitches.
ROWS 8-10: Knit (yarn overs knitted twisted).
ROW 11: Knit 1, 1 yarn over, knit 6, 1 yarn over, knit 1 = 10 stitches.
ROWS 12-14: Knit (yarn overs knitted twisted).
ROWS 15: Knit 1, 1 yarn over, knit 8, 1 yarn over, knit 1 = 12 stitches.
ROW 16: Knit the first stitch and the yarn over twisted together, knit 8, knit the yarn over and the last stitch twisted together = 10 stitches.
Now work the beard and head together, then the hat, as follows.

HEAD AND HAT:
ROW 1: Knit all 24 body stitches with color off white.
ROW 2: Knit the first 7 stitches from the body, knit together the next 10 stitches from the body with the 10 stitches from the beard (knitting together 1 stitch from the body and 1 from the beard each time), knit the last 7 stitches from the body.
ROWS 3-4: Knit with color off white.
ROWS 5-8: Knit with color desert rose.
ROW 9-12: Knit with off white.
ROWS 13-14: Knit with color red.
ROW 15: Continue with color red and * knit 2, knit 2 together *, work from *-* a total of 6 times = 18 stitches.
ROWS 16-18: Knit.
ROW 19: * Knit 2, knit 2 together *, work from *-* a total of 4 times, knit 2 = 14 stitches.
ROWS 20-22: Knit.
ROW 23: * Knit 1, knit 2 together *, work from *-* a total of 4 times, knit 2 = 10 stitches.
ROWS 24-26: Knit.

Change to color off white and work 3 ridges over all stitches. Cut the strand, pull it through the stitches, tighten and fasten.

ASSEMBLY:
Embroider eyes and mouth with left-over color chocolate for the eyes and red for the mouth. Both the eyes and mouth have 2 horisontal flat stitches, approx. 0.7 cm = ¼" long - see diagram A and photo.
Embroider 5 buttons onto the body with French knots in color black – see diagram B and photo.
Sew the back seam on the body – sewing edge to edge in the outermost loop of the outermost stitch so the seam is flat. Fill with wadding.
Sew the body together at the bottom, then sew a leg-seam in the middle of the black ridges, through both layers and wadding, to separate the legs.
Sew each arm seam and the openings at the top of each arm. Fill each arm with a little wadding. Tack a strand through the stitches at the bottom of each arm, tighten and fasten well.

MRS SANTA:

ARMS:
Cast on 8 stitches with needle size 3.5 MM = US 4 and color desert rose DROPS Merino Extra Fine. Work GARTER STITCH – read description above, as follows: 2 ridges with color desert rose, 2 ridges with color off white and 4 ridges with color red.
Continue as follows with color red:
ROW 1 (right side): Knit
ROW 2: Cast off 2 stitches, knit until 2 stitches remain, cast off the next 2 stitches.
Cut the yarn approx. 25 cm = 9¾" from piece (to sew the arm with), and pull the yarn into the last stitch. Slip the 4 remaining stitches on a thread or another needle.
Work 1 more arm in the same way.

LEGS AND BODY:
Cast on 24 stitches with needle size 3.5 MM = US 4 and color black. Work 1 ridge, then work as follows:
ROW 1: Knit 5, 1 yarn over, knit 2, 1 yarn over, knit 10, 1 yarn over, knit 2, 1 yarn over, knit 5 = 28 stitches.
ROW 2: Knit (yarn overs are always knitted twisted to avoid holes). REMEMBER THE KNITTING GAUGE!
ROW 3: Knit 6, 1 yarn over, knit 2, 1 yarn over, knit 12, 1 yarn over, knit 2, 1 yarn over, knit 6 = 32 stitches.
ROW 4: Knit.
ROW 5: Knit 7, 1 yarn over, knit 2, 1 yarn over, knit 14, 1 yarn over, knit 2, 1 yarn over, knit 7 = 36 stitches.
ROW 6: Knit.

Change to color off white, work 2 ridges. Change to color red, work 4 ridges.
Continue with color red and decrease as follows:
ROW 1: Knit 6, knit 2 together, knit 2, knit 2 twisted together, knit 12, knit 2 together, knit 2, knit 2 twisted together, knit 6 = 32 stitches.
ROWS 2-4: Knit.
ROW 5: Knit 5, knit 2 together, knit 2, knit 2 twisted together, knit 10, knit 2 together, knit 2, knit 2 twisted together, knit 5 = 28 stitches.
ROWS 6-8: Knit.
ROW 9: Knit 4, knit 2 together, knit 2, knit 2 twisted together, knit 8, knit 2 together, knit 2, knit 2 twisted together, knit 4 = 24 stitches.
ROW 10: Knit.

Now work in the sleeves with color red from the right side as follows: Knit 4 stitches from the body, knit the next 4 stitches on the body together with the 4 stitches on one arm (knitting together 1 stitch from the body and 1 from the arm each time), knit 8 stitches from the body, knit the next 4 stitches on the body together with the 4 stitches on the other arm, knit the last 4 stitches from the body.
Turn and knit back from the wrong side.

HEAD AND HAT:
Work 4 ridges with color desert rose over all 24 body-stitches. Change to color off white and work 2 ridges. Change to color red and work 2 ridges. Continue as follows with color red:
ROW 1: * Knit 4, knit 2 together *, work from *-* a total of 4 times = 20 stitches.
ROW 2: Knit.
ROW 3: * Knit 3, knit 2 together *, work from *-* a total of 4 times = 16 stitches.
ROW 4: Knit.
ROW 5: * Knit 2, knit 2 together *, work from *-* a total of 4 times = 12 stitches.
ROW 6: Knit.
ROW 7: * Knit 4, knit 2 together *, work from *-* a total of 2 times = 10 stitches.
ROW 8: Knit.

Change to color off white and work 3 ridges over all stitches. Cut the strand, pull it through the stitches, tighten and fasten.

ASSEMBLY:
Embroider eyes and mouth with left-over color chocolate for the eyes and red for the mouth. The eyes have 2 horisontal flat stitches, approx. 0.7 cm = ¼" long. The mouth has 2 vertical flat stitches in the middle and 1 horisontal flat stitch on each side, each 0.5 cm = ⅛" long - see diagram A and photo.
Embroider 3 buttons onto the body with French knots in color black – see diagram B and photo.
Sew the back seam on the body – sewing edge to edge in the outermost loop of the outermost stitch so the seam is flat. Fill with wadding.
Sew the body together at the bottom, then sew a leg-seam in the middle of the black ridges, through both layers and wadding, to separate the legs.
Sew each arm seam and the openings at the top of each arm. Fill each arm with a little wadding. Tack a strand through the stitches at the bottom of each arm, tighten and fasten well.
To mark the neck, we have tacked a single strand of color red up and down through the stitches in the transition between the body and head and tightened slightly. Fasten well.

PLAITS:
Cut 6 strands of color off white, each 20 cm = 8" long. Lay the strands together and pull them through 1 stitch on one side of the head (in the transition between the head and the hat). Fold the strands double (= 12 strands) and divide into 3 bunches of 4. Plait the bunches together and tie a knot in the end. Work another plait on the other side.

Diagram

All measurements in charts are in cm.

symbols = Flat stitch, Pictures 1-4
PICTURE 1: Insert the needle from the wrong side to the right side, where you wish the stitch to start.
PICTURE 2: Skip 0.5 - 1 cm = ⅛" – ⅜" and thread the needle down and up again to where you want the next flat stitch to start, pull the strand through.
PICTURE 3: Skip 0.5 - 1 cm = ⅛" – ⅜" and thread the needle down and up again to where you want the next flat stitch to start, pull the strand through.
Continue like this until you have enough stitches. Fasten the strand on the wrong side.
PICTURE 4: Flat stitches of different lengths and in different directions.
symbols = French knot, Pictures 1-4
PICTURE 1: Insert the needle from the wrong side and up to the right side where you would like the French knot to be positioned.
PICTURE 2: Wind the strand around the end of the needle 2 to 4 times – depending on how big you wish the knot to be.
PICTURE 3: Thread the needle down, 0.5-1 stitches away from where the strand came up and pull it out on the wrong side.
PICTURE 4: Pulling the strand through the material fastens the French knot. Fasten the strand on the wrong side.
diagram
diagram
Do you have a question? See a list of frequently asked questions (FAQ)

Knitting tension is what determines the final measurements of your work, and is usually measured per 10 x 10 cm. It is provided like so: number of stitches in width x number of rows in height - eg: 19 stitches x 26 rows = 10 x 10 cm.

The knitting tension is very individual; some people knit/crochet loosely while others work tightly. You adjust the knitting tension with the needle size, which is why the suggested needle size only serve as a guide! You need to adjust this (up or down) to ensure that YOUR knitting tension matches the knitting tension provided in the pattern. If you work with a different knitting tension than provided you will have a different yarn consumption, and your work will have different measurements than what the pattern suggests.

The knitting tension also determines which yarns can replace each other. As long as you achieve the same knitting tension you can replace one yarn with another.

See DROPS lesson: How to measure your tension/gauge

See DROPS video: How to make a gauge tension swatch

The required amount of yarn is provided in grams, eg: 450 g. To calculate how many balls you’ll need you first need to know how many grams are in 1 ball (25g, 50g or 100g). This information is available if you click on the individual yarn quality on our pages. Divide the amount required with the amount of each ball. For example, if each ball is 50g (the most common amount), the calculation will be as follows: 450 / 50 = 9 balls.

The important thing when changing from one yarn to another is that the knitting/crochet tension remains the same. This is so that the measurements of the finished piece will be the same as on the sketch provided. It is easier to achieve the same knitting tension using yarns from the same yarn group. It is also possible to work with multiple strands of a thinner yarn to achieve the knitting tension of a thicker one. Please try our yarn converter. We recommend you to always work a test swatch.

Please NOTE: when changing yarn the garment might have a different look and feel to the garment in the photo, due to individual properties and qualities of each yarn.

See DROPS lesson: Can I use a different yarn than the one mentioned in the pattern?

All our yarns are categorised into yarn groups (from A to F) according to thickness and knitting tension – group A contains the thinnest yarns and group F the thickest. This makes it easier for you to find alternative yarns to our patterns, should you wish to switch yarn. All yarns within the same group have a similar knitting tension and can easily replace each other. However, different yarn qualities have different structures and properties which will give the finished work a unique look and feel.

Click here for an overview of the yarns in each yarn group

At the top of all our patterns you’ll find a link to our yarn converter, which is a helpful tool should you wish to use a different yarn than suggested. By filling in the yarn quality you wish to replace, the amount (in your size) and number of strands, the converter will present good alternative yarns with the same knitting tension. Additionally it will tell you how much you’ll require in the new qualities and whether you’ll need to work with multiple strands. Most skeins are 50g (some are 25g or 100g).

If the pattern is worked with multiple colours, every colour will have to be converted separately. Similarly, if the pattern is worked with several strands of different yarns (for example 1 strand Alpaca and 1 strand Kid-Silk) you will have to find alternatives for each, individually.

Click here to see our yarn converter

Since different yarns have different qualities and textures we have chosen to keep the original yarn in our patterns. However, you can easily find options among our available qualities by using our yarn converter, or simply pick a yarn from the same yarn group.

It is possible that some retailers still have discontinued yarns in stock, or that someone has a few skeins at home that they would like to find patterns for.

The yarn converter will provide both alternative yarn as well as required amount in the new quality.

If you think it's hard to decide what size to make, it can be a good idea to measure a garment you own already and like the size of. Then you can pick the size by comparing those measures with the ones available in the pattern's size chart.

You'll find the size chart at the bottom of the pattern.

See DROPS lesson: How to read size chart

The needle size provided in the pattern serves only as a guide, the important thing is to follow the knitting tension. And since knitting tension is very individual, you will have to adjust the needle size to ensure that YOUR tension is the same as in the pattern – maybe you’ll have to adjust 1, or even 2 needle sizes, up or down to achieve the correct tension. For this, we recommend that you work test swatches.

Should you work with a different knitting tension than the one provided, the measurements of the finished garment might deviate from the measurement sketch.

See DROPS lesson: How to measure your tension/gauge

See DROPS video: How to make a gauge tension swatch

Working a garment top-down provides more flexibility and room for personal adjustment. For example it is easier to try the garment on while working, as well as making adjustments to length of yoke and shoulder caps.

The instructions are carefully explaining every step, in the correct order. Diagrams are adjusted to the knitting direction and are worked as usual.

The diagram depicts all rows/rounds, and every stitch seen from the right side. It is read from bottom to top, from right to left. 1 square = 1 stitch.

When working back and forth, every other row is worked from the right side and every other row is worked from the wrong side. When working from the wrong side, the diagram will have to be worked reversed: from left to right, knit stitches are purled, purl stitches are knit etc.

When working in the round every round is worked from the right side and the diagram are worked from right to left on all rounds.

See DROPS lesson: How to read knitting diagrams

The diagram depicts all rows/rounds, and every stitch seen from the right side. It is worked from bottom to top, from right to left.

When working back and forth every other row is worked from the right side: from right to left and every other row is worked from the wrong side: from left to right.

When working in the round, every row in the diagram are worked from the right side, from right to left.

When working a circular diagram you start in the middle and work your way outwards, counter clockwise, row by row.

The rows usually start with a given number of chain stitches (equivalent to the height of the following stitch), this will either be depicted in the diagram or explained in the pattern.

See DROPS lesson: How to read crochet diagrams

Instructions for working several diagrams after each other on the same row/round, will often be written like so: “work A.1, A.2, A.3 a total of 0-0-2-3-4 times". This means you work A.1 once, then A.2 is worked once, and A.3 is repeated (in width) the number of times provided for your size – in this case like so: S = 0 times, M = 0 times, L=2 times, XL= 3 times and XXL = 4 times.

The diagrams are worked as usual: begin with the first row in A.1, then work the first row in A.2 etc.

See DROPS lesson: How to read knitting diagrams

See DROPS lesson: How to read crochet diagrams

The total width of the garment (from wrist-to-wrist) will be larger in the larger sizes, despite the actual sleeves being shorter. The larger sizes have longer sleeve caps and wider shoulders, so there will be a good fit in all sizes.

The measurement sketch/schematic drawing provides information regarding the full length of the garment. If it’s a jumper or a jacket the length is measured from the highest point on the shoulder (usually closest to the neckline), and straight down to the bottom of the garment. It is NOT measured from the tip of shoulder. Similarly, the length of yoke is measured from the highest point on the shoulder and down to where yoke is split into body and sleeves.

See DROPS lesson: How to read a schematic drawing

Diagrams are often repeated on the round or in height. 1 repeat is the diagram the way it appears in the pattern. If it says to work 5 repeats of A.1 in the round, then you work A.1 a total of 5 times after/next to each other in the round. If it says to work 2 repeats of A.1 vertically/in height you work the entire diagram once, then begin again at the start and work the entire diagram one more time.

Chain stitches are slightly narrower than other stitches and to avoid working the cast-on edge too tight, we simply chain more stitches to begin with. The stitch count will be adjusted on the following row to fit the pattern and measurement sketch.

The rib edge is more elastic and will contract slightly compared to, for example, stocking stitch. By increasing before the rib edge, you avoid a visible difference in width between the rib edge and the rest of the body.

It’s very easy to cast off too tightly, and by making yarn overs while casting off (and simultaneously casting these off) you avoid a too tight cast off edge.

See DROPS video: How to bind off with yarn overs (yo)

To achieve an even increase (or decrease) you can increase on, for example: every 3rd and 4th row alternately, like so: work 2 rows and increase on the 3rd row, work 3 rows and increase on the 4th. Repeat this until the increase is complete.

See DROPS lesson: Increase or decrease 1 st on every 3rd and 4th row alternately

Should you prefer to work in the round instead of back and forth, you may of course adjust the pattern. You’ll need to add steeks mid-front (usually 5 stitches), and follow the instructions. When you would normally turn and work from the wrong side, simply work across the steek and continue in the round. At the end you’ll cut the piece open, pick up stitches to work bands, and cover the cut edges.

See DROPS video: How to knit steeks and cut open

Should you prefer to work back and forth instead of in the round, you may of course adjust the pattern so you work the pieces separately and then assemble them at the end. Divide the stitches for the body in 2, add 1 edge stitch in each side (for sewing) and work the front and back pieces separately.

See DROPS lesson: Can I adapt a pattern for circular needles into straight needles?

Pattern repeats can vary slightly in the different sizes, in order to get the correct proportions. If you’re not working the exact same size as the garment in the photo, yours might deviate slightly. This has been carefully developed and adjusted so that the complete impression of the garment is the same in all sizes.

Make sure to follow instructions and diagrams for your size!

If you have found a pattern you like which is available in women’s size it’s not very difficult to convert it to men’s size. The biggest difference will be the length of sleeves and body. Start working on the women size that you think would fit across the chest. The additional length will be worked right before you cast off for the armhole/sleeve cap. If the pattern is worked top-down you can add the length right after the armhole or before the first decrease on sleeve.

Regarding additional yarn amount, this will depend on how much length you add, but it is better with a skein too many than too few.

All yarns will have excess fibres (from production) that might come off as lint or shedding. Brushed yarns (ie hairier yarns) have more of these loose, excess fibres, causing more shedding.

Shedding also depends on what is worn under or over the garment, and whether this pulls at the yarn fibres. It’s therefore not possible to guarantee that there will be no shedding

Below are some tips on how to get the best result when working with hairier yarns:

1. When the garment is finished (before you wash it) shake it vigorously so the looser hairs come off. NOTE: do NOT use a lint roller, brush or any method that pulls at the yarn.

2. Place the garment in a plastic bag and put it in your freezer - the temperature will cause the fibres to become less attached to each other, and excess fibres will come off easier.

3. Leave in the freezer for a few hours before taking it out and shaking it again.

4. Wash the garment according to the instructions on the yarn label.

Pilling is a natural process that happens to even the most exclusive of fibers. It's a natural sign of wear and tear that is hard to avoid, and that is most visible in high friction areas of your garment like a sweater's arms and cuffs.

You can make your garment look as new by removing the pilling, using a fabric comb or a pill/lint remover.

Still can't find the answer you need? Then scroll down and leave your question so one of our experts can try to help you. This will be done normally within 5 to 10 working days.
In the meantime, you can read the questions and answers that others have left to this pattern or join the DROPS Workshop on Facebook to get help from fellow knitters/crocheters!

You might also like...

Post a comment to pattern DROPS Baby 46-21

We would love to hear what you have to say about this pattern!

If you want to leave a question, please make sure you select the correct category in the form below, to speed up the answering process. Required fields are marked *.

Comments / Questions (2)

country flag Mo wrote:

What are the approximate dimensions of these two cute little figures? Thanks,

15.12.2023 - 21:06

DROPS Design answered:

Hi, the height of each of them is approximately 13 cm. Happy knitting!

17.12.2023 - 07:43

country flag Heidi Rønde Bitsch wrote:

Her mangler der nogle billeder. Det ligner at I har sat nogle hæklediagrammer ind ved en fejl.

15.12.2023 - 16:26