
Popular categories
Looking for a yarn?


|
||||||||||||||||||||||||||||||||||
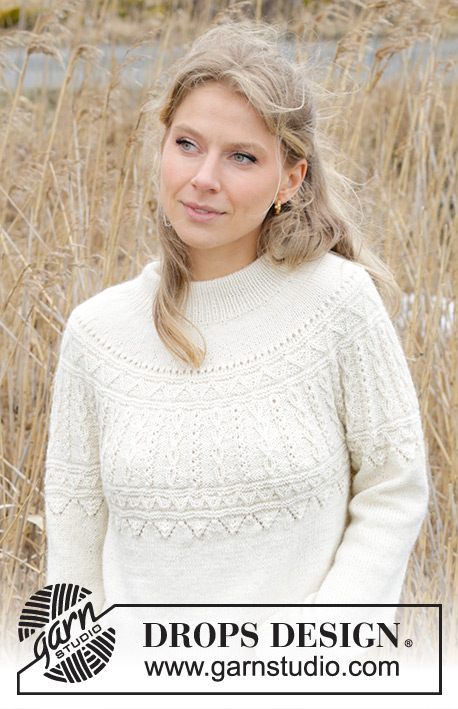
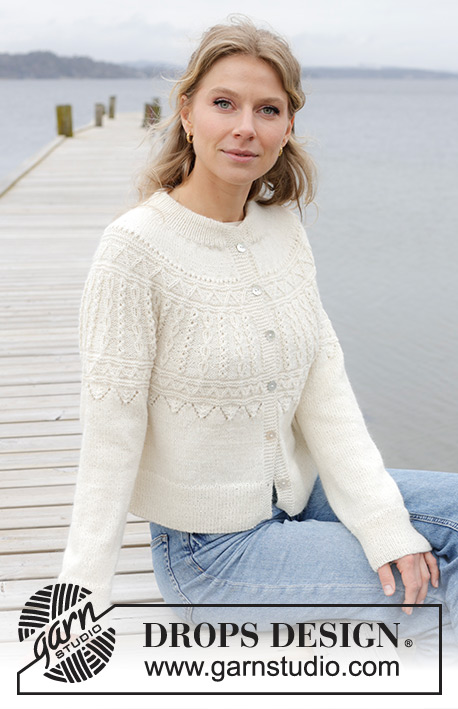
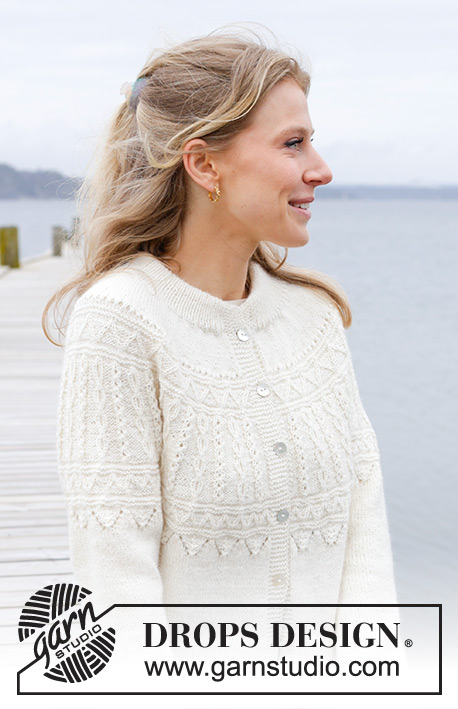
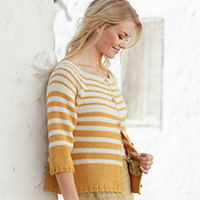
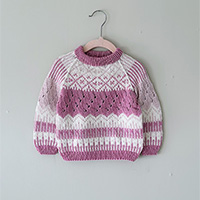
Avalanche Cardigan |
||||||||||||||||||||||||||||||||||
 |
 |
|||||||||||||||||||||||||||||||||
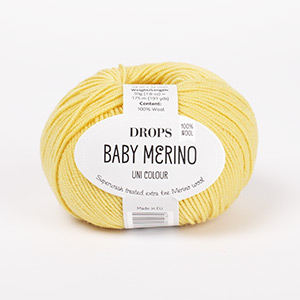
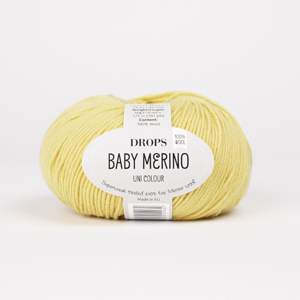
Knitted jacket in DROPS BabyMerino. The piece is worked top down with double neck, round yoke, relief-pattern and split in sides. Sizes S - XXXL.
DROPS 243-7 |
||||||||||||||||||||||||||||||||||
|
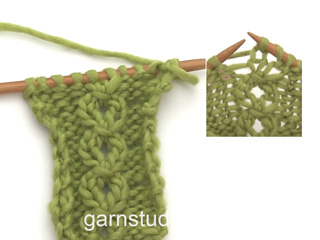
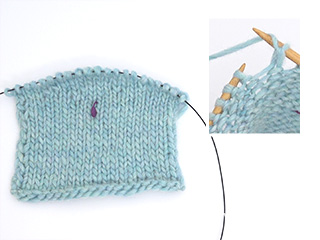
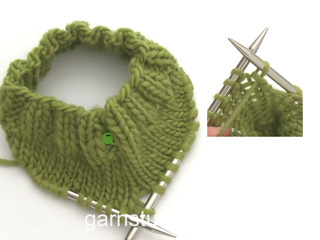
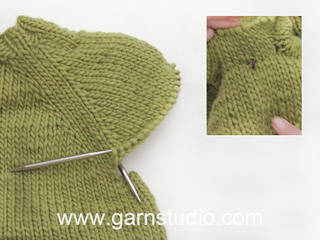
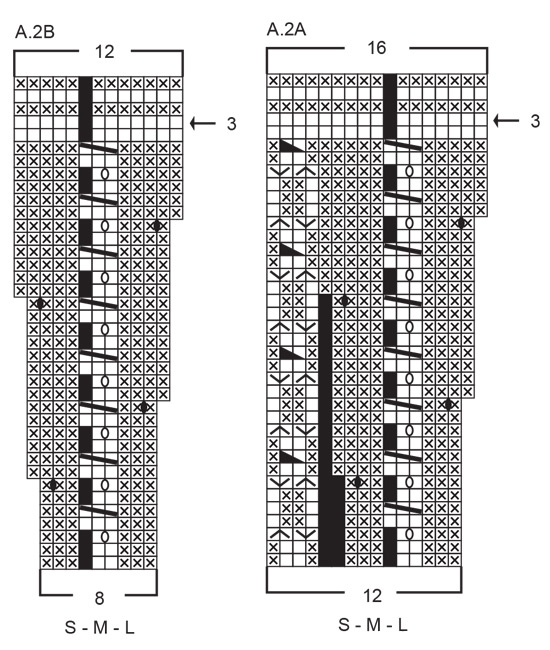
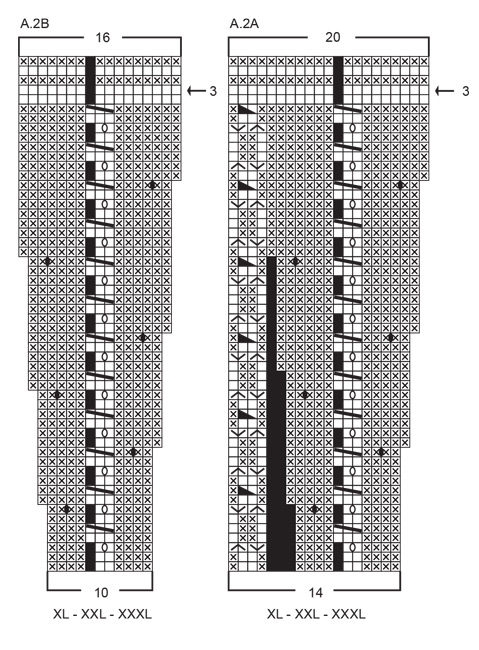
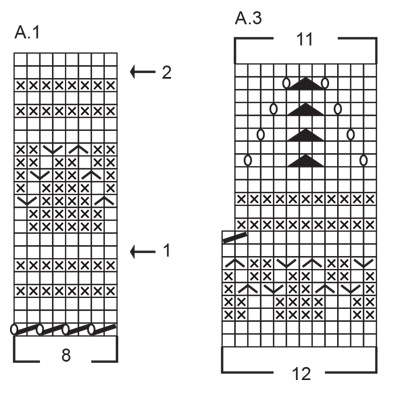
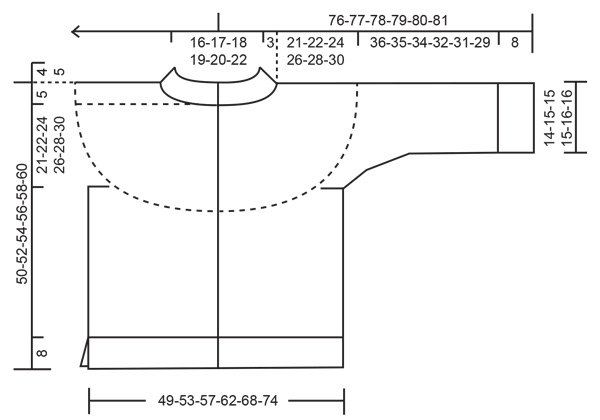
------------------------------------------------------- EXPLANATIONS FOR THE PATTERN: ------------------------------------------------------- GARTER STITCH (worked back and forth): Knit all rows. 1 ridge = knit 2 rows. ELEVATION (back of neck): To make the back of the neck slightly higher on a round yoke, you can work an elevation as described here. Skip this section if you do not want an elevation. Insert 1 marker in the middle stitch on the row. Start from the right side and knit 16-17-18-19-20-21 stitches past the marker-stitch, turn, tighten strand and purl 33-35-37-39-41-43 stitches back. Turn, tighten strand and knit 49-52-55-58-61-64 stitches, turn, tighten strand and purl 65-69-73-77-81-85 stitches back. Turn, tighten strand and knit 81-86-91-96-101-106 stitches, turn, tighten strand and purl 97-103-109-115-121-127 stitches. Turn, tighten strand, knit 1 row then purl 1 row (with the bands worked in garter stitch). Now work the yoke as described in the text. PATTERN: See diagrams A.1 to A.3. The diagrams show all rows in the pattern from the right side. Choose diagram for your size (applies to A.2). INCREASE TIP (evenly spaced): Increase 1 stitch by making 1 yarn over which is worked twisted on the next row/round to avoid a hole. DECREASE TIP (for sleeves): Decrease 1 stitch on each side of the marker-thread as follows: Work until there are 3 stitches left before the marker-thread, knit 2 together, knit 2 (marker-thread sits between these 2 stitches), slip 1 stitch knit-wise, knit 1 and pass the slipped stitch over the knitted stitch. BUTTONHOLES: Work buttonholes on the right band (when the garment is worn). Work from the right side when there are 4 stitches left on the row as follows: Make 1 yarn over, knit 2 together and knit 2. On the next row (wrong side), knit the yarn over to leave a hole. The first buttonhole is worked on the first knitted row after the neck, the other 5-5-5-6-6-6 buttonholes with approx. 7½-8-8½-7½-7½-8 cm = 2⅞"-3⅛"-3¼"-2⅞"-2⅞"-3⅛" between each one. ------------------------------------------------------- START THE PIECE HERE: ------------------------------------------------------- JACKET – SHORT OVERVIEW OF THE PIECE. The neck and yoke are worked back and forth with circular needle, from mid front and top down. You can work an elevation at the back of the neck if you wish. The yoke is divided for body and sleeves and the body continued back and forth with circular needle. The sleeves are worked in the round with short circular needle/double pointed needles, top down. DOUBLE NECK: Cast on 137-143-147-153-159-169 stitches with DROPS Baby Merino, using short circular needles size 2.5 and 3 MM = US 2.5 held together. Remove the needle size 3 MM = US 2.5 keeping stitches on needle size 2.5 MM = US 1.5 (this gives you an elastic cast-on edge). Work as follows from the right side: 1 GARTER STITCH – read description above, * knit 1, purl 1 *, work from *-* until there are 2 stitches left on the row, knit 1 and 1 garter stitch. Continue this rib back and forth for 4-4-4-5-5-5 cm = 1½"-1½"-1½"-2"-2"-2". Cast on 6 stitches for the bands at the end of the next 2 rows = 149-155-159-165-171-181 stitches. Continue the rib but with 7 band stitches in garter stitch on each side. When the rib measures 8-8-8-10-10-10 cm = 3⅛"-3⅛"-3⅛"-4"-4"-4" and the next row is from the right side, fold the neck double to the inside and work as follows: 7 band stitches in garter stitch, continue the rib but working every 4th stitch together with its corresponding stitch on the cast-on edge, until there are 7 stitches left, 7 band stitches in garter stitch. You now have a double neck. YOKE: Switch to circular needle size 3 MM = US 2.5. Work the first row as follows from the wrong side: 7 band stitches in garter stitch, purl until there are 7 stitches left and increase 34-36-36-38-40-42 stitches evenly over these stitches – read INCREASE TIP = 183-191-195-203-211-223 stitches. Insert 1 marker after the band at the beginning of the row – it will be used to measure the yoke. You can now work an ELEVATION in the back of the neck – read description above. Continue with the next section if you do not want an elevation. Work stockinette stitch back and forth with 7 band stitches in garter stitch on each side – remember the BUTTONHOLES on the right band – read description above. REMEMBER THE KNITTING GAUGE! When the yoke measures 3-4-6-2-3-4 cm = 1⅛"-1½"-2⅜"-¾"-1⅛"-1½" from the marker, increase 39-39-43-39-39-41 stitches evenly spaced – remember INCREASE TIP (do not increase over the bands) = 222-230-238-242-250-264 stitches. The increases on the relief-pattern are finished in sizes S, M and L. SIZES XL, XXL and XXXL: When the yoke measures 4-6-8 cm = 1½"-2⅜"-3⅛" from the marker, increase 36-36-38 stitches evenly spaced (do not increase over the bands) = 278-286-302 stitches. ALL SIZES: = 222-230-238-278-286-302 stitches. Continue with stockinette stitch and 7 band stitches in garter stitch on each side until the yoke measures 4-5-7-5-7-9 cm = 1½"-2"-2¾"-2"-2¾"-3½" from the marker. Work as follows from the right side: 7 band stitches in garter stitch, work A.1 26-27-28-33-34-36 times and 7 band stitches in garter stitch. Continue this pattern. AT THE SAME TIME on each row marked with an arrow in A.1, increase as follows (do not increase over the bands): Arrow-1: Increase 40-48-56-40-48-56 stitches evenly spaced = 262-278-294-318-334-358 stitches. Arrow-2: Increase 48-44-52-42-54-58 stitches evenly spaced = 310-322-346-360-388-416 stitches. When A.1 is finished, the yoke measures approx. 10-11-13-11-13-15 cm = 4"-4⅜"-5⅛"-4⅜"-5⅛"-6" from the marker. Work as follows from the right side: 7 band stitches in garter stitch, work A.2A 24-25-27-24-26-28 times, A.2B, 7 band stitches in garter stitch. Continue this pattern according to the diagrams. When you reach the row marked with arrow-3 there are 410-426-458-510-550-590 stitches. Work this row and increase 1-7-11-3-10-3 stitches evenly spread = 411-433-469-513-560-593 stitches. When A.2 is finished, the yoke measures approx. 21-22-24-26-28-30 cm = 8¼"-8¾"-9½"-10¼"-11"-11¾" from the marker. Now divide for the body and sleeves as follows: Work 7 band stitches in garter stitch, work the first row in A.3 over the next 59-64-69-74-82-90 stitches and increase 6-7-7-8-8-9 stitches evenly over these stitches (= 72-78-83-89-97-106 stitches on the front piece), place the next 80-80-89-100-109-109 stitches on 1 thread for the sleeve, cast on 8-8-10-10-12-12 stitches under the sleeve, work the first row in A.3 over the next 119-131-139-151-164-181 stitches and increase 11-11-13-13-16-17 stitches evenly over these stitches (= 130-142-152-164-180-198 stitches on the back piece), place the next 80-80-89-100-109-109 stitches on 1 thread for the sleeve, cast on 8-8-10-10-12-12 stitches under the sleeve, work the first row in A.3 over the next 59-64-69-74-82-90 stitches and increase 6-7-7-8-8-9 stitches evenly over these stitches, 7 band stitches in garter stitch (= 72-78-83-89-97-106 stitches on the front piece). The body and sleeves are finished separately. The piece is now measured from here! BODY: = 290-314-338-362-398-434 stitches. Work as follows from the wrong side: 7 band stitches in garter stitch, work A.3 23-25-27-29-32-35 times, 7 band stitches in garter stitch. Continue this pattern. When A.3 is finished there are 267-289-311-333-366-399 stitches. Insert 2 marker-threads, each 70-75-81-86-95-103 stitches in from each side (= 127-139-149-161-176-193 stitches between the marker-threads on the back piece). Allow them to follow your work onwards; they are used when working the split in each side. Continue with stockinette stitch and 7 band stitches in garter stitch on each side. When the body measures 16-17-17-17-17-17 cm = 6¼"-6¾"-6¾"-6¾"-6¾"-6¾" from the division and the next row is from the right side, divide at both marker threads and finish the front and back pieces separately. LEFT FRONT PIECE: Place the 70-75-81-86-95-103 stitches for the left front piece on circular needle size 2.5 MM = US 1.5. Knit 1 row from the right side and increase 23-26-26-31-32-36 stitches evenly spaced (do not increase over the band) = 93-101-107-117-127-139 stitches. Work as follows from the wrong side: 3 stitches in garter stitch, * purl 1, knit 1 *, work from *-* until there are 8 stitches left, purl 1 and 7 band stitches in garter stitch. Continue this rib for 8 cm = 3⅛". Bind off – you can use Italian bind-off. The jacket measures approx. 50-52-54-56-58-60 cm = 19¾"-20½"-21¼"-22"-22¾"-23⅝" from the shoulder. RIGHT FRONT PIECE: Place the 70-75-81-86-95-103 stitches for the right front piece on circular needle size 2.5 MM = US 1.5. Knit 1 row from the right side and increase 23-26-26-31-32-36 stitches evenly spaced (do not increase over the band) = 93-101-107-117-127-139 stitches. Work as follows from the wrong side: 7 band stitches in garter stitch, * purl 1, knit 1 *, work from *-* until there are 4 stitches left, purl 1 and 3 stitches in garter stitch. Continue this rib for 8 cm = 3⅛". Bind off in the same way as on the left front piece. BACK PIECE: Place the 127-139-149-161-176-193 m stitches for the back piece on circular needle size 2.5 MM = US 1.5. Knit 1 row from the right side and increase 46-48-52-58-65-70 stitches evenly spaced = 173-187-201-219-241-263 stitches. Work as follows from the wrong side: 3 stitches in garter stitch, * purl 1, knit 1 *, work from *-* until there are 4 stitches left, purl 1 and 3 stitches in garter stitch. Continue this rib for 8 cm = 3⅛". Bind off in the same way as on the front pieces. SLEEVES: Start mid-under one sleeve, use short circular needle or double pointed needles size 3 MM = US 2.5 and knit up 1 stitch in each of the last 4-4-5-5-6-6 cast-on stitches, place the 80-80-89-100-109-109 stitches from the thread on short circular/double pointed needles size 3 MM = US 2.5, work the first row in A.3 and increase 8-8-9-10-11-11 stitches evenly, knit up 1 stitch in each of the first 4-4-5-5-6-6 cast-on stitches = 96-96-108-120-132-132 stitches. Work sleeve worked in the round. Insert 1 marker-thread at the beginning of the round (in the middle of the 8-8-10-10-12-12 new stitches under the sleeve) – allow the thread to follow your work onwards; it is used when decreasing under the sleeve. Work A.3 8-8-9-10-11-11 times on the round. When A.3 is finished, 1 stitch has been decreased in each repeat (8-8-9-10-11-11 decreased stitches). Continue with stockinette stitch. AT THE SAME TIME, when the sleeve measures 2 cm = ¾", decrease 1 stitch on each side of the marker – read DECREASE TIP. Decrease like this every 2nd round a total of 2-0-3-7-10-10 times, then every 4th round 6-6-8-8-8-8 times = 72-76-77-80-85-85 stitches. Continue working until the sleeve measures 36-35-34-32-31-29 cm = 14¼"-13¾"-13⅜"-12½"-12¼"-11⅜" from the division (or to desired length. There is approx. 8 cm = 3⅛"). Knit 1 round and increase 26-26-29-30-31-31 stitches evenly spaced = 98-102-106-110-116-116 stitches. Change to double pointed needles size 2.5 MM = US 1.5 and work rib (knit 1, purl 1) for 8 cm = 3⅛". Bind off in the same way as on the body. Work the other sleeve in the same way. ASSEMBLY: Sew together the openings on the bands with small stitches. Sew the buttons onto the left band. |
||||||||||||||||||||||||||||||||||
Diagram explanations |
||||||||||||||||||||||||||||||||||
|
||||||||||||||||||||||||||||||||||
|
||||||||||||||||||||||||||||||||||
|
||||||||||||||||||||||||||||||||||
|
||||||||||||||||||||||||||||||||||
|
||||||||||||||||||||||||||||||||||
|
Have you made this or any other of our designs? Tag your pictures in social media with #dropsdesign so we can see them! Do you need help with this pattern?You'll find tutorial videos, a Comments/Questions area and more by visiting the pattern on garnstudio.com. © 1982-2024 DROPS Design A/S. We reserve all rights. This document, including all its sub-sections, has copyrights. Read more about what you can do with our patterns at the bottom of each pattern on our site. |
||||||||||||||||||||||||||||||||||

With over 40 years in knitting and crochet design, DROPS Design offers one of the most extensive collections of free patterns on the internet - translated to 17 languages. As of today we count 304 catalogs and 11422 patterns - 11417 of which are translated into English (US/in).
We work hard to bring you the best knitting and crochet have to offer, inspiration and advice as well as great quality yarns at incredible prices! Would you like to use our patterns for other than personal use? You can read what you are allowed to do in the Copyright text at the bottom of all our patterns. Happy crafting!
Comments / Questions (23)
Hej Jeg kan slet ikke få A1 til at passe. Jeg har prøvet om og om igen. Den lille snoning kommer slet ikke til at ligne billedet, hvor det jo nærmest bare ligner retmasker, der danner V-er. Jeg håber meget, at I kan hjælpe mig. Venlig hilsen Hanne
26.03.2024 - 04:30DROPS Design answered:
Hej Hanne, prøv at kun strikke de 8 masker i A.1, du flytter helt enkelt bare retmasken (ifølge symbolforklaringen). Du starter nederst i højre side og strikker mod venstre, de små snoninger strikkes fra retsiden og på pinden tilbage (næste pind i diagrammet) strikkes de modsat, så det bliver til vrang på retsiden :)
04.04.2024 - 15:31Når jeg er klar til at dele bærestykket og skal tage masker af til forstykke. Skal jeg tage 8 masker ud fordelt over 74 masker. Det har jeg gjort og skal så ende med 89 masker, det regnestykke kan jeg ikke få til at passe. Jeg skal strikke første p. I a3 og det er en glat uden udt. Er der noget. Jeg overser?
24.03.2024 - 11:46DROPS Design answered:
Hej Helle, jeg kan ikke finde de 89 masker du beskriver... Hvilken størrelse strikker du og hvor er du i opskriften?
03.04.2024 - 15:05Når jeg er ferdig med a1 skal jeg strikke a.2a skal jeg strikke det sammen med a.2b eller bare a.2a ut pinnen?
15.03.2024 - 12:55DROPS Design answered:
Hej Trine, ja du gentager A.2A det antal gange som passer til din størrelse og så afslutter du omgangen med A.2B inden kantmaskerne :)
19.03.2024 - 12:197 oczek obszycia przodu ściegiem francuskim, powtórzyć 24-25-27-24-26-28 razy schemat A.2A, przerobić A.2B i zakończyć przerabiając 7 oczek obszycia przodu ściegiem francuskim. Dalej przerabiać tak samo zgodnie ze schematami. Gdy dojdziemy do rzędu oznaczonego strzałką-3 na drucie jest 410-426-458-510-550-590 oczek. Przepraszam, ale nie rozumiem kiedy przerabiać schemat A.2A i A.2B
09.03.2024 - 15:33DROPS Design answered:
Witaj Edyto, na prawej stronie robótki przerabiasz 1 schemat A.2B przed 7 ostatnimi oczkami ściegiem francuskim jak w opisie (7 oczek obszycia przodu ściegiem francuskim, powtórzyć 24-25-27-24-26-28 razy schemat A.2A, przerobić A.2B i zakończyć przerabiając 7 oczek obszycia przodu ściegiem francuskim). Za to na lewej stronie przerabiasz: 7 oczek obszycia przodu ściegiem francuskim, 1 raz schemat A.2B, 24-25-27-24-26-28 razy schemat A.2A i 7 oczek obszycia przodu ściegiem francuskim. Jak czytać schematy w robótce na drutach znajdziesz TUTAJ. Pozdrawiamy!
11.03.2024 - 08:42Ich stricke Grösse M. Ich habe A1 gestrickt und bei Pfeil 2 44M zugenommen=322. Dann folgt A2 und passt nicht. 25 × 12M =300+ 14 RM = 314 M und nicht 322. Wo ist mein Fehler?
05.03.2024 - 09:05DROPS Design answered:
Liebe Claudia, am Ende der Reihe wird man A.2B stricken, damit das Muster symmetrisch wird, dh so sollen Sie stricken: 7 Blenden-Maschen, die 12 Maschen A.2A 25 Mal wiederholen (= über die nächsten 300 Maschen), dann die 8 Maschen A.2B stricken und 7 Blenden-Maschen 7+300+8+7=322 Maschen. Viel Spaß beim Stricken!
05.03.2024 - 15:28Bonjour. Quand je passe du diagramme A1 à A2 je ne comprends pas. J'ai 322 mailles (taillesM). En suivant les diagrammes et le patron, quand j'additionne les 14 mailles des bords + (12×25) + 8 ça fait bien 322. Pourtant il y a des cases noires sur le diagrammes, et quand je ré aditionne ça fait moins que 322 mailles alors qu'il est spécifié qu'on doit faire 25 fois le A2A. Je ne comprends pas ce que que dois faire des mailles manquantes... Merci Amélie
17.02.2024 - 12:16Amélie answered:
Autant pour moi j'ai compté directement les cases sur le diagramme et ça fait 12 + les 3 cases noires merci 🙂
17.02.2024 - 12:32Bonjour je peux tricoter les manches en allers retours ?
08.01.2024 - 14:51DROPS Design answered:
Bonjour Amel, tout à fait, montez la moitié des mailles à relever sous la manche + 1, tricotez les mailles des manches et montez l'autre moitié des mailles à relever + 1 - les 2 m en plus sont pour les coutures. Retrouvez plus d'infos ici. Bon tricot!
09.01.2024 - 07:09Enligt mönstret ska det var Baby Merinoull med stickfastighet 26 x 34. Enligt garnet så är det 24x 32 . Något måste vara fel för det stämmer inte. Vilket garn ska det vara som passar till mönstret.
27.12.2023 - 17:27DROPS Design answered:
Hej Kerstin, jo det stemmer, design har valgt at strikke denne på 26 masker på 10 cm i DROPS Baby Merino :)
02.01.2024 - 12:11Stickar A:3 på ärmar. När A:3 är färdigstickat ska jag ha minskat 1 maska i varje rapport. Samtidigt ska jag efter 2 cm från delningen minska mitt under ärmen först på vartannat varv och sedan på vart fjärde. Detta går ju inte ihop med rapporterna för efter 2 cm har jag ju inte kommit fram till slätstickning. Hur ska jag göra? Vänl hälsn
17.12.2023 - 13:16DROPS Design answered:
Hei Catharina. Mønstret vil ikke stemme 100% under ermet i A.3, men dette vil ikke vises ved brukt. mvh DROPS Design
18.12.2023 - 09:36Saknar diagram A3
10.12.2023 - 16:49DROPS Design answered:
Hei Ingela. Du finner diagram A.3 under A.2A og til høyre fra diagram A.1. mvh DROPS Design
11.12.2023 - 12:55