
Popular categories
Looking for a yarn?


|
||||||||||||||||
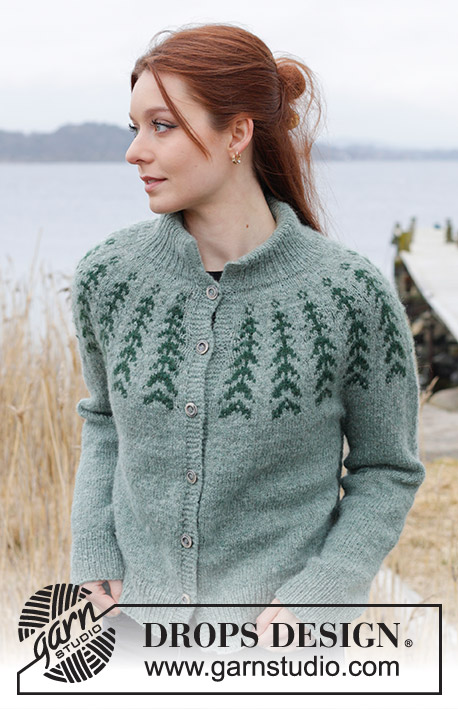
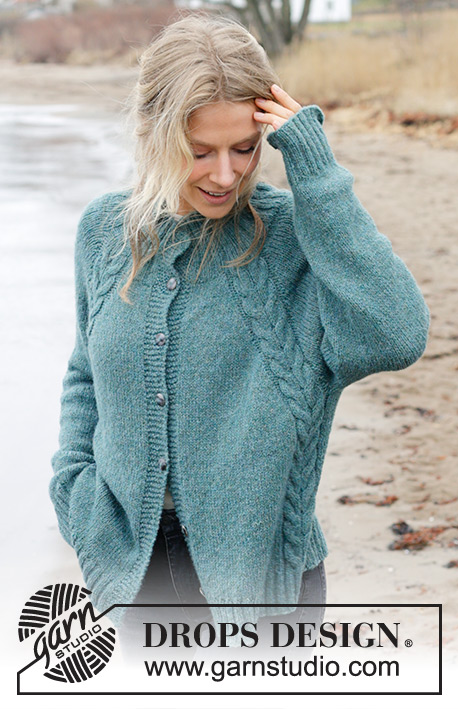
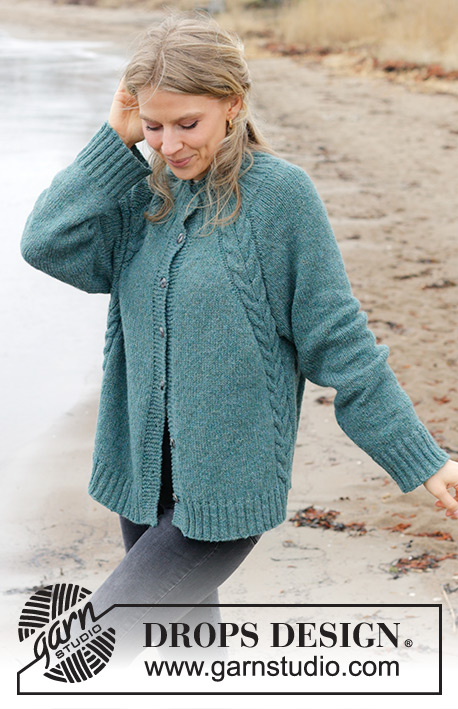
Emerald Lake Cardigan |
||||||||||||||||
 |
 |
|||||||||||||||
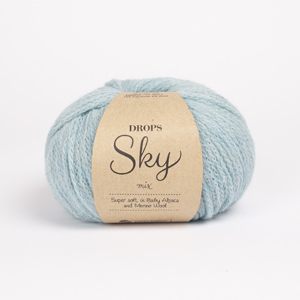
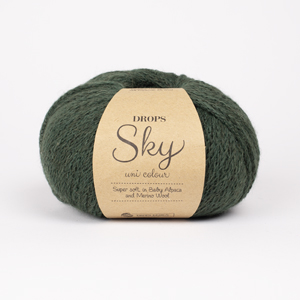
Knitted jacket in DROPS Sky. The piece is worked top down with high neck, raglan, cables and split in sides. Sizes XS - XXL.
DROPS 244-11 |
||||||||||||||||
|
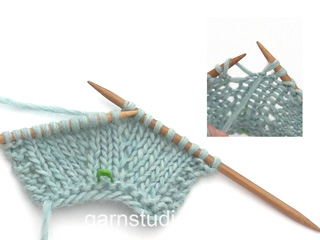
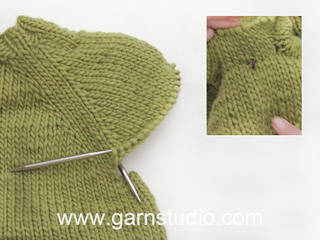
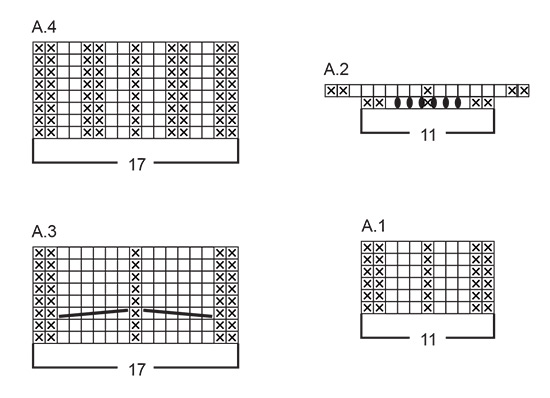
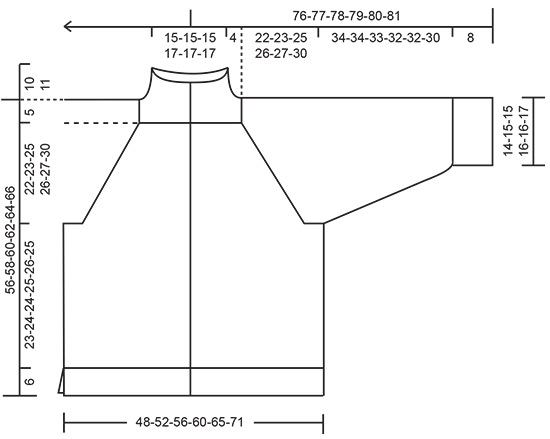
------------------------------------------------------- EXPLANATIONS FOR THE PATTERN: ------------------------------------------------------- GARTER STITCH (worked back and forth): Knit all rows. 1 ridge = knit 2 rows. PATTERN: See diagrams A.1 to A.4. The diagrams show all rows in the pattern from the right side. RAGLAN: All increases are worked from the right side! Increase 1 stitch before/after each A.2/A.3 by making 1 yarn over. The yarn overs are then worked from the wrong side as follows: BEFORE A.2/A.3: Purl the back loop. There is no hole. AFTER A.2/A.3: Slip yarn over onto right needle knit-wise, replace it onto the left needle the other way around (the yarn over is now twisted), purl the yarn over. There is no hole. INCREASE TIP: Increase 1 stitch by making 1 yarn over which is worked twisted on the next row/round to avoid a hole. DECREASE TIP (for sleeves): Decrease 1 stitch on each side of the marker-thread as follows: Work until there are 3 stitches left before the marker-thread, knit 2 together, knit 2 (marker-thread sits between these 2 stitches), slip 1 stitch knit-wise, knit 1 and pass the slipped stitch over the knitted stitch. BUTTONHOLES: Work buttonholes on the right band (when the garment is worn). Work from the right side when there are 5 stitches left on the row as follows: Make 1 yarn over, knit 2 together and knit 3. On the next row (wrong side), knit the yarn over to leave a hole. The first buttonhole is worked on the first row after the rib on the neck. Then work the other 5-5-6-6-6-6 buttonholes with approx. 8½-9-8-8-8½-9 cm = 3¼"-3½"-3⅛"-3⅛"-3¼"-3½" between each one. ------------------------------------------------------- START THE PIECE HERE: ------------------------------------------------------- JACKET – SHORT OVERVIEW OF THE PIECE. The neck and yoke are worked back and forth with circular needle, from mid front and top down. The yoke is divided for body and sleeves and the body continued back and forth with circular needle. The sleeves are worked in the round with double pointed needles/short circular needle. HIGH NECK: Cast on 130-130-130-142-142-142 stitches with circular needle size 4.5 MM = US 7 and DROPS Sky. Change to circular needle size 3 MM = US 2.5. Purl 1 row from the wrong side. Work as follows from the right side: 8 band stitches in GARTER STITCH – read description above, * knit 2, purl 2 *, work from *-* a total of 1-1-1-2-2-2 times, knit 2, A.1, * knit 2, purl 2 *, work from *-* 4 more times, knit 2, A.1, * knit 2, purl 2 *, work from *-* a total of 3-3-3-4-4-4 times, knit 2, A.1, * knit 2, purl 2 *, work from *-* 4 more times, knit 2, A.1, * knit 2, purl 2 *, work from *-* a total of 1-1-1-2-2-2 times, knit 2, 8 band stitches in garter stitch. Continue this rib back and forth for 10-10-10-11-11-11 cm = 4"-4"-4"-4⅜"-4⅜"-4⅜" – finishing after a row from the wrong side. YOKE: Change to circular needle size 4.5 MM = US 7. Insert 1 marker after the band at the beginning of the row. The yoke is measured from this marker. Work as follows from the right side: 8 band stitches in garter stitch, knit 6-6-6-10-10-10 and decrease 2-0-0-3-1-1 stitches evenly spaced over these stitches, increase 1 stitch for RAGLAN – read description above, work A.2 over A.1, increase 1 stitch for raglan, knit 22 and decrease 2 stitches evenly spaced, increase 1 stitch for raglan, work A.2 over A.1, increase 1 stitch for raglan, knit 14-14-14-18-18-18 and decrease 6-2-2-4-0-0 stitches evenly spaced over these stitches, increase 1 stitch for raglan, work A.2 over A.1, increase 1 stitch for raglan, knit 22 and decrease 2 stitches evenly spaced over these stitches, increase 1 stitch for raglan, work A.2 over A.1, increase 1 stitch for raglan, knit 6-6-6-10-10-10 and decrease 2-0-0-3-1-1 stitches evenly spaced over these stitches, 8 band stitches in garter stitch – remember the BUTTONHOLES on the right band – read description above. You have increased 8 stitches for raglan = 148-156-156-160-168-168 stitches. Work back from the wrong side with 8 band stitches in garter stitch on each side, stockinette stitch and the last row in A.2 in each transition between the body and sleeves – remember to work the yarn overs as described under RAGLAN. Continue this pattern but with A.3 over each A.2. Repeat A.3 in height. REMEMBER THE KNITTING GAUGE! Continue increasing for RAGLAN every 2nd row (each row from the right side) a total of 7-12-15-14-13-9 times, including the first increase after the neck = 196-244-268-264-264-232 stitches. Continue to increase for raglan every 2nd row but every 2nd increase is only on the front and back pieces, i.e., increase on the front and back pieces every 2nd row and on the sleeves every 4th row (alternately 4 and 8 increased stitches). Increase like this 22-18-18-20-22-30 times on the front and back pieces and 11-9-9-10-11-15 times on the sleeves. There are 328-352-376-384-396-412 stitches and the yoke measures approx. 22-23-25-26-27-30 cm = 8¾"-9"-9¾"-10¼"-10⅝"-11¾" from the marker by the neck. Now divide for the body and sleeves: Work 58-61-64-66-69-73 stitches as before (front piece), place the next 56-62-68-68-68-68 stitches on 1 thread for the sleeve, cast on 8-10-12-16-20-24 stitches (= in side under sleeve), work 100-106-112-116-122-130 stitches (back piece), place the next 56-62-68-68-68-68 stitches on 1 thread for the sleeve, cast on 8-10-12-16-20-24 stitches (= in side under sleeve), work the last 58-61-64-66-69-73 stitches (front piece). The body and sleeves are finished separately. The piece is now measured from here! BODY: = 232-248-264-280-300-324 stitches. Insert 1 marker-thread in the middle of the 8-10-12-16-20-24 stitches cast on under each sleeve. Allow the threads to follow your work onwards – they are used for the split in each side. Continue stockinette stitch back and forth with 8 band stitches in garter stitch on each side and A.3 as before (the 8-10-12-16-20-24 cast-on stitches under each sleeve are worked in stockinette stitch). When the body measures 23-24-24-25-26-25 cm = 9"-9½"-9½"-9¾"-10¼"-9¾" from the division – with 2 or 4 rows after the last cable and the next row from the wrong side, divide for the split in each side and finish each piece separately. RIGHT FRONT PIECE: = 62-66-70-74-79-85 stitches. Work from the wrong side as follows: 8 band stitches in garter stitch, purl 33-36-39-41-44-48 and increase 5-6-7-5-6-6 stitches evenly spaced over these stitches – read INCREASE TIP, work A.4 over A.3, purl 3-4-5-7-9-11 and increase 0-3-2-4-2-4 stitches evenly spaced over these stitches, 1 stitch in garter stitch = 67-75-79-83-87-95 stitches. Change to circular needle size 3 MM = US 2.5. Work as follows from the right side: SIZE XS: 2 stitches in garter stitch, knit 2, A.4, * knit 2, purl 2 *, work from *-* 8 more times, knit 2 and 8 band stitches in garter stitch. Continue this rib back and forth for 6 cm = 2⅜". Bind off a little loosely. The jacket measures approx. 56 cm = 22" from the shoulder. SIZES S, M, L, XL and XXL: 2 stitches in garter stitch, * knit 2, purl 2 *, work from *-* a total of 1-1-2-2-3 times, knit 2, A.4, * knit 2, purl 2 *, work from *-* a total of 10-11-11-12-13 times, knit 2 and 8 band stitches in garter stitch. Continue this rib back and forth for 6 cm = 2⅜". Bind off a little loosely. The jacket measures approx. 56-58-60-62-64-66 cm = 22"-22¾"-23⅝"-24⅜"-25¼"-26" from the shoulder. LEFT FRONT PIECE: = 62-66-70-74-79-85 stitches. Work from the wrong side as follows: 1 stitch in garter stitch, purl 3-4-5-7-9-11 and increase 0-3-2-4-2-4 stitches evenly spaced over these stitches, A.4, purl 33-36-39-41-44-48 and increase 5-6-7-5-6-6 stitches evenly spaced over these stitches, 8 band stitches in garter stitch = 67-75-79-83-87-95 stitches. Change to circular needle size 3 MM = US 2.5. Work as follows from the right side: SIZE XS: 8 band stitches in garter stitch, * knit 2, purl 2 *, work from *-* 8 more times, knit 2, A.4, knit 2 and 2 stitches in garter stitch. Continue this rib back and forth for 6 cm = 2⅜". Bind off a little loosely. SIZES S, M, L, XL and XXL: 8 band stitches in garter stitch, * knit 2, purl 2 *, work from *-* a total of 10-11-11-12-13 times, knit 2, A.4, * knit 2, purl 2 *, work from *-* a total of 1-1-2-2-3 times, knit 2 and 2 stitches in garter stitch. Continue this rib back and forth for 6 cm = 2⅜". Bind off a little loosely. BACK PIECE: = 108-116-124-132-142-154 stitches. Work from the wrong side as follows: 1 stitch in garter stitch, purl 3-4-5-7-9-11 and increase 0-3-2-4-2-4 stitches evenly spaced over these stitches, A.4, purl 66-72-78-82-88-96 and increase 8-10-12-12-14-14 stitches evenly spaced over these stitches, A.4, purl 3-4-5-7-9-11 and increase 0-3-2-4-2-4 stitches evenly spaced over these stitches, 1 stitch in garter stitch = 116-132-140-152-160-176 stitches. Change to circular needle size 3 MM = US 2.5. Work as follows from the right side: SIZE XS: 2 stitches in garter stitch, knit 2, A.4, * knit 2, purl 2 *, work from *-* 17 more times, knit 2, A.4, knit 2 and 2 stitches in garter stitch. Continue this rib back and forth for 6 cm = 2⅜". Bind off a little loosely. SIZES S, M, L, XL and XXL: 2 stitches in garter stitch, * knit 2, purl 2 *, work from *-* a total of 1-1-2-2-3 times, knit 2, A.4, * knit 2, purl 2 *, work from *-* a total of 20-22-23-25-27 times, knit 2, A.4, * knit 2, purl 2 *, work from *-* a total of 1-1-2-2-3 times, knit 2 and 2 stitches in garter stitch. Continue this rib back and forth for 6 cm = 2⅜". Bind off a little loosely. SLEEVES: Place the 56-62-68-68-68-68 stitches from the thread on the one side of the piece on short circular needle/double pointed needles size 4.5 MM = US 7 and knit up 1 stitch in each of the 8-10-12-16-20-24 stitches cast on under the sleeve = 64-72-80-84-88-92 stitches. Insert a marker-thread mid-under the sleeve. Start at the marker-thread and work stockinette stitch in the round. When the sleeve measures 4-4-3-3-2-2 cm = 1½"-1½"-1⅛"-1⅛"-¾"-¾", decrease 2 stitches under the sleeve – read DECREASE TIP. Decrease like this every 8-4-3-2½-2½-2 cm = 3⅛"-1½"-1⅛"-1"-1"-¾" a total of 4-7-10-11-12-13 times = 56-58-60-62-64-66 stitches. Continue working until the sleeve measures 34-34-33-32-32-30 cm = 13⅜"-13⅜"-13"-12½"-12½"-11¾" from the division. Knit 1 round and increase 12-14-16-18-16-18 stitches evenly spaced – remember INCREASE TIP = 68-72-76-80-80-84 stitches. Change to double pointed needles size 3 MM = US 2.5 and work rib (knit 2, purl 2) for 8 cm = 3⅛". Bind off a little loosely. The sleeve measures approx. 42-42-41-40-40-38 cm = 16½"-16½"-16⅛"-15¾"-15¾"-15" from the division. Work the other sleeve in the same way. ASSEMBLY: Sew the buttons onto the left band. If you want a double neck, fold the rib to the inside and sew down with a couple of stitches in each raglan-line. |
||||||||||||||||
Diagram explanations |
||||||||||||||||
|
||||||||||||||||
|
||||||||||||||||
|
||||||||||||||||
|
Have you made this or any other of our designs? Tag your pictures in social media with #dropsdesign so we can see them! Do you need help with this pattern?You'll find tutorial videos, a Comments/Questions area and more by visiting the pattern on garnstudio.com. © 1982-2024 DROPS Design A/S. We reserve all rights. This document, including all its sub-sections, has copyrights. Read more about what you can do with our patterns at the bottom of each pattern on our site. |
||||||||||||||||


With over 40 years in knitting and crochet design, DROPS Design offers one of the most extensive collections of free patterns on the internet - translated to 17 languages. As of today we count 304 catalogs and 11422 patterns - 11417 of which are translated into English (US/in).
We work hard to bring you the best knitting and crochet have to offer, inspiration and advice as well as great quality yarns at incredible prices! Would you like to use our patterns for other than personal use? You can read what you are allowed to do in the Copyright text at the bottom of all our patterns. Happy crafting!
Comments / Questions (10)
Bonjour, Je trouve ce modèle sympa, mais il n'y a pas la taille 3XL. J'aimerais savoir si ce modèle taille grand s'il vous plaît ? Si oui, pensez-vous que la taille 2XL conviendrait? Merci d'avance pour vôtre réponse.
03.05.2024 - 13:04DROPS Design answered:
Bonjour Tigresse, pour trouver votre taille, mesurez un vêtement similaire que vous avez et dont vous aimez la forme et comparez ces mesures à celles du schéma en bas de page; retrouvez ici plus d'infos sur les tailles, et tous les modèles en 3XL ici, n'hésitez pas à ajouter des filtres si besoin. Bon tricot!
03.05.2024 - 15:47Jammer dat de fout in de berekening van de hals niet is gecorrigeerd! Hopelijk wordt dit alsnog gedaan en hoeven de volgende breisters het niet uit te halen zoals ik nu heb moeten doen.
19.12.2023 - 13:59Thank you. i am trying to know what is considered the front piece and the back piece there are 8 raglan increase places, but which are the 2 front and the 2 back...it is hard to tell after which parts?..
12.12.2023 - 17:34DROPS Design answered:
Dear Julia, you work from one band to the other band. So the first stitches are the left front piece, 1st raglan line, left sleeve stitches, 2nd raglan line, back piece, 3rd raglan line, right sleeve stitches, 4th raglan line, right front piece. The increases are worked on each side of A.2. So, the increases for the body would be: before A.2 in the 1st raglan line (left front piece), after A.2 in the 2nd raglan line (= back piece), before A.2 in the 3rd raglan line (= back piece), after A.2 in the 4th raglan line (= right front piece). Happy knitting!
17.12.2023 - 17:59Hello, I am knitting the yoke and am at "Continue to increase for raglan every 2nd row but every 2nd increase is only on the front and back pieces, i.e., increase on the front and back pieces every 2nd row and on the sleeves every 4th row (alternately 4 and 8 increased stitches). " where is the delineation of front and the back .... i know the sleeves are where the "increases for raglan" are done but where do i do the increases for front and back only every 2nd row? thx
12.12.2023 - 15:16DROPS Design answered:
Daer Julia, you will continue increasing for raglan just as before, but you will now increase alternately 4 sts (front pieces and back piece only) and 8 sts (front pieces, sleeves and back piece, just as before). This means for body increase at the end of left front piece and back piece and increase at the beg of back piece and right front piece. Happy knitting!
12.12.2023 - 17:08De berekening bij de hoge hals klopt niet. Er staat een rekenfout in de vertaling. Hierdoor missen ee 8 steken. Daar waar staat dat *-* 4 x herhaald moet worden staat in de originele versie dat dit 5x herhaald moet worden. In dat geval klopt het wel.
06.10.2023 - 18:53Hallo, ich verstehe leider nicht wo die Vorderteile bzw. das Rückenteil anfängen bzw. aufhören. Und deshalb verstehe ich auch das nicht: "Dann die Raglanzunahmen in jeder 2. Reihe weiterarbeiten, aber bei jedem 2. Mal, wenn zugenommen wird, nur an den Vorderteilen/am Rückenteil zunehmen. D.h. an den Vorderteilen/am Rückenteil wird weiter in jeder 2. Reihe zugenommen und an den Ärmeln nur noch in jeder 4. Reihe". Ist vor A3 jede 2. Reihe und nach A3 jede 4. Reihe?
04.10.2023 - 14:19I don't know where I'm getting this wrong but the starting point on the neck doesnt add up. There's only 122sts following the written pattern for xs~m size pattern and I keet getting 8 sts left. 8garter+6rib+11(a1)+18rib+11(a1)+14rib+11(a1)+18rib+11(a1)+6rib+8garter=122st
12.09.2023 - 02:15DROPS Design answered:
Dear Jun, between A.1 you shouldn't have 18 sts for sleeve but 22 sts instead: work*k2, p2* and repeat 4 more times = 5 times in total = 20 sts + K2 = 22 sts in total. Happy knitting!
12.09.2023 - 09:35Juliet
07.08.2023 - 10:12Caroleen
03.08.2023 - 22:55Climbing Fern
03.08.2023 - 14:26