
Popular categories
Looking for a yarn?


|
|||||||||||||||||||
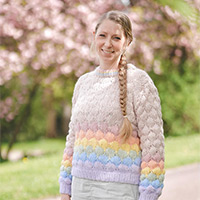
Spill the Beans |
|||||||||||||||||||
 |
 |
||||||||||||||||||
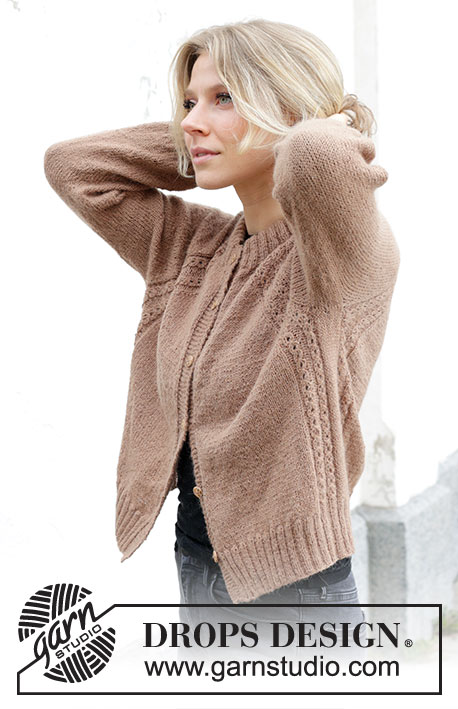
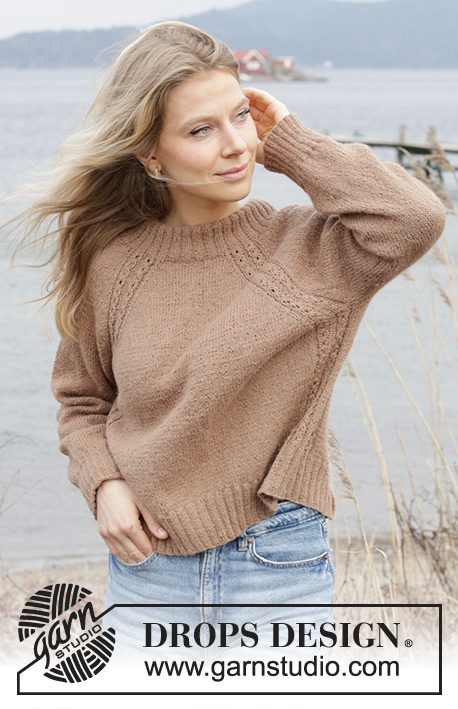
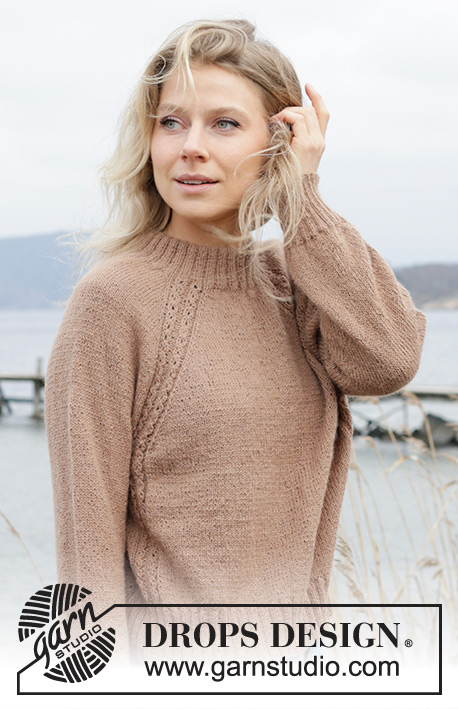
Knitted sweater in DROPS Alpaca. The piece is worked top down with double neck, raglan and cables. Sizes S - XXXL.
DROPS 244-5 |
|||||||||||||||||||
|
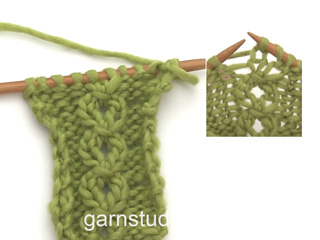
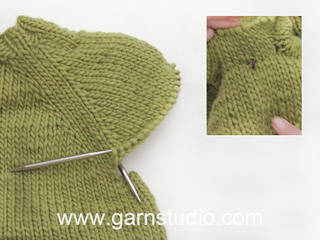
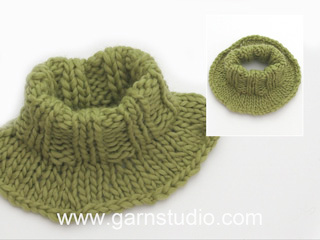
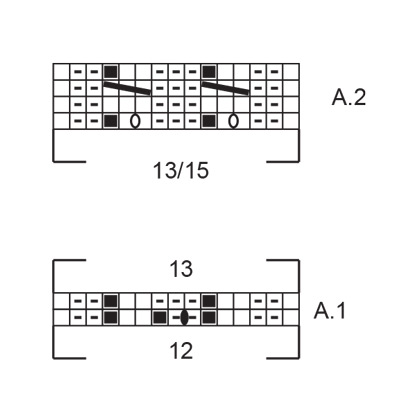
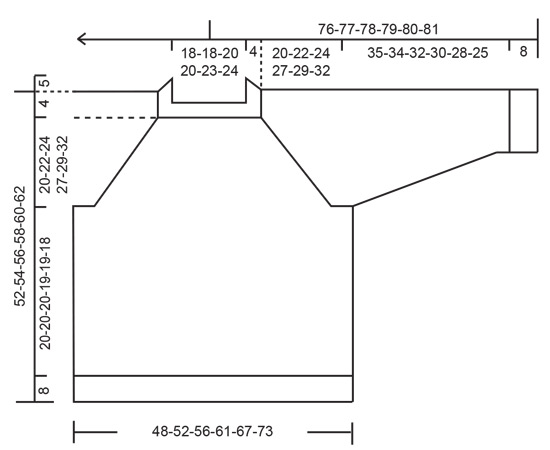
------------------------------------------------------- EXPLANATIONS FOR THE PATTERN: ------------------------------------------------------- PATTERN: See diagrams A.1 and A.2. In A.2 the stitch count varies as you increase and decrease, i.e., on rows 1 and 4 there are 13 stitches and on rows 2 and 3 there are 15 stitches. RAGLAN: Increase before/after A.2 in each transition between the body and sleeves. To start with increase on each side of A.2 every 2nd round (8 stitches increased), then continue to increase on the front and back pieces every 2nd round and on the sleeves every 4th round, i.e., every 2nd increase is only on the body and not on the sleeves (4 stitches increased). Increase 1 stitch by making 1 yarn over which is knitted twisted on the next round to avoid holes. Work the new stitches in stockinette stitch. DECREASE TIP (for sleeves): Decrease 1 stitch on either side of the marker-thread as follows: Work until there are 3 stitches left before the marker-thread, knit 2 together, knit 2 (marker-thread sits between these 2 stitches), slip 1 stitch knit-wise, knit 1 and pass the slipped stitch over the knitted stitch. ------------------------------------------------------- START THE PIECE HERE: ------------------------------------------------------- SWEATER – SHORT OVERVIEW OF THE PIECE: The neck and yoke are worked in the round with circular needle, from mid back and top down. The yoke is divided for body and sleeves and the body is continued in the round with double pointed needles. The sleeves are worked with short circular needle/double pointed needles. DOUBLE NECK: Cast on 128-128-136-136-144-152 stitches with circular needle size 2.5 MM = US 1.5 and DROPS Alpaca. Work rib as follows in the different sizes: SIZES S, M and XXL: Purl 1, * knit 2, purl 2 *, work from *-* until there are 3 stitches left on the round, knit 2, purl 1. SIZES L, XL and XXXL: Knit 1, * purl 2, knit 2 *, work from *-* until there are 3 stitches left on the round, purl 2, knit 1. ALL SIZES: Insert a marker-thread at the beginning of the round and allow it to follow your work onwards (mid-back). Work this rib in the round until neck measure 10 cm = 4" (rib will be later folded towards the wrong side, so that the neck edge is approx. 5 cm = 2"). YOKE: Change to circular needle size 3.5 MM = US 4. Work as follows from the marker-thread: Knit 10-10-12-12-14-16, work A.1 (= half back piece), knit 20 (= sleeve), A.1, knit 20-20-24-24-28-32, work A.1 (= front piece), knit 20 (= sleeve), work A.1, knit 10-10-12-12-14-16 (= half back piece). 1 stitch is increased in each repeat of A.1 = 132-132-140-140-148-156 stitches. Work 1 more round in the established pattern, A.1 is finished. REMEMBER THE KNITTING GAUGE! Read the next section before continuing! Read RAGLAN in the explanations above. Work stockinette stitch, diagram A.2 over diagram A.1 and increase for raglan as follows: Increase every 2nd round 22-22-26-30-30-31 times in each transition between the body and sleeves = 308-308-348-380-388-404 stitches. Continue to increase for raglan on the front and back pieces every 2nd round but now increase on the sleeves every 4th round. Increase like this 8-12-10-12-16-20 times on the front/back piece (4-6-5-6-8-10 times on the sleeves). You have increased for raglan a total of 30-34-36-42-46-51 times on the front/back piece and 26-28-31-36-38-41 times on the sleeves. When all the increases for raglan are finished there are 356-380-408-452-484-524 stitches. Continue working as before until the yoke measures 20-22-24-27-29-32 cm = 8"-8¾"-9½"-10⅝"-11⅜"-12½" from after the neck. On the next round divide for the body and sleeves as follows: Knit 40-44-48-54-60-67, work A.2 (= half back piece), place the next 72-76-82-92-96-102 stitches on a thread for the sleeve, cast on 10-10-12-12-14-14 stitches (in side under sleeve), work A.2, knit 80-88-96-108-120-134, work A.2 (= front piece), place the next 72-76-82-92-96-102 stitches on a thread for the sleeve, cast on 10-10-12-12-14-14 stitches (in side under sleeve), work A.2, knit 80-88-96-108-120-134, work A.2, knit 40-44-48-54-60-67 (= half back piece). Finish the body and sleeves separately, the piece is now measured from here! BODY: = 232-248-268-292-320-348 stitches (if there were 13 stitches in A.2 on the division round). Continue in the round with the pattern as before (knit the cast-on stitches under each sleeve). Work until the body measures 20-20-20-19-19-18 cm = 8"-8"-8"-7½"-7½"-7" from the division – make sure the last round was round 4 in A.2, with 232-248-268-292-320-348 stitches on the round. Insert a marker on each side of the 13 stitches in each A.2 – so it is easier to match the following rib to the pattern. Repeat round 4 in A.2 over the 13 stitches in A.2. Knit 40-44-48-54-60-67 and increase 16-20-20-22-24-25 stitches evenly spaced (56-64-68-76-84-92 knitted stitches), work A.2 over the next 13 stitches, knit 10-10-12-12-14-14 and increase 2-2-4-4-6-6 stitches evenly spaced (12-12-16-16-20-20 knitted stitches), work A.2 over the next 13 stitches, knit 80-88-96-108-120-134 and increase 32-40-40-44-48-50 stitches evenly spaced (112-128-136-152-168-184 knitted stitches), work A.2 over the next 13 stitches, knit 10-10-12-12-14-14 and increase 2-2-4-4-6-6 stitches evenly spaced (12-12-16-16-20-20 knitted stitches), work A.2 over the next 13 stitches, knit 40-44-48-54-60-67 and increase 16-20-20-22-24-25 stitches evenly spaced (56-64-68-76-84-92 knitted stitches). There are 300-332-356-388-428-460 stitches. Switch to needle size 2,5 mm = US 1,5 and work rib as follows: Knit 1 * purl 2, knit 2 *, work from *-* until there are 3 stitches left before the first marker, purl 2, knit 1, work A.2 over 13 stitches, knit 1, work from *-* until there are 3 stitches left before the next marker, purl 2, knit 1, work A.2 over 13 stitches, knit 1, work from *-* until there are 3 stitches left before the next marker, purl 2, knit 1, work A.2 over 13 stitches, knit 1, work from *-* until there are 3 stitches left before the last marker, purl 2, knit 1, work A.2 over 13 stitches, knit 1, work from *-* until there are 3 stitches left, purl 2, knit 1. Work this rib for 8 cm = 3⅛". Loosely bind off with knit over knit and purl over purl. The sweater measures approx. 52-54-56-58-60-62 cm = 20½"-21¼"-22"-22¾"-23⅝"-24⅜" from the shoulder down. SLEEVES: Place the 72-76-82-92-96-102 stitches from the thread on the one side of the piece on short circular needle/double pointed needles size 3.5 MM = US 4 and knit up 1 stitch in each of the 10-10-12-12-14-14 stitches cast on under the sleeve = 82-86-94-104-110-116 stitches. Insert a marker in the middle of the new stitches under the sleeve. Start at the marker and work stockinette stitch in the round. When the sleeve measures 4-3-3-4-2-3 cm = 1½"-1⅛"-1⅛"-1½"-¾"-1⅛" from the division, decrease 2 stitches mid under sleeve – read DECREASE TIP. Decrease like this every 3½-3½-2½-1½-1½-1 cm = 1¼"-1¼"-1"-½"-½"-⅜" a total of 9-9-12-16-18-20 times = 64-68-70-72-74-76 stitches. Continue working until the sleeve measures 35-34-32-30-28-25 cm = 13¾"-13⅜"-12½"-11¾"-11"-9¾" from the division. Knit 1 round and increase 20-16-18-20-22-20 stitches evenly spaced = 84-84-88-92-96-96 stitches. Change to double pointed needles size 2.5 MM = US 1.5 and work rib (knit 2, purl 2) for 8 cm = 3⅛". Loosely bind off with knit over knit and purl over purl. The sleeve measures approx. 43-42-40-38-36-33 cm = 17"-16½"-15¾"-15"-14¼"-13" from the division. Work the other sleeve in the same way. ASSEMBLY: Fold the neck double to the inside and fasten with a couple of stitches on each side. |
|||||||||||||||||||
Diagram explanations |
|||||||||||||||||||
|
|||||||||||||||||||
|
|||||||||||||||||||
|
|||||||||||||||||||
|
Have you made this or any other of our designs? Tag your pictures in social media with #dropsdesign so we can see them! Do you need help with this pattern?You'll find tutorial videos, a Comments/Questions area and more by visiting the pattern on garnstudio.com. © 1982-2024 DROPS Design A/S. We reserve all rights. This document, including all its sub-sections, has copyrights. Read more about what you can do with our patterns at the bottom of each pattern on our site. |
|||||||||||||||||||


With over 40 years in knitting and crochet design, DROPS Design offers one of the most extensive collections of free patterns on the internet - translated to 17 languages. As of today we count 304 catalogs and 11422 patterns - 11417 of which are translated into English (US/in).
We work hard to bring you the best knitting and crochet have to offer, inspiration and advice as well as great quality yarns at incredible prices! Would you like to use our patterns for other than personal use? You can read what you are allowed to do in the Copyright text at the bottom of all our patterns. Happy crafting!
Comments / Questions (16)
Tak 😊🧶
19.03.2024 - 20:07Hej🧶 Var det ikke muligt, at få et grundmønster, til garngruppe 1, hvor der tages ud på ærmet, på hver 4 omgang. Tak for nogle fine mønstre og smukt garn.
16.03.2024 - 20:59DROPS Design answered:
Hej Pia, jo men på den her tager du ud på ærmesiden på hver 4 omgang :)
19.03.2024 - 14:15Vad menas med ingen maska
09.03.2024 - 13:34DROPS Design answered:
Hei Ann-Christin. At det er ingen maske. Strikk neste maske som vises i diagrammet. F.eks i 1. rad i diag A.2 strikkes det slik: 1 rett - 2 vrang - 1 kast - 1 rett - 3 vrang - 1 rett - 1 kast - 1 rett - 2 vrang - 1 rett. På denne raden er det økt med 2 masker og du vil da se disse 2 maskene i 2. rad i diagrammet. I 3.rad i A.2 felles det 2 masker og siden disse maskene ikke fins lengre når du skal strikk 4. rad vises det med en sort rute (= ingen maske). mvh DROPS Design
11.03.2024 - 14:25Welche Grösse trägt das Model? Steht das irgendwo? (Zum Abschätzen wie gross die Grössen bemessen sind)
24.02.2024 - 08:33DROPS Design answered:
Liebe Frau Heiniger, unsere Modelle tragen meistens entweder S oder M aber um Ihre passende Größe zu finden, messen Sie am besten einen ähnlicher Pullover den Sie gerne tragen, diese Mae mit den in der Maßskizze vergleichen; hier lesen Sie mehr. Viel Spaß beim stricken!
26.02.2024 - 07:56Bonjour, Doit on continuer le graphique A2 quand on aborde les côtés du bas du pull? Merci d'avance pour votre réponse. 😊
15.01.2024 - 08:52DROPS Design answered:
Bonjour Mme Wargnie, tout à fait, continuez à tricoter les mailles comme avant: en jersey avec A.2 tout juste comme avant. Bon tricot!
15.01.2024 - 10:17Na het meerderen in de raglan: 12 keer op de panden is 48 steken en 6 keer op de mouwen is 24 steken. Er staan andere getallen in het patroon
05.01.2024 - 17:38Ich habe 500gr. von dieser Wolle. Möchte aber mit doppeltem Faden stricken. 44-46wie istdie Aufteilung? reichen 500gr?
15.12.2023 - 15:35DROPS Design answered:
Dear Mrs Schnitker, wenn Sie Alpaca 2-fädig stricken, wird dann die Maschenprobe nicht stimmen, so sollen Sie die ganze Anleitung neu umrechnen; am besten stricken Sie mit nur 1 Faden oder wenn Sie 2-fädig stricken möchten, schauen Sie mal passende Modellen (hier z.B.). Viel Spaß beim stricken!
15.12.2023 - 15:46Bleibt die Maschenzahl gleich,wenn ich das Diagramm weglasse, sondern ganz normal Raglan stricke? 2rechte Maschen in der Mitte links und rechts jeweils eine Zuhnahme.?
09.11.2023 - 13:23DROPS Design answered:
Liebe Frau Schnitker, wenn Sie das Diagram an den Raglanlinien nicht möchten, dann sollen Sie die Markierung in der mittlere Masche von jedem Diagram (als ob Sie sie stricken sollten) einsetzen, dann nehmen Sie für den Raglan vor/nach dieser Masche. Viel Spaß beim stricken!
09.11.2023 - 16:03Wenn ich die maschen von der halsblende aufteile Gr.XXL bleiben mir zum Schluss immer 16-20 Maschen überig. Anschlag 136 Maschen.Was mache ich falsch? Dieser Pullover bringt mich zur Verzweiflung.Danke und liebe Grüße U.Schnitker
14.10.2023 - 16:36DROPS Design answered:
Liebe Frau Schnitker, in XXL schlagen Sie 144 Maschen an, in XL schlagen Sie nur 136 Maschen an und so werden diese Maschen gestrickt/verteilt: 12 Maschen (Rückenteil), A.1 (12 Maschen), 24 Maschen (Ärmel), A.1 (12 Maschen), 28 Maschen (Vorderteil), A.1 (12 Maschen), 24 Maschen (Ärmel), A.1 (12 Maschen), 12 Maschen (Vorderteil)= 12+12+20+12+24+12+20+12+12=136 Maschen. Viel Spaß beim stricken!
16.10.2023 - 09:14Gibt es von diesem Pullover auch eine " normale" Anleitung, möchte ihn gerne stricken- aber nicht von oben.
29.09.2023 - 18:55