
Popular categories
Looking for a yarn?


|
||||||||||
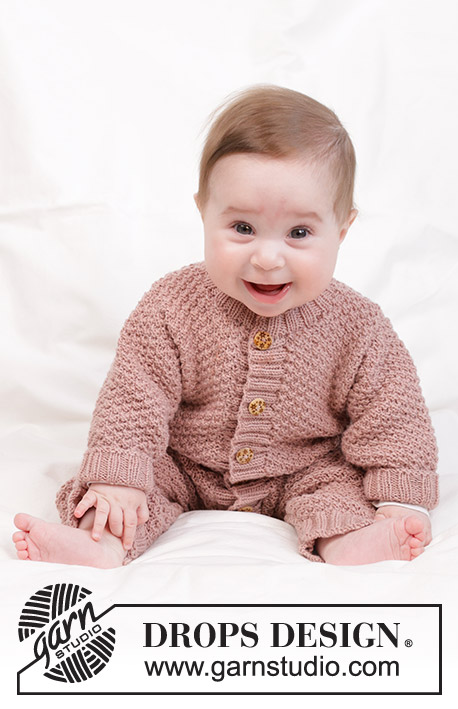
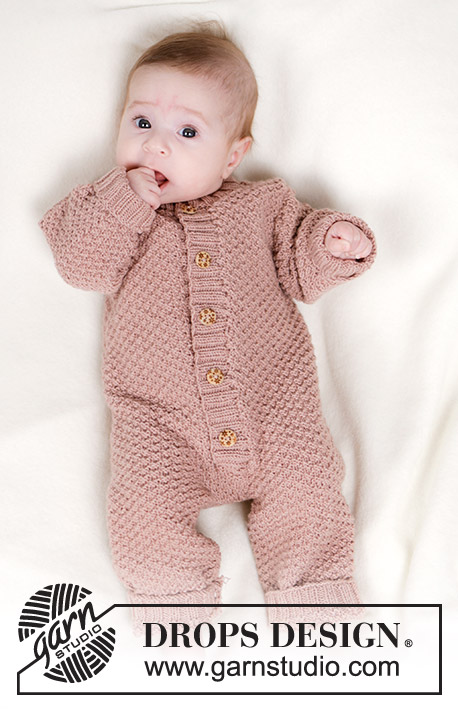
Lili Rose |
||||||||||
 |
 |
|||||||||
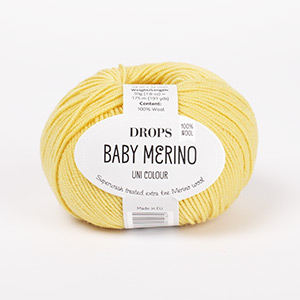
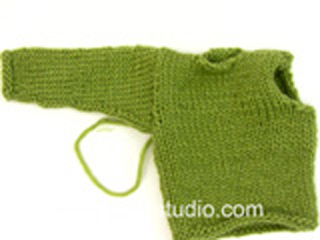
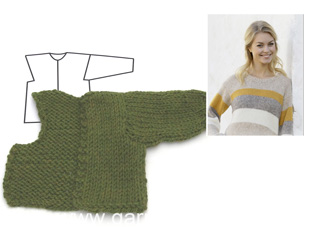
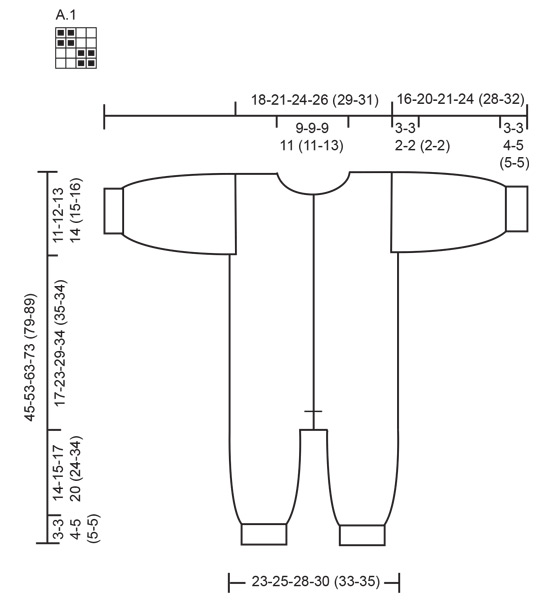
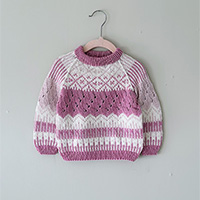
Knitted suit for babies in DROPS BabyMerino. The piece is worked top down with moss stitch. Sizes 0 – 4 years.
DROPS Baby 45-5 |
||||||||||
|
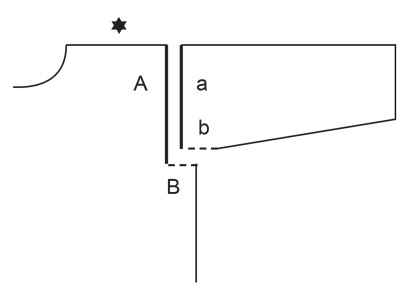
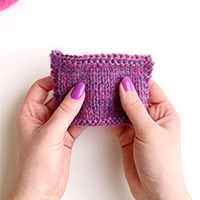
------------------------------------------------------- EXPLANATIONS FOR THE PATTERN: ------------------------------------------------------- GARTER STITCH (worked back and forth): Knit all rows. 1 ridge = knit 2 rows. PATTERN: See diagram A.1. The diagram shows all rows in the pattern from the right side. DECREASE TIP (inside leg): Start 2 stitches before the marker, knit 2 together, (marker), knit 2 twisted together. INCREASE TIP (for sleeves): Work until there is 1 stitch left before the marker thread, make 1 yarn over, knit 2 (marker thread sits between these stitches), 1 yarn over (2 increased stitches). On the next round knit the yarn overs twisted to avoid holes. Then work the new stitches into the pattern. ------------------------------------------------------- START THE PIECE HERE: ------------------------------------------------------- SUIT - SHORT OVERVIEW OF THE PIECE: The back and front pieces are worked separately, top down, then joined and continued back and forth with circular needle. Stitches are bind off for the crotch and the legs are finished in the round separately. The sleeves are worked in the round and sewn in. The bands and neck are worked to finish. BACK PIECE: Each shoulder is worked separately before being joined, and stitches cast on for the neck. RIGHT SHOULDER: Cast on 10-14-18-18 (22-22) stitches with circular needle size 3.5 MM = US 4 and DROPS Baby Merino. Work the first row from the right side as follows: 1 edge stitch in GARTER STITCH – read description above, work pattern A.1 until there is 1 stitch left, 1 edge stitch in garter stitch. Continue this pattern. When the piece measures 2 cm = ¾", cast on 1 stitch for the neck at the end of the row from the wrong side = 11-15-19-19 (23-23) stitches. REMEMBER THE KNITTING GAUGE! Lay the piece to one side. LEFT SHOULDER: Cast on and work in the same way as the right shoulder but cast on 1 stitch for the neck at the end of a row from the right side. Work 1 row from the wrong side. BACK PIECE: Work the left and right shoulders together from the right side as follows: Work the 11-15-19-19 (23-23) stitches from the left shoulder as before, cast on 20-20-20-24 (24-28) stitches for the neck, work the 11-15-19-19 (23-23) stitches from the right shoulder as before = 42-50-58-62 (70-74) stitches. Continue the pattern back and forth with 1 edge stitch in garter stitch on each side until the piece measures 11-12-13-14 (15-16) cm = 4⅜"-4¾"-5⅛"-5½" (6"-6¼") and the last row was from the wrong side. Lay the piece to one side. FRONT PIECE: Each front piece is worked separately and new stitches are cast on for the neck. The parts are then put together and the suit is continued in the round. RIGHT FRONT PIECE: Cast on 10-14-18-18 (22-22) stitches with circular needle size 3.5 MM = US 4 and DROPS Baby Merino. Work the first row from the right side as follows: 1 edge stitch in garter stitch, work A.1 until there is 1 stitch left, 1 edge stitch in garter stitch. Continue this pattern. When the piece measures 3-3-4-4 (5-5) cm = 1⅛"-1⅛"-1½"-1½" (2"-2"), cast on for the neck at the end of each row from the right side as follows: 1 stitch 2 times, then 2 stitches 3-3-3-4-4-5 times = 18-22-26-28 (32-34) stitches. Continue the pattern with 1 edge stitch in garter stitch on each side until the piece measures 11-12-13-14 (15-16) cm = 4⅜"-4¾"-5⅛"-5½" (6"-6¼"), with the last row from the wrong side (matches the back piece). Lay the piece to one side and work left front piece. LEFT FRONT PIECE: Cast on and work in the same way as the right front piece, casting on stitches for the neck at the end of each row from the wrong side. SUIT: Join all the pieces, working back and forth with needle size 3.5 MM = US 4 as follows: Work the left front piece, cast on 14-10-10-10 (10-10) stitches for the armhole, work the back piece, cast on 14-10-10-10 (10-10) stitches for the armhole and work the right front piece = 106-114-130-138 (154-162) stitches. Continue the pattern with 1 edge stitch in garter stitch on each side until the piece measures 12-18-24-29 (30-29) cm = 4¾"-7"-9½"-11⅜" (11¾"-11⅜") from where the piece was put together under the sleeves. Bind off the edge stitches on the next 2 rows (start from the right side) = 104-112-128-136 (152-160) stitches. Now work for the crotch as follows: Work all stitches as before and cast on 8 stitches at the end of the row from the right side = 112-120-136-144 (160-168) stitches. Insert 1 marker-thread here – allow it to follow your work onwards. Continue in the round with pattern over all stitches, until the piece measures 17-23-29-34-35-34 cm = 6¾"-9"-11⅜"-13⅜"-13¾"-13⅜" from where the piece was joined after the armholes. Divide for the legs as follows: Start 6-8-10-10 (14-14) stitches before the marker-thread, bind off the next 4-8-12-12 (20-20) stitches, work the next 52-52-56-60 (60-64) stitches and place them on a thread/stitch-holder, bind off 4-8-12-12 (20-20) stitches, work the next 52-52-56-60 (60-64) stitches. Now work the right leg. LEGS: = 52-52-56-60 (60-64) stitches. Use double pointed needles size 3.5 MM = US 4. Insert a marker inside leg and continue A.1 in the round. When the leg measures 2 cm = ¾", decrease 1 stitch on each side of the marker – read DECREASE TIP. Decrease like this every 3-7-7-5 (10-15) cm = 1⅛"-2¾"-2¾"-2" (4"-6") a total of 4-2-2-4 (2-2) times = 44-48-52-52 (56-60) stitches. Continue working until the leg measures 14-15-17-20 (24-34) cm = 5½"-6"-6¾"-8" (9½"-13⅜"). Knit 1 round and increase 4-4-4-4 (8-12) stitches evenly spaced = 48-52-56-56 (64-72) stitches. Change to double pointed needles size 3 MM = US 2.5 and work rib (knit 2, purl 2) for 3-3-4-5 (5-5) cm = 1⅛"-1⅛"-1½"-2" (2"-2"). Bind off with knit. The leg measures 17-18-21-25 (29-39) cm = 6¾"-7"-8¼"-9¾" (11⅜"-15¼"). Work the other leg in the same way. SLEEVES: Cast on 44-44-48-56 (56-60) stitches with double pointed needles size 3 MM = US 2.5 and DROPS Baby Merino. Knit 1 round, then work rib (knit 2, purl 2) for 3-3-4-5 (5-5) cm = 1⅛"-1⅛"-1½"-2" (2"-2"). Change to double pointed needles size 3.5 MM = US 4. Insert 1 marker-thread at the beginning of the round = mid-under sleeve. Work A.1. When the sleeve measures 5-6-7-9 (9-10) cm = 2"-2⅜"-2¾"-3½" (3½"-4"), increase 1 stitch on each side of the marker-thread - read INCREASE TIP. Increase like this every 2-1½-1½-1½ (2-2½) cm = ¾"-½"-½"-½" (3/4"-1") a total of 4-7-7-6 (8-8) times = 52-58-62-68 (72-76) stitches. Work until the sleeve measures 13-17-19-22 (26-30) cm = 5⅛"-6¾"-7½"-8¾" (10¼"-11¾"). Divide the sleeve at the marker thread and finish the sleeve cap back and forth. Bind off when the sleeve measures 16-20-21-24 (28-32) cm = 6¼"-8"-8¼"-9½" (11"-12½"). Work the other sleeve in the same way. RIGHT BAND: Start from the right side, where stitches were cast on for the crotch. Use circular needle size 3 MM = US 2.5 and knit up 48 to 96 stitches (stitch-count should be divisible by 4) inside the 1 edge stitch along the right front piece as far as the neck. Purl 1 row from the wrong side. Work rib as follows from the right side: 1 edge stitch in garter stitch, * knit 2, purl 2 *, work from *-* until there are 3 stitches left, knit 2 and 1 edge stitch in garter stitch. Continue this rib for 1 cm = ⅜". Now work 5-5-5-6 (6-6) buttonholes evenly spaced. 1 buttonhole = bind off 2 stitches and cast on 2 stitches over the bind-off stitches on the next row - NOTE: It is neatest if you work the buttonholes in purled sections (seen from the right side). The bottom buttonhole is 3 cm = 1⅛" from the bottom edge, the top buttonhole 1 cm = ⅜" from the top edge. Place the remaining buttonholes evenly spaced between these two. Continue working until the band measures 3 cm = 1⅛". Bind off. LEFT BAND: Start from the right side at the top of the left front piece. Use circular needle size 3 MM = US 2.5 and knit up stitches in the same way as on the right front piece. Purl 1 row from the wrong side and work rib in the same way as on the right band – do not work buttonholes. NECK: Start mid-front from the right side and knit up 68 to 88 stitches (stitch-count should be divisible by 4) around the neck, with circular needle size 3 MM = US 2.5 and DROPS Baby Merino. Work rib from the wrong side as follows: 1 edge stitch in garter stitch, purl 2, * knit 2, purl 2 *, work from *-* until there is 1 stitch left, 1 edge stitch in garter stitch. Work this rib for 2-2-3-3 (3-3) cm = ¾"-¾"-1⅛"-1⅛" (1⅛"-1⅛"). Bind off with knit from the right side. ASSEMBLY: Sew the shoulder seams. Sew the sleeve cap to the armhole, then the top 3-3-2-2 (2-2) cm = 1⅛"-1⅛"-¾"-¾" (3/4"-¾") of the sleeve to the bottom of the armhole– see sketch. Sew the opening between the legs. Lay the right band over the left and fasten to the suit where stitches were cast on for the crotch. Sew the buttons onto the left band. The rib on the sleeves and legs can be folded up. |
||||||||||
Diagram explanations |
||||||||||
|
||||||||||
|
||||||||||
|
||||||||||
|
Have you made this or any other of our designs? Tag your pictures in social media with #dropsdesign so we can see them! Do you need help with this pattern?You'll find tutorial videos, a Comments/Questions area and more by visiting the pattern on garnstudio.com. © 1982-2024 DROPS Design A/S. We reserve all rights. This document, including all its sub-sections, has copyrights. Read more about what you can do with our patterns at the bottom of each pattern on our site. |
||||||||||


With over 40 years in knitting and crochet design, DROPS Design offers one of the most extensive collections of free patterns on the internet - translated to 17 languages. As of today we count 304 catalogs and 11422 patterns - 11417 of which are translated into English (US/in).
We work hard to bring you the best knitting and crochet have to offer, inspiration and advice as well as great quality yarns at incredible prices! Would you like to use our patterns for other than personal use? You can read what you are allowed to do in the Copyright text at the bottom of all our patterns. Happy crafting!
Comments / Questions (11)
When the pattern stated to knit until the piece measures a certain number of cm is this from the shoulder or from the back of the neck?
14.01.2024 - 11:05DROPS Design answered:
Dear Judy, unless otherwise indicated, it should be from the beginning of the piece (cast on edge). For example, in this sentence: "Continue the pattern back and forth with 1 edge stitch in garter stitch on each side until the piece measures 11-12-13-14 (15-16) cm" in the BACK PIECE it means until the length of the whole back piece is 11.... cm. So you measure it from the cast-on edge/ start of the shoulders. Happy knitting!
14.01.2024 - 13:24Vad menas med "Sedan sys de översta 3-3-2-2 (2-2) cm på ärmen till botten av ärmhålet"?
27.12.2023 - 23:35DROPS Design answered:
Hej Nora, se skissen nederst i opskriften, sy b til B :)
02.01.2024 - 12:17I am happy to find this website. Seems very beneficial. Hope I would be able to follow the pattern.
14.12.2023 - 12:01I love you❤
09.12.2023 - 07:14Die Videos zur Anleitung sind super angelegt, nur leider ohne Ton (zumindest bei mir). Das wäre toll, wenn das noch behoben werden würde. Liebe Grüße
06.12.2023 - 11:19Er staat bij dit patroon : wordt gebreid in gerstekorrel maar in beschrijving staat ribbelsteek, kunt u mij dit uitleggen?
24.11.2023 - 15:29Ich möchte gerne die Arme von oben nach unten Stricken aus Maschen, die ich direkt aus dem Armloch aufnehme. Bin mir aber unsicher wie viele Maschen ich aus dem Armloch aufnehmen muss. Wären das bei Größe 56/62 dann die 58 Maschen? Liebe Grüße
24.10.2023 - 17:55Mit welcher Nadelstärke wurde denn die Maschenprobe gestrickt?
12.10.2023 - 12:34DROPS Design answered:
Liebe Stephanie, die Maschenprobe stricken Sie mit den grösseren Nadeln und im Muster A.1. Viel Spaß beim stricken!
12.10.2023 - 14:14When do you start knitting in the round in this pattern
06.10.2023 - 12:17DROPS Design answered:
Dear Patricia, you will work in the round when working SUIT part, after you have cast on the 8 new stitches for bands, just before dividing for legs (legs are also worked in the round). Sleeves are worked in the round to the sleeve cap which is worked back and forth. Happy knitting!
06.10.2023 - 14:31Cast on for the neck at the end of each row from the right side as follows: 1 stitch 2 times, then 2 stitches 3-3-3-4-4-5 times = 18 Does this mean 1 increase next 2 rows, 2 stitches increase over 3 rows
02.10.2023 - 20:51DROPS Design answered:
Hi Patricia, Yes, on the first row from the right side, cast on 1 stitch and again on the next row from the right side. Then 2 stitches on 3 subsequent rows from the right side. Happy knitting!
03.10.2023 - 06:51