DROPS Safran uni colour 100% Cotton |
1.70 € /50g |
Order |
Clicking the ORDER button will redirect you to Igla i kukica website
The yarn cost is calculated from the pattern’s smallest size and the yarn’s cheapest product type. Looking for an even better price? You might find it on the DROPS Deals!
-------------------------------------------------------
Alternative Yarn – See how to change yarns here
Yarn Groups A to F – Use the same pattern and change the yarn here
Yarn usage using an alternative yarn – Use our yarn converter here
-------------------------------------------------------
DROPS Safran uni colour 100% Cotton 1.70 € /50g Order |
Clicking the ORDER button will redirect you to Igla i kukica website
The yarn cost is calculated from the pattern’s smallest size and the yarn’s cheapest product type. Looking for an even better price? You might find it on the DROPS Deals!
This pattern has been corrected. Click here to see the correction/s.
= knit from the right side, purl from the wrong side | |
= purl from the right side, knit from the wrong side | |
= between 2 stitches make 1 yarn over, purl yarn over from wrong side to make a hole | |
= knit 3, slip first stitch worked (of these 3 stitches) over the other 2 so that the slipped stitch is around the other 2 stitches (1 stitch decreased) | |
= this square is not a stitch because stitch was decreased earlier, move directly to next square in diagram | |
= slip 3 stitches on cable needle behind piece, knit 1, knit 3 from cable needle | |
= slip 1 stitch on cable needle in front of piece, knit 3, knit 1 from cable needle |
Each of our patterns has specific tutorial videos to help you.
These step-by-step tutorials might also help you:
Why is the knitting/crochet tension so important?
Knitting tension is what determines the final measurements of your work, and is usually measured per 10 x 10 cm. It is provided like so: number of stitches in width x number of rows in height - eg: 19 stitches x 26 rows = 10 x 10 cm.
The knitting tension is very individual; some people knit/crochet loosely while others work tightly. You adjust the knitting tension with the needle size, which is why the suggested needle size is only meant as a guide! You need to adjust this (up or down) to ensure that YOUR knitting tension matches the knitting tension provided in the pattern. If you work with a different knitting tension than provided you will have a different yarn consumption, and your work will have different measurements than what the pattern suggests.
The knitting tension also determines which yarns can replace each other. As long as you achieve the same knitting tension you can replace one yarn with another.
See DROPS lesson: How to measure your tension/gauge
See DROPS video: How to make a gauge tension swatch
How do I know how many balls of yarn I need?
The required amount of yarn is provided in grams, eg: 450 g. To calculate how many balls you’ll need you first need to know how many grams are in 1 ball (25g, 50g or 100g). This information is available if you click on the individual yarn quality on our pages. Divide the amount required with the amount of each ball. For example, if each ball is 50g (the most common amount), the calculation will be as follows: 450 / 50 = 9 balls.
Can I use a different yarn than what the pattern suggests?
The important thing when changing from one yarn to another is that the knitting/crochet tension remains the same. This is so that the measurements of the finished piece will be the same as on the sketch provided. It is easier to achieve the same knitting tension using yarns from the same yarn group. It is also possible to work with multiple strands of a thinner yarn to achieve the knitting tension of a thicker one. Please try our yarn converter. We recommend you to always work a test swatch.
Please NOTE: when changing yarn the garment might have a different look and feel to the garment in the photo, due to individual properties and qualities of each yarn.
See DROPS lesson: Can I use a different yarn than the one mentioned in the pattern?
What are the yarn groups?
All our yarns are categorised into yarn groups (from A to F) according to thickness and knitting tension – group A contains the thinnest yarns and group F the thickest. This makes it easier for you to find alternative yarns to our patterns, should you wish to switch yarn. All yarns within the same group have a similar knitting tension and can easily replace each other. However, different yarn qualities have different structures and properties which will give the finished work a unique look and feel.
How do I use the yarn calculator?
At the top of all our patterns you’ll find a link to our yarn calculator, which is a helpful tool should you wish to use a different yarn than suggested. By filling in the yarn quality you wish to replace, the amount (in your size) and number of strands, the calculator will present good alternative yarns with the same knitting tension. Additionally it will tell you how much you’ll require in the new qualities and whether you’ll need to work with multiple strands. Most skeins are 50g (some are 25g or 100g).
If the pattern is worked with multiple colours, every colour will have to be calculated separately. Similarly, if the pattern is worked with several strands of different yarns (for example 1 strand Alpaca and 1 strand Kid-Silk) you will have to find alternatives for each, individually.
Why do you show discontinued yarns in the patterns?
Since different yarns have different qualities and textures we have chosen to keep the original yarn in our patterns. However, you can easily find options among our available qualities by using our yarn calculator, or simply pick a yarn from the same yarn group.
It is possible that some retailers still have discontinued yarns in stock, or that someone has a few skeins at home that they would like to find patterns for.
The yarn calculator will provide both alternative yarn as well as required amount in the new quality.
What size should I knit?
If you think it's hard to decide what size to make, it can be a good idea to measure a garment you own already and like the size of. Then you can pick the size by comparing those measures with the ones available in the pattern's size chart.
You'll find the size chart at the bottom of the pattern.
See DROPS lesson: How to read size chart
Why do I get the wrong knitting tension with the suggested needle size?
The needle size provided in the pattern serves only as a guide, the important thing is to follow the knitting tension. And since knitting tension is very individual, you will have to adjust the needle size to ensure that YOUR tension is the same as in the pattern – maybe you’ll have to adjust 1, or even 2 needle sizes, up or down to achieve the correct tension. For this, we recommend that you work test swatches.
Should you work with a different knitting tension than the one provided, the measurements of the finished garment might deviate from the measurement sketch.
See DROPS lesson: How to measure your tension/gauge
See DROPS video: How to make a tension/gauge swatch
Why is the pattern worked top-down?
Working a garment top-down provides more flexibility and room for personal adjustment. For example it is easier to try the garment on while working, as well as making adjustments to length of yoke and shoulder caps.
The instructions are carefully explaining every step, in the correct order. Diagrams are adjusted to the knitting direction and are worked as usual.
How do I work according to a knitting diagram?
The diagram depicts all rows/rounds, and every stitch seen from the right side. It is read from bottom to top, from right to left. 1 square = 1 stitch.
When working back and forth, every other row is worked from the right side and every other row is worked from the wrong side. When working from the wrong side, the diagram will have to be worked reversed: from left to right, knit stitches are purled, purl stitches are knit etc.
When working in the round every round is worked from the right side and the diagram are worked from right to left on all rounds.
See DROPS lesson: How to read knitting diagrams
How do I work according to a crochet diagram?
The diagram depicts all rows/rounds, and every stitch seen from the right side. It is worked from bottom to top, from right to left.
When working back and forth every other row is worked from the right side: from right to left and every other row is worked from the wrong side: from left to right.
When working in the round, every row in the diagram are worked from the right side, from right to left.
When working a circular diagram you start in the middle and work your way outwards, counter clockwise, row by row.
The rows usually start with a given number of chain stitches (equivalent to the height of the following stitch), this will either be depicted in the diagram or explained in the pattern.
See DROPS lesson: How to read crochet diagrams
How do I work several diagrams simultaneously on the same row/round?
Instructions for working several diagrams after each other on the same row/round, will often be written like so: “work A.1, A.2, A.3 a total of 0-0-2-3-4 times". This means you work A.1 once, then A.2 is worked once, and A.3 is repeated (in width) the number of times provided for your size – in this case like so: S = 0 times, M = 0 times, L=2 times, XL= 3 times and XXL = 4 times.
The diagrams are worked as usual: begin with the first row in A.1, then work the first row in A.2 etc.
See DROPS lesson: How to read knitting diagrams
See DROPS lesson: How to read crochet diagrams
Why are the sleeves shorter in larger sizes?
The total width of the garment (from wrist-to-wrist) will be larger in the larger sizes, despite the actual sleeves being shorter. The larger sizes have longer sleeve caps and wider shoulders, so there will be a good fit in all sizes.
Where on the garment is the length measured?
The measurement sketch/schematic drawing provides information regarding the full length of the garment. If it’s a jumper or a jacket the length is measured from the highest point on the shoulder closest to the neckline, and straight down to the bottom of the garment. It is NOT measured from the tip of shoulder. Similarly, the length of yoke is measured from the highest point on the shoulder and down to where yoke is split into body and sleeves.
On a jacket measures are never taken along bands, unless specifically stated. Always measure inside band stitches when measuring the length.
See DROPS lesson: How to read a schematic drawing
What is a repeat?
Diagrams are often repeated on the round or in height. 1 repeat is the diagram the way it appears in the pattern. If it says to work 5 repeats of A.1 in the round, then you work A.1 a total of 5 times after/next to each other in the round. If it says to work 2 repeats of A.1 vertically/in height you work the entire diagram once, then begin again at the start and work the entire diagram one more time.
Why does the piece start with more chain stitches than it’s worked with?
Chain stitches are slightly narrower than other stitches and to avoid working the cast-on edge too tight, we simply chain more stitches to begin with. The stitch count will be adjusted on the following row to fit the pattern and measurement sketch.
Why increase before the rib edge when the piece is worked top-down?
The rib edge is more elastic and will contract slightly compared to, for example, stocking stitch. By increasing before the rib edge, you avoid a visible difference in width between the rib edge and the rest of the body.
Why increase in the cast-off edge?
It’s very easy to cast off too tightly, and by making yarn overs while casting off (and simultaneously casting these off) you avoid a too tight cast off edge.
See DROPS video: How to bind off with yarn overs (yo)
How do I increase/decrease on every 3rd and 4th row/round alternately?
To achieve an even increase (or decrease) you can increase on, for example: every 3rd and 4th row alternately, like so: work 2 rows and increase on the 3rd row, work 3 rows and increase on the 4th. Repeat this until the increase is complete.
See DROPS lesson: Increase or decrease 1 st on every 3rd and 4th row alternately
How can I work a jacket in the round instead of back and forth?
Should you prefer to work in the round instead of back and forth, you may of course adjust the pattern. You’ll need to add steeks mid-front (usually 5 stitches), and follow the instructions. When you would normally turn and work from the wrong side, simply work across the steek and continue in the round. At the end you’ll cut the piece open, pick up stitches to work bands, and cover the cut edges.
See DROPS video: How to knit steeks and cut open
Can I work a jumper back and forth instead of in the round?
Should you prefer to work back and forth instead of in the round, you may of course adjust the pattern so you work the pieces separately and then assemble them at the end. Divide the stitches for the body in 2, add 1 edge stitch in each side (for sewing) and work the front and back pieces separately.
See DROPS lesson: Can I adapt a pattern for circular needles into straight needles?
Why is the pattern slightly different than what I see in the photo?
Pattern repeats can vary slightly in the different sizes, in order to get the correct proportions. If you’re not working the exact same size as the garment in the photo, yours might deviate slightly. This has been carefully developed and adjusted so that the complete impression of the garment is the same in all sizes.
Make sure to follow instructions and diagrams for your size!
How do I make a women’s size garment into a men’s size one?
If you have found a pattern you like which is available in women’s size it’s not very difficult to convert it to men’s size. The biggest difference will be the length of sleeves and body. Start working on the women size that you think would fit across the chest. The additional length will be worked right before you cast off for the armhole/sleeve cap. If the pattern is worked top-down you can add the length right after the armhole or before the first decrease on sleeve.
Regarding additional yarn amount, this will depend on how much length you add, but it is better with a skein too many than too few.
How do I prevent a hairy garment from shedding?
All yarns will have excess fibres (from production) that might come off as lint or shedding. Brushed yarns (ie hairier yarns) have more of these loose, excess fibres, causing more shedding.
Shedding also depends on what is worn under or over the garment, and whether this pulls at the yarn fibres. It’s therefore not possible to guarantee that there will be no shedding
Below are some tips on how to get the best result when working with hairier yarns:
1. When the garment is finished (before you wash it) shake it vigorously so the looser hairs come off. NOTE: do NOT use a lint roller, brush or any method that pulls at the yarn.
2. Place the garment in a plastic bag and put it in your freezer - the temperature will cause the fibres to become less attached to each other, and excess fibres will come off easier.
3. Leave in the freezer for a few hours before taking it out and shaking it again.
4. Wash the garment according to the instructions on the yarn label.
Why does my garment pill?
Pilling is a natural process that happens to even the most exclusive of fibers. It's a natural sign of wear and tear that is hard to avoid, and that is most visible in high friction areas of your garment like a sweater's arms and cuffs.
You can make your garment look as new by removing the pilling, using a fabric comb or a pill/lint remover.
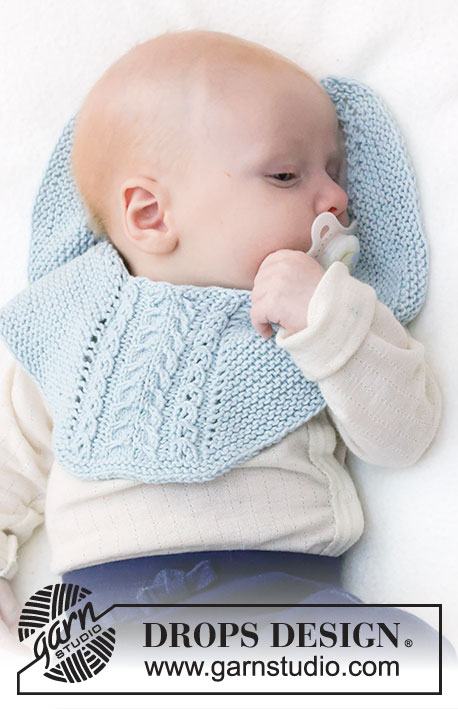
Cables and Cuddles Bib |
||||||||||||||||||||||
|
|
|||||||||||||||||||||
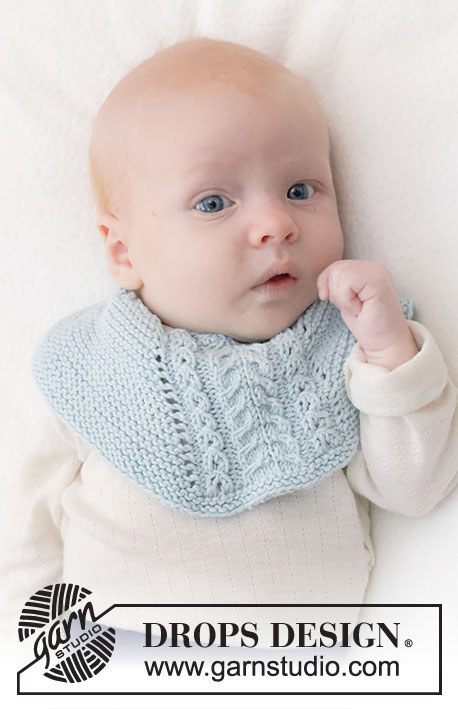
Knitted bib for baby in DROPS Safran. Piece is worked back and forth, top down in garter stitch with cable. Size 0 - 4 years
DROPS Baby 45-16 |
||||||||||||||||||||||
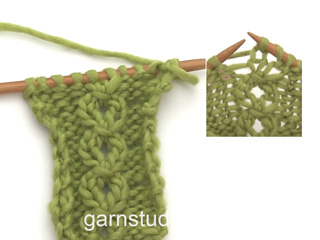
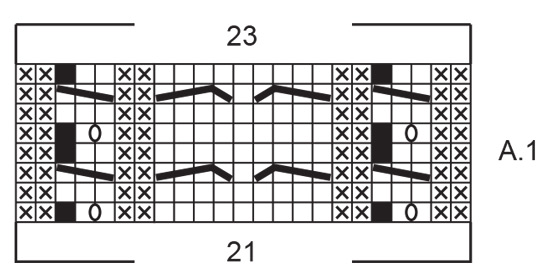
---------------------------------------------------------- EXPLANATION FOR THE PATTERN: ---------------------------------------------------------- GARTER STITCH (back and forth): Knit all rows. 1 ridge vertically = knit 2 rows. PATTERN: See diagram A.1. Diagrams show all rows in pattern seen from the right side. ---------------------------------------------------------- START THE PIECE HERE: ---------------------------------------------------------- BIB – SHORT OVERVIEW OF THE PIECE: Worked back and forth on circular needle, top down. BIB: Cast on 27 stitches in all sizes on circular needle size 3.5 mm with DROPS Safran. Knit 1 row over all stitches from wrong side. ROW 1 (= right side): Work 2 edge stitch in GARTER STITCH - read explanation above, make 1 yarn over, work 1 stitch in garter stitch, make 1 yarn over, work A.1 over 21 stitches, make 1 yarn over, work 1 stitch in garter stitch, make 1 yarn over and work 2 edge stitches in garter stitch (6 stitches increased on the row, 2 of them are increased in A.1). There are 33 stitches on needle. ROW 2 (= wrong side): Work 2 edge stitches in garter stitch, make 1 yarn over, work 3 stitches in garter stitch, work A.1 over 23 stitches, work 3 stitches in garter stitch, make 1 yarn over and work 2 edge stitches in garter stitch (2 stitches increased). There are 35 stitches on needle. ROW 3 (= right side): Work 2 edge stitches in garter stitch, make 1 yarn over, work in garter stitch until A.1, make 1 yarn over, work A.1 over 23 stitches, make 1 yarn over, work in garter stitch until 2 stitches remain, make 1 yarn over and work 2 edge stitches in garter stitch (4 stitches increased and 2 stitches decreased in A.1). There are 37 stitches on needle. ROW 4 (= wrong side): Work 2 edge stitches in garter stitch, make 1 yarn over, work in garter stitch until A.1, work A.1 over 21 stitches, work in garter stitch until 2 stitches remain, make 1 yarn over and work 2 edge stitches in garter stitch (2 stitches increased). There are 39 stitches on needle. ROW 5 (= right side): Work 2 edge stitches in garter stitch, make 1 yarn over, work in garter stitch until A.1, make 1 yarn over, work A.1 over 21 stitches, make 1 yarn over, work garter stitch until 2 stitches remain, make 1 yarn over and work 2 stitches in garter stitch (6 stitches incrased, 2 of them are increased in A.1). There are 45 stitches on needle. ROW 6 (from wrong side): Work 2 edge stitches in garter stitch, make 1 yarn over, work in garter stitch until A.1, work A.1 over 23 stitches, work in garter stitch until 2 stitches remain, make 1 yarn over and work 2 stitches in garter stitch (2 stitches increased). There are now 47 stitches on needle. REMEMBER THE KNITTING TENSION! Continue as 3rd to 6th row (4 stitches increased from right side and 2 stitches increased from wrong side, A.1 will vary between 21 and 23 stitches). Work until piece measures approx. 9-11-13 (17-19) cm measured in the middle of A.1 - adjust so that last row is 2nd or 6th row in pattern A.1. Work 2 ridges over all stitches. Cast off knitting from right side. ASSEMBLY: Fasten a button in one end of bib (button through 1 of the holes inside the 2 edge stitches in garter stitch). |
||||||||||||||||||||||
Diagram explanations |
||||||||||||||||||||||
|
||||||||||||||||||||||
Have you made this or any other of our designs? Tag your pictures in social media with #dropsdesign so we can see them! Do you need help with this pattern?You'll find tutorial videos, a Comments/Questions area and more by visiting the pattern on garnstudio.com. © 1982-2024 DROPS Design A/S. We reserve all rights. This document, including all its sub-sections, has copyrights. Read more about what you can do with our patterns at the bottom of each pattern on our site. |
With over 40 years in knitting and crochet design, DROPS Design offers one of the most extensive collections of free patterns on the internet - translated to 17 languages. As of today we count 304 catalogues and 11422 patterns - 11422 of which are translated into English (UK/cm).
We work hard to bring you the best knitting and crochet have to offer, inspiration and advice as well as great quality yarns at incredible prices! Would you like to use our patterns for other than personal use? You can read what you are allowed to do in the Copyright text at the bottom of all our patterns. Happy crafting!
Comments / Questions (8)
Marchand wrote:
Bonjour Je tricote avec des aiguilles droites. Y a t-il des modifications à faire? Merci pour votre réponse
08.12.2023 - 17:58DROPS Design answered:
Bonjour Mme Marchand, dans le cas présent, il n'y a aucune modification à faire, retrouvez ici d'autres informations sur les aiguilles circulaires. Bon tricot!
11.12.2023 - 07:13Margarete Czernecki wrote:
Vielen lieben Dank für die schnelle Antwort zum Anleitung 45-16 ,es erscheint mir jetzt logischer nur dann muss ich statt 29 doch 27 Maschen anschlagen?wäre das richtig? Sonst wenn ich in der 2-te Hinreihe den Anschlag zwischen den beiden re.Maschen mache habe ich 2 Maschen zu viel also statt 33 sind es 35 Maschen.Wenn ich in dem Diagramm 9 re.Maschen stricke bleiben mir am Ende dann die zwei zuviel...ich hoffe,Sie verstehen was ich meine...Herzlichen Dank für Ihre Unterstützung.
22.08.2023 - 18:27DROPS Design answered:
Liebe Frau Czernecki, ja genau, eine Korrektur von der deutschen Anleitung kommt so schnell wie möglich, 27 Maschen muss man am Anfang anschlagen. Viel Spaß beim stricken!
23.08.2023 - 07:56Margarete Czernecki wrote:
Hallo,ich versuche immer wieder dieses Lätzchen 45-16 zu stricken,scheitere jedoch direkt am Anfang der Arbeit. Wie soll ich die Masche bearbeiten welche als schwarze Kästchen im Diagramm dargestellt ist?Ich meine in der erste Reihe konnte ich noch keine Masche abgenommen(nur re.Maschen)haben und mit dem A1 Diagramm fängt man doch in der zweite Hinreihe...was mache ich falsch?\r\nUnd werden die Rückreihen nicht so gearbeitet wie sie erscheinen?\r\nVielen Dank vorab!!
20.08.2023 - 00:38DROPS Design answered:
Liebe Frau Czernecki, bei der 1. und 2 . Reihe existiert diese Masche noch nicht, so wird man hier 2 M rechts glatt stricken (bei der 2. Reihe stricken Sie 1 M re, 1 Umschlag, 1 M re), so sind es jetzt 3 Maschen bei der nächsten Reihe, und bei der 4. Reihe wird man 1 Masche abnehmen (= 3 Maschen rechts stricken, die erste gestrickte Masche (dieser 3 Maschen) über die beiden anderen ziehen, sodass diese Masche um die beiden anderen herum liegt (1 Masche abgenommen)). Viel Spaß beim stricken!
21.08.2023 - 09:38Merete Jensen wrote:
Jeg vil gerne strikke hagesmækker 45-16 men det ser ud til at diagrammet begynder forkert det siger at A.1 er 23 masker men første pind er 21 masker jeg har jo ikke taget ind endnu hvor begynder jeg
07.08.2023 - 10:27DROPS Design answered:
Hej Merete, det kan jeg godt se, vi skal lade design se på diagrammet, så kommer der en rettelse. Hvis du ikke vil vente kan du strikke de 2 masker ret, så det først bliver taget ind på 4.pind :)
10.08.2023 - 14:23Zz wrote:
Bonjour, Y a t il une erreur dans le motif ? De bas en haut, on voit une maille manquante et de haut en bas on ajoute que 2 mailles et non 4 comme précisé. Merci
25.07.2023 - 22:41DROPS Design answered:
Bonjour, S'il s'agit du diagramme A.1: en bas on a 2 mailles manquantes (2 carres noirs) au premier rang > 21 mailles. En haut (rang 8): 2 mailles sont diminuees > 21 mailles. Bon tricot!
26.07.2023 - 08:24Petra wrote:
Det här känns ju knepigt… varv 1 är rät enligt mönstret och varv 2 avig. Ska man verkligen sticka flätor på avigvarven?
17.06.2023 - 19:15DROPS Design answered:
Hei Petra. Takk for ditt innspill. Design avd skal ta en dobbeltsjekk på oppskriften og evnt. komme med en forandring/rettelse. mvh DROPS Design
19.06.2023 - 09:44Toni Burgau wrote:
I sent an question earlier and tells me it is too long - so I will shorten this question....when I am knitting the ROW 1 and working the chart with 23 stitches I end up with 2 extra at the end of the row - is this because of the black squares in the first row should be knit and not ignored as it indicates in the explanation field?
06.06.2023 - 14:08DROPS Design answered:
Dear Toni, those stitches should be skipped; in that specific row, the number of stitches in the chart would be 21 instead of 23. You will increase to 23 in the next row. So there would be 21 stitches in the chart and 31 stitches in the row. In that case, you should cast on 2 less stitches. We will check with the design department to see and correct the mistakes in the pattern. There may be a delay in the response due to the vacation period. Happy knitting!
17.06.2023 - 17:24Debora wrote:
Buonasera, come posso lavorare il motivo A1 di 23 maglie se ne ho avviate solo 5? Non riesco a capire, grazie mille!
21.05.2023 - 20:04DROPS Design answered:
Buonasera Debora, grazie per la segnalazione, deve avviare 29 maglie per il bavaglino. Abbiamo corretto il testo. Buon lavoro!
22.05.2023 - 16:33