
Popular categories
Looking for a yarn?


|
|||||||||||||
Midsummer's Night |
|||||||||||||
 |
 |
||||||||||||
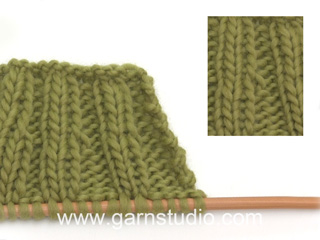
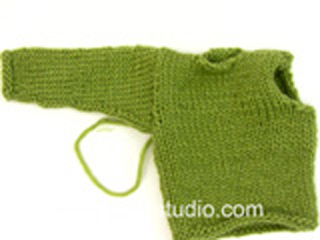
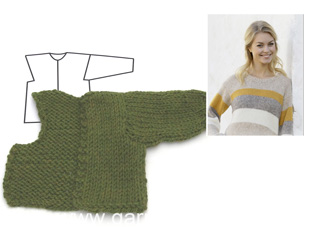
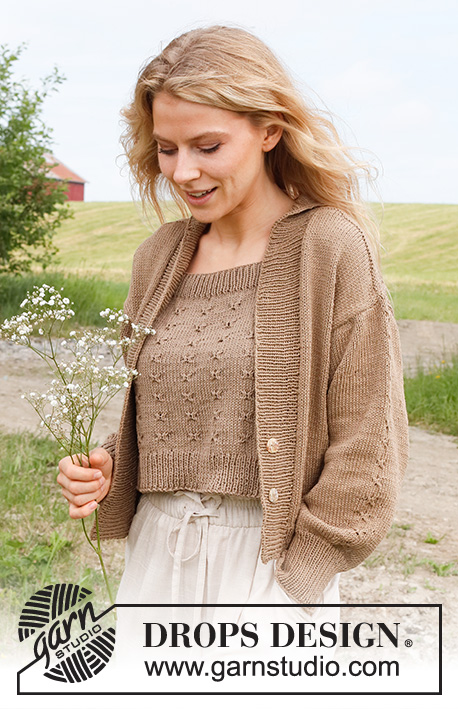
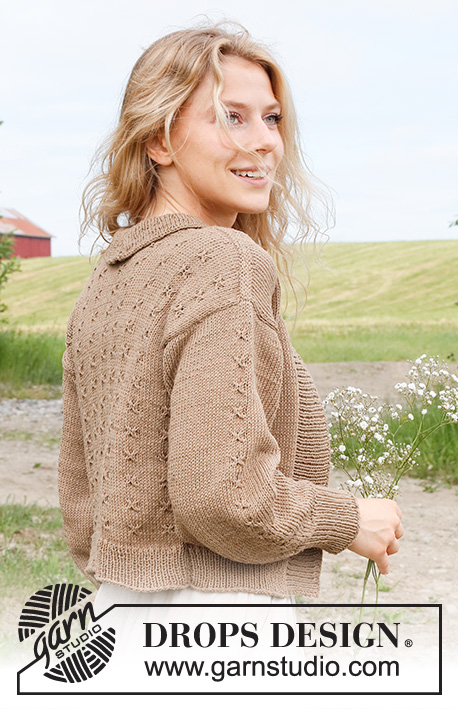
Knitted jacket in DROPS Cotton Light. Piece is knitted bottom up with relief pattern. Size: S - XXXL
DROPS 232-23 |
|||||||||||||
|
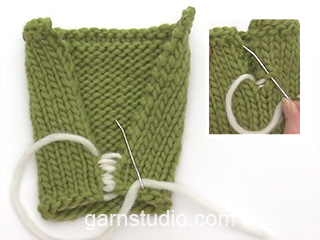
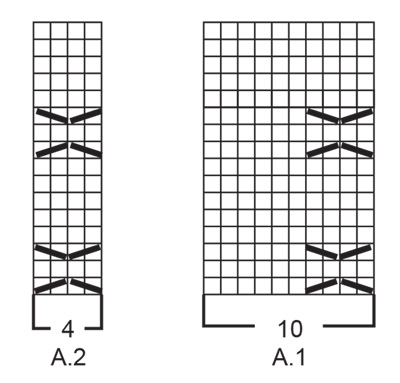
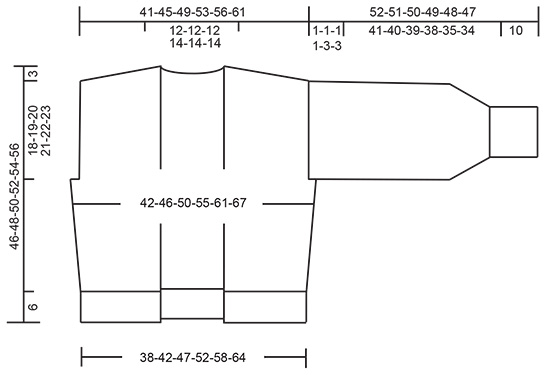
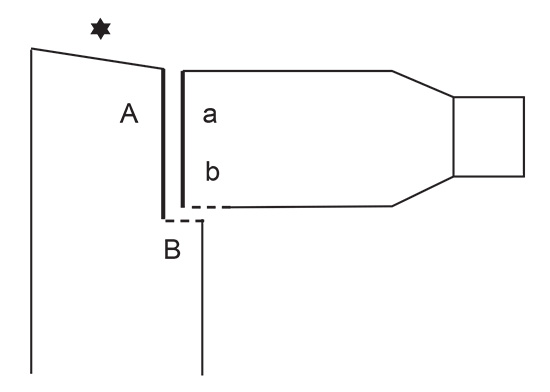
---------------------------------------------------------- EXPLANATION FOR THE PATTERN: ---------------------------------------------------------- GARTER STITCH (back and forth): Knit all rows. 1 ridge vertically = knit 2 rows. PATTERN: See diagrams A.1 and A.2. Diagrams show all rows in pattern seen from the right side. INCREASE TIP-1(applies to sides on back piece and front pieces): Increase 1 stitch inside the outermost 2 stitches from the edge by making 1 yarn over. On next row work yarn over twisted to avoid holes Then work the new stitches in stocking stitch. INCREASE TIP-2 (applies to sleeves): INCREASE AS FOLLOWS AFTER MARKER THREAD: Work the first 4 stitches after marker thread as before, make 1 yarn over. INCREASE AS FOLLOWS BEFORE MARKER THREAD: Work until 4 stitches remain before marker thread, make 1 yarn over. On next round knit yarns over twisted to avoid holes. Then work the new stitches in stocking stitch. ---------------------------------------------------------- START THE PIECE HERE: ---------------------------------------------------------- JACKET - SHORT OVERVIEW OF THE PIECE: Work back piece and front pieces back and forth on circular needle, bottom up, separately. Work sleeves in the round on double pointed needles/short circular needle, from the bottom and up to sleeve cap, then work back and forth on circular needle. Sew the piece together as explained in pattern. Finish by working a band in rib. BACK PIECE: Cast on 93-101-113-127-141-153 stitches on circular needle size 3.5 mm with DROPS Cotton Light. Purl 1 row from wrong side. Work next row as follows from right side: 1 stitch in GARTER STITCH - read explanation above - * knit 1, purl 1 *, repeat from *-* until 2 stitches remain, knit 1, 1 stitch in garter stitch. Continue rib back and forth like this for 6 cm. When rib is finished, knit 1 row from right side while decreasing 11-11-13-15-17-17 stitches evenly = 82-90-100-112-124-136 stitches. Purl 1 row from wrong side with 1 stitch in garter stitch in each side. Switch to circular needle size 4 mm. Work in stocking stitch with 1 stitch in garter stitch in each side. REMEMBER THE KNITTING TENSION! When piece measures 8 cm, begin relief pattern. Work next row as follows from right side: 1 stitch in garter stitch, 3-2-2-3-4-5 stitches in stocking stitch, work A.1 7-8-9-10-11-12 times, A.2, 3-2-2-3-4-5 stitches in stocking stitch, 1 stitch in garter stitch. Continue this pattern. AT THE SAME TIME when piece measures 9 cm, increase 1 stitch in each side - READ INCREASE TIP-1! Increase like this every 4-4-4-6-6-6 cm 4-4-4-3-3-3 times in total = 90-98-108-118-130-142 stitches. When piece measures 25-26-27-28-29-30 cm, cast off 2-2-3-3-6-7 stitches for armholes at the beginning of the next 2 rows = 86-94-102-112-118-128 stitches. Continue the pattern as before with 5-4-3-3-1-1 stitches in stocking stitch and 1 stitch in garter stitch in each side. When piece measures 43-45-47-49-51-53 cm, cast off for neck on mid back. AT THE SAME TIME slip stitches on a thread for diagonal shoulder in each side. Read NECK DECREASE and DIAGONAL SHOULDER before continuing. NECK DECREASE: Cast off the middle 20-20-20-24-24-24 stitches for neck and finish each shoulder separately. AT THE SAME TIME cast off for neck at the beginning of every row from neck as follows: Cast off 2 stitches 1 time and 1 stitch 1 time. DIAGONAL SHOULDER: Slip the outermost stitches towards armholes on a thread for diagonal shoulder but to avoid cutting the yarn work them before slipping them on the thread. Slip 8-9-10-10-11-12 stitches on a thread 3 times, and then the last 6-7-8-11-11-13 stitches on a thread. All stitches have now been cast off or slipped on a thread. Slip the 30-34-38-41-44-49 stitches from thread back on circular needle size 4 mm. Knit 1 row from wrong side but to avoid a hole where turning mid piece, pick up the yarn between 2 stitches and knit twisted together with first stitch on left needle. Then loosely cast off all stitches by knitting from right side. Piece measures approx. 46-48-50-52-54-56 cm from cast-on edge to the top of shoulder. Work the other shoulder the same way. RIGHT FRONT PIECE: Cast on 32-36-42-46-54-60 stitches on circular needle size 3.5 mm with DROPS Cotton Light. Purl 1 row from wrong side. Work next row as follows from right side: 1 stitch in garter stitch, * knit 1, purl 1 *, work from*-* until 1 stitch remains on needle, work 1 stitch in garter stitch. Continue rib back and forth like this for 6 cm. When rib is finished, knit 1 row from right side while decreasing 4-4-5-5-7-7 stitches evenly = 28-32-37-41-47-53 stitches. Purl 1 row from wrong side with 1 stitch in garter stitch in each side. Switch to circular needle size 4 mm. Work in stocking stitch with 1 stitch in garter stitch in each side. When piece measures 9 cm, increase 1 stitch in the side - remember INCREASE TIP-1! Increase like this every 4-4-4-6-6-6 cm 4-4-4-3-3-3 times in total = 32-36-41-44-50-56 stitches. When piece measures 25-26-27-28-29-30 cm, cast off 2-2-3-3-6-7 stitches for armhole at the beginning of next row from wrong side = 30-34-38-41-44-49 stitches. When piece measures 43-45-47-49-51-53 cm, slip stitches on a thread for diagonal shoulder the same way as on back piece, i.e. begin from wrong side and slip 8-9-10-10-11-12 stitches on a thread 3 times, then slip the last 6-7-8-11-11-13 stitches on a thread. All stitches have now been slipped on a thread (there is no neck decrease on front piece). Slip the 30-34-38-41-44-49 stitches from thread back on circular needle size 4 mm. Knit 1 row from wrong side but to avoid a hole where turning mid piece, pick up the yarn between 2 stitches and knit twisted together with first stitch on left needle. Then loosely cast off all stitches by knitting from right side. Piece measures approx. 46-48-50-52-54-56 cm from cast-on edge to the top of shoulder. LEFT FRONT PIECE: Cast on 32-36-42-46-54-60 stitches on circular needle size 3.5 mm with DROPS Cotton Light. Purl 1 row from wrong side. Work next row as follows from right side: 1 stitch in garter stitch, * purl 1, knit 1 *, work from*-* until 1 stitch remains on needle, work 1 stitch in garter stitch. Continue rib back and forth like this for 6 cm. When rib is finished, knit 1 row from right side while decreasing 4-4-5-5-7-7 stitches evenly = 28-32-37-41-47-53 stitches. Purl 1 row from wrong side with 1 stitch in garter stitch in each side. Switch to circular needle size 4 mm. Work in stocking stitch with 1 stitch in garter stitch in each side. When piece measures 9 cm, increase 1 stitch in the side - remember INCREASE TIP-1! Increase like this every 4-4-4-6-6-6 cm 4-4-4-3-3-3 times in total = 32-36-41-44-50-56 stitches. When piece measures 25-26-27-28-29-30 cm, cast off 2-2-3-3-6-7 stitches for armhole at the beginning of next row from right side = 30-34-38-41-44-49 stitches. When piece measures 43-45-47-49-51-53 cm, slip stitches on a thread for diagonal shoulder the same way as on right front piece, i.e. begin from right side and slip 8-9-10-10-11-12 stitches on a thread 3 times, then slip the last 6-7-8-11-11-13 stitches on a thread. All stitches have now been slipped on a thread (there is no neck decrease on front piece). Slip the 30-34-38-41-44-49 stitches from thread back on circular needle size 4 mm. Knit 1 row from wrong side the same way as on right front piece. Then loosely cast off all stitches by knitting from right side. SLEEVES: Cast on 54-56-58-60-62-64 stitches on double pointed needles size 3.5 mm with DROPS Cotton Light. Knit 1 round. Then work rib (= knit 1/purl 1) for 10 cm. Knit 1 round while increasing 2-0-2-0-2-0 stitches evenly = 56-56-60-60-64-64 stitches. Switch to double pointed needles size 4 mm. Insert 1 marker thread at beginning of round (mid under sleeve), and 1 marker thread after 28-28-30-30-32-32 stitches (mid on top of sleeve). Work in stocking stitch in the round. When 5 rounds in stocking stitch have been worked, increase 1 stitch on each side of both marker threads - read INCREASE TIP-2 (= 4 stitches increased). Increase like this every 6th round 5-6-6-7-7-8 times in total = 76-80-84-88-92-96 stitches. AT THE SAME TIME when sleeve measures 12 cm, work A.2 mid on top of sleeve (marker thread is in the middle of A.2). Repeat A.2 vertically. Work until sleeve measures 51-50-49-48-45-44 cm from cast-on edge. Now divide the piece mid under sleeve. Work in stocking stitch back and forth until sleeve measures 52-51-50-49-48-47 cm, i.e. there is a vent of approx. 1-1-1-1-3-3 cm at the top of sleeve. Cast off. Work the other sleeve the same way. ASSEMBLY: Sew shoulder seams inside cast-off edge. Sew side seams inside 1 edge stitch. Sew sleeve cap to armhole. Then sew vent at the top of sleeve to bottom of armhole - see chart. BAND: Insert 1 marker mid back of neck. Begin from right side at the bottom of right front piece, use circular needle size 3.5 mm and Cotton Light, and knit up approx. 123-129-133-141-145-149 stitches along front piece and the neck at the back until marker in the neck (number of stitches must be divisible by 2 + 1), knit up 1 stitch mid back, then knit up the same number of stitches as along right front piece, inside 1 edge stitch along the neck at the back and down along left front piece = approx. 247-259-267-283-291-299 stitches. Begin from wrong side and work as follows: 1 stitch in garter stitch, * purl 1, knit 1 *, work from*-* until 2 stitches remain on needle, purl 1, 1 stitch in garter stitch. Continue rib back and forth like this. When band measures 3 cm, increase 1 stitch in every purl section (seen from right side) between shoulder seams at the back of neck. This is done to avoid a tight edge in the back of neck. Repeat increase when band measures approx. 6 cm. AT THE SAME TIME when band measures 5-5-5-6-6-6 cm, decrease for 2 buttonholes on right band. 1 buttonhole = work 2 together, make 1 yarn over. Bottom buttonhole should be placed approx. 12 cm from bottom edge and top approx. 7-7-7-8-8-8 cm from bottom buttonhole. Continue to work until band measures approx. 8-8-8-9-9-9 cm. Loosely cast off. Sew the buttons on to the left band. |
|||||||||||||
Diagram explanations |
|||||||||||||
|
|||||||||||||
|
|||||||||||||
|
|||||||||||||
|
|||||||||||||
|
Have you made this or any other of our designs? Tag your pictures in social media with #dropsdesign so we can see them! Do you need help with this pattern?You'll find tutorial videos, a Comments/Questions area and more by visiting the pattern on garnstudio.com. © 1982-2024 DROPS Design A/S. We reserve all rights. This document, including all its sub-sections, has copyrights. Read more about what you can do with our patterns at the bottom of each pattern on our site. |
|||||||||||||


With over 40 years in knitting and crochet design, DROPS Design offers one of the most extensive collections of free patterns on the internet - translated to 17 languages. As of today we count 304 catalogues and 11422 patterns - 11422 of which are translated into English (UK/cm).
We work hard to bring you the best knitting and crochet have to offer, inspiration and advice as well as great quality yarns at incredible prices! Would you like to use our patterns for other than personal use? You can read what you are allowed to do in the Copyright text at the bottom of all our patterns. Happy crafting!
Comments / Questions (30)
Bonjour, pour la bordure au niveau du col : les mailles envers supplémentaires sont-elles sur le dessus ou le dessous du col ? (lorsque le col est replié, est-ce qu'on a des côtes 3 envers un endroit ou 3 endroits un envers visibles sur le dessus du col ?) Merci
21.05.2024 - 14:11DROPS Design answered:
Bonjour Françoise, vu sur l'endroit quand on tricote le col, vous aurez 2 puis 3 mailles endroit dans les côtes, autrement dit ces mailles seront à l'envers quand le col sera replié. Bon tricot!
21.05.2024 - 16:00Ich komme gleich an die Schulter schräge von der Jacke 232-23. versteht ich das richtig , dass die ersten 10 Maschen gestrickt werden und dann bis zum Hals weiterstricken und zurück bis auf die ersten 10, dann die nächsten 10 stricken , bis zum Hals und zurück und die nächsten 10 etc. ??? Wären insgesamt 7 Reihen Schulter schräge?? LG Ulrike
18.04.2024 - 18:45DROPS Design answered:
Liebe Ulrike, die Maschen am Anfang einer Reihe vom Armausschnitt bis Hals zuerst stricken dann stilllegen: die ersten 10 Maschen (in 3. und 4. Grösse) stricken und stilllegen, die Reihe bis zum Hals fertigstricken, die Rückreihe stricken, wenden. Die ersten 10 Maschen stricken und stilllegen, die Reihe bis zum Hals fertigstricken, wenden und die Rückreihe stricken. Diese 2 Reihen noch 1 Mal stricken = es sind noch 11 Maschen übrig. Stricken Sie 2 Reihen über diese 11 Maschen (insegsamt 8 Reihen) dann stricken Sie alle 38-41 Maschen und ketten Sie diese Maschen ab. Viel Spaß beim Stricken!
19.04.2024 - 08:35Could you please clarify how to "finish each shoulder separately" whilst also binding off for the neck "at the beginning of every row from neck as follows: Bind off 2 stitches 1 time and 1 stitch 1 time." What is meant by the "beginning of row FROM neck"? So (after the mid-back neck bind off of 20-20-20-24-24-24 stitches) do you bind off 2 stitches on the very next row, and 1 stitch on the row after that, and then not any more? Many thanks :)
23.03.2024 - 11:32DROPS Design answered:
Dear Ihapera, we mean that you decrease / cast off on those rows that starts from the neck (as you can cast off at the beginning of a row), which is the right side on one side and the wrong side on the other one. Yes, you bind off 2 stitches, then in the next row starting from the neckline, you bind off one more. Happy Crafting!
24.03.2024 - 14:38Hallo, verstehe ich die Anleitung richtig, dass ich im Nacken bei der Zunahme der Blende aus einer linken Masche dann 2 linke Maschen mache? Oder muss ich die neu zugenommenen Maschen rechts Stricken? Und ist es bei der zweiten Zunahme dann ebenfalls so? Also drei linke Maschen oder im Prinzip links-rechts-links? Oder sind es dann dort sogar 2 Zunahmen und somit dann 4 linke Maschen? Vielen Dank für die Hilfe ;)
15.10.2023 - 23:13DROPS Design answered:
Liebe Sidney, Sie stricken die zugenommenen Maschen alle links und haben dann nach allen Zunahmen 3 Maschen links, 1 Masche rechts im Wechsel. Gutes Gelingen weiterhin!
16.10.2023 - 09:16Hallo. Eine Frage zur Blende, ich stricke Größe S und habe für meine Blende 303 Maschen aufgenommen, es ging nicht weniger. Ist das schlimm? Und muss ich dann für die Schultern noch mehr aufnehmen oder reicht das?
12.06.2023 - 22:32DROPS Design answered:
Liebe Mariam, Sie können gerne bei der 1. Reihe regelmäßig verteilt abnehmen, damit Ihre Maschenanzahl stimmt, dann beginnen Sie das Bündchen mit einer Hinrehe; oder diese 303 Maschen einfach so stricken und mal sehen ob es nicht zu viel wird, je nach Ihrer eigenen Maschenprobe - die Zunahmen stricken Sie am besten genauso gleich wie in der Anleitung, oder weniger wenn Sie das so möchten. Viel Spaß beim stricken!
13.06.2023 - 08:33Can you explain what this means? thanks AT THE SAME TIME cast off for neck at the beginning of every row from neck as follows: Cast off 2 stitches 1 time and 1 stitch 1 time.
17.11.2022 - 03:03DROPS Design answered:
Hi May, It means that you cast off at the beginning of the rows straight after casting off the middle stitches for the neck. Happy knitting!
17.11.2022 - 06:50For sleeves, can i use circular needles instead of dpns?
07.11.2022 - 14:38DROPS Design answered:
Dear May, sure but you might then have to use the magic loop technique. Happy knitting!
07.11.2022 - 16:15In het deel met als kopje: “voorbies “ staat:Als de voorbies 3 cm meet, meerder dan 1 steek in ieder averecht deel …..op de achterkant van de hals. Wat wordt bedoeld met averecht deel? Iedere averechte steek?, lijkt me veel. En op de foto zie ik een puntje aan de achterkant van de kraag. De omschrijving is voor mij niet duidelijk. Kunt u me helpen ?
15.10.2022 - 17:01DROPS Design answered:
Dag Jannie,
De bies brei je met 1 recht, 1 averecht. Wanneer je moet meerderen in ieder averecht deel, dan meerder je de 1 averecht naar 2 averecht.
26.10.2022 - 09:51I’m making the large size. A 49cm sleeve with a dropped shoulder seems very long to me. Can you confirm these instructions are correct? Thanks!
03.08.2022 - 19:30DROPS Design answered:
Dear Kate, sure there are, you will find all finished measurements for each size in the chart at the bottom of the pattern, measure a similar garment you have and like the shape to compare with these numbers and adjust if necessary. Happy knitting!
04.08.2022 - 08:09Ang udtag i nakke: Hvor mange masker forøges der med i nakken?\\r\\nSynes ikke opskrift er logisk her.\\r\\nBirgit Lemcke
28.07.2022 - 19:21